目录
前言
上一篇博客回顾:OpenGL学习(五)相机变换,透视投影与FPS相机
在上一篇博客中,我们利用相机变换矩阵,对场景进行透视投影,同时我们实现了可以自由飞翔的 FPS 相机。
迄今为止我们的渲染都是非常单调并且过时的,今天我们来引入一些现代化的东西,来丰富我们的场景。
首先我们会利用一张图片生成纹理,随后我们将这张图片贴在我们的物体上。这就像现代计算机游戏中,我们可以让艺术家们人为的制定一些图片,而不是由程序员大费周章的生成它。
在最后我们通过读取 obj 格式的模型并且创建对应的纹理,来绘制一些精美的模型。
⚠
该部分的绘制代码基于上一篇博客:OpenGL学习(五)相机变换,透视投影与FPS相机
博客内容因为篇幅关系,不会完整的列出所有的代码 完整代码会放在文章末尾
纹理映射
在正式开始之前,我们需要了解纹理映射的知识。在计算机游戏中,我们往往见到很多精美的模型,比如下图的水果摊,就有很多个🍎。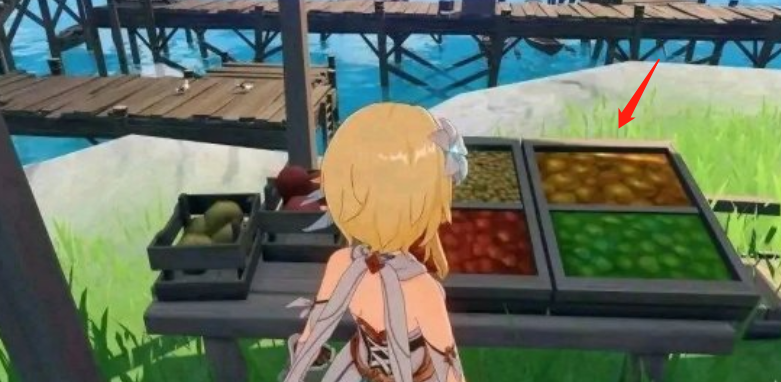
通过模型实际上还原这些🍎的几何细节是非常困难的。而且我们还要确定他们的颜色,这更加是难上加难。
于是我们想出了一个曲线救国的方式:我们将一张图片贴上去,不就可以达到逼真的效果了吗?

你通过观察不难发现,原本的柜台就是一个平面,我们将图片贴上去就达到了 “近似” 的效果。
你不得不承认这样看上去很假,因为我们没有考虑到从各个角度观察的情况,但是事实上这是聪明的图形程序员一种非常高效的解决方案
在之后的博客中,我们会利用视差贴图来进一步丰富该效果
纹理的本质就是一张图片。一张图片,那么他就有坐标。纹理的坐标通常称之为 uv 坐标。
该坐标的原点位于左下角,为 (0, 0) 而右上角的坐标为 (1, 1),这是约定俗成的,因为不同的纹理有不同的大小,我们必须归一化!
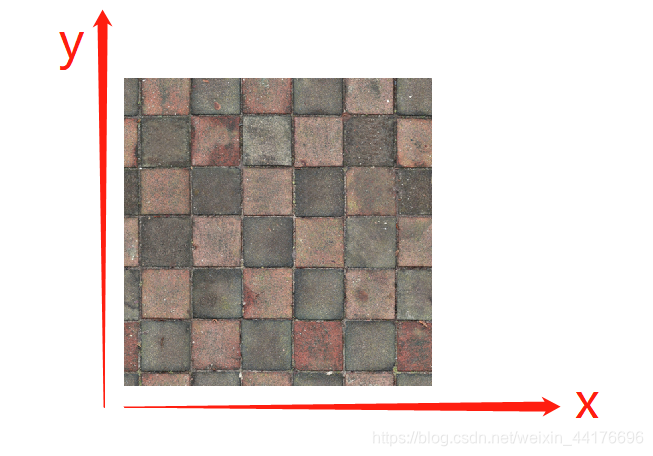
我们在 GLSL 中,引入一个新的变量类型,叫做 sampler2D,这就是一张 2D 的纹理对象,一般以 uniform 的形式传入。
和一般的编程语言中进行图像处理不同,我们不能通过下标索引来取像素。相反,我们通过:
uniform sampler2D image;
vec3 color = texture2D(image, 坐标).rgb;
其中 texture2D 是纹理采样函数,第一个参数是 sampler2D 纹理对象,第二个参数是纹理的坐标,即一个位于 [0, 1] 之间的二维向量。
如果我们传入 (0, 0) 那么我们会取纹理左下角的像素颜色,如果是 (0.5, 0.5) 那么我们会取纹理图像中心的像素颜色。

我们想要将纹理贴到物体上,可是物体的几何形状非常不规则,我们难以通过数学的方式描述这些变换,于是我们要引入一个新的东西,叫做纹理坐标。
纹理坐标
纹理坐标,顾名思义就是纹理的坐标。纹理坐标是一种顶点属性,就和顶点的位置,颜色,法线一样,理论上每个顶点都必须拥有纹理坐标。
纹理坐标描述了该顶点的颜色,应该从纹理图上的哪个位置去取。
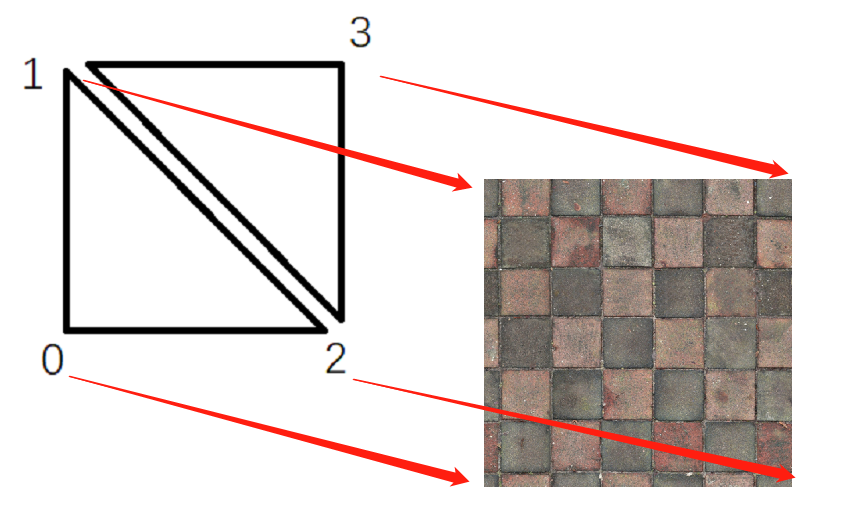
比如我们渲染一个正方形平面,它有 4 个顶点,那么我们应该去纹理图像上的四个顶点取颜色,这样我们就能够显示整张图片!

因为纹理坐标是顶点属性,我们在片段着色器中,采样纹理的时候,得到的纹理坐标是经过线性插值的,我们可以连续地取像素。
值得注意的是,纹理坐标也是人为指定的,一般模型信息里面会附代它的纹理坐标(就如同顶点位置信息一样)
映射到简单正方形
我们试图按照上文的思路来。正方形一共四个顶点,我们将其映射到纹理图像的四个角上,他们的坐标分别是:
(0, 0)
(0, 1)
(1, 0)
(1, 1)
于是我们需要向顶点着色器中传递的纹理坐标就是这四个点(实际上正方形是 6 个点组成的,我们要传递 6 个顶点位置,和 6 个纹理坐标)

读取图像
我们通过 SOIL 库进行图像的读取。通过
vcpkg install SOIL2
可以利用 vcpkg 进行安装。如果安装遇到问题,那么尝试阅读:vcpkg安装SOIL2库报错及其解决方案
在成功安装之后,我们可以通过
#include <SOIL2/SOIL2.h>

int textureWidth, textureHeight;
unsigned char* image = SOIL_load_image("textures/wall.png", &textureWidth, &textureHeight, 0, SOIL_LOAD_RGB);
来进行图像的读取。其中 textureWidth, textureHeight 是图像的宽高,单位为像素。我们传入其引用(地址),函数就会自动给他们赋值。
生成正方形数据
我们将 init 函数中的 readOff 注释掉,因为我们现在不再依赖 off 格式的模型,而是手动创建一个正方形。
事实上这里大改了整个 init 详情请见【完整代码】部分
为了为正方形贴上图片,我们需要确定两个顶点属性:
- 正方形顶点位置
- 正方形顶点的纹理坐标
故,我们添加如下的顶点数据:
// 手动指定正方形的 4 个顶点位置和其纹理坐标
std::vector<glm::vec3> vectexPosition = {


    glm::vec3(-1,-0.2,-1), glm::vec3(-1,-0.2,1), glm::vec3(1,-0.2,-1),glm::vec3(1,-0.2,1)
};
std::vector<glm::vec2> vertexTexcoord = {


    glm::vec2(0, 0), glm::vec2(0, 1), glm::vec2(1, 0), glm::vec2(1, 1)
};
同时我们创建一个新的全局变量 texcoords,用以存储每个顶点的纹理坐标。事实上 texcoord 就是 texture coord,纹理坐标。
然后我们需要绘制两个三角形(共 6 个点)来填充正方形。我们在 init 函数中添加:
// 根据顶点属性生成两个三角面片顶点位置 -- 共6个顶点
points.push_back(vectexPosition[0]);
points.push_back(vectexPosition[2]);
points.push_back(vectexPosition[1]);
points.push_back(vectexPosition[2]);
points.push_back(vectexPosition[3]);
points.push_back(vectexPosition[1]);
// 根据顶点属性生成三角面片的纹理坐标 -- 共6个顶点
texcoords.push_back(vertexTexcoord[0]);
texcoords.push_back(vertexTexcoord[2]);
texcoords.push_back(vertexTexcoord[1]);
texcoords.push_back(vertexTexcoord[2]);
texcoords.push_back(vertexTexcoord[3]);
texcoords.push_back(vertexTexcoord[1]);
如图:
然后我们生成 vbo 对象,我们将数据传递进去:
// 生成vbo对象并且绑定vbo
GLuint vbo;
glGenBuffers(1, &vbo);
glBindBuffer(GL_ARRAY_BUFFER, vbo);
// 先确定vbo的总数据大小 -- 传NULL指针表示我们暂时不传数据
GLuint dataSize = sizeof(glm::vec3) * points.size() + sizeof(glm::vec2) * texcoords.size();
glBufferData(GL_ARRAY_BUFFER, dataSize, NULL, GL_STATIC_DRAW);

// 传送数据到vbo 分别传递 顶点位置 和 顶点纹理坐标
GLuint pointDataOffset = 0;
GLuint texcoordDataOffset = sizeof(glm::vec3) * points.size();
glBufferSubData(GL_ARRAY_BUFFER, pointDataOffset, sizeof(glm::vec3) * points.size(), &points[0]);
glBufferSubData(GL_ARRAY_BUFFER, texcoordDataOffset, sizeof(glm::vec2) * texcoords.size(), &texcoords[0]);
然后我们生成 vao 对象,指定这些参数该如何读取。这部分在之前 OpenGL学习(二)渲染流水线与三角形绘制 已经细🔒过了,这里直接粘贴代码:
这里我们只需要传递顶点位置和顶点纹理坐标,他们分别对应着色器变量 vPositon 和 vTexture
// 生成vao对象并且绑定vao
GLuint vao;
glGenVertexArrays(1, &vao);
glBindVertexArray(vao);

// 生成着色器程序对象
std::string fshaderPath = "shaders/fshader.fsh";
std::string vshaderPath = "shaders/vshader.vsh";
program = getShaderProgram(fshaderPath, vshaderPath);
glUseProgram(program);  // 使用着色器

// 建立顶点变量vPosition在着色器中的索引 同时指定vPosition变量的数据解析格式
GLuint vlocation = glGetAttribLocation(program, "vPosition");    // vPosition变量的位置索引
glEnableVertexAttribArray(vlocation);
glVertexAttribPointer(vlocation, 3, GL_FLOAT, GL_FALSE, 0, (GLvoid*)0);  // vao指定vPosition变量的数据解析格式

// 建立颜色变量vTexcoord在着色器中的索引 同时指定vTexcoord变量的数据解析格式
GLuint tlocation = glGetAttribLocation(program, "vTexcoord");    // vTexcoord变量的位置索引
glEnableVertexAttribArray(tlocation);
glVertexAttribPointer(tlocation, 2, GL_FLOAT, GL_FALSE, 0, (GLvoid*)(sizeof(glm::vec3) * points.size()));  // 注意指定offset参数
生成纹理
和大多数 OpenGL 对象一样,纹理对应也是通过引用来创建的。我们调用 glGenxxx 函数就行了。我们创建一个纹理对象,并且绑定它,这意味着之后所有的纹理操作都会执行在其上面:
// 生成纹理
GLuint texture;
glGenTextures(1, &texture);
glBindTexture(GL_TEXTURE_2D, texture);
随后我们设置纹理的一些参数:
// 参数设置 -- 过滤方式与越界规则
glTexParameteri(GL_TEXTURE_2D, GL_TEXTURE_MIN_FILTER, GL_LINEAR);
glTexParameteri(GL_TEXTURE_2D, GL_TEXTURE_MAG_FILTER, GL_LINEAR);
glTexParameteri(GL_TEXTURE_2D, GL_TEXTURE_WRAP_S, GL_MIRRORED_REPEAT);
glTexParameteri(GL_TEXTURE_2D, GL_TEXTURE_WRAP_T, GL_MIRRORED_REPEAT);
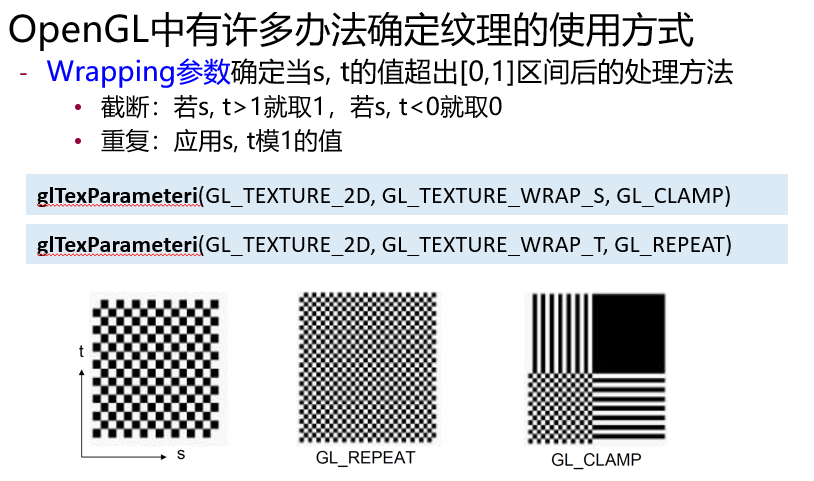
这些参数决定了纹理是如何取值的,比如线性过滤。此外,还决定了一个纹理坐标超出返回,该如何取纹理图像的像素:
然后我们利用 SOIL 库读取图片,并且利用 glTexImage2D 生成一张纹理。我们读取路径 textures/wall.png 下的一张图片: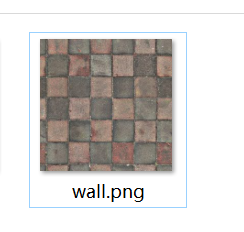
// 读取图片纹理
int textureWidth, textureHeight;
unsigned char* image = SOIL_load_image("textures/wall.png", &textureWidth, &textureHeight, 0, SOIL_LOAD_RGB);
glTexImage2D(GL_TEXTURE_2D, 0, GL_RGB, textureWidth, textureHeight, 0, GL_RGB, GL_UNSIGNED_BYTE, image);   // 生成纹理
参数很多,但是前人已经帮我们总结好了 引自【learn OpenGL】:
- 第一个参数指定了纹理目标(Target)。设置为GL_TEXTURE_2D意味着会生成与当前绑定的纹理对象在同一个目标上的纹理(任何绑定到GL_TEXTURE_1D和GL_TEXTURE_3D的纹理不会受到影响)。
- 第二个参数为纹理指定多级渐远纹理的级别,如果你希望单独手动设置每个多级渐远纹理的级别的话。这里我们填0,也就是基本级别。
- 第三个参数告诉OpenGL我们希望把纹理储存为何种格式。我们的图像只有RGB值,因此我们也把纹理储存为RGB值。
- 第四个和第五个参数设置最终的纹理的宽度和高度。我们之前加载图像的时候储存了它们,所以我们使用对应的变量。
- 下个参数应该总是被设为0(历史遗留问题)。
- 第七第八个参数定义了源图的格式和数据类型。我们使用RGB值加载这个图像,并把它们储存为char(byte)数组,我们将会传入对应值。
- 最后一个参数是真正的图像数据。
至此,我们离绘制纹理还差最后一步,我们需要在着色器中,根据
着色器贴纹理
在这之后,我们的着色器需要接收两个参数,即顶点位置和顶点纹理坐标。我们编写顶点着色器(因为基于上一篇博客的代码,我们还行要接收 m,v,p 矩阵以完成投影变换)。
下面是顶点着色器的代码:
#version 330 core

in vec3 vPosition;  // cpu传入的顶点坐标
in vec2 vTexcoord;     // cpu传入的顶点纹理坐标

out vec2 texcoord;   // 传顶点纹理坐标给片元着色器

uniform mat4 model; // 模型变换矩阵
uniform mat4 view;      // 模型变换矩阵
uniform mat4 projection;    // 模型变换矩阵

void main()
{


    gl_Position = projection * view * model * vec4(vPosition, 1.0); // 指定ndc坐标
    texcoord = vTexcoord;   // 传递纹理坐标到片段着色器
}
片段着色器则直接接收来自顶点着色器的纹理坐标,这个坐标是线性插值过后的,于是我们直接用它来访问纹理。我们调用 texture2D 函数即可完成对 2D 图像纹理的访问。
下面是片元着色器的代码:
#version 330 core

in vec3 vColorOut;  // 顶点着色器传递的颜色
in vec2 texcoord;    // 纹理坐标

out vec4 fColor;    // 片元输出像素的颜色

uniform sampler2D Texture;  // 纹理图片

void main()
{


    fColor.rgb =  texture2D(Texture, texcoord.st).rgb;
}
值得注意的是,我们并没有指定纹理图像变量(就是那个 sampler2D 变量)的名字。事实上在不涉及多纹理的时候,我们通过
glBindTexture直接绑定后,就可以在着色器中,以任意变量名,对该纹理进行访问。
一切即将就绪。重新加载程序之后我们可以看到一张贴了纹理的正方形:
我们绘制的四方形,纹理坐标刚好涵盖图像的四个顶点,这意味着我们实现了在三维空间(的地板上)显示一张图片!事实上你可以换成任意你喜欢的图片:

上面那张罗恩的 p 站 id 是:85397623
读取obj文件
正方形是一个易于理解的模型。对于正方形的纹理,我们像盖被子一样,将图片的四个顶点给予正方形的顶点纹理坐标即可。
但是对于一些复杂的模型,我们无法建立有效的数学表达式,纹理图像的纹理坐标赋给顶点。于是我们有一种名叫 obj 的模型格式,该格式指定了模型的一些顶点属性,包括:
- 顶点位置
- 顶点纹理坐标
- 顶点法向量
于是,我们通过阅读 obj 格式的模型,就可以确定模型顶点的纹理坐标了!
obj文件格式
和 off 文件格式类似,obj 文件格式也是一种文本。obj 文件的每一行以一个 type 字符串开头,其中不同的 type 字符串,阐述了该行所表达的信息类型:
| type名称 | 该行数据格式 | 解释 |
|---|---|---|
| v | 0.114 0.514 0.191 | 三个以空格分隔的浮点数 表示该顶点的位置 |
| vt | 0.114 0.514 0.191 | 三个以空格分隔的浮点数 表示该顶点纹理坐标 |
| vn | 0.114 0.514 0.191 | 三个以空格分隔的浮点数 表示该顶点的法向量方向 |
| f | 1/1/1 2/2/2 3/3/3 | 三组(或者四组)以斜杠分隔的整数 表示该面片第 i 个顶点的 位置索引/纹理坐标索引/法向量索引 |
| # | 注释 | zsbd |
注:还有其他的 type,只是我们暂时用不到。今天先读取顶点位置和纹理坐标
下面给出 obj 模型的文本示例:
v  0.4366 -0.3235 0.0973

# ...
vn -0.0018 0.0043 -1.0000

# ...
vt 0.1159 0.3127 0.0000

# ...
f 1/1/1 2/2/2 3/3/3
注:因为纹理坐标(vt)一般为 2D 图片的坐标,其第三个数都是 0 所以我们一般只读取前两个数字即可
编写readObj函数进行读取
读取 obj 文件也很简单。首先我们遍历文件:
- 对于以 v,vt,vn 开头的顶点属性,我们直接存储。我们利用三个数组,分别是 vertexPosition,vertexTexcoord,vertexNormal 来存储。
- 对于以 f 开头的面片信息,我们也用三个数组存储他们的索引,分别是 positonIndex,texcoordIndex,normalIndex
- 读取完文件之后,遍历 2 中的索引数组,根据索引去 1 中的临时数组取数据,并且存储到目的数组(函数形参中给出的数组)
索引和 obj 给出的顶点属性之间的关联是这样的:

注:我们暂时用不到法线数据,但是我们先读进来,下次博客就会用到
于是我们可以编写一个函数 readObj 来读取这些变量。值得注意的是,所有的索引都是以 1 开始的下标,所以我们要减一。此外,使用 istringstream 解析一行的字符串的时候,要注意读取 f 开头的信息时,数据用斜杠分隔。我们要通过读取一个字符 slash 来消除斜杠。
此外,我们需要额外的头文件,这些都是 std c++ 标准头文件:
#include <fstream>
#include <sstream>
#include <iostream>
下面是 readObj 函数的代码:
/ 读取off文件并且生成最终传递给顶点着色器的 顶点位置 / 顶点纹理坐标 / 顶点法线
void readObj(
    std::string filepath,
    std::vector<glm::vec3>& points,
    std::vector<glm::vec2>& texcoords,
    std::vector<glm::vec3>& normals
)
{


    // 顶点属性
    std::vector<glm::vec3> vectexPosition;
    std::vector<glm::vec2> vertexTexcoord;
    std::vector<glm::vec3> vectexNormal;

    // 面片索引信息
    std::vector<glm::ivec3> positionIndex;
    std::vector<glm::ivec3> texcoordIndex;
    std::vector<glm::ivec3> normalIndex;

    // 打开文件流
    std::ifstream fin(filepath);
    std::string line;
    if (!fin.is_open())
    {


        std::cout << "文件 " << filepath << " 打开失败" << std::endl;
        exit(-1);
    }

    // 按行读取
    while (std::getline(fin, line))
    {


        std::istringstream sin(line);   // 以一行的数据作为 string stream 解析并且读取
        std::string type;
        GLfloat x, y, z;
        int v0, vt0, vn0;   // 面片第 1 个顶点的【位置,纹理坐标,法线】索引
        int v1, vt1, vn1;   // 2
        int v2, vt2, vn2;   // 3
        char slash;

        // 读取obj文件
        sin >> type;
        if (type == "v") {


            sin >> x >> y >> z;
            vectexPosition.push_back(glm::vec3(x, y, z));
        }
        if (type == "vt") {


            sin >> x >> y;
            vertexTexcoord.push_back(glm::vec2(x, y));
        }
        if (type == "vn") {


            sin >> x >> y >> z;
            vectexNormal.push_back(glm::vec3(x, y, z));
        }
        if (type == "f") {


            sin >> v0 >> slash >> vt0 >> slash >> vn0;
            sin >> v1 >> slash >> vt1 >> slash >> vn1;
            sin >> v2 >> slash >> vt2 >> slash >> vn2;
            positionIndex.push_back(glm::ivec3(v0 - 1, v1 - 1, v2 - 1));
            texcoordIndex.push_back(glm::ivec3(vt0 - 1, vt1 - 1, vt2 - 1));
            normalIndex.push_back(glm::ivec3(vn0 - 1, vn1 - 1, vn2 - 1));
        }
    }

    // 根据面片信息生成最终传入顶点着色器的顶点数据
    for (int i = 0; i < positionIndex.size(); i++)
    {


        // 顶点位置
        points.push_back(vectexPosition[positionIndex[i].x]);
        points.push_back(vectexPosition[positionIndex[i].y]);
        points.push_back(vectexPosition[positionIndex[i].z]);

        // 顶点纹理坐标
        texcoords.push_back(vertexTexcoord[texcoordIndex[i].x]);
        texcoords.push_back(vertexTexcoord[texcoordIndex[i].y]);
        texcoords.push_back(vertexTexcoord[texcoordIndex[i].z]);

        // 顶点法线
        normals.push_back(vectexNormal[normalIndex[i].x]);
        normals.push_back(vectexNormal[normalIndex[i].y]);
        normals.push_back(vectexNormal[normalIndex[i].z]);
    }
}
渲染一张桌子
现在我们知晓了如何读取 obj 格式的文件,我们开始着手渲染一张带纹理的桌子。首先我们准备如下的 obj 文件和他们的贴图,我们放置于 models/obj 目录下:

然后我们再多准备一个全局变量,用来存储顶点法向量:

虽然这一篇博客中,我们用不到法向量,但是我们读取 obj 的时候先读上,以后有用。
然后在 init 中,我们删掉刚刚的一大段生成正方形的代码,因为我们要通过 obj 模型自动生成顶点属性了。我们添加一句:
// 读取 obj 文件
readObj("models/obj/table.obj", points, texcoords, normals);
即可。

随后我们改变读取的纹理图片的路径,我们读取 table.png 即桌子对应的纹理:

然后在 display 函数中,传递模型变换矩阵之前,我们偷偷让桌子旋转一下:

其他的改动就没有了。重启代码,我们看到的是 唔。。。一张炸裂的桌子?

出现这个情况的原因,是因为 OpenGL 认为图片的 y 坐标的原点应该在图像底部,而图片的 y 坐标是在图像顶部的。于是我们的纹理坐标反了。。。
一般的图片加载器,都有翻转图片的选项,SOIL ?算了,我们在片段着色器中,手动翻转一下坐标罢(我是懒狗)
我们将片段着色器中,读取纹理的代码:
fColor.rgb = texture2D(Texture, texcoord.st).rgb;
改为:
fColor.rgb = texture2D(Texture, vec2(texcoord.s, 1.0 - texcoord.t)).rgb;
注:因为纹理坐标范围 [0, 1] 我们用 1 减去原来的 y 坐标即可实现翻转。
然后再次运行程序,好耶,我们利用 obj 模型生成了一张带纹理的桌子!这意味着我们的程序能够读取标准化的 obj 模型,能够和现代艺术家接轨辣

完整代码
c++
#include <iostream>
#include <string>
#include <fstream>
#include <vector>
#include <sstream>
#include <iostream>

#include <GL/glew.h>
#include <GL/freeglut.h>
#include <glm/glm.hpp>
#include <glm/gtc/matrix_transform.hpp>
#include <glm/gtc/type_ptr.hpp>
#include <SOIL2/SOIL2.h>

std::vector<glm::vec3> points;      // 顶点坐标
std::vector<glm::vec2> texcoords;   // 顶点纹理坐标
std::vector<glm::vec3> normals;     // 顶点法线

GLuint program; // 着色器程序对象

// 相机参数
glm::vec3 cameraPosition(0, 0, 0);      // 相机位置
glm::vec3 cameraDirection(0, 0, -1);    // 相机视线方向
glm::vec3 cameraUp(0, 1, 0);            // 世界空间下竖直向上向量
float pitch = 0.0f;
float roll = 0.0f;
float yaw = 0.0f;

// 视界体参数
float left = -1, right = 1, bottom = -1, top = 1, zNear = 0.1, zFar = 100.0;

int windowWidth = 512;  // 窗口宽
int windowHeight = 512; // 窗口高

bool keyboardState[1024];   // 键盘状态数组 keyboardState[x]==true 表示按下x键

// --------------- end of global variable definition --------------- //

// 读取文件并且返回一个长字符串表示文件内容
std::string readShaderFile(std::string filepath)
{


    std::string res, line;
    std::ifstream fin(filepath);
    if (!fin.is_open())
    {


        std::cout << "文件 " << filepath << " 打开失败" << std::endl;
        exit(-1);
    }
    while (std::getline(fin, line))
    {


        res += line + '\n';
    }
    fin.close();
    return res;
}

// 获取着色器对象
GLuint getShaderProgram(std::string fshader, std::string vshader)
{


    // 读取shader源文件
    std::string vSource = readShaderFile(vshader);
    std::string fSource = readShaderFile(fshader);
    const char* vpointer = vSource.c_str();
    const char* fpointer = fSource.c_str();

    // 容错
    GLint success;
    GLchar infoLog[512];

    // 创建并编译顶点着色器
    GLuint vertexShader = glCreateShader(GL_VERTEX_SHADER);
    glShaderSource(vertexShader, 1, (const GLchar**)(&vpointer), NULL);
    glCompileShader(vertexShader);
    glGetShaderiv(vertexShader, GL_COMPILE_STATUS, &success);   // 错误检测
    if (!success)
    {


        glGetShaderInfoLog(vertexShader, 512, NULL, infoLog);
        std::cout << "顶点着色器编译错误\n" << infoLog << std::endl;
        exit(-1);
    }

    // 创建并且编译片段着色器
    GLuint fragmentShader = glCreateShader(GL_FRAGMENT_SHADER);
    glShaderSource(fragmentShader, 1, (const GLchar**)(&fpointer), NULL);
    glCompileShader(fragmentShader);
    glGetShaderiv(fragmentShader, GL_COMPILE_STATUS, &success);   // 错误检测
    if (!success)
    {


        glGetShaderInfoLog(fragmentShader, 512, NULL, infoLog);
        std::cout << "片段着色器编译错误\n" << infoLog << std::endl;
        exit(-1);
    }

    // 链接两个着色器到program对象
    GLuint shaderProgram = glCreateProgram();
    glAttachShader(shaderProgram, vertexShader);
    glAttachShader(shaderProgram, fragmentShader);
    glLinkProgram(shaderProgram);

    // 删除着色器对象
    glDeleteShader(vertexShader);
    glDeleteShader(fragmentShader);

    return shaderProgram;
}

// 读取obj文件并且生成最终传递给顶点着色器的 顶点位置 / 顶点纹理坐标 / 顶点法线
void readObj(
    std::string filepath,
    std::vector<glm::vec3>& points,
    std::vector<glm::vec2>& texcoords,
    std::vector<glm::vec3>& normals
)
{


    // 顶点属性
    std::vector<glm::vec3> vectexPosition;
    std::vector<glm::vec2> vertexTexcoord;
    std::vector<glm::vec3> vectexNormal;

    // 面片索引信息
    std::vector<glm::ivec3> positionIndex;
    std::vector<glm::ivec3> texcoordIndex;
    std::vector<glm::ivec3> normalIndex;

    // 打开文件流
    std::ifstream fin(filepath);
    std::string line;
    if (!fin.is_open())
    {


        std::cout << "文件 " << filepath << " 打开失败" << std::endl;
        exit(-1);
    }

    // 按行读取
    while (std::getline(fin, line))
    {


        std::istringstream sin(line);   // 以一行的数据作为 string stream 解析并且读取
        std::string type;
        GLfloat x, y, z;
        int v0, vt0, vn0;   // 面片第 1 个顶点的【位置,纹理坐标,法线】索引
        int v1, vt1, vn1;   // 2
        int v2, vt2, vn2;   // 3
        char slash;

        // 读取obj文件
        sin >> type;
        if (type == "v") {


            sin >> x >> y >> z;
            vectexPosition.push_back(glm::vec3(x, y, z));
        }
        if (type == "vt") {


            sin >> x >> y;
            vertexTexcoord.push_back(glm::vec2(x, y));
        }
        if (type == "vn") {


            sin >> x >> y >> z;
            vectexNormal.push_back(glm::vec3(x, y, z));
        }
        if (type == "f") {


            sin >> v0 >> slash >> vt0 >> slash >> vn0;
            sin >> v1 >> slash >> vt1 >> slash >> vn1;
            sin >> v2 >> slash >> vt2 >> slash >> vn2;
            positionIndex.push_back(glm::ivec3(v0 - 1, v1 - 1, v2 - 1));
            texcoordIndex.push_back(glm::ivec3(vt0 - 1, vt1 - 1, vt2 - 1));
            normalIndex.push_back(glm::ivec3(vn0 - 1, vn1 - 1, vn2 - 1));
        }
    }

    // 根据面片信息生成最终传入顶点着色器的顶点数据
    for (int i = 0; i < positionIndex.size(); i++)
    {


        // 顶点位置
        points.push_back(vectexPosition[positionIndex[i].x]);
        points.push_back(vectexPosition[positionIndex[i].y]);
        points.push_back(vectexPosition[positionIndex[i].z]);

        // 顶点纹理坐标
        texcoords.push_back(vertexTexcoord[texcoordIndex[i].x]);
        texcoords.push_back(vertexTexcoord[texcoordIndex[i].y]);
        texcoords.push_back(vertexTexcoord[texcoordIndex[i].z]);

        // 顶点法线
        normals.push_back(vectexNormal[normalIndex[i].x]);
        normals.push_back(vectexNormal[normalIndex[i].y]);
        normals.push_back(vectexNormal[normalIndex[i].z]);
    }
}

// 初始化
void init()
{


    /*
    // 手动指定正方形的 4 个顶点位置和其纹理坐标
    std::vector<glm::vec3> vectexPosition = {
        glm::vec3(-1,-0.2,-1), glm::vec3(-1,-0.2,1), glm::vec3(1,-0.2,-1),glm::vec3(1,-0.2,1)
    };
    std::vector<glm::vec2> vertexTexcoord = {
        glm::vec2(0, 0), glm::vec2(0, 1), glm::vec2(1, 0), glm::vec2(1, 1)
    };
    // 根据顶点属性生成两个三角面片顶点位置 -- 共6个顶点
    points.push_back(vectexPosition[0]);
    points.push_back(vectexPosition[2]);
    points.push_back(vectexPosition[1]);
    points.push_back(vectexPosition[2]);
    points.push_back(vectexPosition[3]);
    points.push_back(vectexPosition[1]);
    // 根据顶点属性生成三角面片的纹理坐标 -- 共6个顶点
    texcoords.push_back(vertexTexcoord[0]);
    texcoords.push_back(vertexTexcoord[2]);
    texcoords.push_back(vertexTexcoord[1]);
    texcoords.push_back(vertexTexcoord[2]);
    texcoords.push_back(vertexTexcoord[3]);
    texcoords.push_back(vertexTexcoord[1]);
    */

    // 读取 obj 文件
    readObj("models/obj/table.obj", points, texcoords, normals);

    // ---------------------------------------------------------------------//

    // 生成vbo对象并且绑定vbo
    GLuint vbo;
    glGenBuffers(1, &vbo);
    glBindBuffer(GL_ARRAY_BUFFER, vbo);
    // 先确定vbo的总数据大小 -- 传NULL指针表示我们暂时不传数据
    GLuint dataSize = sizeof(glm::vec3) * points.size() + sizeof(glm::vec2) * texcoords.size();
    glBufferData(GL_ARRAY_BUFFER, dataSize, NULL, GL_STATIC_DRAW);

    // 传送数据到vbo 分别传递 顶点位置 和 顶点纹理坐标
    GLuint pointDataOffset = 0;
    GLuint texcoordDataOffset = sizeof(glm::vec3) * points.size();
    glBufferSubData(GL_ARRAY_BUFFER, pointDataOffset, sizeof(glm::vec3) * points.size(), &points[0]);
    glBufferSubData(GL_ARRAY_BUFFER, texcoordDataOffset, sizeof(glm::vec2) * texcoords.size(), &texcoords[0]);

    // 生成vao对象并且绑定vao
    GLuint vao;
    glGenVertexArrays(1, &vao);
    glBindVertexArray(vao);

    // 生成着色器程序对象
    std::string fshaderPath = "shaders/fshader.fsh";
    std::string vshaderPath = "shaders/vshader.vsh";
    program = getShaderProgram(fshaderPath, vshaderPath);
    glUseProgram(program);  // 使用着色器

    // 建立顶点变量vPosition在着色器中的索引 同时指定vPosition变量的数据解析格式
    GLuint vlocation = glGetAttribLocation(program, "vPosition");    // vPosition变量的位置索引
    glEnableVertexAttribArray(vlocation);
    glVertexAttribPointer(vlocation, 3, GL_FLOAT, GL_FALSE, 0, (GLvoid*)0);  // vao指定vPosition变量的数据解析格式

    // 建立颜色变量vTexcoord在着色器中的索引 同时指定vTexcoord变量的数据解析格式
    GLuint tlocation = glGetAttribLocation(program, "vTexcoord");    // vTexcoord变量的位置索引
    glEnableVertexAttribArray(tlocation);
    glVertexAttribPointer(tlocation, 2, GL_FLOAT, GL_FALSE, 0, (GLvoid*)(sizeof(glm::vec3) * points.size()));  // 注意指定offset参数

    // 生成纹理
    GLuint texture;
    glGenTextures(1, &texture);
    glBindTexture(GL_TEXTURE_2D, texture);
    // 参数设置 -- 过滤方式与越界规则
    glTexParameteri(GL_TEXTURE_2D, GL_TEXTURE_MIN_FILTER, GL_LINEAR);
    glTexParameteri(GL_TEXTURE_2D, GL_TEXTURE_MAG_FILTER, GL_LINEAR);
    glTexParameteri(GL_TEXTURE_2D, GL_TEXTURE_WRAP_S, GL_MIRRORED_REPEAT);
    glTexParameteri(GL_TEXTURE_2D, GL_TEXTURE_WRAP_T, GL_MIRRORED_REPEAT);
    // 读取图片纹理
    int textureWidth, textureHeight;
    unsigned char* image = SOIL_load_image("models/obj/table.png", &textureWidth, &textureHeight, 0, SOIL_LOAD_RGB);
    glTexImage2D(GL_TEXTURE_2D, 0, GL_RGB, textureWidth, textureHeight, 0, GL_RGB, GL_UNSIGNED_BYTE, image);   // 生成纹理

    glEnable(GL_DEPTH_TEST);  // 开启深度测试

    glClearColor(0.0, 0.0, 0.0, 1.0);   // 背景颜色 -- 黑
}

// 鼠标滚轮函数
void mouseWheel(int wheel, int direction, int x, int y)
{


    // zFar += 1 * direction * 0.1;
    glutPostRedisplay();    // 重绘
}

// 鼠标运动函数
void mouse(int x, int y)
{


    // 调整旋转
    yaw += 35 * (x - float(windowWidth) / 2.0) / windowWidth;
    yaw = glm::mod(yaw + 180.0f, 360.0f) - 180.0f;    // 取模范围 -180 ~ 180

    pitch += -35 * (y - float(windowHeight) / 2.0) / windowHeight;
    pitch = glm::clamp(pitch, -89.0f, 89.0f);

    glutWarpPointer(windowWidth / 2.0, windowHeight / 2.0);
    glutPostRedisplay();    // 重绘
}

// 键盘回调函数
void keyboardDown(unsigned char key, int x, int y)
{


    keyboardState[key] = true;
}
void keyboardDownSpecial(int key, int x, int y)
{


    keyboardState[key] = true;
}
void keyboardUp(unsigned char key, int x, int y)
{


    keyboardState[key] = false;
}
void keyboardUpSpecial(int key, int x, int y)
{


    keyboardState[key] = false;
}
// 根据键盘状态判断移动
void move()
{


    if (keyboardState['w']) cameraPosition += 0.0005f * cameraDirection;
    if (keyboardState['s']) cameraPosition -= 0.0005f * cameraDirection;
    if (keyboardState['a']) cameraPosition -= 0.0005f * glm::normalize(glm::cross(cameraDirection, cameraUp));
    if (keyboardState['d']) cameraPosition += 0.0005f * glm::normalize(glm::cross(cameraDirection, cameraUp));
    if (keyboardState[GLUT_KEY_CTRL_L]) cameraPosition.y -= 0.0005;
    if (keyboardState[' ']) cameraPosition.y += 0.0005;
    glutPostRedisplay();    // 重绘
}

// 显示回调函数
void display()
{


    glClear(GL_COLOR_BUFFER_BIT | GL_DEPTH_BUFFER_BIT);       // 清空窗口颜色缓存

    // 模型变换矩阵
    glm::mat4 model(    // 单位矩阵
        glm::vec4(1, 0, 0, 0),
        glm::vec4(0, 1, 0, 0),
        glm::vec4(0, 0, 1, 0),
        glm::vec4(0, 0, 0, 1)
    );
    model = glm::rotate(model, glm::radians(-90.0f), glm::vec3(1, 0, 0));   // 绕 x 轴转90度
    GLuint mlocation = glGetUniformLocation(program, "model");    // 名为model的uniform变量的位置索引
    glUniformMatrix4fv(mlocation, 1, GL_FALSE, glm::value_ptr(model));   // 列优先矩阵

    // 视图矩阵 -- 世界坐标转相机坐标
    move(); // 移动控制 -- 控制相机位置

    // 计算欧拉角以确定相机朝向
    cameraDirection.x = cos(glm::radians(pitch)) * sin(glm::radians(yaw));
    cameraDirection.y = sin(glm::radians(pitch));
    cameraDirection.z = -cos(glm::radians(pitch)) * cos(glm::radians(yaw)); // 相机看向z轴负方向

    // 传视图矩阵
    glm::mat4 view = glm::lookAt(cameraPosition, cameraPosition + cameraDirection, cameraUp);
    GLuint vlocation = glGetUniformLocation(program, "view");
    glUniformMatrix4fv(vlocation, 1, GL_FALSE, glm::value_ptr(view));

    // 传投影矩阵
    glm::mat4 projection = glm::perspective(glm::radians(70.0f), (GLfloat)windowWidth / (GLfloat)windowHeight, zNear, zFar);
    GLuint plocation = glGetUniformLocation(program, "projection");
    glUniformMatrix4fv(plocation, 1, GL_FALSE, glm::value_ptr(projection));

    glDrawArrays(GL_TRIANGLES, 0, points.size());   // 绘制n个点

    glutSwapBuffers();                  // 交换缓冲区
}

int main(int argc, char** argv)
{


    glutInit(&argc, argv);              // glut初始化
    glutInitDisplayMode(GLUT_RGBA | GLUT_DEPTH);
    glutInitWindowSize(windowWidth, windowHeight);// 窗口大小
    glutCreateWindow("5 - texture"); // 创建OpenGL上下文

#ifdef __APPLE__
#else
    glewInit();
#endif

    init();

    // 绑定鼠标移动函数 --
    //glutMotionFunc(mouse);  // 左键按下并且移动
    glutPassiveMotionFunc(mouse);   // 鼠标直接移动
    //glutMouseWheelFunc(mouseWheel); // 滚轮缩放

    // 绑定键盘函数
    glutKeyboardFunc(keyboardDown);
    glutSpecialFunc(keyboardDownSpecial);
    glutKeyboardUpFunc(keyboardUp);
    glutSpecialUpFunc(keyboardUpSpecial);

    glutDisplayFunc(display);           // 设置显示回调函数 -- 每帧执行
    glutMainLoop();                     // 进入主循环

    return 0;
}
顶点着色器
#version 330 core

in vec3 vPosition;  // cpu传入的顶点坐标
in vec2 vTexcoord;     // cpu传入的顶点纹理坐标

out vec2 texcoord;   // 传顶点纹理坐标给片元着色器

uniform mat4 model; // 模型变换矩阵
uniform mat4 view;      // 模型变换矩阵
uniform mat4 projection;    // 模型变换矩阵

void main()
{


    gl_Position = projection * view * model * vec4(vPosition, 1.0); // 指定ndc坐标
    texcoord = vTexcoord;   // 传递纹理坐标到片段着色器
}
片元着色器
#version 330 core

in vec3 vColorOut;  // 顶点着色器传递的颜色
in vec2 texcoord;    // 纹理坐标

out vec4 fColor;    // 片元输出像素的颜色

uniform sampler2D Texture;  // 纹理图片

void main()
{


    //fColor.rgb =  texture2D(Texture, texcoord.st).rgb;
    fColor.rgb =  texture2D(Texture, vec2(texcoord.s, 1.0 - texcoord.t)).rgb;
    //fColor.rgb = vec3(1, 0, 0);
}
来源:oschina
链接:https://my.oschina.net/u/4329790/blog/4793928
