Spring之旅
一、简化java开发
- 创建Spring的主要目的就是用来代替更加重量级的企业级的java技术,尤其是EJB。
- 为了降低java开发的复杂性,Spring采用了以下四种关键策略:
- 基于POJO的轻量级和最小侵入性编程。
- 通过依耐注入和面向接口实现松耦合。
- 基于切面和惯例进行声明式编程。
- 通过切面和模版减少板式代码。
激发POJO的潜能
与其他框架不一样的是,Spring不会像其他框架一样,让你继承某个类或者实现某个接口从而导致应用与框架绑死。
依赖注入
DI帮助应用对象彼此之间保持松耦合。
- 在构造的时候把接口对象作为构造器参数传入,即构造器注入。可以利用mock来测试
- 示例:(使用xml来装载)
- 创建两个接口,因为现在都是面向接口开发,所以我们顶层一般都是用接口来声明功能。
package spring.com.one;

/**
 * 将要注入的接口,即调用的方法
 */
public interface Quest {
		void embark();
}
package spring.com.one; /** * 被实现的接口 */ public interface Knight { //开始行动 void embarkOnQuest(); }- 创建一个实现类BravenKnight用来实现Knight接口,这个类将会被注入Quest对象,
package spring.com.one; /** * 将Quest接口对象注入到BravenKnight类中。 * 1.声明一个注入接口类型的字段 * 2. 在构造方法中设置入参为注入接口类型的参数 * 3.将该参数赋值给声明字段 */ public class BravenKnight implements Knight { private Quest quest; public BravenKnight(Quest quest){ this.quest=quest; } public void embarkOnQuest(){ quest.embark(); } }- 创建一个实现类SlayDragonQuest用来实现Quest接口,该对象将被注入PrintStream对象。
package spring.com.one; import java.io.PrintStream; public class SlayDragonQuest implements Quest { private PrintStream stream; public SlayDragonQuest(PrintStream stream){ this.stream=stream; } public void embark() { stream.println("安怡宁爱学习"); } }- 创建一个Spring的配置文件,将PrintStream对象注入到SlayDragonQuest类中装配成名字为quest的bean,然后再将quest注入到对象为BravenKnight类中,bean的名字为knight。
<?xml version="1.0" encoding="UTF-8"?>
<!--xmlns:表示命名空间,允许你通过一个网址指向来识别你的标识.
xmlns:xsi:遵守xml规范
xsi:是指具体用到的schema资源,schema:文档的限制。
-->
<beans xmlns="http://www.springframework.org/schema/beans"
       xmlns:xsi="http://www.w3.org/2001/XMLSchema-instance"
       xsi:schemaLocation="http://www.springframework.org/schema/beans
        http://www.springframework.org/schema/beans/spring-beans.xsd">
<!--    将bean为quest注入到BravenKnight中-->
    <bean id="knight" class="spring.com.one.BravenKnight">
        <constructor-arg ref="quest"/>
    </bean>
<!--    将PrintStream对象注入到SlayDragonQuest类中-->
    <bean id="quest" class="spring.com.one.SlayDragonQuest"><!--这里的class会被标红,但是不影响程序运行,应该是版本的问题-->
        <constructor-arg value="#{T(System).out}"/>
    </bean>
</beans>
3.下面我们用java的方式装配bean(@Bean注解会自动把方法的名字设置为bean的名字)
package spring.com.one;

import org.springframework.context.annotation.Bean;
import org.springframework.context.annotation.Configuration;

@Configuration
public class KnightConfig {

		@Bean
		public Knight knight() {
				return new BravenKnight(quest());
		}

		@Bean
		public Quest quest() {
				return new SlayDragonQuest(System.out);
		}
}
- 测试()
	@Test
		public void KnightMain() {
		//xml配置测试
				ClassPathXmlApplicationContext context = new ClassPathXmlApplicationContext("one/oneConfig.xml");
				Knight knight = context.getBean(Knight.class);
				knight.embarkOnQuest();
				context.close();
		//java注解配置测试
				AnnotationConfigApplicationContext context1=new AnnotationConfigApplicationContext(KnightConfig.class);
				Knight knight1=(Knight) context1.getBean("knight");
				knight1.embarkOnQuest();
				context1.close();
		}
- 输出
安怡宁爱学习
安怡宁爱学习
Spring通过应用上下文,装载bean的定义并把它们组装起来,Spring应用上下文全权负责对象的创建和组装,Spring自带了多种应用上下文的实现,他们之间的区别仅仅在于如何加载配置
应用切面
DI能够让相互协作的软件组件保持松散耦合,而面向切面编程(aop)允许你把遍布应用各处的功能分离出来形成可重用的组件。
- 书写Minstrel类,在这里定义切点前后要使用的方法。只需要将PrintStream注入到Minstrel类中。
package spring.com.one.aop;

import java.io.PrintStream;
/*
将这个类的方法加入到别的代码中并运行起来
 */
public class Minstrel {
		private PrintStream stream;

		public Minstrel(PrintStream stream) {
				this.stream = stream;
		}

		public void singBeforeQuest() {
				stream.println("安公主睡前喜欢听音乐!");
		}

		public void singAfterAuest() {
				stream.println("安公主醒来后就要看书!");
		}
}
- 书写BravenKnight类实现knight接口
package spring.com.one.aop;

import spring.com.one.di.Quest;

public class BravenKnight implements Knight {

		private Quest quest;
		private Minstrel minstrel;

		public BravenKnight(Quest quest, Minstrel minstrel) {
				this.quest = quest;
				this.minstrel = minstrel;
		}

		//将Minstrel类中的方法分别在Quest的方法的前后执行
		@Override
		public void embarkOnQuest() {
//				minstrel.singBeforeQuest();
				quest.embark();
//				minstrel.singAfterAuest();
		}
}
- xml文件
<?xml version="1.0" encoding="UTF-8"?>
<!--xmlns:表示命名空间,允许你通过一个网址指向来识别你的标识.
xmlns:xsi:遵守xml规范
xsi:是指具体用到的schema资源,schema:文档的限制。
-->
<beans xmlns="http://www.springframework.org/schema/beans"
       xmlns:xsi="http://www.w3.org/2001/XMLSchema-instance"
       xmlns:aop="http://www.springframework.org/schema/aop"
       xsi:schemaLocation="http://www.springframework.org/schema/aop
       http://www.springframework.org/schema/aop/spring-aop.xsd
       http://www.springframework.org/schema/beans
        http://www.springframework.org/schema/beans/spring-beans.xsd">

    <!--    将PrintStream对象注入到SlayDragonQuest类中-->
    <bean id="quest" class="spring.com.one.di.SlayDragonQuest">
        <constructor-arg value="#{T(System).out}"/>
    </bean>
    <!--    首先将Minstrel声明为一个bean,注入PrintStream-->
    <bean id="minstrel" class="spring.com.one.aop.Minstrel">
        <constructor-arg value="#{T(System).out}"/>
    </bean>
<!--    将minstrel和quest的bean注入到名字为knight1的BravenKnight类中-->
    <bean id="knight1" class="spring.com.one.aop.BravenKnight">
        <constructor-arg ref="quest"/>
        <constructor-arg ref="minstrel"/>
    </bean>

    <!--    execution():表达式的主体;-->
    <!--    第一个”*“符号 :表示返回值的类型任意;-->
    <!--    com.sample.service.impl	:AOP所切的服务的包名,即,我们的业务部分-->
    <!--    包名后面的”..“	:表示当前包及子包-->
    <!--    第二个”*“	:表示类名,*即所有类。此处可以自定义,下文有举例-->
    <!--    .*(..)	:表示任何方法名,括号表示参数,两个点表示任何参数类型-->
    <aop:config>
        <!--        将Minstrel  bean声明为一个切面,即bean名为minstrel,引用前面的bean-->
        <aop:aspect ref="minstrel">
            <!--            声明一个切点,当调用embarkOnQuest方法的时候触发该切面,在该方法执行前执行before,之后执行after-->
            <aop:pointcut id="embark" expression="execution(*  spring.com.one.aop.BravenKnight.embarkOnQuest(..))"/>
            <aop:before pointcut-ref="embark" method="singBeforeQuest"/>
            <aop:after pointcut-ref="embark" method="singAfterAuest"/>
        </aop:aspect>
    </aop:config>
</beans>
- 输出
安公主睡前喜欢听音乐!
安怡宁爱学习
安公主醒来后就要看书!
使用aop技术可以将我们常用的组件加入到某一个点,这样可以实现组件的重用。
二、使用模版消除板式代码
- 在开发中我们常常会遇见一些板式代码,为了实现通用的和简单的任务,我们不得不一遍遍的重复编写这样的代码。
- 比如我们曾用到的jdbc,去操作数据库。
- Spring旨在通过模版封装来消除板式代码,比如使用Spring的JdbcTemplate重写的getEmployeeById方法仅仅关注于获取员工数据的核心逻辑,而不需要迎合JDBC API的需求。
- 示例:
- 创建pojo类
package spring.com;

//pojo类
public class Employee {
		private String name;
		private int id ;
		private String sex;
		private  int age;

		public String getName() {
				return name;
		}

		public void setName(String name) {
				this.name = name;
		}

		public int getId() {
				return id;
		}

		public void setId(int id) {
				this.id = id;
		}

		public String getSex() {
				return sex;
		}

		public void setSex(String sex) {
				this.sex = sex;
		}

		public int getAge() {
				return age;
		}

		public void setAge(int age) {
				this.age = age;
		}
}
- 创建获取数据的方法类
package spring.com;

import org.springframework.jdbc.core.BeanPropertyRowMapper;
import org.springframework.jdbc.core.JdbcTemplate;
import org.springframework.jdbc.core.RowMapper;

//@Repository
public class GetEmployee {

		private JdbcTemplate template;

		//		@Autowired
		public GetEmployee(JdbcTemplate template) {
				this.template = template;
		}

		public Employee get(int id) {
				String sql = "Select ID,NAME,SEX,AGE from teacher where id=?";
				RowMapper<Employee> mapper = new BeanPropertyRowMapper<>(Employee.class);
				return template.queryForObject(sql, mapper, id);
		}


}
- 引入依耐(连接池com.mchange.v2.c3p0.ComboPooledDataSource)
     <!--jdbc连接池-->
        <dependency>
            <groupId>c3p0</groupId>
            <artifactId>c3p0</artifactId>
            <version>0.9.1.2</version>
        </dependency>
- 书写配置xml(记着添加xmlns,xsi)
  <context:property-placeholder location="classpath:one/db.properties"/>
    <bean id="dataSource" class="com.mchange.v2.c3p0.ComboPooledDataSource">
        <property name="user" value="${jdbc.user}"/>
        <property name="password" value="${jdbc.password}"/>
        <property name="driverClass" value="${jdbc.driverClass}"/>
        <property name="jdbcUrl" value="${jdbc.jdbcUrl}"/>
    </bean>

    <bean id="jdbcTemplate" class="org.springframework.jdbc.core.JdbcTemplate">
        <property name="dataSource" ref="dataSource"/>
    </bean>

    <bean id="getEmployee" class="spring.com.GetEmployee">
        <constructor-arg ref="jdbcTemplate"/>
    </bean>
- 书写连接数据库的properties属性文件
jdbc.user=lining
jdbc.password=123456
jdbc.driverClass=com.mysql.jdbc.Driver
jdbc.jdbcUrl=jdbc:mysql://localhost:3306/student
- 测试方法
	@Test
		public void getEmployee() {
				ApplicationContext context = new ClassPathXmlApplicationContext("one/oneConfig.xml");
				Employee employee=context.getBean(GetEmployee.class).get(8);
				System.out.println(employee.getAge());
				System.out.println(employee.getId());
				System.out.println(employee.getSex());
				System.out.println(employee.getName());
		}
- 输出
19
8
女
泰妍
这里我们可以多去了解板式代码的好处和使用的思想,在Spring中还有很多这种方法的封装,让我们一起去体验吧。
三、容纳你的Bean
- 在基于Spring的应用中,你的应用对象生存与Spring容器中。Spring容器负责创建对象,装配他们,配置他们并管理他们的整个生命周期,从生存到死亡。
- Spring自带多个容器实现,可以归为两种不同的类型:
- bean工厂是最简单的容器,提供基本的DI支持。
- 应用上下文基于BeanFactory构建,并提供应用框架级别的服务。
使用应用上下文
-
AnnotationConfigApplicationContext:从一个或多个基于java的配置类中加载上下文定义,适用于java注解的方式;
-
ClassPathXmlApplicationContext:从类路径下的一个或多个xml配置文件中加载上下文定义,适用于xml配置的方式;
-
FileSystemXmlApplicationContext:从文件系统下的一个或多个xml配置文件中加载上下文定义,也就是说系统盘符中加载xml配置文件;
-
AnnotationConfigWebApplicationContext:专门为web应用准备的,适用于注解方式;
-
XmlWebApplicationContext:从web应用下的一个或多个xml配置文件加载上下文定义,适用于xml配置方式。
ClassPathXmlApplicationContext是在类路径中寻找文件,而 FileSystemXmlApplicationContext是在系统路径下寻找文件。在前面我们也用到过前两种上下文,后面我们会详细使用他们。
通过配置类来加载bean
ApplicationContext applicationContext=new AnnotationConfigApplicationContext(配置类的全限定名);
bean的生命周期
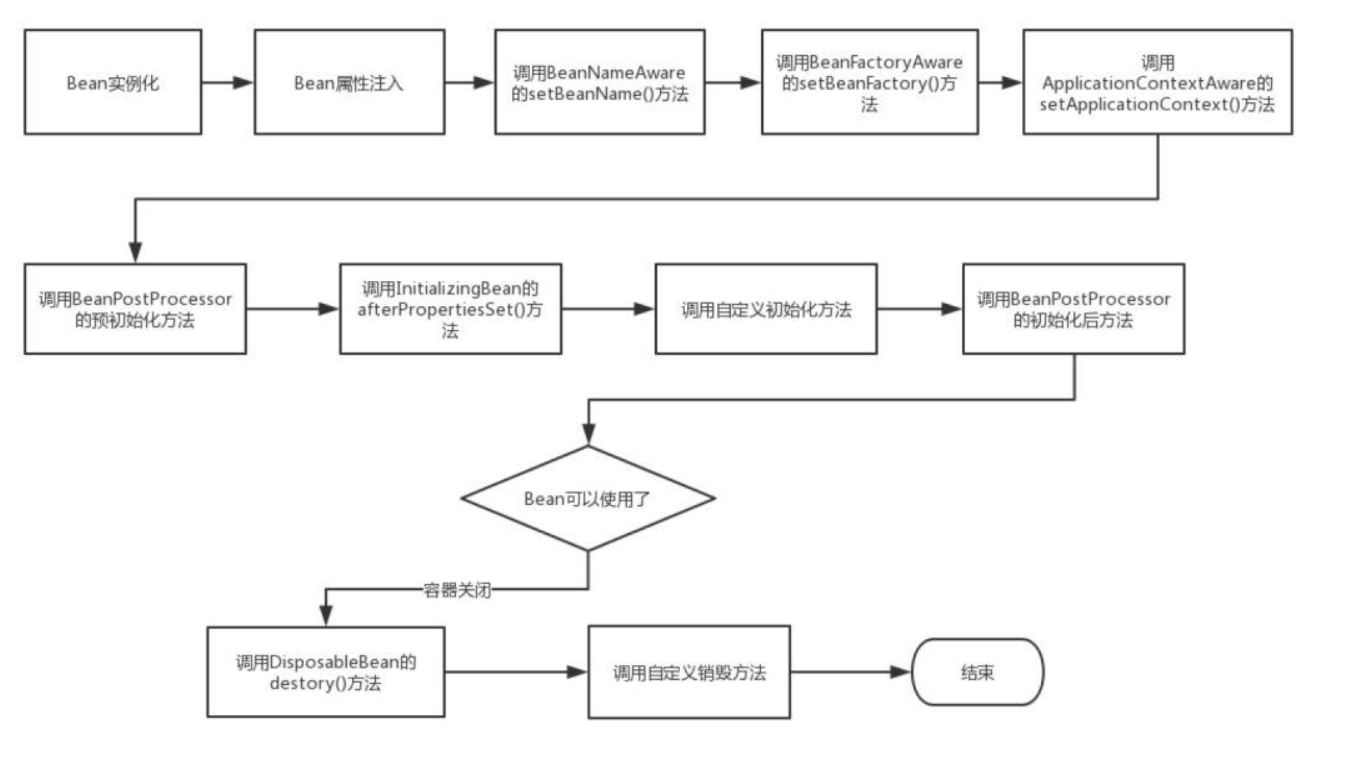
使用java关键字new进行bean实例化,然后该bean就可以使用,则由java自动进行垃圾回收。相比之下Spring容器中的bean的生命周期就显得相对复杂多了,

我们对上图进行详细描述
-
Spring对bean进行实例化;
-
Spring将值和bean的引用注入到bean对应的属性中;
-
如果bean实现了BeanNameAware接口,Spring将bean的ID传递给setBean-Name()方法;
-
如果bean实现了BeanFactoryAware接口,Spring将调用setBeanFactory()方法,将BeanFactory容器实例传入;
-
如果bean实现了ApplicationContextAware接口,Spring将掉用SetApplicationContext()方法,将bean所在的应用上下文引用传入进来;
-
如果Bean实现了BeanPostProcessor接口,Spring就将调用他们的postProcessBeforeInitialization()方法;
-
如果Bean 实现了InitializingBean接口,Spring将调用他们的afterPropertiesSet()方法。类似的,如果bean使用init-method声明了初始化方法,该方法也会被调用
-
如果Bean 实现了BeanPostProcessor接口,Spring就将调用他们的postProcessAfterInitialization()方法。
-
此时,Bean已经准备就绪,可以被应用程序使用了。他们将一直驻留在应用上下文中,直到应用上下文被销毁。
-
如果bean实现了DisposableBean接口,Spring将调用它的destory()接口方法,同样,如果bean使用了destory-method 声明销毁方法,该方法也会被调用。
下一节我们将仔细描述Bean的装配
来源:oschina
链接:https://my.oschina.net/u/4045839/blog/3191326