0.前言
Java的学习前端和后端需要一起重视。
前端页面的布局分布,用framset可以做到,但是如果把页面在细分为小块一些的内容,framset就不易办到。若是把页面视为行列交错的表格,每个表格内都可以填充内容,使用Struts的Tiles布局其实更为合适。
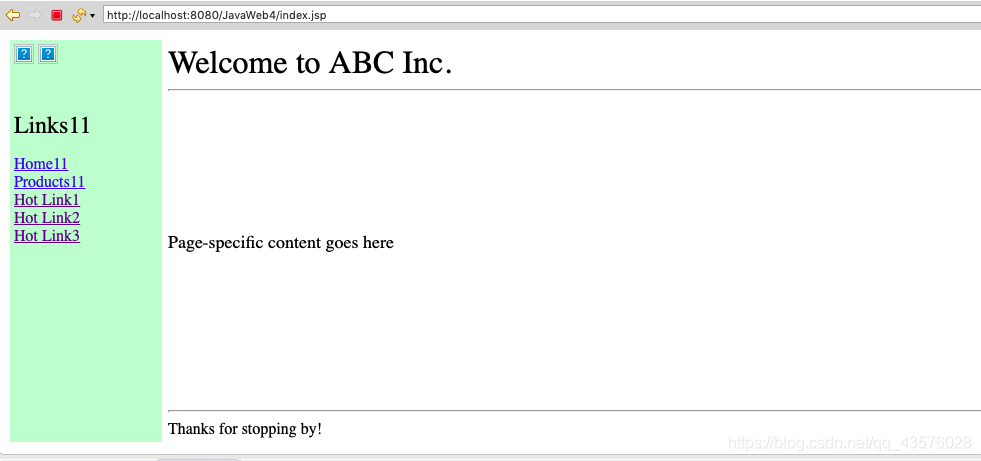
假设要开发一个页面,
如上图所示,当用户点击链接的时候,内容仅仅在右侧中间栏进行更改,以下有几种方案。
1.方案1
构造两个几乎完全一样的页面,仅在中间栏有所有不同。这样点击链接,看上去就显得没有变化,但是这种方法弊端很明显,比如说原本需要维护一份的代码,现在变成两份;网页再跳转的时候如果网速比较慢或者服务器相应比较慢的话,会造成使用的不流畅体验。。
2.方案2
将每个部分分为独立的页面,用JSP的include标签,把各部分内容包含在一个页面里面。
以上述页面为例,可以拆分成左边(sidebar.jsp),右上(head.jsp),右下(foot.jsp),右中(content.jsp)
拆开之后再用jsp的include把它们包含在一个页面里面。
index.jsp就是利用了jsp的include方法进行内容插入,有点像挖空——填空这样的过程。
代码如下:
<%@ page contentType="text/html; charset=UTF-8" %>
<html>
   <head>
      <title>TilesTaglibs Sample</title>
   </head>
   <body >
      <%-- One table lays out all of the content for this page --%>
      <table width="100%" height="100%" >
         <tr>
            <%-- Sidebar--%>
            <td width="150" valign="top" align="left" bgcolor="#CCFFCC">

               <jsp:include flush="true" page="sidebar.jsp"></jsp:include>


            </td>
            <%-- Main content--%>
            <td valign="top" height="100%" width="*">
               <table width="100%" height="100%">
                  <tr>
                     <%-- Header--%>
                     <td valign="top" height="15%">

                       <jsp:include flush="true" page="head.jsp"></jsp:include>
                     </td>
                  <tr>
                 <tr>
                     <%-- Content--%>
                     <td valign="top" height="*">
                       <jsp:include flush="true" page="content.jsp"></jsp:include>
                     </td>
                  </tr>
                  <tr>
                     <%-- Footer--%>
                     <td valign="bottom" height="15%">
                  <jsp:include flush="true" page="foot.jsp"></jsp:include>

                     </td>
                  </tr>
               </table>
            </td>
         </tr>
      </table>
   </body>
</html>
这样只需要维护“块”代码就行了,维护代码量减少了。而Struts提供的Tiles布局方法也可以达到这种效果。
3.Tiles布局
tiles布局的方法和JSP的include方法很像,把jsp改为tiles,把include改为insert就可以了。
index.jsp:
<%@ page contentType="text/html; charset=UTF-8" %>
<%@ taglib uri="/WEB-INF/struts-tiles.tld" prefix="tiles"%>

<html>
   <head>
      <title>TilesTaglibs Sample</title>
   </head>
   <body >
      <%-- One table lays out all of the content for this page --%>
      <table width="100%" height="100%" >
         <tr>
            <%-- Sidebar--%>
            <td width="150" valign="top" align="left" bgcolor="#CCFFCC">

               <tiles:insert page="sidebar.jsp"></tiles:insert>


            </td>
            <%-- Main content--%>
            <td valign="top" height="100%" width="*">
               <table width="100%" height="100%">
                  <tr>
                     <%-- Header--%>
                     <td valign="top" height="15%">

               <tiles:insert page="head.jsp"></tiles:insert>
                     </td>
                  <tr>
                 <tr>
                     <%-- Content--%>
                     <td valign="top" height="*">
               <tiles:insert page="content.jsp"></tiles:insert>
                     </td>
                  </tr>
                  <tr>
                     <%-- Footer--%>
                     <td valign="bottom" height="15%">
               <tiles:insert page="foot.jsp"></tiles:insert>

                     </td>
                  </tr>
               </table>
            </td>
         </tr>
      </table>
   </body>
</html>
那么这样看起来,tiles和jsp的include也没什么区别,为什么还要使用tiles?
问题在于页面布局,挖空——填空其实是基于页面布局已经完成的情况下,填充代码就会显得十分方便,但是页面布局如果要改变,那么里面填充的代码也要跟着改变,也就是还是需要修改两份代码,十分不方便,所以tiles布局就能够凸显出其魅力了。
3.1 tiles标签的attribute属性
在jsp页面挖空,在空处填入tiles标签,此举不是为了填充内容,而是做一个标记,告诉系统,在此处填充的内容,可以被动态的显示在其他地方。
而标记就是使用Attribute作为标记。
在新页面处使用tiles标签,使用name属性,就可以把attribute定义的模版拷贝过来,value可以指定内容的显示。
也就是说,attribute作为标记,name指定样式,value指定显示内容。
index.jsp:
<%@ page contentType="text/html; charset=UTF-8" %>
<%@ taglib uri="/WEB-INF/struts-tiles.tld" prefix="tiles"%>

<html>
   <head>
      <title>TilesTaglibs Sample</title>
   </head>
   <body >
      <%-- One table lays out all of the content for this page --%>
      <table width="100%" height="100%" >
         <tr>
            <%-- Sidebar--%>
            <td width="150" valign="top" align="left" bgcolor="#CCFFCC">
            	<tiles:insert attribute="SIDEBAR"></tiles:insert>	            		<!-- 相当于模板内挖了一个空 -->
            </td>
            <%-- Main content--%>
            <td valign="top" height="100%" width="*">
               <table width="100%" height="100%">
                  <tr>
                     <%-- Header--%>
                     <td valign="top" height="15%">
                       <tiles:insert attribute="HEADER"></tiles:insert>
                     </td>
                  <tr>
                 <tr>
                     <%-- Content--%>
                     <td valign="top" height="*">
                     	<tiles:insert attribute="CONTENT"></tiles:insert>
                     </td>
                  </tr>
                  <tr>
                     <%-- Footer--%>
                     <td valign="bottom" height="15%">
                     	<tiles:insert attribute="FOOTER"></tiles:insert>
                     </td>
                  </tr>
               </table>
            </td>
         </tr>
      </table>
   </body>
</html>
layout.jsp:
<%@ page language="java" contentType="text/html; charset=UTF-8"
    pageEncoding="UTF-8"%>

<%@ taglib uri="/WEB-INF/struts-tiles.tld" prefix="tiles"%>
<!DOCTYPE html>
<html>
<head>
<meta charset="UTF-8">
<title>Insert title here</title>
</head>
<body>

<tiles:insert page="index.jsp">
	<tiles:put name="SIDEBAR" 	 value="sidebar.jsp"></tiles:put>
	<tiles:put name="HEADER"   	 value="head.jsp"></tiles:put>
	<tiles:put name="CONTENT"	 value="content.jsp"></tiles:put>
	<tiles:put name="FOOTER"	 value="foot.jsp"></tiles:put>
</tiles:insert>

</body>
</html>
使用tiles布局的优点有很多,不必在意样式顺序,修改代码只需要修改jsp内容即可,对于调用的页面没有什么影响,
#Tiles布局使用实例
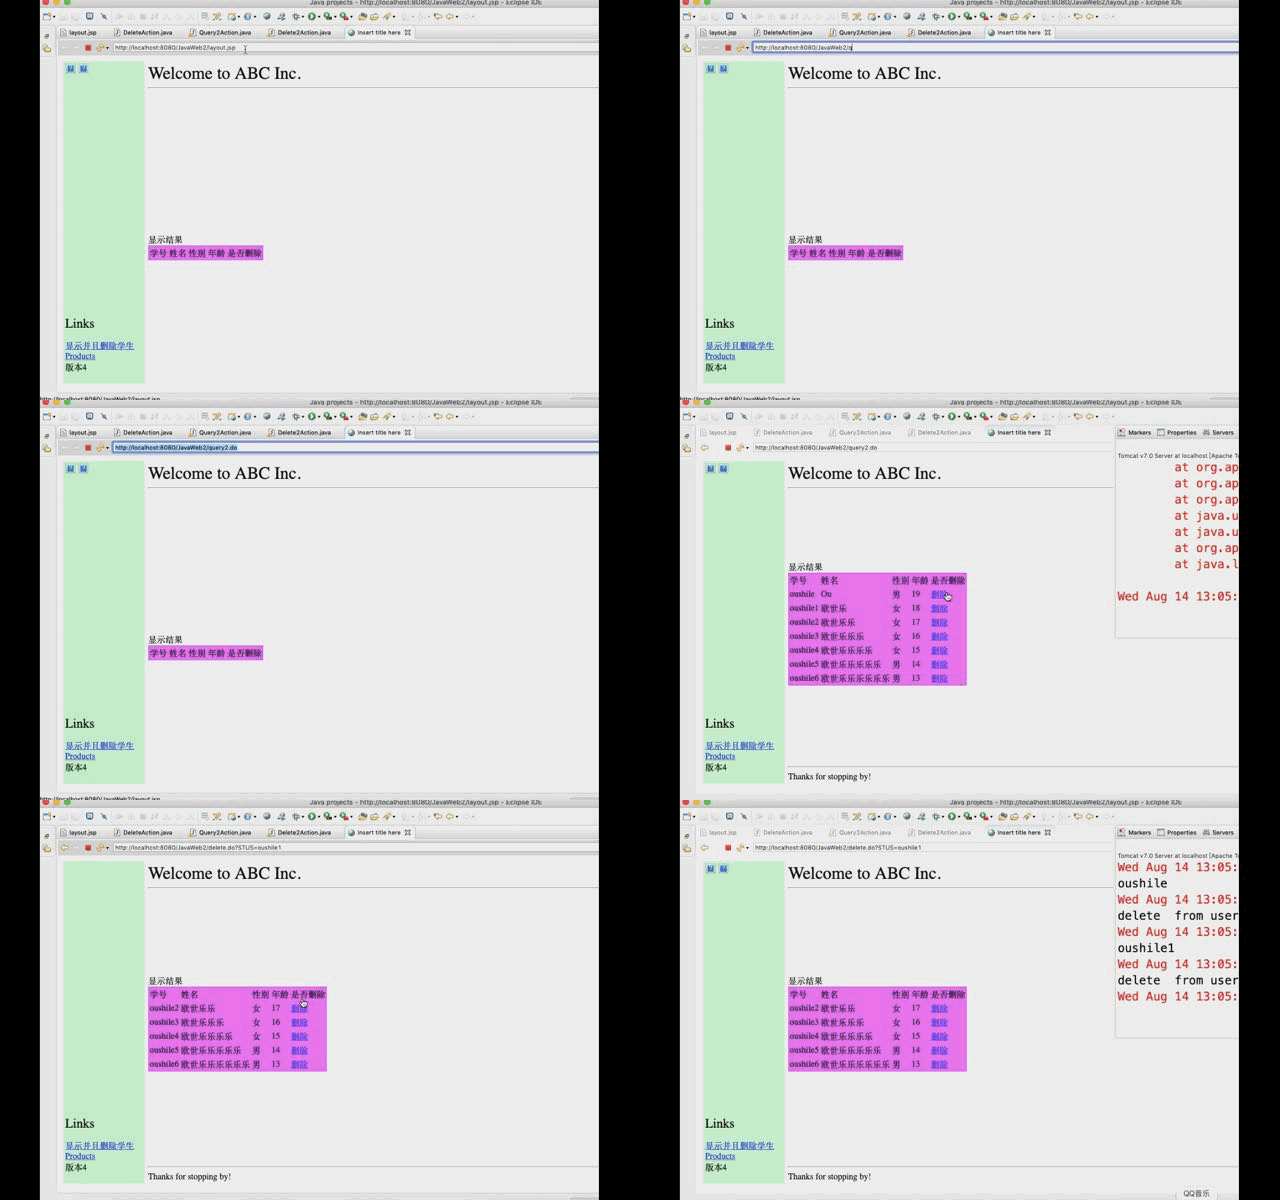
以删除学生信息为例,在右中部分显示学生信息每个学生信息后面都跟一个“删除”链接
首先在layout.jsp页面,右中的部分需要改为display.jsp。
在第一次查询信息的时候,不应该直接启动layout.jsp,而是应该启动query2.do,因为html是不允许页面部分跳转而其他页面不动的。
将Query2Action里面,返回值应写为return new ActionForward("/layout.jsp");即查询完后跳转到layout.jsp。
在DeleteAction里面,返回值应写为return new ActionForward("/query2.do");

来源:https://blog.csdn.net/qq_43576028/article/details/99543804