一、python介绍:
1、语言类型区分,编译型和解释型
1)编译型(代表:C):
编译器是把源程序的每一条语句都编译成机器语言,并保存成二进制文件,这样运行时计算机可以直接以机器语言来运行此程序,速度很快;
优点:编译器一般会有预编译的过程对代码进行优化。因为编译只做一次,运行时不需要编译,所以编译型语言的程序执行效率高。可以脱离语言环境独立运行。
缺点:编译之后如果需要修改就需要整个模块重新编译。编译的时候根据对应的运行环境生成机器码,不同的操作系统之间移植就会有问题,需要根据运行的操作系统环境编译不同的可执行文件。
2)解释型(代表:Python):
解释器则是只在执行程序时,才一条一条的解释成机器语言给计算机来执行,所以运行速度是不如编译后的程序运行的快的.
优点:有良好的平台兼容性,在任何环境中都可以运行,前提是安装了解释器(虚拟机)。灵活,修改代码的时候直接修改就可以,可以快速部署,不用停机维护。
缺点:每次运行的时候都要解释一遍,性能上不如编译型语言。
2、python版本选择
1)python2和python3的区别:
Python2:
a、源码重复,不规范
b、默认的编码是ascii,处理中文会乱码
           解决方式在文件头添加:
                  # !/usr/bin/env python
                  # -*- encoding:utf-8 -*-
Python3:
a、整合源码,更清晰简单优美。
b、默认的编码是utf-8
选择:由于python2版本将于2020年停止维护,建议使用python3版本。
二、变量
1、变量命名要求:
a、变量是由数字字母下划线任意组合。
b、变量不能是数字开头。
c、变量不能是Python中的关键字。
d、变量要具有可描述性。
e、变量不能使用中文。
f、变量不能过长
2、变量命名选择,建议选择下划线:
1)驼峰体:
      #!/usr/bin/env python3
      AgeOfOldboy = 56

      NumberOfStudents = 80
2)下划线:
       #!/usr/bin/env python3
      age_of_oldboy = 56

        number_of_students = 80
三、常量
1、常量定义:不可变的量为常量,比如π(pai 3.141592653)
2、在python中如何定义常量:变量名全部大写即为常量例如 CHINA = '中国'
四、注释
1、单行注释:#
例:# print ("ABC")
2、多行注释: """ """ 或者 ''' ''''
Pycharm 多行注释快捷键: 选中代码 Ctrl + /
    3个双引号:
    #!/usr/bin/env python3
    """
    print ("ABC")
    print ("123")
    """
    3个单引号:
    #!/usr/bin/env python3
    '''
    print ("ABC")
    print ("123")
    '''
五、基础数据类型
查看数据类型方法:type()
1、字符串类型 str
  #!/usr/bin/env python3
  name = "sunpengfei"
2、数字类型 int (在Python3里不再有long类型了,全都是int)
  #!/usr/bin/env python3
  age = 18
3、浮点类型 float
  #!/usr/bin/env python3
  weight = 70.5
4、布尔类型 bool
  #!/usr/bin/env python3
  # True
  2 > 1
  # False
  1 > 2
  # 数字0为True,其他均为Fals
六、用户交互 INPUT
1、python3:
input : 默认是字符串
      #!/usr/bin/env python3
      name = input("请输入用户名:")
2、python2:
raw_input:默认是字符串
input:默认是数字
      #!/usr/bin/env python
      # -*- encoding:utf-8 -*-
      # 字符串类型:
      name = raw_input("请输入名字:")
      # 数字类型
      age = input ("请输入年龄:")
七、格式化输出(字符串)
# %s = 字符串类型  %d = 数字类型
# 格式化输出 示例1
name = input("请输入用户名:")
age = int(input("请输入年龄:"))
job = input("请输入工作:")
hap = input("请输入爱好:")
meg = """
     info
     姓名:%s
     年龄:%d
     工作:%s
     爱好:%s
""" % (name, age, job, hap)
print(meg)

# 格式化输出 示例2
dic = {"name": "XX", "age": 30, "job": "it", "hap": "IT"}
meg = """
     info
     姓名:%(name)s
     年龄:%(age)d
     工作:%(job)s
     爱好:%(hap)s
""" % dic
print(meg)
八、流程控制:if else
#!/usr/bin/env python3
# 示例1:
if 2 > 1:
    print("正确")
# 示例2:
if 2 > 1:
    print('正确')
else:
    print('错误')
# 示例3,猜年龄:
num = int(input("请输入数字:"))
age = 20
if num > 20:
    print("太大了!")
elif num == 20:
    print("猜对了!")
else:
    print("太小了")
九、循环:while 和 for
1、while
# 打印 1 到 100
count = 1
while count <= 100:
    print(count)
    count += 1  # 等于count = count +1

# 打印 1+2+3+4..+100的和
count = 1
sums = 0
while count <= 100:
    sums = sums + count
    count += 1
print(sums)
2、while else
# 打印1到100,如果没有break退出循环则会执行else
# 示例1(会执行else):
count = 1
while count <= 100:
    print(count)
    count += 1
else:
    print("循环正常结束")

# 示例2(不会执行else):
count = 1
while count <= 100:
    print(count)
    if count == 5:
        break
    count += 1
else:
    print("循环正常结束")
3、for
# 打印 1 到 10
for i in range(10):
    print(i)
4、for else
# 和while用法一样,如果有break则不会执行else
# 示例1(会执行else)
for i in range(10): print(i) else: print("循环正常退出") # 示例2(不会执行else) for i in range(10): print(i) if i == 3: break else: print("循环正常退出")
十、break 和 continue的区别
1、break 结束整个循环
2、continue 跳出本次循环进入下次循环,并且不会执行continue之后的代码。
# 示例 只会打印1到5
count = 1
while count <= 100:
    print(count)
    if count == 5:
        break
    count += 1

# 示例 打印1到5以后,循环打印5
count = 1
while count <= 100:
    print(count)
    if count == 5:
        continue
  count += 1
十、运算符
1、算数运算符

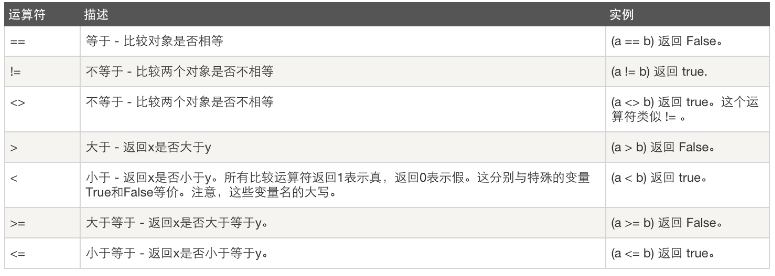
2、比较运算符

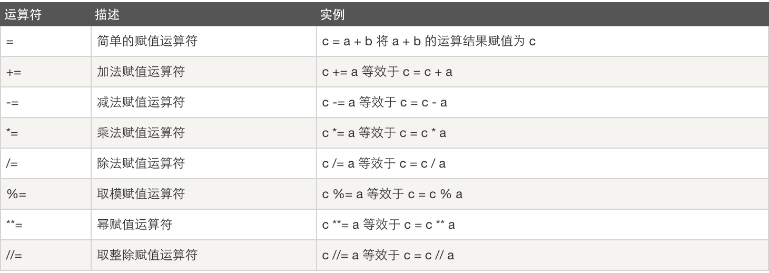
3、赋值运算符

4、逻辑运算符

1)逻辑运算优先级别 在没()的情况下,not > and > or
    1、3>4 or 4<3 and 1==1
    2、1 < 2 and 3 < 4 or 1>2
    3、2 > 1 and 3 < 4 or 4 > 5 and 2 < 1
    4、1 > 2 and 3 < 4 or 4 > 5 and 2 > 1 or 9 < 8
    5、1 > 1 and 3 < 4 or 4 > 5 and 2 > 1 and 9 > 8 or 7 < 6
    6、not 2 > 1 and 3 < 4 or 4 > 5 and 2 > 1 and 9 > 8 or 7 < 6
2) x or y (x为真,值就是x,x为假,值是y)和 x and y(x为真,值是y,x为假,值是x)
    3 or 5 # 值为 3
    0 or 5 # 值为 0 因为 0 为假所以值为5

    3 and 5 # 值为 5
    0 and 5 # 值为 0 因为 0 为假所以值为0
十一、编码
二进制 ->十进制 ->Ascii码->unicode->utf-8
十二、练习题
1、使用while循环输入 1 2 3 4 5 6 8 9 10
count = 1
while count <= 10:
    print(count)
    count += 1
2、求1-100的所有数的和
count = 1
sums = 0
while count <= 100:
    sums = count + sums
    count += 1
print(sums)
3、输出 1-100 内的所有奇数
count = 1
while count <= 100:
    if count % 2 == 1:
        print(count)
    count += 1
4、输出 1-100 内的所有偶数
count = 1
while count <= 100:
    if count % 2 == 0:
        print(count)
    count += 1
5、求1-2+3-4+5 ... 99的所有数的和
count = 1
sums = 0
while count < 100:
    if count % 2 == 0:
        sums = sums - count
    if count % 2 == 1:
        sums = count + sums
    count += 1
print(sums)
6、用户登陆(三次机会重试)


#!/usr/bin/env python3
"""
功能描述:
1、用户登陆,三次机会重试。
2、可以支持多用户登录
3、用户输入了三次机会,都没成功,给它一个选择,让它在试试(必须是同一个用户输入3次错误)
如果用户选择继续则再给他三次机会;如果选择退出则退出程序并打印 print('臭不要脸.....')
4、使用列表+字典存用户名和密码
"""
# 用户信息
info = [
    {"username": "sunpengfei", "password": "123456"},
    {"username": "guangtou", "password": "123456"},
    {"username": "jinxing", "password": "123456"}
]
count = 1
# 临时存储用户登录次数
temp_user = []
while True:
    # 登录标志位
    login_status = False
    # 退出标志位
    sign_out_status = False
    print("#" * 55)
    username = input("请输入用户名:")
    password = input("请输入密码:")
    # 用户名或者密码不能为空
    if username == "" or password == "":
        print("\033[0;31;0m用户名或密码不能为空!\033[0m")
        continue
    # 判断用户名和密码是否正确
    for i in info:
        if username == i["username"] and password == i["password"]:
            print("登录成功!欢迎\033[0;31;0m<%s>\033[0m" % (username,))
            # 用户登录成功则清除之前登录失败的记录
            temp_user.clear()
            # 登录成功则修改标志位为True,则不会执行登录失败操作
            login_status = True
            break
    # 由于用户没登录成功,login_status还是为False
    if login_status == False:
        print("\033[0;31;0m用户名或者密码错误,请重试!\033[0m")
        # 登录失败则添加当前用户到列表
        temp_user.append(username)
        # 如果用户登录失败次数大于等于3次
        if temp_user.count(username) >= 3:
            # while 作用让用户停留在选择界面
            while True:
                choice = input("用户\033[0;31;0m<%s>\033[0m已经登录失败超过3次,是否继续尝试?\033[0;31;0mY继续/N退出\033[0m:" % (username,))
                if choice == "y" or choice == "Y":
                    # 用户选择继续尝试,则清除失败记录
                    temp_user.clear()
                    break
                elif choice == "n" or choice == "N":
                    print("\033[0;31;0m臭不要脸.....Bye!!!\033[0m")
                    # 如果用户选择退出,则修改标志位状态,因为直接break无法退出循环
                    sign_out_status = True
                    break
                else:
                    print("\033[0;31;0m请输入正确的Y或N!\033[0m")
    # 退出整个循环
    if sign_out_status == True:
        break
    count += 1
来源:oschina
链接:https://my.oschina.net/u/4304641/blog/4023958