一、mysql数据库安装
1.安装相关软件包
mysql服务器
PAM组件(pam_mysql)
sasl
2.创建Open×××使用的数据库与表
3.创建测试用户
4.配置PAM mysql认证模块
5.测试pam_mysql是否工作正常
6.配置Open×××服务器及客户端配置文件
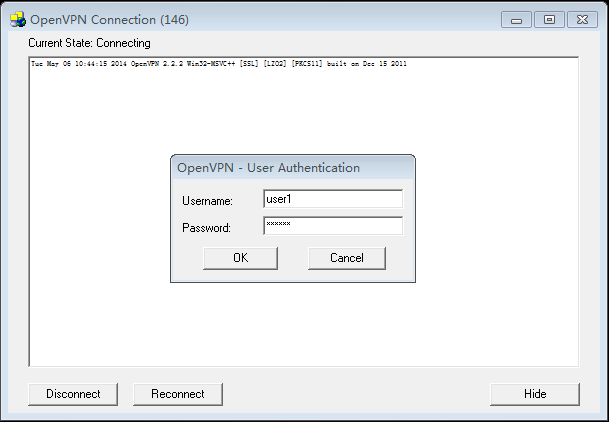
7.测试连接
二、具体配置过程
1.安装相关软件包
mysql服务器
PAM组件(pam_mysql)
sasl
yum install -y mysql mysql-devel mysql-server
yum install -y pam_krb5 pam_mysql pam pam-devel
yum install -y cyrus-sasl cyrus-sasl-plain cyrus-sasl-devel cyrus-sasl-lib cyrus-sasl-gssapi
2.创建Open×××使用的数据库与表
[root@gateway ~]
# mysql
Welcome to the MySQL monitor. Commands end with ; or \g.
Your MySQL connection
id
is 65
Server version: 5.0.37-log Source distribution
Copyright (c) 2000, 2011, Oracle and
/or
its affiliates. All rights reserved.
Oracle is a registered trademark of Oracle Corporation and
/or
its
affiliates. Other names may be trademarks of their respective
owners.
Type
'help;'
or
'\h'
for
help. Type
'\c'
to
clear
the current input statement.
mysql> create database ***;
mysql> show databases;
+--------------------+
| Database |
+--------------------+
| information_schema |
| mysql |
|
test
|
| *** |
+--------------------+
4 rows
in
set
(0.02 sec)
mysql> use ***;
mysql> CREATE TABLE ***user ( name char(20) NOT NULL, password char(128) default NULL, active int(10) NOT NULL DEFAULT 1, PRIMARY KEY (name));
mysql> show tables;
+---------------+
| Tables_in_*** |
+---------------+
| ***user |
+---------------+
1 row in set (0.00 sec)
mysql>grant all on *.* to '***'@'localhost' identified by '***123';
mysql>flush privileges;
#为数据库创建管理员用户密码;
3.创建测试用户
[root@gateway ~]
# mysql -u*** -p***123
Welcome to the MySQL monitor. Commands end with ; or \g.
Your MySQL connection
id
is 65
Server version: 5.0.37-log Source distribution
Copyright (c) 2000, 2011, Oracle and
/or
its affiliates. All rights reserved.
Oracle is a registered trademark of Oracle Corporation and
/or
its
affiliates. Other names may be trademarks of their respective
owners.
Type
'help;'
or
'\h'
for
help. Type
'\c'
to
clear
the current input statement.
mysql> insert into ***user (name,password) values(
'user1'
,password(
'123456'
));
mysql> insert into ***user (name,password) values(
'user2'
,password(
'123456'
));
mysql> insert into ***user (name,password) values(
'user3'
,password(
'123456'
));
mysql>
select
* from ***user;
+-------+-------------------------------------------+--------+
| name | password | active |
+-------+-------------------------------------------+--------+
| user1 | *6BB4837EB74329105EE4568DDA7DC67ED2CA2AD9 | 1 |
| user2 | *6BB4837EB74329105EE4568DDA7DC67ED2CA2AD9 | 1 |
| user3 | *6BB4837EB74329105EE4568DDA7DC67ED2CA2AD9 | 1 |
+-------+-------------------------------------------+--------+
3 rows
in
set
(0.00 sec)
注,我这里创建三个测试用户。
4.配置PAM mysql认证模块
[root@gateway ~]
# vim /etc/pam.d/open*** #新建open***文件,用在open***的配置文件中调用
auth required pam_mysql.so user=***
passwd
=***123 host=127.0.0.1 db=*** \
table=***user usercolumn=name passwdcolumn=password \
where=active=1 sqllog=0 crypt=2
account required pam_mysql.so user=***
passwd
=***123 host=127.0.0.1 db=*** \
table=***user usercolumn=name passwdcolumn=password \
where=active=1 sqllog=0 crypt=2
#crypt(0) -- Used to decide to use MySQL's PASSWORD() function or crypt()
#0 = No encryption. Passwords in database in plaintext. NOT recommended!
#1 = Use crypt
#2 = Use MySQL PASSWORD() function
5.测试pam_mysql是否工作正常
[root@gateway ~]
# /etc/init.d/saslauthd start
启动 saslauthd: [确定]
[root@gateway ~]
# chkconfig saslauthd on
[root@gateway ~]
# chkconfig saslauthd --list
saslauthd 0:关闭 1:关闭 2:启用 3:启用 4:启用 5:启用 6:关闭
[root@gateway ~]
# testsaslauthd -u user1 -p 123456 -s open***
0: OK
"Success."
注,如果出现: 0: OK “Success.”, 表示测试成功。如果出现错误可以从系统日志及安全日志里看到出错信息,系统日志: /var/log/messages与安全日志: /var/log/secure。
6.配置Open×××服务器及客户端配置文件
1).增加open***认证模块,模块需要下载源码编译后会生成,再将生成的模块拷贝到/etc/open***目录下
[root@gateway open***]
# cd /etc/open***/
[root@gateway open***]
# ls | grep open***-auth-pam
open***-auth-pam.so
2).修改server.conf配置文件
plugin .
/open***-auth-pam
.so open***
#申明open***使用的插件, open***为插件参数,和pam_mysql的service name是一样的
client-cert-not-required
#不请求客户的CA证书, 使用用户名/密码验证 (本配置中没指定, 使用双重认证, 证书和密码验证)
3).修改客户端配置文件
auth-user-pass #在客户端配置文件中加入中加入这一行,重新启动客户端连接到*** server时就需要输入用户名和密码了。
7.测试连接

四、总结
在yum安装时,由于依赖软件较多,落掉mysql-server没有安装,导致启用mysql服务时失败。。
在第一次进入数据库是没有密码的,我们需要配置一个用户密码用于管理。
在CREATE TABLE ***user创建数据库表格的时候,命令敲错,mysql> CREATE TABLE ***user ( name char(20) NOT NULL, password char(128) default NULL, active int(10) NOT NULL DEFAULT 1, PRIMARY KEY (name));标红的部分未输入,导致后面再测试pam_mysql总是失败。并且查看***user表时,active列均为NULL。
最后配置完成后,用客户端连接时,总是认证失败,最后发现是open***-auth-pam.so版本的问题,Open××× 2.1以上的Open×××的open***-auth-pam.so都会出现验证错误的问题,这里需要我们重新编译一个低版本的,我这里用2.0.7的,大家也可以使用2.0.9版本的。
来源:oschina
链接:https://my.oschina.net/u/4278528/blog/4342667