1. 安装 FastDFS
1.1 安装编译环境
yum install git gcc gcc-c++ make automake vim wget libevent -y
1.2 安装libfastcommon 基础库
#创建目录
mkdir /root/fastdfs
cd /root/fastdfs
#下载 基础库
git clone https://github.com/happyfish100/libfastcommon.git --depth 1
cd libfastcommon/
#编译安装基础库
./make.sh && ./make.sh install
1.3 安装FastDFS
cd /root/fastdfs
#下载 fdfs
wget https://github.com/happyfish100/fastdfs/archive/V5.11.tar.gz
tar -zxvf V5.11.tar.gz
cd fastdfs-5.11
#编译安装 fdfs
./make.sh && ./make.sh install

#配置文件准备(例子转化为具体配置)
cp /etc/fdfs/tracker.conf.sample /etc/fdfs/tracker.conf
cp /etc/fdfs/storage.conf.sample /etc/fdfs/storage.conf
cp /etc/fdfs/client.conf.sample /etc/fdfs/client.conf

#配置文件准备
cp /root/fastdfs/fastdfs-5.11/conf/http.conf /etc/fdfs
cp /root/fastdfs/fastdfs-5.11/conf/mime.types /etc/fdfs
1.4 修改 tracker server 配置
vim /etc/fdfs/tracker.conf
#服务端口   storage 和 client 连接 使用
port=22122
#日志数据目录
base_path=/home/fastdfs
1.5 修改 storage server 配置
vim /etc/fdfs/storage.conf
# storage server 端口设置
port=23000
# 数据和日志文件存储根目录
base_path=/home/fastdfs
# 第一个存储目录
store_path0=/home/fastdfs
#设置  tracker server 服务器端口(可多个)
tracker_server=192.168.211.136:22122
#tracker_server=192.168.211.136:22122
# http访问文件的端口(默认8888,看情况修改,和nginx中保持一致)
http.server_port=8888
1.6 启动
#创建 数据和日志文件存储根目录
mkdir /home/fastdfs -p
#添加权限
chmod -R 777 /home/fastdfs/data/

#启动 tracker server 服务
/usr/bin/fdfs_trackerd /etc/fdfs/tracker.conf restart
#启动 storage server 服务
/usr/bin/fdfs_storaged /etc/fdfs/storage.conf restart
1.7 检查
查看所有运行的端口
netstat -ntlp

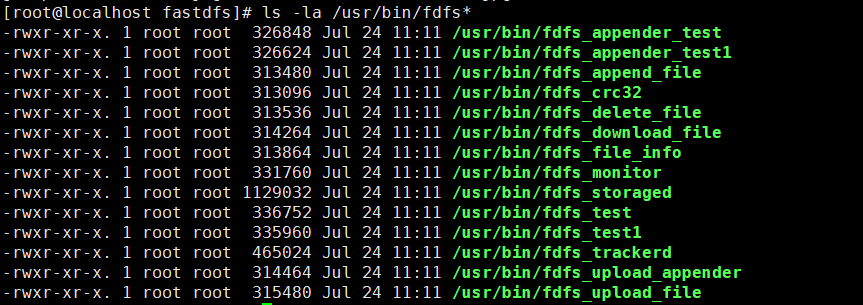
查看 fdfs 可执行命令
ls -la /usr/bin/fdfs*

1.8 修改 client 配置
vim /etc/fdfs/client.conf
#需要修改的内容如下
base_path=/home/fastdfs
#tracker服务器IP和端口
tracker_server=192.168.211.136:22122
#保存后测试,返回ID表示成功 如:group1/M00/
1.9 常用命令
#上传文件
/usr/local/bin/fdfs_upload_file  <config_file> <local_filename>
#下载文件
/usr/local/bin/fdfs_download_file <config_file> <file_id> [local_filename]
#删除文件
/usr/local/bin/fdfs_delete_file <config_file> <file_id>

2. FDFS 添加 ngnix支持
2.1 安装fastdfs-nginx-module
cd /root/fastdfs
#下载  nginx-module
wget https://github.com/happyfish100/fastdfs-nginx-module/archive/V1.20.tar.gz
#解压
tar -xvf V1.20.tar.gz
cd fastdfs-nginx-module-1.20/src
vim config
修改第5 行 和 15 行 修改成
ngx_module_incs="/usr/include/fastdfs /usr/include/fastcommon/"
CORE_INCS="$CORE_INCS /usr/include/fastdfs /usr/include/fastcommon/"
2.2 修改 fastds 模块
# 模块配置
cp mod_fastdfs.conf /etc/fdfs/

vim /etc/fdfs/mod_fastdfs.conf
#需要修改的内容如下
tracker_server=192.168.211.136:22122
url_have_group_name=true
store_path0=/home/fastdfs
2.3 安装 nginx
cd /root/fastdfs
#下载安装 nginx
wget http://nginx.org/download/nginx-1.15.6.tar.gz
tar -zxvf nginx-1.15.6.tar.gz
cd nginx-1.15.6/

yum -y install pcre-devel openssl openssl-devel

# 添加fastdfs-nginx-module模块
./configure --add-module=/root/fastdfs/fastdfs-nginx-module-1.20/src

编译安装
make && make install
查看模块是否安装上
/usr/local/nginx/sbin/nginx -V
2.4 nginx 配置
vim /usr/local/nginx/conf/nginx.conf
#添加如下配置
server {
listen 8888;
server_name localhost;
location ~/group[0-9]/ {
ngx_fastdfs_module;
}
}
启动 nginx
- start nginx:打开 nginx
- nginx -t :测试配置文件是否有语法错误
- nginx -s reopen:重启Nginx
- nginx -s reload:重新加载Nginx配置文件,然后以优雅的方式重启Nginx
- nginx -s stop:强制停止Nginx服务
- nginx -s quit:优雅地停止Nginx服务(即处理完所有请求后再停止服务)
/usr/local/nginx/sbin/nginx
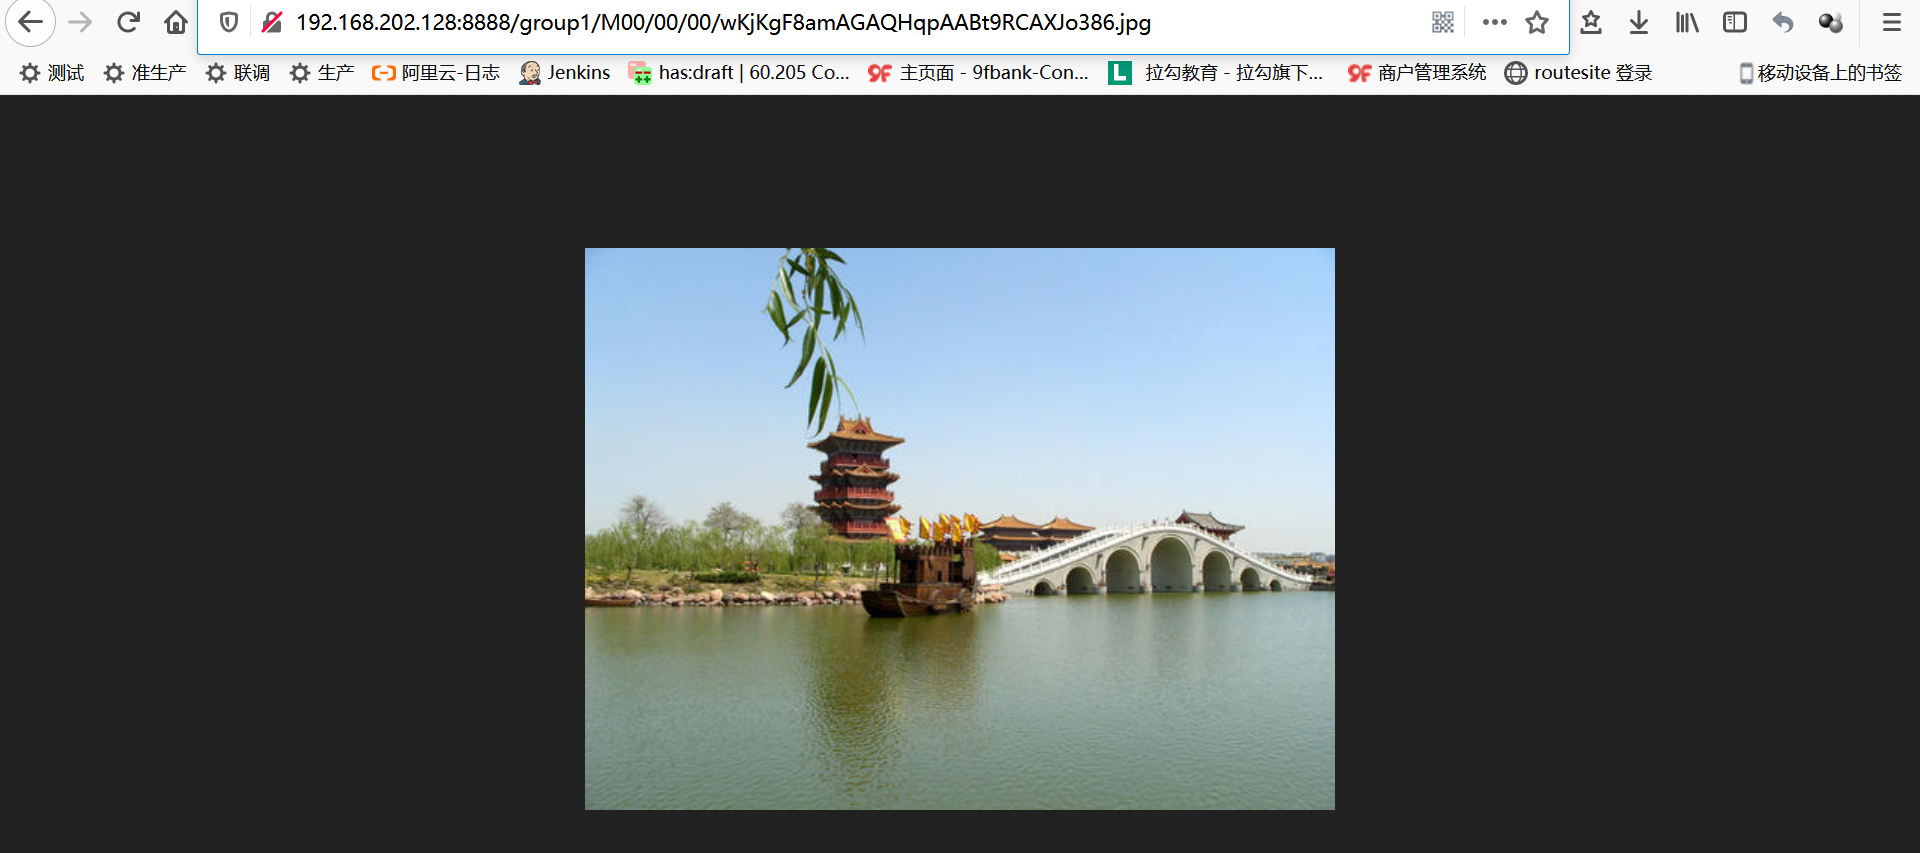
2.5 测试


3. fdfs 动态图片
3.1 lua
3.1.1 安装 lua
cd /root/fastdfs
#获取安装 luaJIT
wget http://luajit.org/download/LuaJIT-2.0.4.tar.gz
tar -zxvf LuaJIT-2.0.4.tar.gz
cd LuaJIT-2.0.4
#编译
make && make install

#获取安装 ngx_devel_kit  lua-nginx-module
wget https://github.com/simpl/ngx_devel_kit/archive/v0.2.18.tar.gz
tar -zxvf v0.8.10.tar.gz

wget https://github.com/openresty/lua-nginx-module/archive/v0.8.10.tar.gz
tar -zxvf v0.8.10.tar.gz

#查看 lua 安装目录 和 命令
ls /usr/local/lib
ls /usr/local/include/

#设置 环境变量 ,
#直接运行下列命令(终端关闭失效) 或者  vim /etc/profile 添加一下命令 source /etc/profile 重启!永久生效
export LUAJIT_LIB=/usr/local/lib
export LUAJIT_INC=/usr/local/include/luajit-2.0
#创建软连接 防止 nginx 启动 报错 找不到 libluajit-5.1.so.2
ln -s /usr/local/lib/libluajit-5.1.so.2 /lib64/libluajit-5.1.so.2
3.1.2 nginx 配置 lua
cd /root/fastdfs/nginx-1.15.6
./configure --prefix=/usr/local/nginx
--add-module=/root/fastdfs/ngx_devel_kit-0.2.18
--add-module=/root/fastdfs/lua-nginx-module-0.8.10
--add-module=/root/fastdfs/fastdfs-nginx-module-1.20/src

#重新编译 nginx
make -j2 make install

#查看模块是否安装上
/usr/local/nginx/sbin/nginx -V
参数说明:
./configure --prefix=/etc/nginx #nginx的安装路径
--add-module=/root/fastdfs/ngx_devel_kit-0.2.18 \#ngx_devel_kit 的源码路径
--add-module=/root/fastdfs/lua-nginx-module-0.8.10 #nginx_lua_module 的源码路径

3.1.3 测试 lua
#添加
vim  /usr/local/nginx/conf/nginx.conf
#添加
location /lua {
  default_type 'text/plain';
  content_by_lua 'ngx.say("hello, lua")';
}

3.2 graphicsmagick
3.2.1 安装
cd /root/fastdfs
#获取 graphicsmagick
wget https://master.dl.sourceforge.net/project/graphicsmagick/graphicsmagick-history/1.3/GraphicsMagick-1.3.18.tar.gz
tar -zxvf GraphicsMagick-1.3.18.tar.gz
cd GraphicsMagick-1.3.18/
#运行配置
./configure --prefix=/usr/local/GraphicsMagick --enable-shared
#编译 安装
make && make install
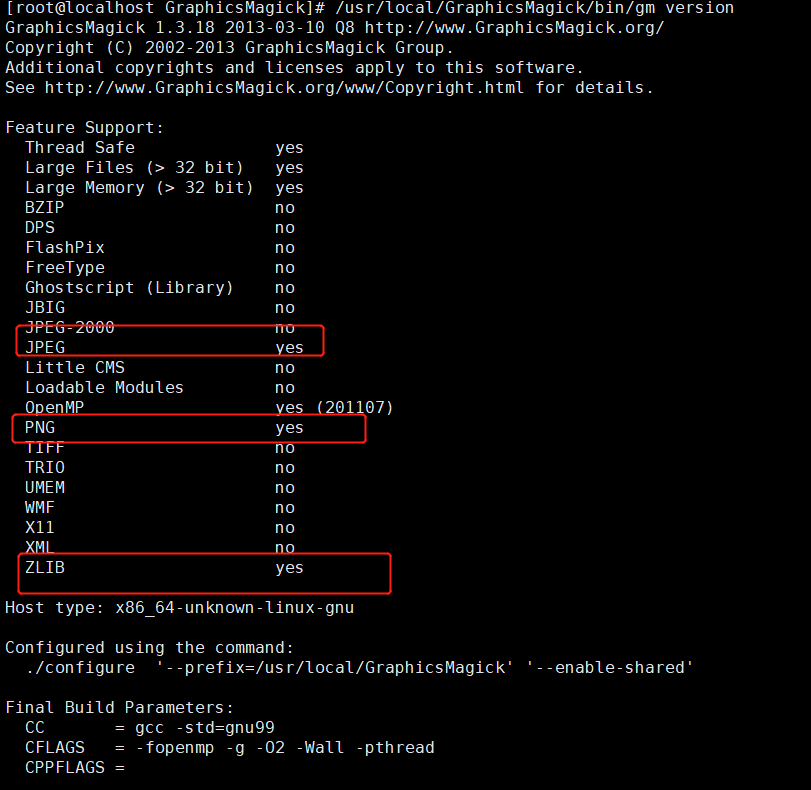
#查看 GraphicsMagick 版本和支持
/usr/local/GraphicsMagick/bin/gm version

3.2.2 测试
#使用 GraphicsMagick 将 图片 1.jpg 转化 未 thumb.jpg
/usr/local/GraphicsMagick/bin/gm  convert -resize 100x80^ -gravity Center -crop 100x80+0+0 1.jpg thumb.jpg
问题: no decode delegate for this image format。 查看配置 是否支持 jpg,png
yum -y install libjpeg libjpeg-devel libpng libpng-devel
3.3 nginx-lua-fastdfs-GraphicsMagick
3.3.1 添加 nginx-lua-fastdfs-GraphicsMagick
#获取 nginx-lua-fastdfs-GraphicsMagick
git clone https://github.com/hpxl/nginx-lua-fastdfs-GraphicsMagick.git
cd nginx-lua-fastdfs-GraphicsMagick/lua
#将 lua配置文件 移动到 nginx
cp ./* /usr/local/nginx/conf/lua

#修改配置
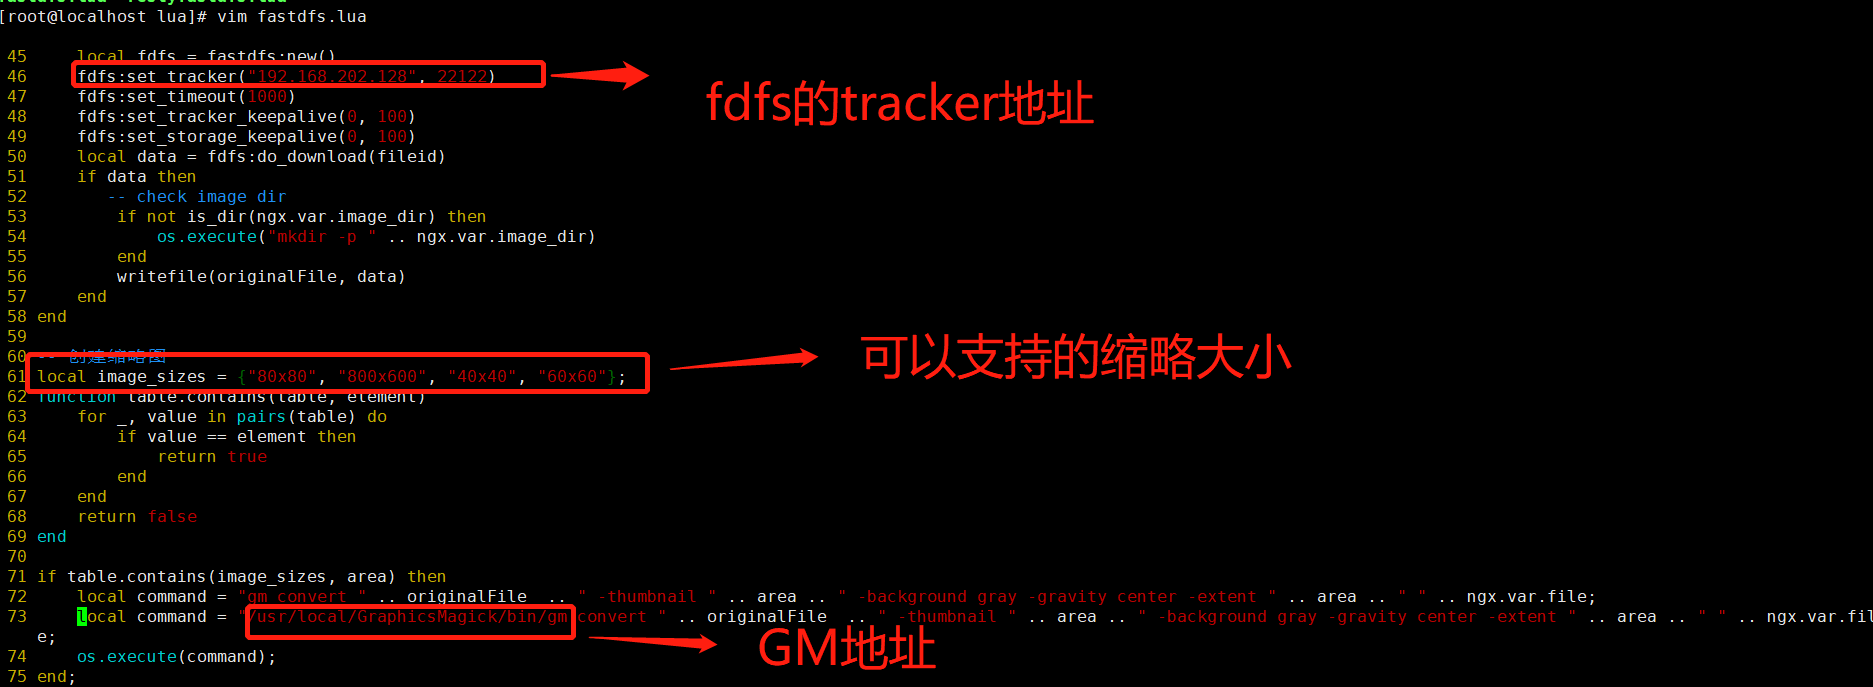
vim /usr/local/nginx/conf/lua/fastdfs.lua

#在46行
fdfs:set_tracker("你的ip", 22122)
#在72行
local command = "/usr/local/GraphicsMagick/bin/gm convert " .. originalFile  .. " -thumbnail " .. area .. " -background gray -gravity center -extent " .. area .. " " .. ngx.var.file;

3.3.2 配置 ngnix
vim /usr/local/nginx/conf/nginx.conf

location /group1/M00 {
   alias /home/fastdfs/data;
   set $image_root "/home/fastdfs/data";
   if ($uri ~ "/([a-zA-Z0-9]+)/([a-zA-Z0-9]+)/([a-zA-Z0-9]+)/([a-zA-Z0-9]+)/(.*)") {
       set $image_dir "$image_root/$3/$4/";
       set $image_name "$5";
       set $file "$image_dir$image_name";
   }
   if (!-f $file) {
       content_by_lua_file /usr/local/nginx/conf/lua/fastdfs.lua ;
   }
   ngx_fastdfs_module;
}

3.3.3. 启动
/usr/local/nginx/sbin/nginx
3.4 效果
原图

800x600 图片

4. 拓展
其他配置
server {
      listen 8888;
      server_name localhost;


      set $img_thumbnail_root /home/fastdfs/data; #缩略图保存的根目录
      set $img_file $img_thumbnail_root$uri;   #缩略图路径

      location /lua {
	    default_type 'text/plain';
	    content_by_lua 'ngx.say("hello, lua")';
      }

      # like:/xx/xx/xx.jpg_100-.jpg or /xx/xx/xx.jpg_-100.jpg
      location ~* ^(\/(\w+)(\/M00)(.+\.(jpg|jpeg|gif|png)))_((\d+\-)|(\-\d+))\.(jpg|jpeg|gif|png)$ {
        root $img_thumbnail_root;    # root path for croped img
          set $fdfs_group_root /home/fastdfs/data; #图片存放目录
          if (!-f $img_file) {    # if thumb file not exists
                  add_header X-Powered-By 'Nginx+Lua+GraphicsMagick By Yanue';  #  header for test
                  add_header file-path $request_filename;    #  header for test
                  set $request_filepath $fdfs_group_root$4;    # origin_img full path:/document_root/1.gif
                  set $img_size $6;    # img width or height size depends on uri : img size like "-100" or "100-", "-" means auto size
                  set $img_ext $5;    # file ext
                  content_by_lua_file /usr/local/nginx/conf/lua/autoSize.lua;    # load auto width or height crop Lua file
          }
      }

      # like:/pic/M00/xx/xx/xx.jpg_200x100.jpg
      location ~* ^(\/(\w+)(\/M00)(.+\.(jpg|jpeg|gif|png))_(\d+)+x(\d+)+\.(jpg|jpeg|gif|png))$ {
          root $img_thumbnail_root;    # root path for croped img
          set $fdfs_group_root /home/fastdfs/data; #set fastdfs group path $2

          if (!-f $img_file) {   # if thumb file not exists
                  add_header X-Powered-By 'Nginx+Lua+GraphicsMagick By Yanue';  #  header for test
                  add_header file-path $request_filename;    #  header for test
                  set $request_filepath $fdfs_group_root$4;    # real file path
                  set $img_width $6;    #  img width
                  set $img_height $7;    #  img height
                  set $img_ext $5;     # file ext
                  content_by_lua_file /usr/local/nginx/conf/lua/cropSize.lua;    # load crop Lua file
          }
      }

      location ~/group[0-9]/ {
        ngx_fastdfs_module;
      }

    }
corpSize.lua
-- 根据输入长和宽的尺寸裁切图片

--GM 路径
local gm_path = '/usr/local/GraphicsMagick/bin/gm'

-- 检测路径是否目录
local function is_dir(sPath)
    if type(sPath) ~= "string" then return false end

    local response = os.execute("cd " .. sPath)
    if response == 0 then
        return true
    end
    return false
end

-- 文件是否存在
function file_exists(name)
    local f = io.open(name, "r")
    if f ~= nil then io.close(f) return true else return false end
end

-- 获取文件路径
function getFileDir(filename)
    return string.match(filename, "(.+)/[^/]*%.%w+$") --*nix system
end

-- 获取文件名
function strippath(filename)
    return string.match(filename, ".+/([^/]*%.%w+)$") -- *nix system
end

--去除扩展名
function stripextension(filename)
    local idx = filename:match(".+()%.%w+$")
    if (idx) then
        return filename:sub(1, idx - 1)
    else
        return filename
    end
end

--获取扩展名
function getExtension(filename)
    return filename:match(".+%.(%w+)$")
end

-- 开始执行
-- ngx.log(ngx.ERR, getFileDir(ngx.var.img_file));

-- check image dir
if not is_dir(getFileDir(ngx.var.img_file)) then
    os.execute("mkdir -p " .. getFileDir(ngx.var.img_file))
end

    ngx.log(ngx.ERR,ngx.var.img_file);
    ngx.log(ngx.ERR,ngx.var.request_filepath);
-- 裁剪后保证等比缩图 (缺点:裁剪了图片的一部分)
-- gm convert input.jpg -thumbnail "100x100^" -gravity center -extent 100x100 output_3.jpg
if (file_exists(ngx.var.request_filepath)) then
    local cmd = gm_path .. ' convert ' .. ngx.var.request_filepath
    cmd = cmd .. " -thumbnail " .. ngx.var.img_width .. "x" .. ngx.var.img_height .. "^"
    cmd = cmd .. " -gravity center -extent " .. ngx.var.img_width .. "x" .. ngx.var.img_height
--  cmd = cmd .. " -quality 100"
    cmd = cmd .. " +profile \"*\" " .. ngx.var.img_file;
--  ngx.log(ngx.ERR, cmd);
    os.execute(cmd);
    ngx.exec(ngx.var.uri);
else
    ngx.exit(ngx.HTTP_NOT_FOUND);
end
autoSize.lua
-- 根据输入长或宽的尺寸自动裁切图片大小

--设置 GM 路径
local gm_path = '/usr/local/GraphicsMagick/bin/gm'

-- 检测路径是否目录
local function is_dir(sPath)
    if type(sPath) ~= "string" then return false end

    local response = os.execute("cd " .. sPath)
    if response == 0 then
        return true
    end
    return false
end

-- 文件是否存在
function file_exists(name)
    local f = io.open(name, "r")
    if f ~= nil then io.close(f) return true else return false end
end

-- 获取文件路径
function getFileDir(filename)
    return string.match(filename, "(.+)/[^/]*%.%w+$") --*nix system
end

-- 获取文件名
function strippath(filename)
    return string.match(filename, ".+/([^/]*%.%w+)$") -- *nix system
end

--去除扩展名
function stripextension(filename)
    local idx = filename:match(".+()%.%w+$")
    if (idx) then
        return filename:sub(1, idx - 1)
    else
        return filename
    end
end

--获取扩展名
function getExtension(filename)
    return filename:match(".+%.(%w+)$")
end

function getImgSize(img)

end

-- 开始执行
-- ngx.log(ngx.ERR, getFileDir(ngx.var.img_file));

-- check image dir
if not is_dir(getFileDir(ngx.var.img_file)) then
    os.execute("mkdir -p " .. getFileDir(ngx.var.img_file))
end

-- 获取高宽 100!或!100模式
local uri = ngx.var.img_size
local width = string.sub(uri,1,1)
local height = 0

if width == "-" then
  width = 0
  height = string.sub(uri,2,string.len(uri))
else
  width = string.sub(uri,1,string.len(uri)-1)
  height = 0
end
ngx.log(ngx.ERR,uri)
ngx.log(ngx.ERR,width)
ngx.log(ngx.ERR,height)
    ngx.log(ngx.ERR,ngx.var.img_file);
    ngx.log(ngx.ERR,ngx.var.request_filepath);
-- 裁剪后保证等比缩图 (缺点:裁剪了图片的一部分)
-- gm convert input.jpg -thumbnail "100x100^" -gravity center -extent 100x100 output_3.jpg
if (file_exists(ngx.var.request_filepath)) then
    local cmd = gm_path .. ' convert ' .. ngx.var.request_filepath
    if height == 0 then
        cmd = cmd .. " -resize " .. width .. "x" ..  ""
    else
        cmd = cmd .. " -resize " .. "x" .. height .. ""
    end

    cmd = cmd .. " +profile \"*\" " .. ngx.var.img_file;
    ngx.log(ngx.ERR, cmd);
    os.execute(cmd);
    ngx.exec(ngx.var.uri);
else
    ngx.exit(ngx.HTTP_NOT_FOUND);
end
以上配置也可以
5. 集群配置
5.1 描述
| 192.168.202.128 | 192.168.202.129 | 192.168.202.131 |
| tracker | tracker | tracker |
| storage(group1) | storage(group1) | storage(group2) |
| nginx | nginx | nginx |
5.2 配置
先按照单机配置完成,如果以下面文档进行配置 。三台相同
5.2.1 配置tracker集群
vi /etc/fdfs/tracker.conf
5.2.2 配置storage集群
vi /etc/fdfs/storage.conf

tracker_server=192.168.202.128:22122
tracker_server=192.168.202.129:22122
tracker_server=192.168.202.131:22122
group_name=group1 #注意组名 192.168.202.131 配置是 group2
port=23000 #storage 的端口号,同一个组的 storage 端口号必须相同
重启服务
/usr/bin/fdfs_trackerd /etc/fdfs/tracker.conf restart
/usr/bin/fdfs_storaged /etc/fdfs/storage.conf restart
5.2.3 查看storage的日志 查看tracker集群信息
cat /home/fastdfs/logs/storaged.log
访问FastDFS时 可以把Tracker 理解成对等的,但实际底层多个Tracker时在运行过程中会选择其中一个作为Leader,由该Leader执行一些唯一性的操作。在早期版本中Tracker-Leader有两个作用,分别是:为新加入的Storage分配一个源Storage;为开启合并存储的Group选择Trunk-Server。但是在最新的版本中实际上只有第二个作用,也就是选择Trunk-Server。查看之后 如果连接不上 注意防火墙。
systemctl stop firewalld
5.2.4 查看存储集群信息
/usr/bin/fdfs_monitor /etc/fdfs/storage.conf
5.2.5 配置 client
vim /etc/fdfs/client.conf
tracker_server=192.168.202.128:22122
tracker_server=192.168.202.129:22122
tracker_server=192.168.202.131:22122
5.2.6 使用Nginx 和 FastDFS集群结合
vi /etc/fdfs/mod_fastdfs.conf
tracker_server=192.168.211.130:22122
tracker_server=192.168.211.136:22122
tracker_server=192.168.211.135:22122
group_name=group1 #注意组名 如果是group2 则一定要改
5.2.7 测试
与单机相同
来源:oschina
链接:https://my.oschina.net/u/943316/blog/4436144