以下内容主要来自于:
1.1 前言
GitBook是一款文档编辑工具。它的功能类似金山WPS中的Word或者微软Office中的Word的文档编辑工具。它可以用来写文档、建表格、插图片、生成pdf。 当然,以上的功能WPS、Office可能做得更好,但是,GitBook还有更最强大的功能:它可以用文档建立一个网站,让更多人了解你写的书,另外,最最核心的是,他支持Git,也就意味着,它是一个分布式的文档编辑工具。 你可以随时随地来编写你的文档,也可以多人共同编写文档,哪怕多人编写同一页文档,它也能记录每个人的内容,然后告诉你他们之间的区别,也能记录你的每一次改动,你可以查看每一次的书写记录和变化,哪怕你将文档都删除了,它也能找回来! 这就是它继承Git后的厉害之处!
分布式、多人协同的全新书写方式!
在GitBook中,你可以使用Markdown或者AsciiDoc语法,加上几个命令就能创建一本漂亮的图书。这种便利就像Node.js一样。GitBook支持GitHub或者git来管理文章的改动和版本。你可以参考这个例子:ReduxJS documentation Or WebMagic Java爬虫文档.
你可以在自己电脑上使用GitBook来写一本书,也可以通过 GitBook.com 线方式写一本书。 还可以在自己电脑上安装桌面版的GitBook编辑器.
你可以加入 GitBook社区也可以在推特账号@GitBookIO 或脸谱账号GitBook 中获取我们的最新进展或者留言。
以下主要记录GitBook的安装配置以及一些插件信息, 下面是GitBook的一些资源
1.2 GitBook安装
下面介绍在本地如何安装 GitBook,如果不需要本地调试 & 不需要获得生成的 html 文件,可以直接使用 官网 提供的服务。
环境要求
- NodeJS(v4.0.0及以上)
通过NPM安装
运行下面的命令进行安装
npm install gitbook-cli -g
其中gitbook-cli是gitbook的一个命令行工具, 通过它可以在电脑上安装和管理gitbook的多个版本.
编辑书籍
gitbook 官方已经提供了一个本地的编辑器, 使用它可以方便的编写书籍(不需要手动的写SUMMARY.md), 并且支持windows、mac、linux 三种平台, 所以强烈建议使用编辑器编写书籍.
预览书籍
使用下列命令会运行一个服务器, 通过http://localhost:4000/可以预览书籍
gitbook serve
运行该命令后会在书籍的文件夹中生成一个 _book 文件夹, 里面的内容即为生成的 html 文件. 我们可以使用下面命令来生成网页而不开启服务器
gitbook build
1.3 命令
这里主要介绍一下 GitBook 的命令行工具 gitbook-cli 的一些命令, 首先说明两点:
gitbook-cli和gitbook是两个软件gitbook-cli会将下载的 gitbook 的不同版本放到~/.gitbook中, 可以通过设置GITBOOK_DIR环境变量来指定另外的文件夹
列出gitbook所有的命令
gitbook help
输出gitbook-cli的帮助信息
gitbook --help
生成静态网页
gitbook build
生成静态网页并运行服务器
gitbook serve
生成时指定gitbook的版本, 本地没有会先下载
gitbook build --gitbook=2.0.1
列出本地所有的gitbook版本
gitbook ls
列出远程可用的gitbook版本
gitbook ls-remote
安装对应的gitbook版本
gitbook fetch 标签/版本号
更新到gitbook的最新版本
gitbook update
卸载对应的gitbook版本
gitbook uninstall 2.0.1
指定log的级别
gitbook build --log=debug
输出错误信息
gitbook builid --debug
1.4 目录结构
GitBook 基本的目录结构如下所示
.
├── book.json
├── README.md
├── SUMMARY.md
├── chapter-1/
|   ├── README.md
|   └── something.md
└── chapter-2/
    ├── README.md
    └── something.md
这里主要讲下 GitBook 预定义的几个文件的作用
book.json
存放配置信息,在下一章中所讲的配置信息都是在这个文件里定义的,关于该文件的配置可以看 配置 这个章节。
Summary
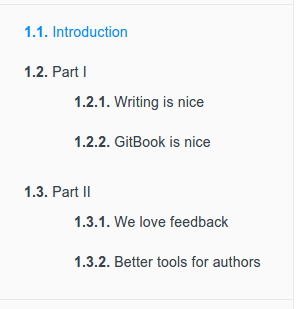
概要文件主要存放 GitBook 的文件目录信息,左侧的目录就是根据这个文件来生成的,默认对应的文件是 SUMMARY.md,可以在 book.json 重新定义该文件的对应值。它通过 Markdown 中的列表语法来表示文件的父子关系,下面是一个简单的示例:
# Summary
* [Introduction](README.md)
* [Part I](part1/README.md)
    * [Writing is nice](part1/writing.md)
    * [GitBook is nice](part1/gitbook.md)
* [Part II](part2/README.md)
    * [We love feedback](part2/feedback_please.md)
    * [Better tools for authors](part2/better_tools.md)
这个配置对应的目录结构如下所示:

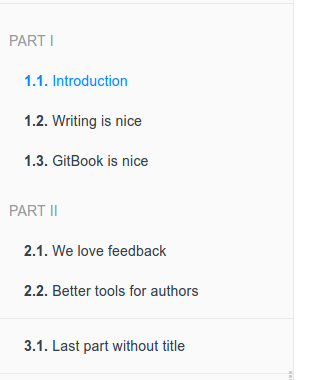
我们通过使用 标题 或者 水平分割线 标志将 GitBook 分为几个不同的部分
# Summary

### Part I

* [Introduction](README.md)
* [Writing is nice](part1/writing.md)
* [GitBook is nice](part1/gitbook.md)

### Part II

* [We love feedback](part2/feedback_please.md)
* [Better tools for authors](part2/better_tools.md)

----

* [Last part without title](part3/title.md)
这个配置对应的目录结构如下所示:

Glossary
词汇表文件,默认对应的文件是 GLOSSARY.md。该文件主要存储词汇信息,如果在其他页面中出现了该文件中的词汇,鼠标放到词汇上会给出词汇示意,可以将鼠标移到下面两个词汇上看下效果。
Glossary 文件的格式如下所示:
## Git
分散式版本控制软件

## Markdown
Aaron Swartz 跟John Gruber共同设计的排版语言
1.5 GitBook配置
记录Gitbook的一些配置信息
- title - 标题
- author - 作者信息
- description - 书本描述
- language - 使用的语言
- gitbook - 指定gitbook版本
- root - 指定存放 GitBook 文件的根目录
- links - 在侧边栏添加链接
- styles - 自定义样式
- plugins - 插件
- pluginsConfig - 插件配置
- structure - 设置 Readme, Summary, Glossary等对应的文件
title
设置书本的标题
"title" : "Gitbook Use"
author
作者的相关信息
"author" : "zhangjikai"
description
本书的简单描述
"description" : "记录Gitbook的配置和一些插件的使用"
language
Gitbook使用的语言, 版本2.6.4中可选的语言如下:
en, ar, bn, cs, de, en, es, fa, fi, fr, he, it, ja, ko, no, pl, pt, ro, ru, sv, uk, vi, zh-hans, zh-tw
配置使用简体中文
"language" : "zh-hans",
gitbook
指定使用的gitbook版本
"gitbook" : "3.2.2",
"gitbook" : ">=3.0.0"
root
指定存放 GitBook 文件(除了 book.json)的根目录
"root": "."
links
在左侧导航栏添加链接信息
"links" : {
    "sidebar" : {
        "Home" : "http://zhangjikai.com"
    }
}
styles
自定义页面样式, 默认情况下各generator对应的css文件
"styles": {
    "website": "styles/website.css",
    "ebook": "styles/ebook.css",
    "pdf": "styles/pdf.css",
    "mobi": "styles/mobi.css",
    "epub": "styles/epub.css"
}
例如使<h1> </h1><h2>标签有下边框, 可以在website.css中设置
h1 , h2{
    border-bottom: 1px solid #EFEAEA;
}
plugins
配置使用的插件
"plugins": [
    "disqus"
]
添加新插件之后需要运行gitbook install来安装新的插件
Gitbook默认带有5个插件:
- highlight
- search
- sharing
- font-settings
- livereload
如果要去除自带的插件, 可以在插件名称前面加-
"plugins": [
    "-search"
]
pluginsConfig
配置插件的属性
"pluginsConfig": {
    "fontsettings": {
        "theme": "sepia",
        "family": "serif",
        "size":  1
    }
}
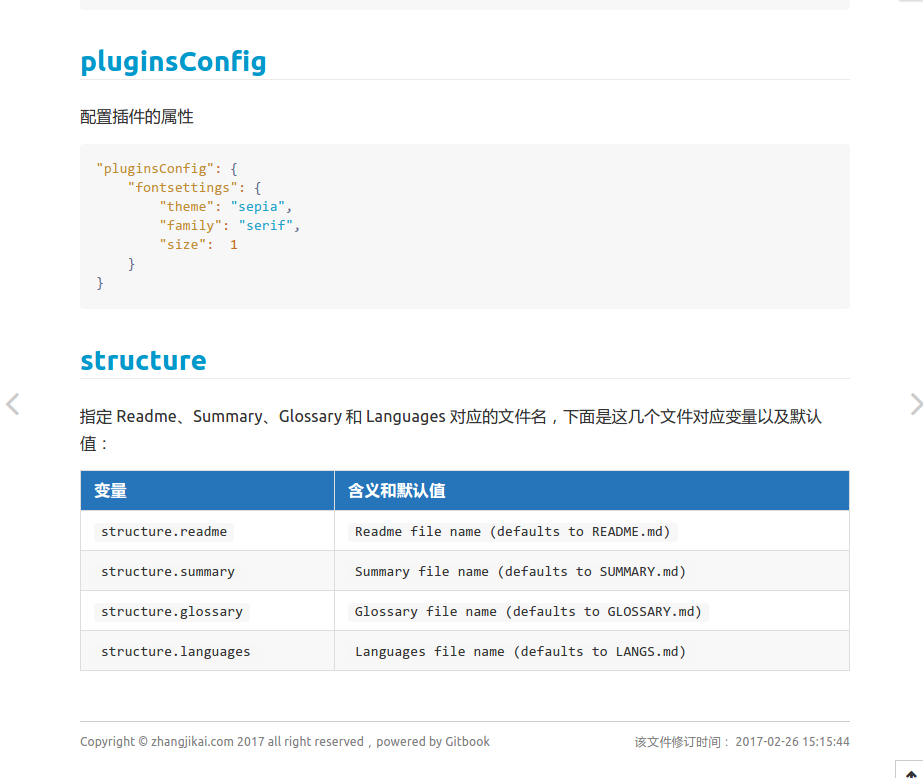
structure
指定 Readme、Summary、Glossary 和 Languages 对应的文件名,下面是这几个文件对应变量以及默认值:
| 变量 | 含义和默认值 |
|---|---|
structure.readme |
Readme file name (defaults to README.md) |
structure.summary |
Summary file name (defaults to SUMMARY.md) |
structure.glossary |
Glossary file name (defaults to GLOSSARY.md) |
structure.languages |
Languages file name (defaults to LANGS.md) |
1.6 GitBook 插件
记录一些实用的插件, 如果要指定插件的版本可以使用 plugin@0.3.1。下面的插件在 GitBook 的 3.2.3 版本中可以正常工作,因为一些插件可能不会随着 GitBook 版本的升级而升级,即下面的插件可能不适用高版本的 GitBook,所以这里指定了 GitBook 的版本。另外本文记录的插件在 Linux 下都是可以正确工作的,windows 系统没有测试。这里只是列举了一部分插件,如果有其它的需求,可以到 插件官网 区搜索相关插件。
- Disqus - Disqus 评论
- Search Plus - 支持中文搜索
- Prsim - 使用 Prism.js 高亮代码
- Advanced Emoji - 支持 emoji 表情
- Github - 添加github图标
- Github Buttons - 添加项目在 Github 上的 star、fork、watch 信息
- Ace Plugin - 支持ace
- Emphasize - 为文字加上底色
- KaTex - 支持数学公式
- Include Codeblock - 用代码块显示包含文件的内容
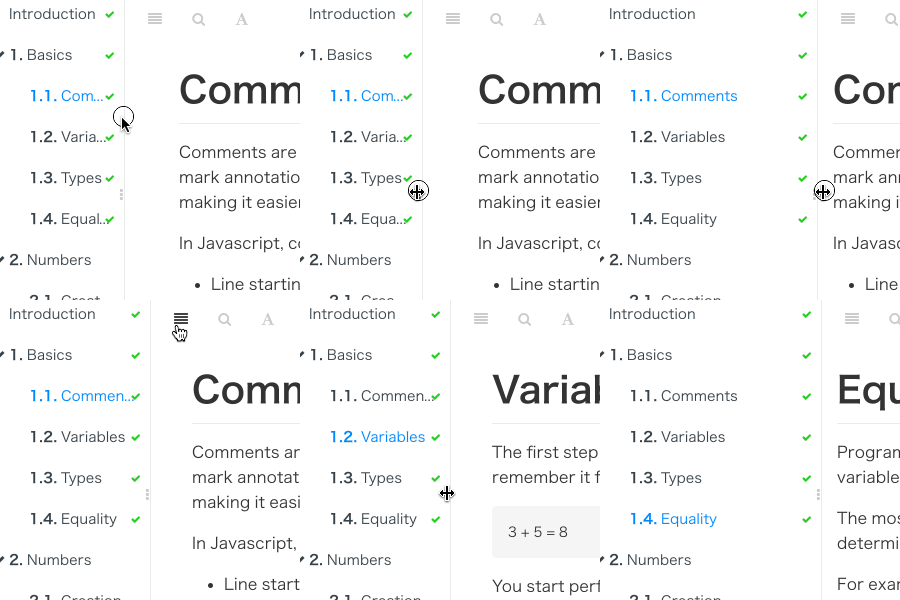
- Splitter - 使侧边栏的宽度可以自由调节
- Mermaid-gb3 - 支持渲染 Mermaid 图表
- Puml - 支持渲染 uml 图
- Graph - 使用 function-plot 绘制数学函数图
- Chart - 绘制图形
- Sharing-plus - 分享当前页面
- Tbfed-pagefooter - 为页面添加页脚
- Expandable-chapters-small - 使左侧的章节目录可以折叠
- Sectionx - 将页面分块显示
- GA - Google 统计
- 3-ba - 百度统计
- Donate - 打赏插件
- Local Video - 使用 Video.js 播放本地视频
- Simple-page-toc - 自动生成本页的目录结构
- Anchors - 添加 Github 风格的锚点
- Anchor-navigation-ex - 添加Toc到侧边悬浮导航以及回到顶部按钮
- Edit Link - 链接到当前页源文件上
- Sitemap-general - 生成sitemap
- Favicon - 更改网站的 favicon.ico
- Todo - 添加 Todo 功能
- Terminal - 模拟终端样式
- Copy-code-button - 为代码块添加复制按钮
- Alerts - 添加不同 alerts 样式的 blockquotes
- Include-csv - 显示 csv 文件内容
- Musicxml - 支持 musicxml 格式的乐谱渲染
- Klipse - 集成 Kplise (online code evaluator)
- Versions-select - 添加版本选择的下拉菜单
- Rss - 添加 rss 订阅功能
Disqus
添加disqus评论
"plugins": [
    "disqus"
],
"pluginsConfig": {
    "disqus": {
        "shortName": "gitbookuse"
    }
}
Search Plus
支持中文搜索, 需要将默认的 search 和 lunr 插件去掉。
{
    "plugins": ["-lunr", "-search", "search-plus"]
}
Prism
使用 Prism.js 为语法添加高亮显示,需要将 highlight 插件去掉。该插件自带的主题样式较少,可以再安装 prism-themes 插件,里面多提供了几种样式,具体的样式可以参考 这里,在设置样式时要注意设置 css 文件名,而不是样式名。
{
    "plugins": [
        "prism",
        "-highlight"
    ],
    "pluginsConfig": {
        "prism": {
            "css": [
                "prism-themes/themes/prism-base16-ateliersulphurpool.light.css"
            ]
        }
    }
}
如果需要修改背景色、字体大小等,可以在 website.css 定义 pre[class*="language-"] 类来修改,下面是一个示例:
pre[class*="language-"] {
    border: none;
    background-color: #f7f7f7;
    font-size: 1em;
    line-height: 1.2em;
}
Advanced Emoji
支持emoji表情
"plugins": [
    "advanced-emoji"
]
使用示例:


Github
添加github图标
"plugins": [
    "github"
],
"pluginsConfig": {
    "github": {
        "url": "https://github.com/zhangjikai"
    }
}
Github Buttons
添加项目在 github 上的 star,watch,fork情况
{
    "plugins": [
        "github-buttons"
    ],
    "pluginsConfig": {
        "github-buttons": {
            "repo": "zhangjikai/gitbook-use",
            "types": [
                "star",
                "watch",
                "fork"
            ],
            "size": "small"
        }
    }
}
Ace Plugin
使 GitBook 支持ace 。默认情况下,line-height 为 1,会使代码显得比较挤,而作者好像没提供修改行高的选项,如果需要修改行高,可以到 node_modules -> github-plugin-ace -> assets -> ace.js 中加入下面两行代码 (30 行左右的位置):
editor.container.style.lineHeight = 1.25;
editor.renderer.updateFontSize();
不过上面的做法有个问题就是,每次使用 gitbook install 安装新的插件之后,代码又会重置为原来的样子。另外可以在 website.css 中加入下面的 css 代码来指定 ace 字体的大小
.aceCode {
  font-size: 14px !important;
}
使用插件:
"plugins": [
    "ace"
]
使用示例:
// This is a hello world program for C.
#include <stdio.h>

int main(){
  printf("Hello World!");
  return 1;
}
Emphasize
为文字加上底色
"plugins": [
    "emphasize"
]
使用示例:
This text is highlighted !
This text is highlighted with markdown!
This text is highlighted in green!
This text is highlighted in red!
This text is highlighted with a custom color!
KaTex
为了支持数学公式, 我们可以使用KaTex和MathJax插件, 官网上说Katex速度要快于MathJax
"plugins": [
    "katex"
]
使用示例:
When a \ne 0a≠0, there are two solutions to (ax^2 + bx + c = 0)(ax2+bx+c=0) and they are x = {-b \pm \sqrt{b^2-4ac} \over 2a}.x=2a−b±√b2−4ac.
\int_{-\infty}^\infty g(x) dx∫−∞∞g(x)dx
1 \over 331
Include Codeblock
使用代码块的格式显示所包含文件的内容. 该文件必须存在。插件提供了一些配置,可以区插件官网查看。如果同时使用 ace 和本插件,本插件要在 ace 插件前面加载。
{
    "plugins": [
        "include-codeblock"
    ],
    "pluginsConfig": {
        "include-codeblock": {
            "template": "ace",
            "unindent": "true",
            "theme": "monokai"
        }
    }
}
使用示例:
/* CSS for website */
h1 , h2{
    border-bottom: 1px solid #EFEAEA;
    padding-bottom: 3px;
}
.markdown-section>:first-child {
    margin-top: 0!important;
}
.page-wrapper {
    margin-top: -1.275em;
}
.book .book-body .page-wrapper .page-inner section.normal {
    min-height:350px;
    margin-bottom: 30px;
}

.book .book-body .page-wrapper .page-inner section.normal hr {
    height: 0px;
    padding: 0;
    margin: 1.7em 0;
    overflow: hidden;
    background-color: #e7e7e7;
    border-bottom: 1px dotted #e7e7e7;
}

.video-js {
    width:100%;
    height: 100%;
}

pre[class*="language-"] {
    border: none;
    background-color: #f7f7f7;
    font-size: 1em;
    line-height: 1.2em;
}

.book .book-body .page-wrapper .page-inner section.normal {
    font-size: 16px;
    font-family:  "ubuntu", "Tahoma", "Microsoft YaHei", arial, sans-serif;
}

.aceCode {
  font-size: 14px !important;
}

input[type=checkbox]{
    margin-left: -2em;
}

.page-footer span{
    font-size: 12px;
}

.page-footer .copyright {
    float: left;
}

.body, html {
    overflow-y: hidden;
}

.versions-select select {
    height: 2em;
    line-height: 2em;
    border-radius: 4px;
    background: #efefef;
}
Splitter
使侧边栏的宽度可以自由调节

"plugins": [
    "splitter"
]
Mermaid-gb3
"plugins": [
    "mermaid-gb3"
]
使用示例:
ABCD
Puml
使用 PlantUML 展示 uml 图。
{
    "plugins": ["puml"]
}
使用示例:
{% plantuml %}
Class Stage
    Class Timeout {
        +constructor:function(cfg)
        +timeout:function(ctx)
        +overdue:function(ctx)
        +stage: Stage
    }
    Stage <|-- Timeout
{% endplantuml %}
效果如下所示:
Graph
使用 function-plot 绘制数学函数图。
{
    "plugins": [ "graph" ],
}
下面是一个示例,需要注意的是 {% graph %} 块中的内容必须是合法的 JSON 格式。
{% graph %}
{
    "title": "1/x * cos(1/x)",
    "grid": true,
    "xAxis": {
        "domain": [0.01, 1]
    },
    "yAxis": {
        "domain": [-100, 100]
    },
    "data": [{
        "fn": "1/x * cos(1/x)",
        "closed": true
    }]
}
{% endgraph %}
效果如下所示:
1/x * cos(1/x)0.10.20.30.40.50.60.70.80.91-100-80-60-40-20020406080100
Chart
使用 C3.js 或者 Highcharts 绘制图形。
{
    "plugins": [ "chart" ],
    "pluginsConfig": {
        "chart": {
            "type": "c3"
        }
    }
}
type 可以是 c3 或者 highcharts, 默认是 c3.
下面是一个示例:
{% chart %}
{
    "data": {
        "type": "bar",
        "columns": [
            ["data1", 30, 200, 100, 400, 150, 250],
            ["data2", 50, 20, 10, 40, 15, 25]
        ],
        "axes": {
            "data2": "y2"
        }
    },
    "axis": {
        "y2": {
            "show": true
        }
    }
}
{% endchart %}
效果如下所示:
0123450501001502002503003504000510152025303540455055data1data2
Sharing-plus
分享当前页面,比默认的 sharing 插件多了一些分享方式。
plugins: ["-sharing", "sharing-plus"]
配置:
"pluginsConfig": {
    "sharing": {
       "douban": false,
       "facebook": false,
       "google": true,
       "hatenaBookmark": false,
       "instapaper": false,
       "line": true,
       "linkedin": true,
       "messenger": false,
       "pocket": false,
       "qq": false,
       "qzone": true,
       "stumbleupon": false,
       "twitter": false,
       "viber": false,
       "vk": false,
       "weibo": true,
       "whatsapp": false,
       "all": [
           "facebook", "google", "twitter",
           "weibo", "instapaper", "linkedin",
           "pocket", "stumbleupon"
       ]
   }
}
Tbfed-pagefooter
为页面添加页脚
"plugins": [
   "tbfed-pagefooter"
],
"pluginsConfig": {
    "tbfed-pagefooter": {
        "copyright":"Copyright © zhangjikai.com 2017",
        "modify_label": "该文件修订时间:",
        "modify_format": "YYYY-MM-DD HH:mm:ss"
    }
}
Expandable-chapters-small
使左侧的章节目录可以折叠
plugins: ["expandable-chapters-small"]
Sectionx
将页面分块显示,标签的 tag 最好是使用 b 标签,如果使用 h1-h6 可能会和其他插件冲突。 插件地址
{
    "plugins": [
       "sectionx"
   ],
    "pluginsConfig": {
        "sectionx": {
          "tag": "b"
        }
      }
}
使用示例
Sectionx DemoInsert markdown content here (you should start with h3 if you use heading).
GA
Google 统计 插件地址
"plugins": [
    "ga"
 ],
"pluginsConfig": {
    "ga": {
        "token": "UA-XXXX-Y"
    }
}
3-ba
百度统计 插件地址
{
    "plugins": ["3-ba"],
    "pluginsConfig": {
        "3-ba": {
            "token": "xxxxxxxx"
        }
    }
}
Donate
打赏插件 插件地址
"plugins": [
    "donate"
],
"pluginsConfig": {
    "donate": {
        "wechat": "https://zhangjikai.com/resource/weixin.png",
        "alipay": "https://zhangjikai.com/resource/alipay.png",
        "title": "",
        "button": "赏",
        "alipayText": "支付宝打赏",
        "wechatText": "微信打赏"
    }
}
Local Video
使用Video.js 播放本地视频 插件地址
"plugins": [ "local-video" ]
使用示例:为了使视频可以自适应,我们指定视频的width为100%,并设置宽高比为16:9,如下面所示
{% raw %}
<video id="my-video" class="video-js" controls preload="auto" width="100%" poster="https://zhangjikai.com/resource/poster.jpg" data-setup="{"aspectRatio":"16:9"}">
<source src="https://zhangjikai.com/resource/demo.mp4" type="video/mp4">
<p class="vjs-no-js">
To view this video please enable JavaScript, and consider upgrading to a web browser that
<a href="http://videojs.com/html5-video-support/" target="_blank">supports HTML5 video</a>
</p>
</video>
{% endraw %}
另外我们还要再配置下css,即在website.css中加入
.video-js {
    width:100%;
    height: 100%;
}
Simple-page-toc
自动生成本页的目录结构。另外 GitBook 在处理重复的标题时有些问题,所以尽量不适用重复的标题。 插件地址
{
    "plugins" : [
        "simple-page-toc"
    ],
    "pluginsConfig": {
        "simple-page-toc": {
            "maxDepth": 3,
            "skipFirstH1": true
        }
    }
}
使用方法: 在需要生成目录的地方加上 <!-- toc -->
Anchors
添加 Github 风格的锚点样式

"plugins" : [ "anchors" ]
Anchor-navigation-ex
添加Toc到侧边悬浮导航以及回到顶部按钮。需要注意以下两点:
-
本插件只会提取 h[1-3] 标签作为悬浮导航
-
只有按照以下顺序嵌套才会被提取
# h1
## h2
### h3
必须要以 h1 开始,直接写 h2 不会被提取
## h2
{
    "plugins": [
        "anchor-navigation-ex"
    ],
    "pluginsConfig": {
        "anchor-navigation-ex": {
            "isRewritePageTitle": true,
            "isShowTocTitleIcon": true,
            "tocLevel1Icon": "fa fa-hand-o-right",
            "tocLevel2Icon": "fa fa-hand-o-right",
            "tocLevel3Icon": "fa fa-hand-o-right"
        }
    }
}
Edit Link
如果将 GitBook 的源文件保存到github或者其他的仓库上,使用该插件可以链接到当前页的源文件上。 插件地址
"plugins": ["edit-link"],
"pluginsConfig": {
    "edit-link": {
        "base": "https://github.com/USER/REPO/edit/BRANCH",
        "label": "Edit This Page"
    }
}
Sitemap-general
生成sitemap 插件地址
{
    "plugins": ["sitemap-general"],
    "pluginsConfig": {
        "sitemap-general": {
            "prefix": "http://gitbook.zhangjikai.com"
        }
    }
}
Favicon
更改网站的 favicon.ico 插件地址
{
    "plugins": [
        "favicon"
    ],
    "pluginsConfig": {
        "favicon": {
            "shortcut": "assets/images/favicon.ico",
            "bookmark": "assets/images/favicon.ico",
            "appleTouch": "assets/images/apple-touch-icon.png",
            "appleTouchMore": {
                "120x120": "assets/images/apple-touch-icon-120x120.png",
                "180x180": "assets/images/apple-touch-icon-180x180.png"
            }
        }
    }
}
Todo
添加 Todo 功能。默认的 checkbox 会向右偏移 2em,如果不希望偏移,可以在 website.css 里加上下面的代码:
input[type=checkbox]{
    margin-left: -2em;
}
"plugins": ["todo"]
使用示例:
- write some articles
- drink a cup of tea
Terminal
模拟终端显示,主要用于显示命令以及多行输出,不过写起来有些麻烦。
{
    "plugins": [
        "terminal"
    ],
    "pluginsConfig": {
        "terminal": {
            "copyButtons": true,
            "fade": false,
            "style": "flat"
        }
    }
}
现在支持 6 种标签:
- command: Command "executed" in the terminal.
- delimiter: Sequence of characters between the prompt and the command.
- error: Error message.
- path: Directory path shown in the prompt.
- prompt: Prompt of the user.
- warning: Warning message.
标签的使用格式如下所示:
**[<tag_name> 内容]
为了使标签正常工作,需要在代码块的第一行加入 **[termial] 标记,下面是一个完整的示例:
```
**[terminal]
**[prompt foo[@joe](https://my.oschina.net/joejoe)]**[path ~]**[delimiter $ ]**[command ./myscript]
Normal output line. Nothing special here...
But...
You can add some colors. What about a warning message?
**[warning [WARNING] The color depends on the theme. Could look normal too]
What about an error message?
**[error [ERROR] This is not the error you are looking for]
```
效果如下所示:
foo@joe~ $ ./myscript
Normal output line. Nothing special here...
But...
You can add some colors. What about a warning message?
[WARNING] The color depends on the theme. Could look normal too
What about an error message?
[ERROR] This is not the error you are looking for
terminal 支持下面 5 种样式,如果需要更换样式,在 pluginsConfig 里配置即可。
- black: Just that good old black terminal everybody loves.
- classic: Looking for green color font over a black background? This is for you.
- flat: Oh, flat colors. I love flat colors. Everything looks modern with them.
- ubuntu: Admit it or not, but Ubuntu have a good looking terminal.
- white: Make your terminal to blend in with your GitBook.
Copy-code-button
为代码块添加复制的按钮。
{
    "plugins": ["copy-code-button"]
}
效果如下图所示:

Alerts
添加不同 alerts 样式的 blockquotes,目前包含 info, warning, danger 和 success 四种样式。
{
    "plugins": ["alerts"]
}
下面是使用示例:
Info styling
> **[info] For info**
>
> Use this for infomation messages.

Warning styling
> **[warning] For warning**
>
> Use this for warning messages.

Danger styling
> **[danger] For danger**
>
> Use this for danger messages.

Success styling
> **[success] For info**
>
> Use this for success messages.
效果如下所示:
Info styling
> ** For info** > > Use this for infomation messages.
Warning styling
> ** For warning** > > Use this for warning messages.
Danger styling
> ** For danger** > > Use this for danger messages.
Success styling
> ** For info** > > Use this for success messages.
Include-csv
展示 csv 文件。
{
    "plugins": ["include-csv"]
}
使用示例:
{% includeCsv src="./assets/csv/test.csv", useHeader="true" %} {% endincludeCsv %}
效果如下所示:
| 产业 | 数值 | 比重 |
|---|---|---|
| 第一产业 | 111 | 10.00% |
| 第二产业 | 222 | 20.00% |
| 第三产业 | 333 | 30.00% |
| 第四产业 | 444 | 40.00% |
Musicxml
支持 musicxml 格式的乐谱渲染。
{
    "plugins": ["musicxml"]
}
下面是一个示例,需要注意的是 block 中的内容必须是一个合法的 musicxml 文件路径,并且不能有换行和空格。
{% musicxml %}assets/musicxml/mandoline - debussy.xml{% endmusicxml %}
效果如下所示
Klipse
集成 Klipse (online code evaluator)
{
    "plugins": ["klipse"]
}
klipse 目前支持下面的语言:
- javascript: evaluation is done with the javascript function eval and pretty printing of the result is done with pretty-format
- clojure[script]: evaluation is done with Self-Hosted Clojurescript
- ruby: evaluation is done with Opal
- C++: evaluation is done with JSCPP
- python: evaluation is done with Skulpt
- scheme: evaluation is done with BiwasScheme
- PHP: evaluation is done with Uniter
- BrainFuck
- JSX
- EcmaScript2017
- Google Charts: See Interactive Business Report with Google Charts.
下面是一个使用示例:
```eval-python
print [x + 1 for x in range(10)]
```
效果如下所示:
print [x + 1 for x in range(10)]
Output:
[1, 2, 3, 4, 5, 6, 7, 8, 9, 10]
Versions-select
添加版本选择的下拉菜单,针对文档有多个版本的情况。
{
    "plugins": [ "versions-select" ],
    "pluginsConfig": {
        "versions": {
            "options": [
                {
                    "value": "http://gitbook.zhangjikai.com",
                    "text": "v3.2.2"
                },
                {
                    "value": "http://gitbook.zhangjikai.com/v2/",
                    "text": "v2.6.4"
                }
            ]
        }
    }
}
我们可以自定义 css 来修改 select 的显示样式:
.versions-select select {
    height: 2em;
    line-height: 2em;
    border-radius: 4px;
    background: #efefef;
}
效果见左上角。
RSS
添加 rss 订阅功能。
{
    "plugins": [ "rss" ],
    "pluginsConfig": {
        "rss": {
            "title": "GitBook 使用教程",
            "description": "记录 GitBook 的配置和一些插件的使用",
            "author": "Jikai Zhang",
            "feed_url": "http://gitbook.zhangjikai.com/rss",
            "site_url": "http://gitbook.zhangjikai.com/",
            "managingEditor": "me@zhangjikai.com",
            "webMaster": "me@zhangjikai.com",
            "categories": [
                "gitbook"
            ]
        }
    }
}
效果见右上角。
1.7 主题
目前 GitBook 提供了三类文档: Book 文档、API文档、FAQ文档。我们常用的就是 Book 文档模式,如果我们需要使用 API 文档模式或者 FAQ 文档模式,只需引入文档对应的主题插件即可,下面我们介绍与这三类文档相关的主题插件。
Book
Book 是我们常用的模式,大部分插件也都是针对这个模式做的。下面介绍一下针对 Book 模式的两个主题。
theme-default
theme-default 是默认的 Book 主题。将 showLevel 设为 true, 就可以显示标题前面的数字索引,默认不显示。
{
    "theme-default": {
        "showLevel": true
    }
}
在使用该主题的过程中,发现经常会在控制台报下面的错误,没有找到是哪里的原因,官方也一直没有修复。
theme.js:4 Uncaught TypeError: Cannot read property 'split' of undefined
后来在 这里 看到一个解决方法,需要修改本地的 GitBook Theme 模板。下面是具体步骤:
-
进入 GitBook 默认主题所在的文件夹
用户主目录->.gitbook->versions->3.2.2->node_modules->gitbook-plugin-theme-default->src->js->theme,打开navigation.js,找到getChapterHash函数function getChapterHash($chapter) { var $link = $chapter.children('a'), hash = $link.attr('href').split('#')[1]; if (hash) hash = '#'+hash; return (!!hash)? hash : ''; } -
将该函数修改为下面的形式:
function getChapterHash($chapter) { var $link = $chapter.children('a'), hash, href, parts; if ($link.length) { href = $link.attr('href') if (href) { parts = href.split('#'); if (parts.length>1) { hash = parts[1]; } } } if (hash) hash = '#'+hash; return (!!hash)? hash : ''; } -
回到
gitbook-plugin-theme-default文件夹,运行npm install重新编译文件。
另外在 v3 版本中引入了 part 的概念 (通过标题或者水平分割线将 GitBook 分为几个 part),所以目录的索引格式为 part-index + article-index。但是很多时候我们可能只有一个 part,并且不希望添加 part-index,即 1.1, 1.2 -> 1, 2。官方说是会在 v4 版本中解决这个问题,如果 v3 版本中希望去掉前面的 part-index,需要我们手动修改 gitbook 的源文件,下面是修改方法:
-
打开
<user-home>/.gitbook/versions/3.x.x/lib/models/summaryPart.js -
修改第 51 行的内容:
  // return SummaryArticle.create(article, [level, i + 1].join('.'));
  return SummaryArticle.create(article, (i + 1) + '');
这样修改之后会有个问题,即每个 part 都会从 1 开始计数,如下图所示:

对于这个问题,目前的解决方法就是使用不同版本的 GitBook,对 3.2.2 进行了修改, 3.2.3 没有修改,当只有一个 part 的时候使用 3.2.2 的版本,多个 part 的时候使用 3.2.3 的版本。
theme-comscore
为标题添加颜色,如下如所示

{
"plugins": [
        "theme-comscore"
    ]
}
API 文档
GitBook 同样可以编写 API 文档,只需要引入 theme-api 插件
{
    "plugins": ["theme-api"],
    "pluginsConfig": {
        "theme-api": {
            "theme": "dark"
        }
    }
}
引入之后会替换默认的样式。下面是 API 文档的样式截图和在线演示:

使用 GitBook 的 API 文档模式时也可以使用插件,但是因为大部分插件可能针对写书的模式,所以有可能会出现不兼容的现象。
API文档的语法也很简单,因为主要是针对方法的,所以以方法为基本单位,通过下面的语法来定义一个方法
{% method %}

内容区

{% endmethod %}
在内容区里面,通过 {% sample lang="lang" %}来定义一个针对特定语言的演示,通过 {% common %} 标识所有语言共同的部分。可以在 这里 查看完整的示例。
FAQ 文档
theme-faq 插件主要用来制作知识库或者帮助中心,GitBook 的 帮助中心 就是使用的该主题。为了支持中文搜索我们需要引入 search-pro 包。
{
    "plugins": [
        "theme-faq",
        "-lunr",
        "search-pro@^2.0.2"
    ]
}
下面是该主题的截图以及在线示例:

参考资料
</user-home></tag_name></stdio.h></h2>
来源:oschina
链接:https://my.oschina.net/u/4150612/blog/4289269