写博客的目的是发现虽然网上有许多深度学习资源可供使用,但是要独立的完成一个程序,如何恢复调用模型并不是想象的那么容易,踩过许多坑。幸运的是最终完成了设计和论文。贴出来与大家共享一下。
用到的基础工具:Anaconda,pytq5库,image库,TensorFlow(GPU版)
ps:由于篇幅有限,关于用到的各种神经网络知识部分可以参考我的论文中介绍。
完整代码已放入[github仓库]
- 首先解决GUI的问题。网上参考了一些别人的半成品,在自己的加工下凑合能用,基于python的pyqt5库开发。
先展示下成品:稍后会将代码放出。
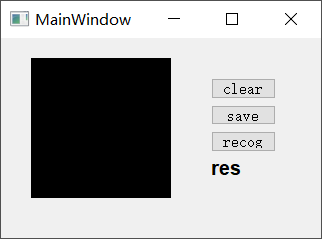
这里我使用了四个py文件:DigitalMnistNum.py,MainWindowC.py,UI_MainWindow.py,run.py
- DigitalMnistNum.py定义了clear,save,recog,以及result事件的操作。初始化时设置保存画布中图像为png格式,以及设置大小为28*28pixel。
 1 # 定义手写数字面板类
 2 from PyQt5 import QtCore, QtGui, QtWidgets
 3 from PyQt5.QtGui import QColor
 4
 5
 6 class DigitalMnistNum(QtWidgets.QWidget):
 7     def __init__(self, parent=None):
 8         super(DigitalMnistNum, self).__init__(parent)
 9         self.pen = QtGui.QPen()
10         self.pen.setStyle(QtCore.Qt.SolidLine)
11         self.pen.setWidth(12)  # 笔的粗细
12         self.pen.setColor(QtCore.Qt.white)  # 白色字体
13         # 图片大小为28*28 pixel
14         self.bitmapSize = QtCore.QSize(28, 28)
15         self.resetBitmap()
16
17     def resetBitmap(self):
18         self.pix = QtGui.QBitmap(self.size())
19         self.pix.fill(QtCore.Qt.black)  # 设置黑色背景
20
21     # 清除按钮
22     def clearBitmap(self):
23         self.resetBitmap()
24         self.update()
25     # 保存图片格式以及图片信息
26
27     def recongBitmap(self):
28         pass
29
30     def saveBitmap(self):
31         fileName = str("pic.bmp")
32         tmp = self.pix.scaled(
33             self.bitmapSize, QtCore.Qt.KeepAspectRatio)  # 保存图片
34         QtCore.qDebug(str(tmp.size()))
35         tmp.save(fileName)
36
37     def setBitmapSize(self, size):
38         self.bitmapSize = QtCore.QSize(size[0], size[1])
- 四个鼠标事件:按下,移动,划线,释放函数参考博客:https://www.cnblogs.com/PyLearn/p/7689170.html


 1 # 以下三个函数为记录鼠标手写数字事件
 2     # 定义鼠标按下事件
 3     def mousePressEvent(self, event):
 4         if event.button() == QtCore.Qt.LeftButton:
 5             self.startPos = event.pos()
 6             painter = QtGui.QPainter()
 7             painter.begin(self.pix)
 8             painter.setPen(self.pen)
 9             painter.drawPoint(self.startPos)
10             painter.end()
11         self.update()
12     # 鼠标移动事件
13
14     def mouseMoveEvent(self, event):
15         painter = QtGui.QPainter()
16         painter.begin(self.pix)
17         painter.setPen(self.pen)
18         painter.drawLine(self.startPos, event.pos())
19         painter.end()
20         self.startPos = event.pos()
21         self.update()
22     # 鼠标画线事件
23
24     def paintEvent(self, event):
25         if self.size() != self.pix.size():
26             QtCore.qDebug(str(self.size()) + "," +
27                           str(self.pix.size()) + "," + str(event.type()))
28             self.resetBitmap()
29         painter = QtGui.QPainter(self)
30         painter.drawPixmap(QtCore.QPoint(0, 0), self.pix)
31     # 鼠标释放事件
32
33     def mouseReleaseEvent(self, event):
34 self.update()- MainWindowC.py
MainWindowC功能是调用clear,save,recong按钮事件。清除保存画布比较简单。
 1 class MainWindow(QtWidgets.QMainWindow):
 2     def __init__(self, parent=None):
 3         super(MainWindow, self).__init__(parent)
 4         self.ui = Ui_MainWindow()
 5         self.ui.setupUi(self)
 6
 7     def clearBtn(self):
 8         QtCore.qDebug(str("clearBtn"))
 9         self.ui.widget.clearBitmap()
10
11     def saveBtn(self):
12         QtCore.qDebug(str("saveBtn"))
13         self.ui.widget.saveBitmap()
14
15     def setLabelText(self, text):
16         self.ui.result.setText(text)
17
18     def setBitmapSize(self, size):
19         self.ui.widget.setBitmapSize(size)
识别事件部分是重点:首先需要对保存的手写数字图片进行预处理,打开,调用image库读取图片list格式,还需要对初始值进行转换,转换为MNIST数据集中一样的数据格式。
 1     # 预测过程
 2     def recongBtn(self):
 3         QtCore.qDebug(str("recongBtn"))
 4         self.ui.widget.recongBitmap()
 5         # 打开自己的图片地址
 6         file_name = R"C:\Users\tensorflow\tensorflow-mnist-tutorial\TestProject\pic.bmp"
 7         img = Image.open(file_name).convert('L')
 8         cvtValue = list(img.getdata())
 9         # 初始化图片的值,1表示纯白色,0表示纯黑色
10         #resCvtValue = [(255 - x) * 1.0 / 255.0 for x in cvtValue]
11         resCvtValue = [x / 255.0 for x in cvtValue]
12         newShape = array(resCvtValue).reshape(28, 28, 1)
接下来使用到了TensorFlow中关于模型中参数恢复的方法。import_meta_graph()和restore()方法一起使用恢复模型中的参数。假设模型已经事先训练完毕并保存。
1        # 加载保存的参数
2         with tf.Session() as sess:
3             sess.run(tf.global_variables_initializer())
4             new_saver = tf.train.import_meta_graph(
5                 R'C:\Users\tensorflow\tensorflow-mnist-tutorial\TestProject\mdlib\md2\init-1000.meta')
6             new_saver.restore(sess, tf.train.latest_checkpoint(
7                 R'C:\Users\tensorflow\tensorflow-mnist-tutorial\TestProject\mdlib\md2'))
8             print("model restore done\n")
9             graph = tf.get_default_graph()
三个代码段落(注释掉了两个)是因为在程序中我使用了三个神经网络模型,需要分别测试模型的准确率,需要不同的接受图片输入格式。设置变量用于接收从模型中恢复的参数的值。
model1表示单层神经网络,model2表示五层全相连神经网络,model3表示卷积神经网络。


 1             '''
 2             # model 1
 3             W = graph.get_tensor_by_name("W:0")
 4             b = graph.get_tensor_by_name("b:0")
 5             XX = tf.reshape(newShape, [-1, 784])
 6             Y = tf.nn.softmax(tf.matmul(tf.cast(XX, tf.float32), W) + b)
 7
 8             feed_dict = {XX: [resCvtValue]}
 9             '''
10
11             # model 2
12             #X = tf.placeholder(tf.float32, [None, 28, 28, 1])
13             L = 200
14             M = 100
15             N = 60
16             O = 30
17             XX = tf.reshape(newShape, [-1, 784])
18             W1 = graph.get_tensor_by_name("W1:0")
19             B1 = graph.get_tensor_by_name("B1:0")
20
21             W2 = graph.get_tensor_by_name("W2:0")
22             B2 = graph.get_tensor_by_name("B2:0")
23
24             W3 = graph.get_tensor_by_name("W3:0")
25             B3 = graph.get_tensor_by_name("B3:0")
26
27             W4 = graph.get_tensor_by_name("W4:0")
28             B4 = graph.get_tensor_by_name("B4:0")
29
30             W5 = graph.get_tensor_by_name("W5:0")
31             B5 = graph.get_tensor_by_name("B5:0")
32
33             Y1 = tf.nn.sigmoid(tf.matmul(tf.cast(XX, tf.float32), W1) + B1)
34             Y2 = tf.nn.sigmoid(tf.matmul(Y1, W2) + B2)
35             Y3 = tf.nn.sigmoid(tf.matmul(Y2, W3) + B3)
36             Y4 = tf.nn.sigmoid(tf.matmul(Y3, W4) + B4)
37             Ylogits = tf.matmul(Y4, W5) + B5
38             Y = tf.nn.softmax(Ylogits)
39             feed_dict = {XX: [resCvtValue]}
40
41             '''
42             # model 3
43             X = tf.placeholder(tf.float32, [None, 28, 28, 1])
44             K = 4  # first convolutional layer output depth
45             L = 8  # second convolutional layer output depth
46             M = 12  # third convolutional layer
47             N = 200  # fully connected layer
48
49             W1 = graph.get_tensor_by_name("W1:0")
50             B1 = graph.get_tensor_by_name("B1:0")
51             stride = 1  # output is 28x28
52             Y1 = tf.nn.relu(tf.nn.conv2d(
53                 X, W1, strides=[1, stride, stride, 1], padding='SAME') + B1)
54
55             W2 = graph.get_tensor_by_name("W2:0")
56             B2 = graph.get_tensor_by_name("B2:0")
57             stride = 2  # output is 14x14
58             Y2 = tf.nn.relu(tf.nn.conv2d(Y1, W2, strides=[
59                             1, stride, stride, 1], padding='SAME') + B2)
60
61             W3 = graph.get_tensor_by_name("W3:0")
62             B3 = graph.get_tensor_by_name("B3:0")
63
64             stride = 2  # output is 7x7
65             Y3 = tf.nn.relu(tf.nn.conv2d(Y2, W3, strides=[
66                             1, stride, stride, 1], padding='SAME') + B3)
67
68             # reshape the output from the third convolution for the fully connected layer
69             YY = tf.reshape(Y3, shape=[-1, 7 * 7 * M])
70
71             W4 = graph.get_tensor_by_name("W4:0")
72             B4 = graph.get_tensor_by_name("B4:0")
73             Y4 = tf.nn.relu(tf.matmul(YY, W4) + B4)
74
75             W5 = graph.get_tensor_by_name("W5:0")
76             B5 = graph.get_tensor_by_name("B5:0")
77
78             Ylogits = tf.matmul(Y4, W5) + B5
79             Y = tf.nn.softmax(Ylogits)
80
81             feed_dict = {X: [newShape]}
82
83             '''
- UI_MainWindow.py
UI部分主要是设置窗口大小,画布大小,按钮显示大小等布局。


 1 from PyQt5 import QtCore, QtGui, QtWidgets
 2 # DigitalMnistNum为数字画板的子类
 3 from DigitalMnistNum import DigitalMnistNum
 4
 5
 6 class Ui_MainWindow(object):
 7     def setupUi(self, MainWindow):
 8         MainWindow.setObjectName("MainWindow")
 9         MainWindow.resize(320, 200)  # 主窗口大小
10         sizePolicy = QtWidgets.QSizePolicy(
11             QtWidgets.QSizePolicy.Fixed, QtWidgets.QSizePolicy.Fixed)
12         sizePolicy.setHorizontalStretch(0)
13         sizePolicy.setVerticalStretch(0)
14         sizePolicy.setHeightForWidth(
15             MainWindow.sizePolicy().hasHeightForWidth())
16         MainWindow.setSizePolicy(sizePolicy)
17         self.centralWidget = QtWidgets.QWidget(MainWindow)
18         self.centralWidget.setObjectName("centralWidget")
19         self.widget = DigitalMnistNum(self.centralWidget)
20         self.widget.setGeometry(QtCore.QRect(30, 20, 140, 140))  # 画布用140*140
21         self.widget.setObjectName("widget")
22         # 修改右侧布局
23         self.verticalLayoutWidget = QtWidgets.QWidget(self.centralWidget)
24         self.verticalLayoutWidget.setGeometry(QtCore.QRect(190, 20, 105, 140))
25         self.verticalLayoutWidget.setObjectName("verticalLayoutWidget")
26         self.verticalLayout = QtWidgets.QVBoxLayout(self.verticalLayoutWidget)
27         self.verticalLayout.setContentsMargins(20, 20, 20, 20)
28         self.verticalLayout.setSpacing(6)
29         self.verticalLayout.setObjectName("verticalLayout")
30
31         self.clearBtn = QtWidgets.QPushButton(self.verticalLayoutWidget)
32         self.clearBtn.setObjectName("clearBtn")
33         self.verticalLayout.addWidget(self.clearBtn)
34
35         self.saveBtn = QtWidgets.QPushButton(self.verticalLayoutWidget)
36         self.saveBtn.setObjectName("saveBtn")
37         self.verticalLayout.addWidget(self.saveBtn)
38
39         self.recongBtn = QtWidgets.QPushButton(self.verticalLayoutWidget)
40         self.recongBtn.setObjectName("recongBtn")
41         self.verticalLayout.addWidget(self.recongBtn)
42         self.result = QtWidgets.QLabel(self.verticalLayoutWidget)
43
44         font = QtGui.QFont()
45         font.setFamily("Arial")
46         font.setPointSize(12)
47         font.setBold(True)
48         font.setWeight(70)
49         # 结果显示区域
50         self.result.setFont(font)
51         self.result.setObjectName("res")
52         self.verticalLayout.addWidget(self.result)
53         self.verticalLayout.setStretch(0, 1)
54         self.verticalLayout.setStretch(1, 1)
55         self.verticalLayout.setStretch(2, 1)
56         self.verticalLayout.setStretch(3, 2)
57         MainWindow.setCentralWidget(self.centralWidget)
58
59         self.retranslateUi(MainWindow)
60         self.clearBtn.clicked.connect(MainWindow.clearBtn)
61         self.saveBtn.clicked.connect(MainWindow.saveBtn)
62         self.recongBtn.clicked.connect(MainWindow.recongBtn)
63         QtCore.QMetaObject.connectSlotsByName(MainWindow)
64
65     def retranslateUi(self, MainWindow):
66         _translate = QtCore.QCoreApplication.translate
67         MainWindow.setWindowTitle(_translate("MainWindow", "MainWindow"))
68         self.clearBtn.setText(_translate("MainWindow", "clear"))
69         self.saveBtn.setText(_translate("MainWindow", "save"))
70         self.recongBtn.setText(_translate("MainWindow", "recog"))
71         self.result.setText(_translate("MainWindow", "res"))
- run.py
链接上述三个文件,执行。
 1 import sys
 2 from PyQt5 import QtWidgets, QtGui
 3 from MainWindowC import MainWindow
 4
 5 if __name__ == '__main__':
 6
 7     app = QtWidgets.QApplication(sys.argv)
 8     win = MainWindow()
 9     win.show()
10     sys.exit(app.exec_())
2 深度学习网络模型。
关于神经网络结构的模型就不废话了,论文中有详细介绍。
- 单层神经网络结构(就不废话了,直接上代码)


  1 import tensorflow as tf
  2 import tensorflowvisu
  3 from tensorflow.examples.tutorials.mnist import input_data as mnist_data
  4 print("Tensorflow version " + tf.__version__)
  5 tf.set_random_seed(0)
  6
  7 # neural network with 1 layer of 10 softmax neurons
  8 #
  9 # · · · · · · · · · ·       (input data, flattened pixels)       X [batch, 784]        # 784 = 28 * 28
 10 # \x/x\x/x\x/x\x/x\x/    -- fully connected layer (softmax)      W [784, 10]     b[10]
 11 #   · · · · · · · ·                                              Y [batch, 10]
 12
 13 # The model is:
 14 #
 15 # Y = softmax( X * W + b)
 16 #              X: matrix for 100 grayscale images of 28x28 pixels, flattened (there are 100 images in a mini-batch)
 17 #              W: weight matrix with 784 lines and 10 columns
 18 #              b: bias vector with 10 dimensions
 19 #              +: add with broadcasting: adds the vector to each line of the matrix (numpy)
 20 #              softmax(matrix) applies softmax on each line
 21 #              softmax(line) applies an exp to each value then divides by the norm of the resulting line
 22 #              Y: output matrix with 100 lines and 10 columns
 23
 24 # Download images and labels into mnist.test (10K images+labels) and mnist.train (60K images+labels)
 25 mnist = mnist_data.read_data_sets("data", one_hot=True, reshape=False, validation_size=0)
 26
 27 # input X: 28x28 grayscale images, the first dimension (None) will index the images in the mini-batch
 28 X = tf.placeholder(tf.float32, [None, 28, 28, 1])
 29 # correct answers will go here
 30 Y_ = tf.placeholder(tf.float32, [None, 10])
 31 # weights W[784, 10]   784=28*28
 32 W = tf.Variable(tf.zeros([784, 10]),name="W")
 33 # biases b[10]
 34 b = tf.Variable(tf.zeros([10]),name="b")
 35
 36 # flatten the images into a single line of pixels
 37 # -1 in the shape definition means "the only possible dimension that will preserve the number of elements"
 38 XX = tf.reshape(X, [-1, 784])
 39
 40 # The model
 41 Y = tf.nn.softmax(tf.matmul(XX, W) + b)
 42
 43 # loss function: cross-entropy = - sum( Y_i * log(Yi) )
 44 #                           Y: the computed output vector
 45 #                           Y_: the desired output vector
 46
 47 # cross-entropy
 48 # log takes the log of each element, * multiplies the tensors element by element
 49 # reduce_mean will add all the components in the tensor
 50 # so here we end up with the total cross-entropy for all images in the batch
 51 cross_entropy = -tf.reduce_mean(Y_ * tf.log(Y)) * 1000.0  # normalized for batches of 100 images,
 52                                                           # *10 because  "mean" included an unwanted division by 10
 53
 54 # accuracy of the trained model, between 0 (worst) and 1 (best)
 55 correct_prediction = tf.equal(tf.argmax(Y, 1), tf.argmax(Y_, 1))
 56 accuracy = tf.reduce_mean(tf.cast(correct_prediction, tf.float32))
 57
 58 # training, learning rate = 0.005
 59 train_step = tf.train.GradientDescentOptimizer(0.005).minimize(cross_entropy)
 60
 61 # matplotlib visualisation
 62 allweights = tf.reshape(W, [-1])
 63 allbiases = tf.reshape(b, [-1])
 64 I = tensorflowvisu.tf_format_mnist_images(X, Y, Y_)  # assembles 10x10 images by default
 65 It = tensorflowvisu.tf_format_mnist_images(X, Y, Y_, 1000, lines=25)  # 1000 images on 25 lines
 66 datavis = tensorflowvisu.MnistDataVis()
 67
 68 # init
 69 init = tf.global_variables_initializer()
 70 sess = tf.Session()
 71 sess.run(init)
 72
 73
 74 # You can call this function in a loop to train the model, 100 images at a time
 75 def training_step(i, update_test_data, update_train_data):
 76
 77     # training on batches of 100 images with 100 labels
 78     batch_X, batch_Y =  mnist.train.next_batch(100)
 79
 80     # compute training values for visualisation
 81     if update_train_data:
 82         a, c, im, w, b = sess.run([accuracy, cross_entropy, I, allweights, allbiases], feed_dict={X: batch_X, Y_: batch_Y})
 83         datavis.append_training_curves_data(i, a, c)
 84         datavis.append_data_histograms(i, w, b)
 85         datavis.update_image1(im)
 86         print(str(i) + ": accuracy:" + str(a) + " loss: " + str(c))
 87
 88     # compute test values for visualisation
 89     if update_test_data:
 90         a, c, im = sess.run([accuracy, cross_entropy, It], feed_dict={X: mnist.test.images, Y_: mnist.test.labels})
 91         datavis.append_test_curves_data(i, a, c)
 92         datavis.update_image2(im)
 93         print(str(i) + ": ********* epoch " + str(i*100//mnist.train.images.shape[0]+1) + " ********* test accuracy:" + str(a) + " test loss: " + str(c))
 94
 95     # the backpropagation training step
 96     sess.run(train_step, feed_dict={X: batch_X, Y_: batch_Y})
 97
 98
 99 datavis.animate(training_step, iterations=2000+1, train_data_update_freq=10, test_data_update_freq=50, more_tests_at_start=True)
100
101 # to save the animation as a movie, add save_movie=True as an argument to datavis.animate
102 # to disable the visualisation use the following line instead of the datavis.animate line
103 #for i in range(2000): training_step(i, i % 50 == 0, i % 10 == 0)
104
105 print("max test accuracy: " + str(datavis.get_max_test_accuracy()))
106
107 # final max test accuracy = 0.9268 (10K iterations). Accuracy should peak above 0.92 in the first 2000 iterations.
108
109 saver = tf.train.Saver()
110 md_path = R"C:\Users\yaoya\AppData\Local\conda\conda\envs\tensorflow\tensorflow-mnist-tutorial\TestProject\mdlib\md1\init"
111 # Later, launch the model, initialize the variables, do some work, save the
112 # variables to disk.
113 sess.run(init)
114 save_path = saver.save(sess, md_path, global_step=1000)
115 print("Model saved in file: %s" % save_path)
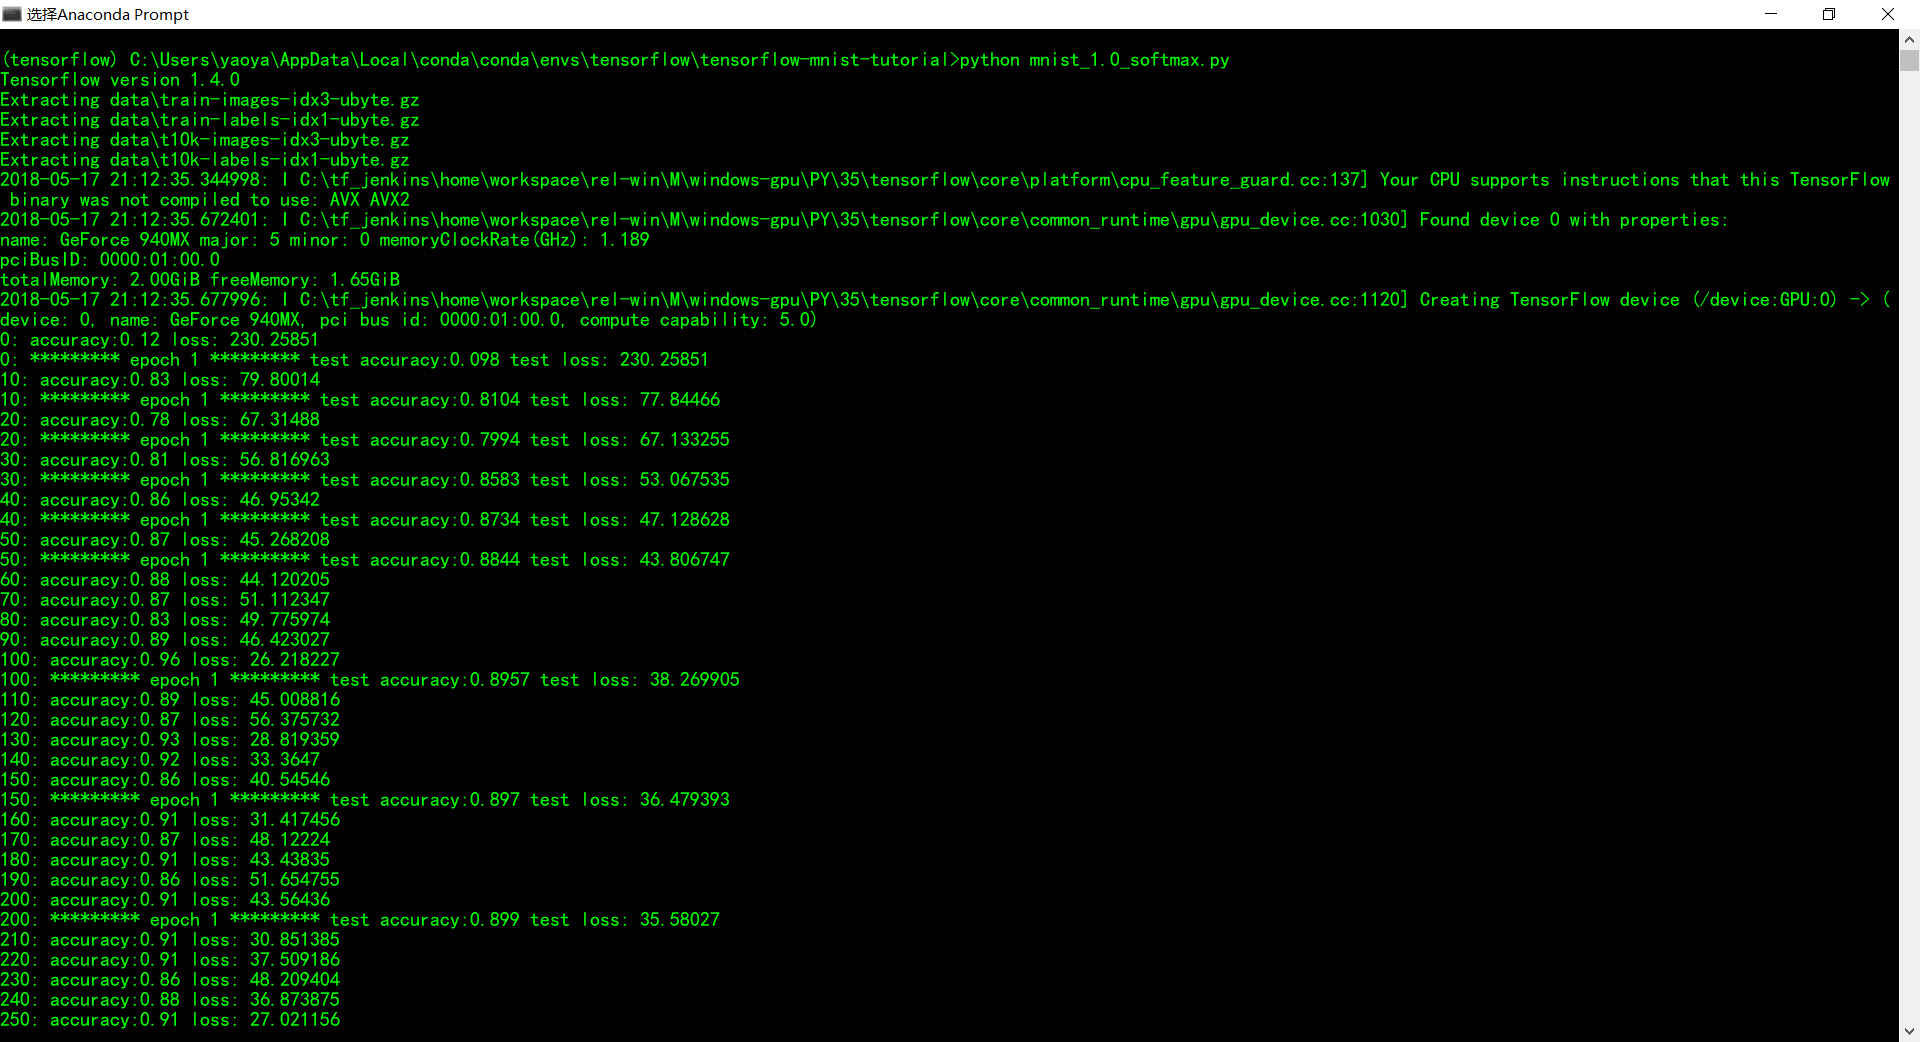
给出训练结果过程:
图形可视化训练过程:
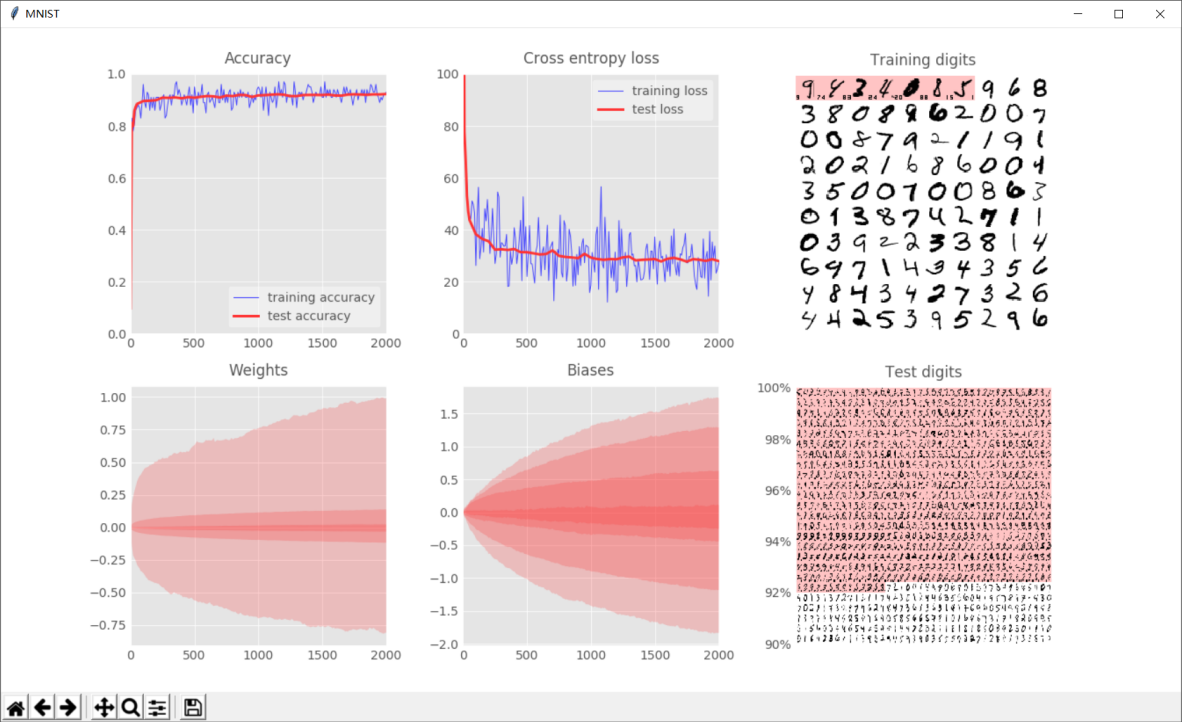
可以看到识别率最终在92%左右,pretty bad :(。
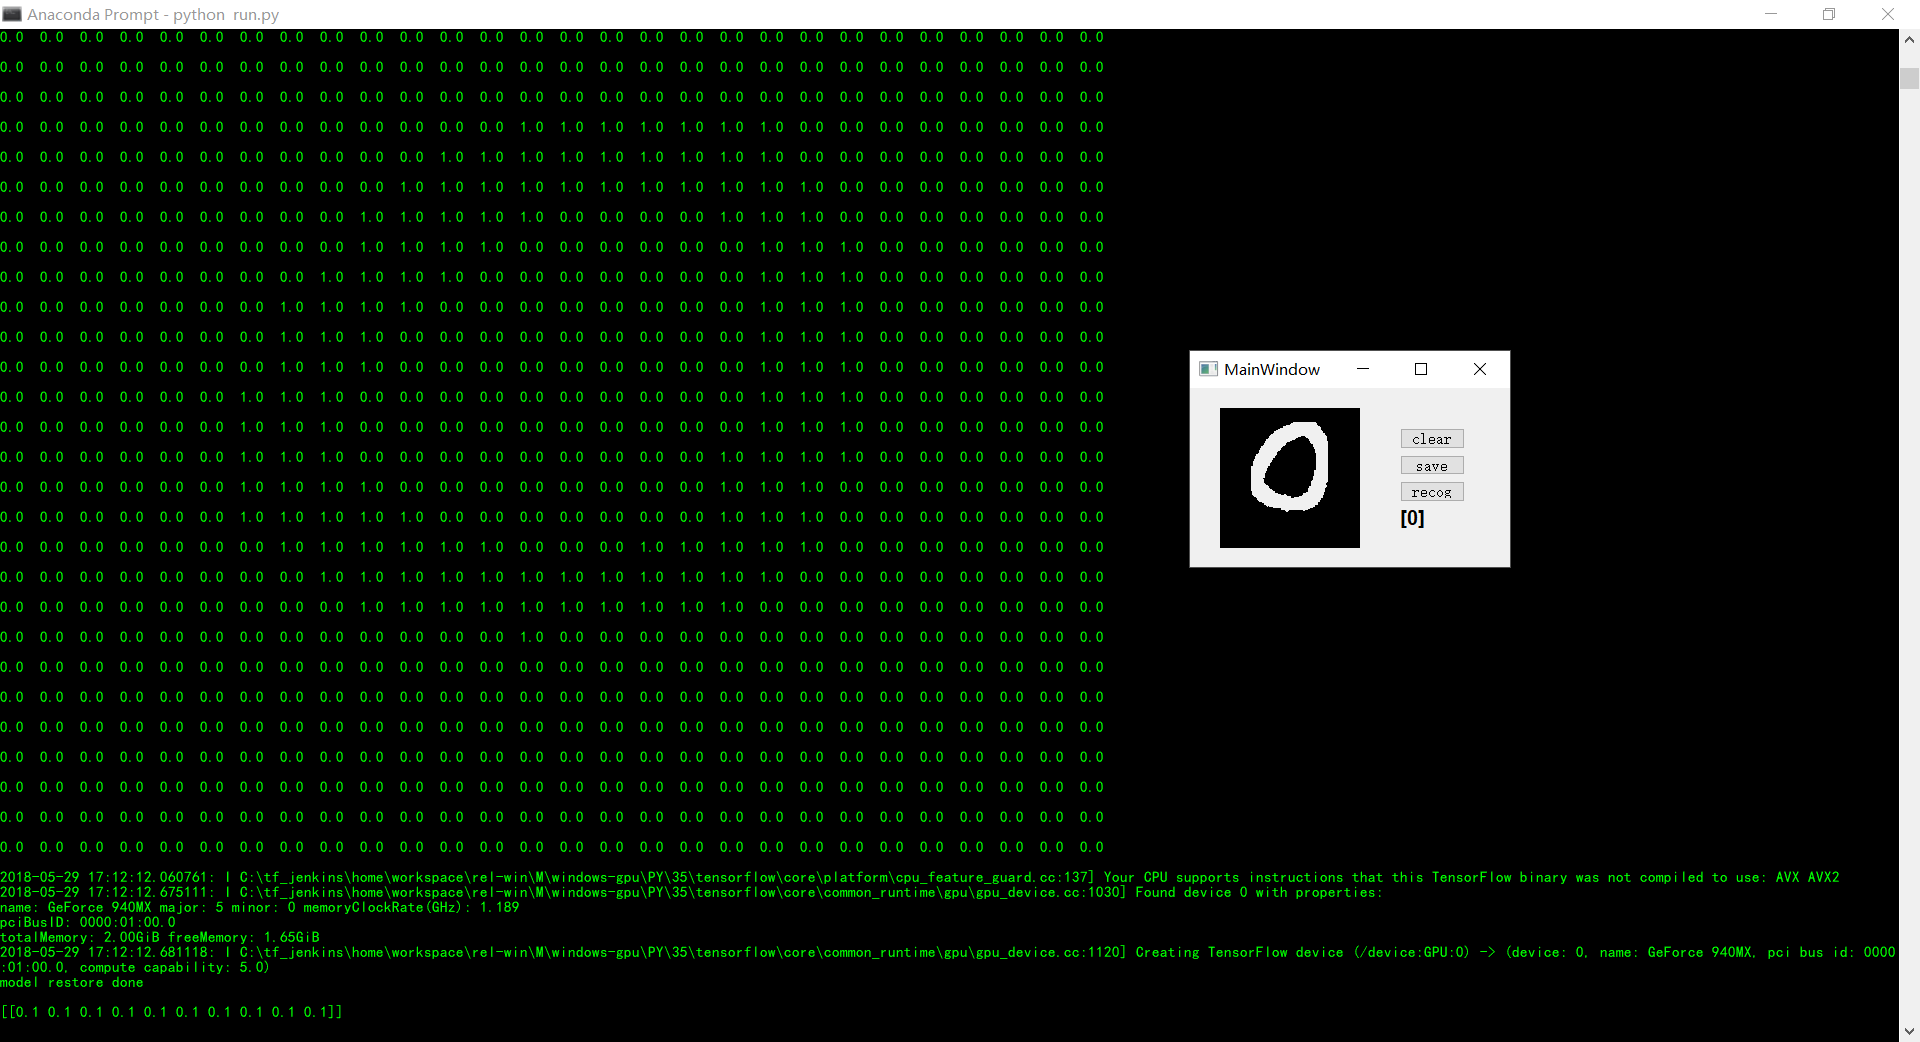
自己调用模型时的识别结果:
- 全相连神经网络结构


  1 import tensorflow as tf
  2 import tensorflowvisu
  3 from tensorflow.examples.tutorials.mnist import input_data as mnist_data
  4 print("Tensorflow version " + tf.__version__)
  5 tf.set_random_seed(0)
  6
  7 # neural network with 5 layers
  8 #
  9 # · · · · · · · · · ·          (input data, flattened pixels)       X [batch, 784]   # 784 = 28*28
 10 # \x/x\x/x\x/x\x/x\x/       -- fully connected layer (sigmoid)      W1 [784, 200]      B1[200]
 11 #  · · · · · · · · ·                                                Y1 [batch, 200]
 12 #   \x/x\x/x\x/x\x/         -- fully connected layer (sigmoid)      W2 [200, 100]      B2[100]
 13 #    · · · · · · ·                                                  Y2 [batch, 100]
 14 #     \x/x\x/x\x/           -- fully connected layer (sigmoid)      W3 [100, 60]       B3[60]
 15 #      · · · · ·                                                    Y3 [batch, 60]
 16 #       \x/x\x/             -- fully connected layer (sigmoid)      W4 [60, 30]        B4[30]
 17 #        · · ·                                                      Y4 [batch, 30]
 18 #         \x/               -- fully connected layer (softmax)      W5 [30, 10]        B5[10]
 19 #          ·                                                        Y5 [batch, 10]
 20
 21 # Download images and labels into mnist.test (10K images+labels) and mnist.train (60K images+labels)
 22 mnist = mnist_data.read_data_sets(
 23     "data", one_hot=True, reshape=False, validation_size=0)
 24
 25 # input X: 28x28 grayscale images, the first dimension (None) will index the images in the mini-batch
 26 X = tf.placeholder(tf.float32, [None, 28, 28, 1])
 27 # correct answers will go here
 28 Y_ = tf.placeholder(tf.float32, [None, 10])
 29
 30 # five layers and their number of neurons (tha last layer has 10 softmax neurons)
 31 L = 200
 32 M = 100
 33 N = 60
 34 O = 30
 35 # Weights initialised with small random values between -0.2 and +0.2
 36 # When using RELUs, make sure biases are initialised with small *positive* values for example 0.1 = tf.ones([K])/10
 37 W1 = tf.Variable(tf.truncated_normal(
 38     [784, L], stddev=0.1), name="W1")  # 784 = 28 * 28
 39 B1 = tf.Variable(tf.zeros([L]), name="B1")
 40 W2 = tf.Variable(tf.truncated_normal([L, M], stddev=0.1), name="W2")
 41 B2 = tf.Variable(tf.zeros([M]), name="B2")
 42 W3 = tf.Variable(tf.truncated_normal([M, N], stddev=0.1), name="W3")
 43 B3 = tf.Variable(tf.zeros([N]), name="B3")
 44 W4 = tf.Variable(tf.truncated_normal([N, O], stddev=0.1), name="W4")
 45 B4 = tf.Variable(tf.zeros([O]), name="B4")
 46 W5 = tf.Variable(tf.truncated_normal([O, 10], stddev=0.1), name="W5")
 47 B5 = tf.Variable(tf.zeros([10]), name="B5")
 48
 49 # The model
 50 XX = tf.reshape(X, [-1, 784])
 51 Y1 = tf.nn.sigmoid(tf.matmul(XX, W1) + B1)
 52 Y2 = tf.nn.sigmoid(tf.matmul(Y1, W2) + B2)
 53 Y3 = tf.nn.sigmoid(tf.matmul(Y2, W3) + B3)
 54 Y4 = tf.nn.sigmoid(tf.matmul(Y3, W4) + B4)
 55 # Ylogits to divide Y5 and Y for the purpose of
 56 # call function "softmax_cross_entropy_with_logits"
 57 # that safty to got cross-entropy
 58 Ylogits = tf.matmul(Y4, W5) + B5
 59 Y = tf.nn.softmax(Ylogits)
 60
 61 # cross-entropy loss function (= -sum(Y_i * log(Yi)) ), normalised for batches of 100  images
 62 # TensorFlow provides the softmax_cross_entropy_with_logits function to avoid numerical stability
 63 # problems with log(0) which is NaN
 64 cross_entropy = tf.nn.softmax_cross_entropy_with_logits(
 65     logits=Ylogits, labels=Y_)
 66 cross_entropy = tf.reduce_mean(cross_entropy) * 100
 67
 68 # accuracy of the trained model, between 0 (worst) and 1 (best)
 69 correct_prediction = tf.equal(tf.argmax(Y, 1), tf.argmax(Y_, 1))
 70 accuracy = tf.reduce_mean(tf.cast(correct_prediction, tf.float32))
 71 # print("correct_prediction: %s", correct_prediction)
 72
 73 # matplotlib visualisation
 74 allweights = tf.concat([tf.reshape(W1, [-1]), tf.reshape(W2, [-1]),
 75                         tf.reshape(W3, [-1]), tf.reshape(W4, [-1]), tf.reshape(W5, [-1])], 0)
 76 allbiases = tf.concat([tf.reshape(B1, [-1]), tf.reshape(B2, [-1]),
 77                        tf.reshape(B3, [-1]), tf.reshape(B4, [-1]), tf.reshape(B5, [-1])], 0)
 78 I = tensorflowvisu.tf_format_mnist_images(X, Y, Y_)
 79 It = tensorflowvisu.tf_format_mnist_images(X, Y, Y_, 1000, lines=25)
 80 datavis = tensorflowvisu.MnistDataVis()
 81
 82 # training step, learning rate = 0.003
 83 learning_rate = 0.003
 84 train_step = tf.train.AdamOptimizer(learning_rate).minimize(cross_entropy)
 85
 86 # init
 87 init = tf.global_variables_initializer()
 88 sess = tf.Session()
 89 sess.run(init)
 90
 91
 92 # You can call this function in a loop to train the model, 100 images at a time
 93 def training_step(i, update_test_data, update_train_data):
 94
 95     # training on batches of 100 images with 100 labels
 96     batch_X, batch_Y = mnist.train.next_batch(100)
 97
 98     # compute training values for visualisation
 99     if update_train_data:
100         a, c, im, w, b = sess.run([accuracy, cross_entropy, I, allweights, allbiases], {
101                                   X: batch_X, Y_: batch_Y})
102         print(str(i) + ": accuracy:" + str(a) + " loss: " +
103               str(c) + " (lr:" + str(learning_rate) + ")")
104         datavis.append_training_curves_data(i, a, c)
105         datavis.update_image1(im)
106         datavis.append_data_histograms(i, w, b)
107
108     # compute test values for visualisation
109     if update_test_data:
110         a, c, im = sess.run([accuracy, cross_entropy, It], {
111                             X: mnist.test.images, Y_: mnist.test.labels})
112         print(str(i) + ": ********* epoch " + str(i * 100 //
113                                                   mnist.train.images.shape[0] + 1) + " ********* test accuracy:" + str(a) + " test loss: " + str(c))
114         datavis.append_test_curves_data(i, a, c)
115         datavis.update_image2(im)
116
117     # the backpropagation training step
118     sess.run(train_step, {X: batch_X, Y_: batch_Y})
119
120
121 '''
122 datavis.animate(training_step, iterations=10000 + 1, train_data_update_freq=20,
123                 test_data_update_freq = 100, more_tests_at_start = True)
124 '''
125
126 # to save the animation as a movie, add save_movie=True as an argument to datavis.animate
127 # to disable the visualisation use the following line instead of the datavis.animate line
128 for i in range(10000 + 1):
129     training_step(i, i % 100 == 0, i % 20 == 0)
130
131 print("max test accuracy: " + str(datavis.get_max_test_accuracy()))图形可视化训练过程:
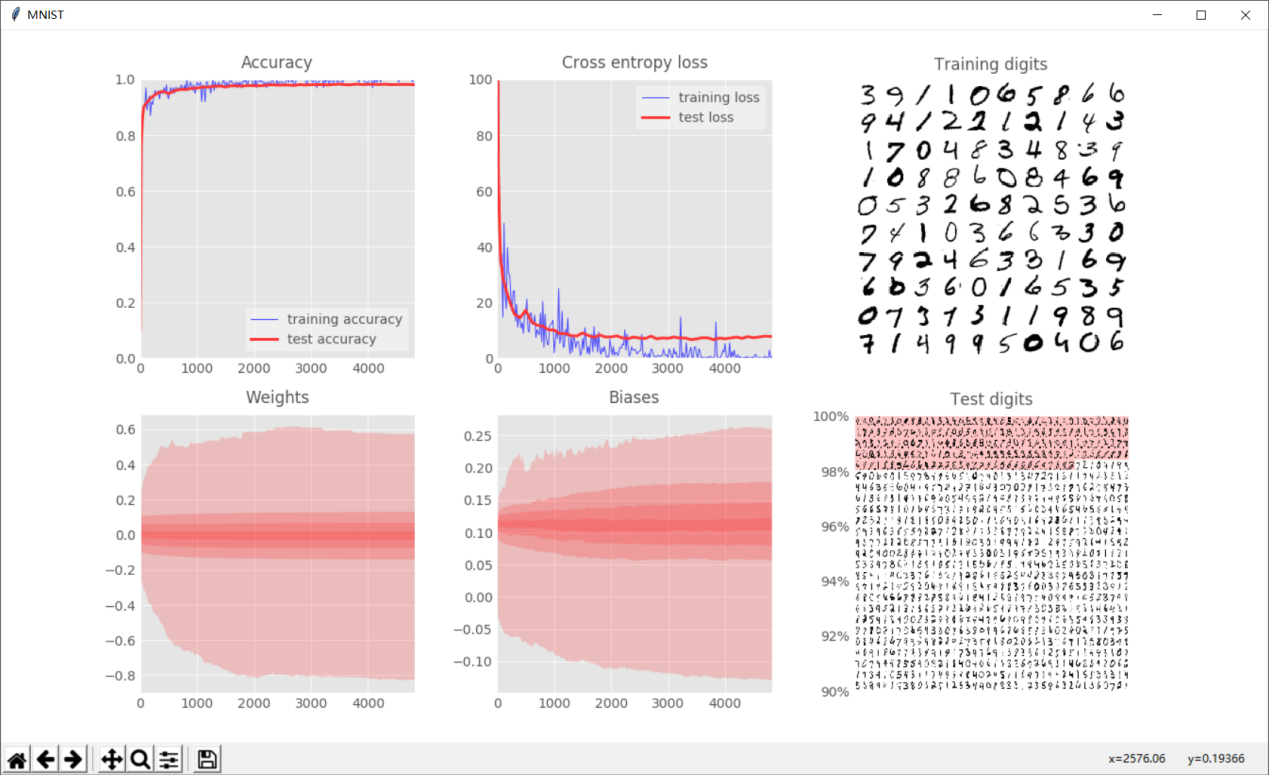
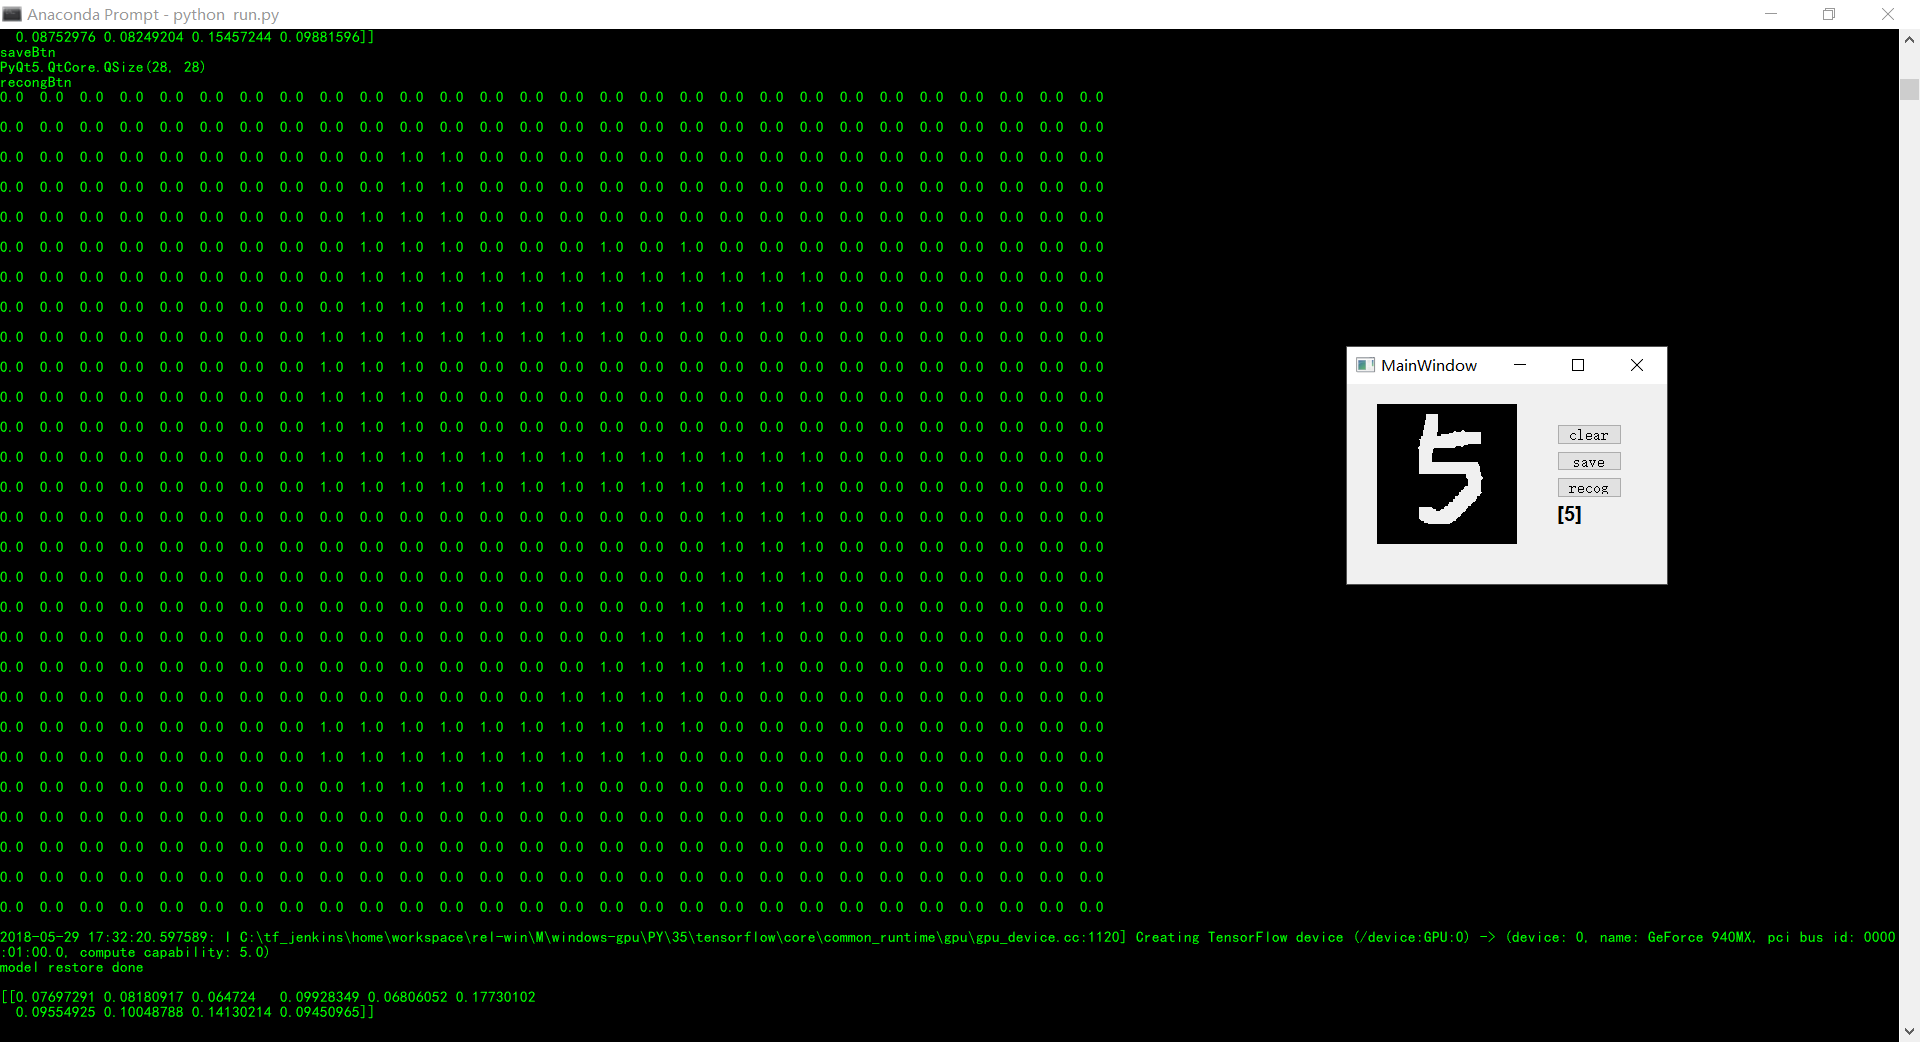
五层全相连的神经网络结构能达到97%的识别率。
调用识别自己的手写数字:
- 卷积神经网络结构


  1 import tensorflow as tf
  2 import tensorflowvisu
  3 import math
  4 from tensorflow.examples.tutorials.mnist import input_data as mnist_data
  5 print("Tensorflow version " + tf.__version__)
  6 tf.set_random_seed(0)
  7
  8 # Download images and labels into mnist.test (10K images+labels) and mnist.train (60K images+labels)
  9 mnist = mnist_data.read_data_sets(
 10     "data", one_hot=True, reshape=False, validation_size=0)
 11
 12 # neural network structure for this sample:
 13 #
 14 # · · · · · · · · · ·      (input data, 1-deep)                 X [batch, 28, 28, 1]
 15 # @ @ @ @ @ @ @ @ @ @   -- conv. layer 5x5x1=>4 stride 1        W1 [5, 5, 1, 4]        B1 [4]
 16 # ∶∶∶∶∶∶∶∶∶∶∶∶∶∶∶∶∶∶∶                                           Y1 [batch, 28, 28, 4]
 17 #   @ @ @ @ @ @ @ @     -- conv. layer 5x5x4=>8 stride 2        W2 [5, 5, 4, 8]        B2 [8]
 18 #   ∶∶∶∶∶∶∶∶∶∶∶∶∶∶∶                                             Y2 [batch, 14, 14, 8]
 19 #     @ @ @ @ @ @       -- conv. layer 4x4x8=>12 stride 2       W3 [4, 4, 8, 12]       B3 [12]
 20 #     ∶∶∶∶∶∶∶∶∶∶∶                                               Y3 [batch, 7, 7, 12] => reshaped to YY [batch, 7*7*12]
 21 #      \x/x\x\x/        -- fully connected layer (relu)         W4 [7*7*12, 200]       B4 [200]
 22 #       · · · ·                                                 Y4 [batch, 200]
 23 #       \x/x\x/         -- fully connected layer (softmax)      W5 [200, 10]           B5 [10]
 24 #        · · ·                                                  Y [batch, 10]
 25
 26 # input X: 28x28 grayscale images, the first dimension (None) will index the images in the mini-batch
 27 X = tf.placeholder(tf.float32, [None, 28, 28, 1])
 28 # correct answers will go here
 29 Y_ = tf.placeholder(tf.float32, [None, 10])
 30 # variable learning rate
 31 lr = tf.placeholder(tf.float32)
 32
 33 # three convolutional layers with their channel counts, and a
 34 # fully connected layer (tha last layer has 10 softmax neurons)
 35 K = 4  # first convolutional layer output depth
 36 L = 8  # second convolutional layer output depth
 37 M = 12  # third convolutional layer
 38 N = 200  # fully connected layer
 39
 40 # 5x5 patch, 1 input channel, K output channels
 41 W1 = tf.Variable(tf.truncated_normal([5, 5, 1, K], stddev=0.1), name="W1")
 42 B1 = tf.Variable(tf.ones([K]) / 10, name="B1")
 43 W2 = tf.Variable(tf.truncated_normal([5, 5, K, L], stddev=0.1), name="W2")
 44 B2 = tf.Variable(tf.ones([L]) / 10, name="B2")
 45 W3 = tf.Variable(tf.truncated_normal([4, 4, L, M], stddev=0.1), name="W3")
 46 B3 = tf.Variable(tf.ones([M]) / 10, name="B3")
 47
 48 W4 = tf.Variable(tf.truncated_normal([7 * 7 * M, N], stddev=0.1), name="W4")
 49 B4 = tf.Variable(tf.ones([N]) / 10, name="B4")
 50 W5 = tf.Variable(tf.truncated_normal([N, 10], stddev=0.1), name="W5")
 51 B5 = tf.Variable(tf.ones([10]) / 10, name="B5")
 52
 53 # The model
 54 stride = 1  # output is 28x28
 55 Y1 = tf.nn.relu(tf.nn.conv2d(
 56     X, W1, strides=[1, stride, stride, 1], padding='SAME') + B1)
 57 stride = 2  # output is 14x14
 58 Y2 = tf.nn.relu(tf.nn.conv2d(Y1, W2, strides=[
 59                 1, stride, stride, 1], padding='SAME') + B2)
 60 stride = 2  # output is 7x7
 61 Y3 = tf.nn.relu(tf.nn.conv2d(Y2, W3, strides=[
 62                 1, stride, stride, 1], padding='SAME') + B3)
 63
 64 # reshape the output from the third convolution for the fully connected layer
 65 YY = tf.reshape(Y3, shape=[-1, 7 * 7 * M])
 66
 67 Y4 = tf.nn.relu(tf.matmul(YY, W4) + B4)
 68 Ylogits = tf.matmul(Y4, W5) + B5
 69 Y = tf.nn.softmax(Ylogits)
 70
 71 # cross-entropy loss function (= -sum(Y_i * log(Yi)) ), normalised for batches of 100  images
 72 # TensorFlow provides the softmax_cross_entropy_with_logits function to avoid numerical stability
 73 # problems with log(0) which is NaN
 74 cross_entropy = tf.nn.softmax_cross_entropy_with_logits(
 75     logits=Ylogits, labels=Y_)
 76 cross_entropy = tf.reduce_mean(cross_entropy) * 100
 77
 78 # accuracy of the trained model, between 0 (worst) and 1 (best)
 79 correct_prediction = tf.equal(tf.argmax(Y, 1), tf.argmax(Y_, 1))
 80 accuracy = tf.reduce_mean(tf.cast(correct_prediction, tf.float32))
 81
 82 # matplotlib visualisation
 83 allweights = tf.concat([tf.reshape(W1, [-1]), tf.reshape(W2, [-1]),
 84                         tf.reshape(W3, [-1]), tf.reshape(W4, [-1]), tf.reshape(W5, [-1])], 0)
 85 allbiases = tf.concat([tf.reshape(B1, [-1]), tf.reshape(B2, [-1]),
 86                        tf.reshape(B3, [-1]), tf.reshape(B4, [-1]), tf.reshape(B5, [-1])], 0)
 87 I = tensorflowvisu.tf_format_mnist_images(X, Y, Y_)
 88 It = tensorflowvisu.tf_format_mnist_images(X, Y, Y_, 1000, lines=25)
 89 datavis = tensorflowvisu.MnistDataVis()
 90
 91 # training step, the learning rate is a placeholder
 92 train_step = tf.train.AdamOptimizer(lr).minimize(cross_entropy)
 93
 94 # init
 95 init = tf.global_variables_initializer()
 96 sess = tf.Session()
 97 sess.run(init)
 98
 99 # You can call this function in a loop to train the model, 100 images at a time
100
101
102 def training_step(i, update_test_data, update_train_data):
103
104     # training on batches of 100 images with 100 labels
105     batch_X, batch_Y = mnist.train.next_batch(100)
106
107     # learning rate decay
108     max_learning_rate = 0.003
109     min_learning_rate = 0.0001
110     decay_speed = 2000.0
111     learning_rate = min_learning_rate + \
112         (max_learning_rate - min_learning_rate) * math.exp(-i / decay_speed)
113
114     # compute training values for visualisation
115     if update_train_data:
116         a, c, im, w, b = sess.run([accuracy, cross_entropy, I, allweights, allbiases], {
117                                   X: batch_X, Y_: batch_Y})
118         print(str(i) + ": accuracy:" + str(a) + " loss: " +
119               str(c) + " (lr:" + str(learning_rate) + ")")
120         datavis.append_training_curves_data(i, a, c)
121         datavis.update_image1(im)
122         datavis.append_data_histograms(i, w, b)
123
124     # compute test values for visualisation
125     if update_test_data:
126         a, c, im = sess.run([accuracy, cross_entropy, It], {
127                             X: mnist.test.images, Y_: mnist.test.labels})
128         print(str(i) + ": ********* epoch " + str(i * 100 //
129                                                   mnist.train.images.shape[0] + 1) + " ********* test accuracy:" + str(a) + " test loss: " + str(c))
130         datavis.append_test_curves_data(i, a, c)
131         datavis.update_image2(im)
132
133     # the backpropagation training step
134     sess.run(train_step, {X: batch_X, Y_: batch_Y, lr: learning_rate})
135
136 #datavis.animate(training_step, 10001, train_data_update_freq=10, test_data_update_freq=100)
137
138
139 # to save the animation as a movie, add save_movie=True as an argument to datavis.animate
140 # to disable the visualisation use the following line instead of the datavis.animate line
141 for i in range(10000 + 1):
142     training_step(i, i % 100 == 0, i % 20 == 0)
143
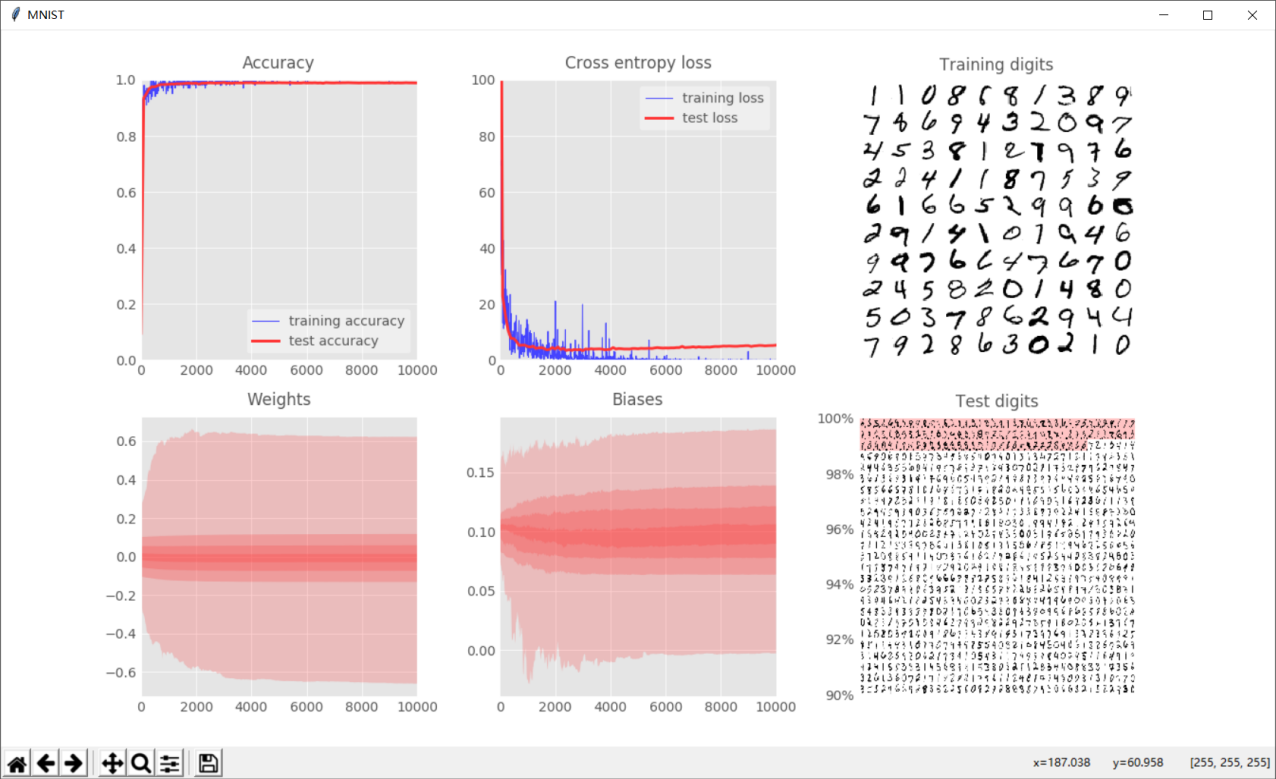
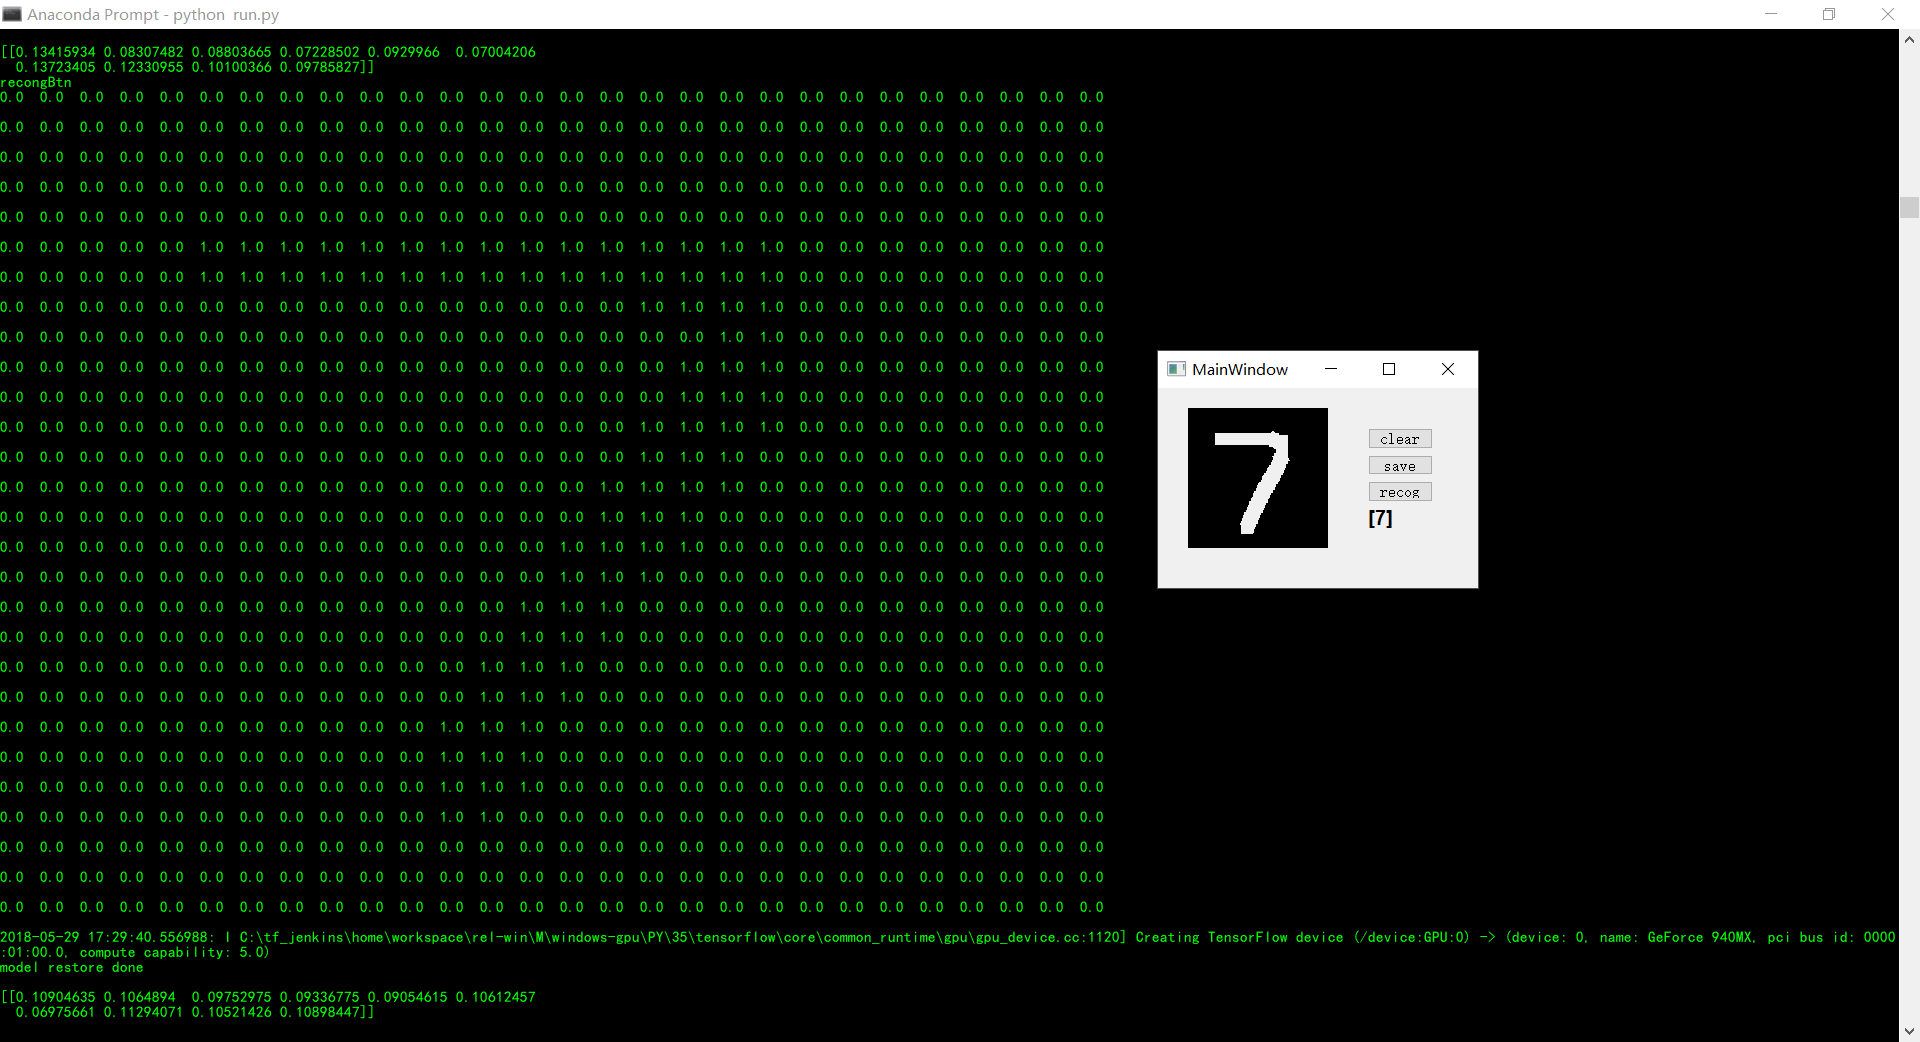
144 print("max test accuracy: " + str(datavis.get_max_test_accuracy()))见识下仅有三个卷积层的神经网络结果:
识别自己的手写数字:
至此总算结束了毕业设计,完成了论文答辩,这两个月来确实学到了许多东西,也遇到了许多麻烦,po出来是希望能够给予像我一样遇到相似困境的人一些帮助。共勉。
参考文献:没有博士学位如何玩转TensorFlow和深度学习
来源:oschina
链接:https://my.oschina.net/u/4393052/blog/3918548