Nagios部署(一)
1) 安装准备
系统:redhat7.1(监控端)、centos6.5(被监控端)
软件:nagios-cn-3.2.3.tar.bz2、gd-devel-2.0.35-26.el7.x86_64.rpm、nagios-plugins-2.1.1.tar.gz
| 主机名 | IP地址 | 角色 |
| ------------------| -------------- |-------------------|
| host.mystudy.com | 192.168.1.183 | 监控端 |
| chunlin | 139.199.181.155| 被监控端1(远程) |
| client5 | 192.168.1222.15| 被监控端2(同网段)|
防火墙:关闭
SELinux:Disabled
时间:保持同步
2) 安装nagios
[root@host ~]# yum install -y httpd
[root@host ~]# yum install -y gd-devel-2.0.35-26.el7.x86_64.rpm
[root@host ~]# mkdir /usr/local/nagios
[root@host ~]# useradd -s /sbin/nologin nagios
[root@host ~]# groupadd nagcmd
#使外部操作能够在Web界面上提交
root@host ~]# usermod -aG nagcmd nagios
root@host ~]# usermod -aG nagcmd apache[root@host nagios]# tar -jxf nagios-cn-3.2.3.tar.bz2
[root@host nagios-cn-3.2.3]# ./configure --with-command-group=nagcmd --prefix=/usr/local/nagios
[root@host nagios-cn-3.2.3]# make all
[root@host nagios-cn-3.2.3]# make install
[root@host nagios-cn-3.2.3]# make install-init
#创建Nagios启动脚本
[root@host nagios-cn-3.2.3]# make install-config
#安装Nagios示例配置文件
[root@host nagios-cn-3.2.3]# make install-commandmode
#配置目录权限
[root@host nagios-cn-3.2.3]# make install-webconf
#创建/etc/httpd/conf.d/nagios.conf
[root@host nagios-cn-3.2.3]# htpasswd -c
/usr/local/nagios/etc/htpasswd.users nagiosadmin
#创建Nagios的Web界面登录账号和密码
[root@host nagios-cn-3.2.3]# /usr/local/nagios/bin/nagios -v /usr/local/nagios/etc/nagios.cfg
#检查Nagios配置文件正确性
[root@host etc]# systemctl restart httpd
[root@host etc]# systemctl start nagios
#在浏览器中输入http://localhost/nagios/即可看到Web监控界面
3) 安装nagios-plugin
[root@client5 nagios-plugins-2.2.0]# yum install -y perl-ExtUtils-MakeMaker
[root@host nagios]# yum install -y openssl-devel
[root@host nagios]# yum install -y mariadb-devel
[root@host nagios]# tar -zxf nagios-plugins-2.2.0.tar.gz
[root@host nagios-plugins-2.2.0]# ./configure --prefix=/usr/local/nagios --with-nagios-user=nagios
--with-nagios-group=nagios
--enable-extra-opts
--enable-libtap
--enable-perl-modules
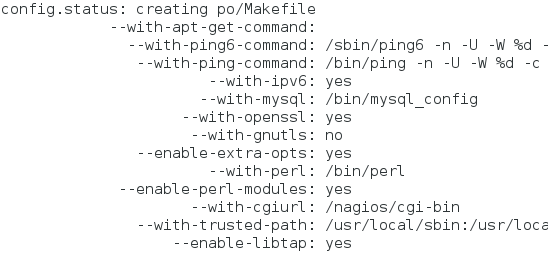
configure过程的输出结果如下:
#支持mysql监控、支持SSL加密、支持extra-opts、perl-modules、libtap
[root@host nagios-plugins-2.2.0]# make
[root@host nagios-plugins-2.2.0]# make install
4) 配置监控实例
- 本地监控:
[root@host ~]# cd /usr/local/nagios/etc/objects
[root@host objects]# cp -p localhost.cfg hosts.cfg
[root@host objects]# cp -p localhost.cfg services.cfg
[root@host objects]# vim ../nagios.cfg
#cfg_file处添加如下两行:
cfg_file=/usr/local/nagios/etc/objects/hosts.cfg
cfg_file=/usr/local/nagios/etc/objects/services.cfg
#cfg_file=/usr/local/nagios/etc/objects/localhost.cfg
#将localhost.cfg这一项注释掉
[root@host objects]# vim hosts.cfg
define host{
     use                     linux-server
     host_name               host.mystudy.com
     alias                   Manager
     address                 127.0.0.1
     icon_image              server.gif
     statusmap_image         server.gd2
     2d_coords               500,200
     3d_coords               500,200,200
     }
define hostgroup{
     hostgroup_name  linux-servers
     alias           Linux Servers
     members         *
    }
#定义主机和主机组
[root@host objects]# vim services.cfg
define servicegroup{
      servicegroup_name Local_Check
      alias Load_Check
      members host.mystudy.com,local_disk,host.mystudy.com,local_user_login,host.mystudy.com,local_load,host.mystudy.com,local_swap,host.mystudy.com,local_process,host.mystudy.com,PING
    }
#定义资源组和资源,资源的定义默认都给出了就不在这一一列出了
- 远程监控:
[root@host objects]# vim hosts.cfg
# 新增如下主机定义
define host{
    use                     linux-server
    host_name               chunlin
    alias                   Web
    address                 139.199.181.155
    icon_image              server.gif
    statusmap_image         server.gd2
    2d_coords               500,100
    3d_coords               500,100,200
    }
- check_mysql
[root@host objects]# vim commands.cfg
define command{
    command_name    check_mysql
    command_line    $USER1$/check_mysql -H $HOSTADDRESS$ -u $ARG1$ -p $ARG2$ -d $ARG3$
    }
#-H:主机地址 -u:mysql授权用户 -p:mysql密码 -d:库
- check_ftp
[root@host objects]# vim commands.cfg
define command{
    command_name   check_ftp
    command_line   $USER1$/check_ftp -H $HOSTADDRESS$ -p 21 -w $ARG1$ -c $ARG2$
    }
#-w:告警时延 -c:严重告警时延
[root@host objects]# vim services.cfg
#新增资源组定义如下
define servicegroup{
    servicegroup_name Web_Check
    alias Load_Check
    members chunlin,PING,chunlin,MySQL,chunlin,FTP
    }
#新增资源定义如下
define service{
    use                             local-service
    host_name                       chunlin
    service_description             MySQL
    check_command                   check_mysql!xx!xx!mysql
    notifications_enabled           0
    }

define service{
    use                             local-service
    host_name                       chunlin
    service_description             FTP
    check_command                   check_ftp!0.080!0.20
    notifications_enabled           0
    }
[root@host objects]# nagios -v /usr/local/nagios/etc/nagios.cfg
[root@host objects]# systemctl restart nagios.service
5) 远端本地资源监控
- 远端主机安装plugin+nrpe
nagios-plugin在这就不赘述,前面有详细说明
nrpe安装:
[root@chunlin ~]# yum install -y xinetd
[root@chunlin nagios]# tar -zxf nrpe-2.15.tar.gz
[root@chunlin nagios]# cd nrpe-2.15
[root@chunlin nrpe-2.15]# ./configure --prefix=/usr/local/nagios
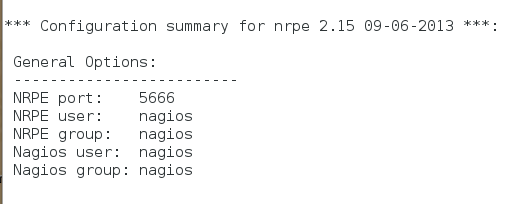
configure过程的输出结果如下:
[root@chunlin nrpe-2.15]# make all
[root@chunlin nrpe-2.15]# make install-plugin
[root@chunlin nrpe-2.15]# make install-daemon
[root@chunlin nrpe-2.15]# make install-daemon-config
[root@chunlin nrpe-2.15]# make install-xinetd
[root@chunlin libexec]# vim /etc/xinetd.d/nrpe
only_from = xxx.xxx.xxx.xxx #nagios监控主机IP地址或域名
[root@chunlin libexec]# vim /usr/local/nagios/etc/nrpe.cfg
#将对磁盘的检测命令修改为如下
command[check_disk]=/usr/local/nagios/libexec/check_disk -w 20% -c 10% -p /
[root@chunlin libexec]# vim /etc/services
#添加如下一行
nrpe 5666/tcp #nrpe
[root@chunlin libexec]# /etc/init.d/xinetd start
- 本地主机安装nrpe
[guest@host nagios]$ tar -zxf nrpe-2.15.tar.gz
[root@host nagios]# cd nrpe-2.15/
[root@host nrpe-2.15]# ./configure --prefix=/usr/local/nagios
--with-nagios-user=nagios
--with-nagios-group=nagios
[root@host nrpe-2.15]# make all
[root@host nrpe-2.15]# make install-plugin
[root@host objects]# vim commands.cfg
    define command{
       command_name    check_nrpe
       command_line    $USER1$/check_nrpe -H $HOSTADDRESS$ -c $ARG1$
    }
[root@host objects]# vim services.cfg
    define servicegroup{
    servicegroup_name Local_Check
    alias disk_Check
    members client5,check_disk
    }

    define service{
    use                             local-service
    host_name                       client5
    service_description             check_disk
    check_command                   check_nrpe!check_disk
    notifications_enabled           0
    }
[root@host objects]# nagios -v /usr/local/nagios/etc/nagios.cfg
[root@host objects]# systemctl restart nagios.service
来源:https://www.cnblogs.com/NewStudy/p/7270492.html