介绍在Kubernetes快速部署高可用PostgreSQL集群的方法,基于Stolon项目的工作。
- 项目源码:https://github.com/sorintlab/stolon
- 项目介绍:https://sgotti.me/post/stolon-introduction/
- Helm Chart:https://github.com/lwolf/stolon-chart/tree/master/stolon

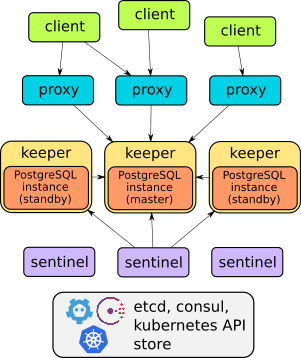
Stolon是由3个部分组成的:
- keeper:管理PostgreSQL实例,汇聚到由sentinel(s)提供的clusterview。
- sentinel:发现并监控keeper,并且计算最理想的clusterview。
- proxy:客户端的接入点。它连接到PostgreSQL的master并且强制关闭非选举产生master。
Stolon用etcd或者consul作为主要的集群状态存储,默认使用Kubernetes的存储来保存集群的状态。
第一步,安装Helm chart
# 获取项目代码,包含一个Helm Chart及其默认参数。
$ git clone https://github.com/lwolf/stolon-chart

# 安装到命名空间stolon,helm chart名称为postgresql。
$ cd stolon-chart
$ helm install ./stolon --name postgresql --namespace stolon
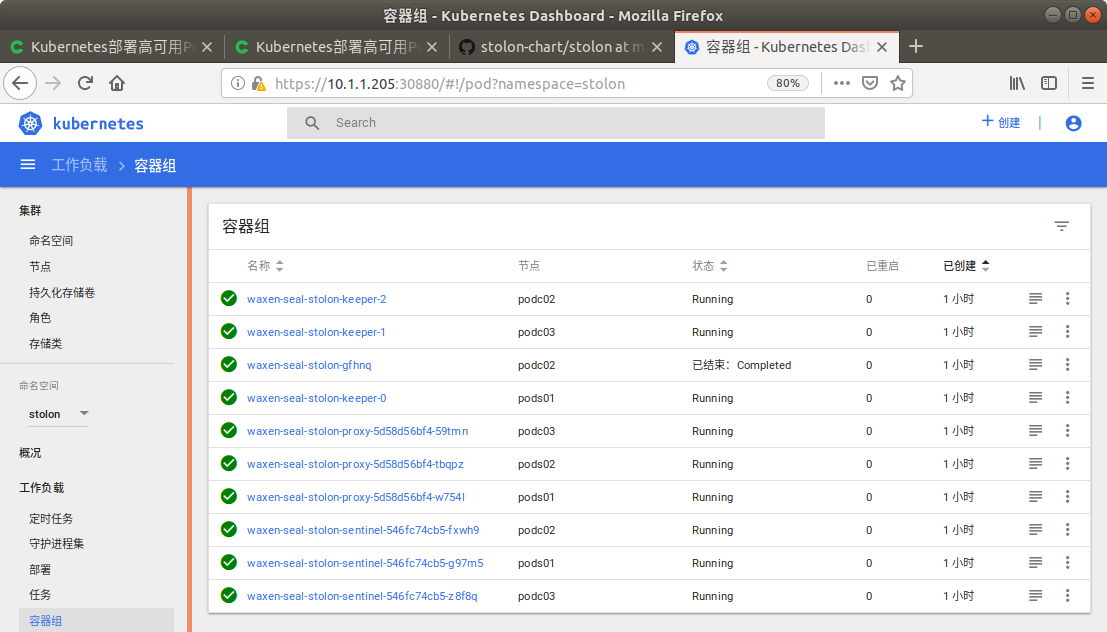
此时,打开Dashboard面板,应该可以看到命名空间stolon下的运行pod和服务等资源。

第二步,修改配置参数
编辑stolon的服务,修改网络地址类型为NodePort(端口号30900),以便外部访问。
kubeedit svc/waxen-seal-stolon-proxy -n stolon修改后的配置文件如下:
#supermap@podc01:~/openthings/$kubectl get svc/waxen-seal-stolon-proxy -n stolon -o yaml
apiVersion: v1
kind: Service
metadata:
  creationTimestamp: "2018-12-25T07:59:48Z"
  labels:
    app: waxen-seal-stolon-proxy
    chart: stolon-0.7.0
    component: stolon-proxy
    heritage: Tiller
    release: waxen-seal
  name: waxen-seal-stolon-proxy
  namespace: stolon
  resourceVersion: "596639"
  selfLink: /api/v1/namespaces/stolon/services/waxen-seal-stolon-proxy
  uid: 0d0ef0b1-081b-11e9-822a-7085c2a625da
spec:
  clusterIP: 10.103.227.204
  externalTrafficPolicy: Cluster
  ports:
  - nodePort: 30900
    port: 5432
    protocol: TCP
    targetPort: 5432
  selector:
    app: waxen-seal-stolon-proxy
    chart: stolon-0.7.0
    component: stolon-proxy
    release: waxen-seal
    stolon-cluster: waxen-seal-stolon
  sessionAffinity: None
  type: NodePort
status:
  loadBalancer: {}
第三步,安装客户端并访问服务
获取代理服务服务的登录密码(用户名为stolon):
PGPASSWORD=$(kubectl get secret --namespace stolon waxen-seal-stolon -o jsonpath="{.data.pg_su_password}" | base64 --decode; echo)

echo $PGPASSWORD
宿主机上,安装postgresql的客户端:
sudo apt install postgresql-client-common postgresql-client测试一下(创建表、添加记录、查询记录):
#psql --host <IP> --port 30900 postgres -U stolon -W
psql --host localhost --port 30900 postgres -U stolon -W
#输入上面获得的登录密码,回车。

postgres=# create table test (id int primary key not null,
value text not null);
CREATE TABLE

postgres=# insert into test values (1, 'value1');
INSERT 0 1

postgres=# select * from test;
id | value
---- --------
1 | value1
(1 row)
完毕。
更多参考:
- Kubernetes上PostgreSQL集群的管理
- Kubernetes部署高可用PostgreSQL集群
- kubernetes-postgis,https://devhub.io/repos/tensorflight-kubernetes-postgis
- Stolon项目源码:https://github.com/sorintlab/stol
MySQL, Vitess: Scaling MySQL with Sugu Sougoumarane
来源:oschina
链接:https://my.oschina.net/u/2306127/blog/2993077