一、安装java环境(略)
这方面资料很多
我的环境是JDK6+eclipse4 j2ee版,自带Maven等一些插件
二、安装Maven(略)
Maven安装简单装好后修改 根目录/conf/settings.xml,配置好maven库目录

打开eclipse windows-preference-maven-userSettings-global settings选择maven安装目录的settings.xml文件
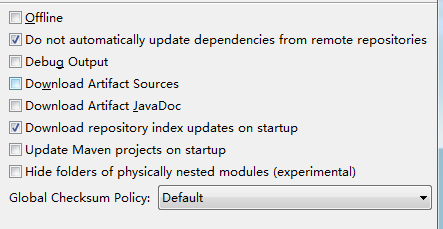
点击maven在主配置上勾选,这时maven会下载index可能会很慢。需要等等
三、创建maven工程
点击Eclipse菜单栏File->New->Ohter->Maven->选择项目目录->next->选择项目类型


搜索web,创建项目->next

填写groupId和artifact Id->finish

项目配置
右击项目-new
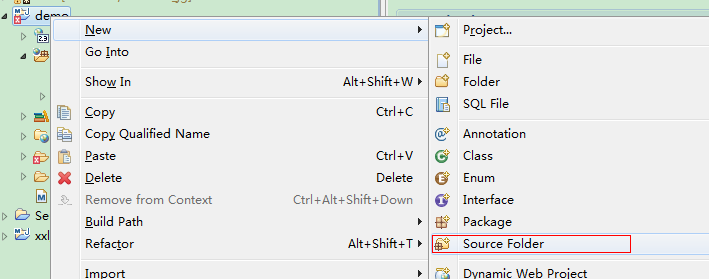
创建如下几个文件

配置build path
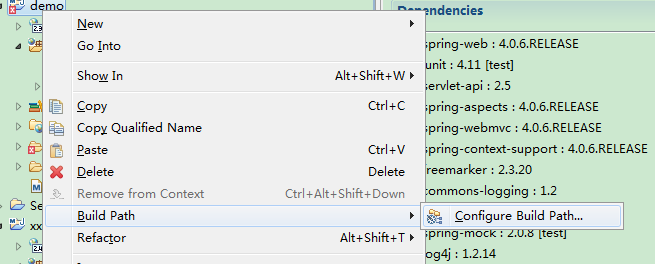
分别修改输出路径为
src/main/resources 对应 target/classes
src/main/java 对应 target/classes
src/test/resources 对应 target/test-classes
src/test/java 对应 target/test-classes

设置JDK版本
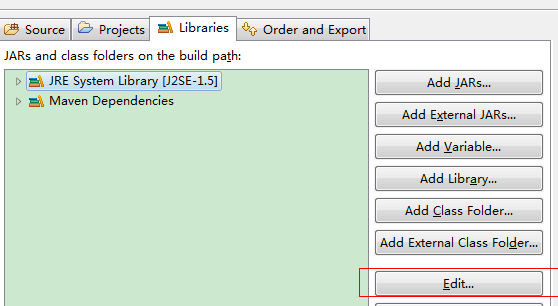

设置部署程序集(Web Deployment Assembly)
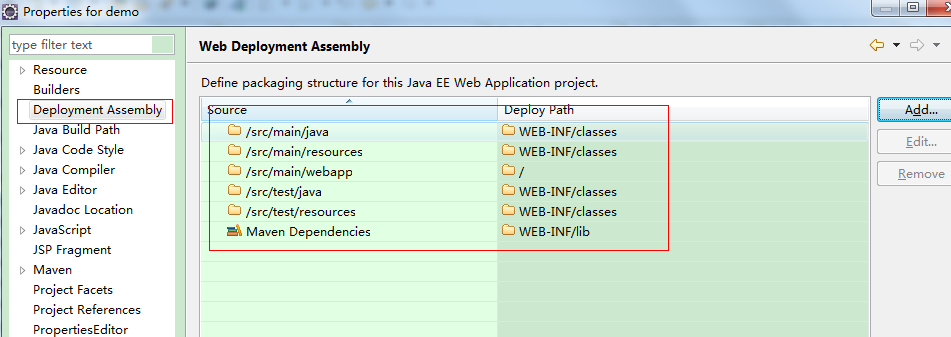
把两个test目录去掉!!!
到此项目算是部署完成了。如果有其他问题百度一下吧!!
三 spring mvc+spring+mybatis配置
首先pom.xml文件内容
<project xmlns="http://maven.apache.org/POM/4.0.0" xmlns:xsi="http://www.w3.org/2001/XMLSchema-instance"
  xsi:schemaLocation="http://maven.apache.org/POM/4.0.0 http://maven.apache.org/maven-v4_0_0.xsd">
  <modelVersion>4.0.0</modelVersion>
  <groupId>com.xxl.maven_web</groupId>
  <artifactId>xxl_maven_web</artifactId>
  <packaging>war</packaging>
  <version>0.0.1-SNAPSHOT</version>
  <name>xxl_maven_web Maven Webapp</name>
  <url>http://maven.apache.org</url>
  <build>
    <finalName>xxl_maven_web</finalName>
  </build>
  <dependencies>
  	<dependency>
  		<groupId>org.springframework</groupId>
  		<artifactId>spring-web</artifactId>
  		<version>4.0.6.RELEASE</version>
  	</dependency>
  	<dependency>
  		<groupId>junit</groupId>
  		<artifactId>junit</artifactId>
  		<version>4.11</version>
  		<scope>test</scope>
  	</dependency>
  	<dependency>
  		<groupId>javax.servlet</groupId>
  		<artifactId>servlet-api</artifactId>
  		<version>2.5</version>
  	</dependency>
  	<dependency>
  		<groupId>org.springframework</groupId>
  		<artifactId>spring-aspects</artifactId>
  		<version>4.0.6.RELEASE</version>
  	</dependency>
  	<dependency>
  		<groupId>org.springframework</groupId>
  		<artifactId>spring-webmvc</artifactId>
  		<version>4.0.6.RELEASE</version>
  	</dependency>
  	<dependency>
  		<groupId>org.springframework</groupId>
  		<artifactId>spring-context-support</artifactId>
  		<version>4.0.6.RELEASE</version>
  	</dependency>
  	<dependency>
  		<groupId>org.freemarker</groupId>
  		<artifactId>freemarker</artifactId>
  		<version>2.3.20</version>
  	</dependency>
  	<dependency>
  		<groupId>commons-logging</groupId>
  		<artifactId>commons-logging</artifactId>
  		<version>1.2</version>
  	</dependency>
  	<dependency>
  		<groupId>commons-lang</groupId>
  		<artifactId>commons-lang</artifactId>
  		<version>2.6</version>
  	</dependency>
  	<dependency>
  		<groupId>org.springframework</groupId>
  		<artifactId>spring-mock</artifactId>
  		<version>2.0.8</version>
  		<scope>test</scope>
  	</dependency>
  	<dependency>
  		<groupId>log4j</groupId>
  		<artifactId>log4j</artifactId>
  		<version>1.2.14</version>
  	</dependency>
  	<dependency>
  		<groupId>org.mybatis</groupId>
  		<artifactId>mybatis</artifactId>
  		<version>3.2.7</version>
  	</dependency>
  	<dependency>
  		<groupId>org.mybatis</groupId>
  		<artifactId>mybatis-spring</artifactId>
  		<version>1.2.2</version>
  	</dependency>
  	<dependency>
  		<groupId>mysql</groupId>
  		<artifactId>mysql-connector-java</artifactId>
  		<version>5.1.32</version>
  	</dependency>
  	<dependency>
  		<groupId>org.springframework</groupId>
  		<artifactId>spring-tx</artifactId>
  		<version>4.0.6.RELEASE</version>
  	</dependency>
  	<dependency>
  		<groupId>org.springframework</groupId>
  		<artifactId>spring-jdbc</artifactId>
  		<version>4.0.6.RELEASE</version>
  	</dependency>
  	<dependency>
  		<groupId>org.apache.commons</groupId>
  		<artifactId>commons-collections4</artifactId>
  		<version>4.0</version>
  	</dependency>
  	<dependency>
  		<groupId>commons-dbcp</groupId>
  		<artifactId>commons-dbcp</artifactId>
  		<version>1.4</version>
  	</dependency>
  	<dependency>
  		<groupId>commons-pool</groupId>
  		<artifactId>commons-pool</artifactId>
  		<version>1.6</version>
  	</dependency>
  	<dependency>
  		<groupId>org.springframework</groupId>
  		<artifactId>spring-test</artifactId>
  		<version>4.0.6.RELEASE</version>
  		<scope>test</scope>
  	</dependency>
  </dependencies>
</project>
web.xml
<?xml version="1.0" encoding="UTF-8"?>
<web-app xmlns="http://java.sun.com/xml/ns/javaee"
         xmlns:xsi="http://www.w3.org/2001/XMLSchema-instance"
	     xsi:schemaLocation="http://java.sun.com/xml/ns/javaee
	                         http://java.sun.com/xml/ns/javaee/web-app_2_5.xsd"
	     version="2.5" >

	<!-- 区分项目名称,防止默认重名 -->
	<context-param>
		<param-name>webAppRootKey</param-name>
		<param-value>maven.xxl_web.root</param-value>
	</context-param>

	<!-- Spring的log4j监听器 -->
	<listener>
		<listener-class>org.springframework.web.util.Log4jConfigListener</listener-class>
	</listener>

	<!-- 字符集 过滤器  -->
	<filter>
		<filter-name>CharacterEncodingFilter</filter-name>
		<filter-class>org.springframework.web.filter.CharacterEncodingFilter</filter-class>
		<init-param>
			<param-name>encoding</param-name>
			<param-value>UTF-8</param-value>
		</init-param>
		<init-param>
			<param-name>forceEncoding</param-name>
			<param-value>true</param-value>
		</init-param>
	</filter>
	<filter-mapping>
		<filter-name>CharacterEncodingFilter</filter-name>
		<url-pattern>/*</url-pattern>
	</filter-mapping>

	<!-- 设置Spring容器加载配置文件路径 -->
	<context-param>
		<param-name>contextConfigLocation</param-name>
		<param-value>classpath:applicationContext-*.xml</param-value>
	</context-param>

	<!-- Spring view分发器 -->
	<servlet>
		<servlet-name>dispatcher</servlet-name>
		<servlet-class>org.springframework.web.servlet.DispatcherServlet</servlet-class>
		<init-param>
			<param-name>contextConfigLocation</param-name>
			<param-value>/WEB-INF/dispatcher-servlet.xml</param-value>
		</init-param>
		<load-on-startup>1</load-on-startup>
	</servlet>
	<servlet-mapping>
		<servlet-name>dispatcher</servlet-name>
		<url-pattern>*.html</url-pattern>
		<!--拦截/*,这是一个错误的方式,请求可以走到Action中,但转到jsp时再次被拦截,不能访问到jsp。
			拦截/,restful风格 弊端:会导致静态文件(jpg,js,css)被拦截后不能正常显示。解决办法看dispatcher-->
	</servlet-mapping>

	<!-- Spring会创建一个WebApplicationContext上下文,称为父上下文(父容器) ,保存在 ServletContext中,key是WebApplicationContext.ROOT_WEB_APPLICATION_CONTEXT_ATTRIBUTE的值。
	可以使用Spring提供的工具类取出上下文对象:WebApplicationContextUtils.getWebApplicationContext(ServletContext);

	DispatcherServlet是一个Servlet,可以同时配置多个,每个 DispatcherServlet有一个自己的上下文对象(WebApplicationContext),称为子上下文(子容器),子上下文可以访问父上下文中的内容,
	但父上下文不能访问子上下文中的内容。 它也保存在 ServletContext中,key是"org.springframework.web.servlet.FrameworkServlet.CONTEXT"+Servlet名称。当一个Request对象产生时,
	会把这个子上下文对象(WebApplicationContext)保存在Request对象中,key是DispatcherServlet.class.getName() + ".CONTEXT"。
	可以使用工具类取出上下文对象:RequestContextUtils.getWebApplicationContext(request);-->
	<listener>
		<listener-class>org.springframework.web.context.ContextLoaderListener</listener-class>
	</listener>


	<welcome-file-list>
		<welcome-file>/login.jsp</welcome-file>
	</welcome-file-list>

</web-app>
dispatcher-servlet.xml
<?xml version="1.0" encoding="UTF-8"?>
<beans xmlns="http://www.springframework.org/schema/beans"
	   xmlns:aop="http://www.springframework.org/schema/aop"
	   xmlns:context="http://www.springframework.org/schema/context"
	   xmlns:mvc="http://www.springframework.org/schema/mvc"
	   xmlns:p="http://www.springframework.org/schema/p"
	   xmlns:tx="http://www.springframework.org/schema/tx"
	   xmlns:xsi="http://www.w3.org/2001/XMLSchema-instance"
	   xsi:schemaLocation="http://www.springframework.org/schema/aop
		http://www.springframework.org/schema/aop/spring-aop-3.0.xsd
		http://www.springframework.org/schema/beans
		http://www.springframework.org/schema/beans/spring-beans-3.0.xsd
		http://www.springframework.org/schema/context
		http://www.springframework.org/schema/context/spring-context-3.0.xsd
		http://www.springframework.org/schema/mvc
		http://www.springframework.org/schema/mvc/spring-mvc-3.0.xsd
		http://www.springframework.org/schema/tx
		http://www.springframework.org/schema/tx/spring-tx-3.0.xsd">

	<!-- <mvc:annotation-driven /> -->
	<!--注解说明
    <context:annotation-config />-->

   <!--  @Controller 声明Action组件
	@Service    声明Service组件    @Service("myMovieLister")
	@Repository 声明Dao组件
	@Component   泛指组件, 当不好归类时.
	@RequestMapping("/menu")  请求映射
	@Resource  用于注入,( j2ee提供的 ) 默认按名称装配,@Resource(name="beanName")
	@Autowired 用于注入,(spring提供的) 默认按类型装配
	@Transactional( rollbackFor={Exception.class}) 事务管理
	@ResponseBody
	@Scope("prototype")   设定bean的作用域 -->
	<context:component-scan base-package="com.xxl.app.**.control" />

	<mvc:resources mapping="/images/**" location="/images/" cache-period="31556926"/>
	<mvc:resources mapping="/js/**" location="/js/" cache-period="31556926"/>
	<mvc:resources mapping="/css/**" location="/css/" cache-period="31556926"/>

	<bean name="handlerAdapter" class="org.springframework.web.servlet.mvc.method.annotation.RequestMappingHandlerAdapter" >
		<!--<property name="messageConverters">
			<list>
				 <ref bean="byteArray_hmc" />
				<ref bean="string_hmc" />
			</list>
		</property>-->
	</bean>
	<!-- <bean id="byteArray_hmc" class="org.springframework.http.converter.ByteArrayHttpMessageConverter" />处理..
	<bean id="string_hmc" class="org.springframework.http.converter.StringHttpMessageConverter" />处理..  -->
	<bean name="handlerMapping" class="org.springframework.web.servlet.mvc.method.annotation.RequestMappingHandlerMapping">
		<!-- 只会拦截@RequestMapping的URL
		<property name="interceptors">
		     <list>
		         <bean class="com.mvc.MyInteceptor"></bean>
		     </list>
		 </property> -->
	</bean>
	<!-- freemarker的配置 -->
    <bean id="freemarkerConfigurer" class="org.springframework.web.servlet.view.freemarker.FreeMarkerConfigurer">
        <property name="templateLoaderPath" value="/WEB-INF/view/" />
        <property name="defaultEncoding" value="UTF-8" />
        <property name="freemarkerSettings">
            <props>
                <prop key="template_update_delay">10</prop>
                <prop key="locale">zh_CN</prop>
                <prop key="datetime_format">yyyy-MM-dd HH:mm:ss</prop>
                <prop key="date_format">yyyy-MM-dd</prop>
                <prop key="number_format">#.##</prop>
            </props>
        </property>
    </bean>
    <!-- FreeMarker视图解析 如返回userinfo。。在这里配置后缀名ftl和视图解析器。。 -->
    <bean id="viewResolver" class="org.springframework.web.servlet.view.freemarker.FreeMarkerViewResolver">
        <property name="viewClass" value="org.springframework.web.servlet.view.freemarker.FreeMarkerView" />
        <property name="suffix" value=".html" />
        <property name="contentType" value="text/html;charset=UTF-8" />
        <property name="exposeRequestAttributes" value="true" />
        <property name="exposeSessionAttributes" value="true" />
        <property name="exposeSpringMacroHelpers" value="true" />
    </bean>

    <bean id="messageSource" class="org.springframework.context.support.ResourceBundleMessageSource"
        p:basename="i18n/messages" />

<!-- 	<bean class="org.springframework.web.servlet.view.InternalResourceViewResolver">
		<property name="prefix" value="/WEB-INF/views/" />
		<property name="suffix" value=".html" />
	</bean> -->

	<!-- 全局拦截器   会拦截静态资源
	Spring为我们提供了:
	org.springframework.web.servlet.HandlerInterceptor接口,
	org.springframework.web.servlet.handler.HandlerInterceptorAdapter适配器,
	实现这个接口或继承此类,可以非常方便的实现自己的拦截器。

	有以下三个方法:

	Action之前执行:
	 public boolean preHandle(HttpServletRequest request,
	   HttpServletResponse response, Object handler);

	生成视图之前执行
	 public void postHandle(HttpServletRequest request,
	   HttpServletResponse response, Object handler,
	   ModelAndView modelAndView);

	最后执行,可用于释放资源
	 public void afterCompletion(HttpServletRequest request,
	   HttpServletResponse response, Object handler, Exception ex)
	<mvc:interceptors >
	 <mvc:interceptor>
	        <mvc:mapping path="/user/*" />  /user/*
	        <bean class="com.mvc.MyInteceptor"></bean>
	    </mvc:interceptor>
	</mvc:interceptors>
	-->

	<!-- 总错误处理
	这里主要的类是SimpleMappingExceptionResolver类,和他的父类AbstractHandlerExceptionResolver类。
	具体可以配置哪些属性,我是通过查看源码知道的。
	你也可以实现HandlerExceptionResolver接口,写一个自己的异常处理程序。
	<bean id="exceptionResolver" class="org.springframework.web.servlet.handler.SimpleMappingExceptionResolver">
		<property name="defaultErrorView">
		 	<value>/error/error</value> error页面可以通过Exception e = (Exception)request.getAttribute("exception")获得异常信息
		</property>
		<property name="defaultStatusCode">
		 	<value>500</value>
		</property>
		<property name="warnLogCategory">
		 	<value>org.springframework.web.servlet.handler.SimpleMappingExceptionResolver</value>
		</property>
	</bean>-->

	<!-- 对静态资源文件的访问  方案一 (二选一)
	会把"/**" url,注册到SimpleUrlHandlerMapping的urlMap中,把对静态资源的访问由HandlerMapping转到
	org.springframework.web.servlet.resource.DefaultServletHttpRequestHandler处理并返回.
	DefaultServletHttpRequestHandler使用就是各个Servlet容器自己的默认Servlet.
	<mvc:default-servlet-handler/> -->

	<!-- 对静态资源文件的访问  方案二 (二选一)/images/**映射到ResourceHttpRequestHandler进行处理,
	location指定静态资源的位置.可以是web application根目录下、jar包里面,这样可以把静态资源压缩到jar包中。
	cache-period 可以使得静态资源进行web cache
	<mvc:resources mapping="/images/**" location="/images/" cache-period="31556926"/>
	<mvc:resources mapping="/js/**" location="/js/" cache-period="31556926"/>
	<mvc:resources mapping="/css/**" location="/css/" cache-period="31556926"/>-->

</beans>
applicationContext-bean.xml
<?xml version="1.0" encoding="UTF-8"?>
<beans xmlns="http://www.springframework.org/schema/beans"
	xmlns:xsi="http://www.w3.org/2001/XMLSchema-instance"
	xmlns:context="http://www.springframework.org/schema/context"
	xmlns:tx="http://www.springframework.org/schema/tx"
	xsi:schemaLocation="
		http://www.springframework.org/schema/beans
		http://www.springframework.org/schema/beans/spring-beans-3.0.xsd
		http://www.springframework.org/schema/context
		http://www.springframework.org/schema/context/spring-context-3.0.xsd
		http://www.springframework.org/schema/tx
		http://www.springframework.org/schema/tx/spring-tx-3.0.xsd">

	<context:component-scan base-package="com.xxl.app.**.service" />

	<!-- 用于持有ApplicationContext,可以使用SpringContextHolder.getBean('xxxx')的静态方法得到spring bean对象 -->
	<bean class="com.xxl.app.base.SpringContextHolder" lazy-init="false" />

	<!-- 使用annotation注解方式配置事务 -->
	<tx:annotation-driven transaction-manager="transactionManager" />
	<!-- 使用JDBC事务 -->
    <bean id="transactionManager" class="org.springframework.jdbc.datasource.DataSourceTransactionManager">
        <property name="dataSource" ref="dataSource" />
    </bean>

	<!-- 引入配置文件 -->
    <context:property-placeholder location="classpath:ini.properties"/>

    <!--创建jdbc数据源 -->
    <bean id="dataSource" class="org.apache.commons.dbcp.BasicDataSource" destroy-method="close">
      <property name="driverClassName" value="${driver}"/>
      <property name="url" value="${url}"/>
      <property name="username" value="${username}"/>
      <property name="password" value="${password}"/>
      <property name="maxActive" value="${maxActive}"/>
      <property name="maxIdle" value="${maxIdle}"/>
      <property name="minIdle" value="${minIdle}"/>
    </bean>

    <!-- 配置SqlSessionFactoryBean -->
	<bean id="sqlSessionFactory" class="org.mybatis.spring.SqlSessionFactoryBean">
		<property name="dataSource" ref="dataSource"/>
		<property name="configLocation" value="classpath:mybatis.xml"/>
		<!-- <property name="mapperLocations">
			<list>
				表示在包或以下所有目录中,以-mapper.xml结尾所有文件
				<value>classpath:config/**/*-mapper.xml</value>
			</list>
		</property> -->
	</bean>

	<!-- 配置mybatis dao注册,所有dao都继承sqlMapper
	annotationClass:当指定了annotationClass的时候,MapperScannerConfigurer将只注册使用了annotationClass注解标记的接口。
	markerInterface:markerInterface是用于指定一个接口的,当指定了markerInterface之后,MapperScannerConfigurer将只注册继承自markerInterface的接口。
          如果上述两个属性都指定了的话,那么MapperScannerConfigurer将取它们的并集,而不是交集。即使用了annotationClass进行标记或者继承自markerInterface
          的接口都将被注册为一个MapperFactoryBean。
          除了用于缩小注册Mapper接口范围的属性之外,我们还可以指定一些其他属性,如:
    sqlSessionFactory:这个属性已经废弃。当我们使用了多个数据源的时候我们就需要通过sqlSessionFactory来指定在注册MapperFactoryBean的时候需要使用的SqlSessionFactory,
    	因为在没有指定sqlSessionFactory的时候,会以Autowired的方式自动注入一个。换言之当我们只使用一个数据源的时候,即只定义了一个SqlSessionFactory的时候我们就可以不给
    	MapperScannerConfigurer指定SqlSessionFactory。
	sqlSessionFactoryBeanName:它的功能跟sqlSessionFactory是一样的,只是它指定的是定义好的SqlSessionFactory对应的bean名称。
	sqlSessionTemplate:这个属性已经废弃。它的功能也是相当于sqlSessionFactory的,因为就像前面说的那样,MapperFactoryBean最终还是使用的SqlSession的getMapper
	方法取的对应的Mapper对象。当定义有多个SqlSessionTemplate的时候才需要指定它。对于一个MapperFactoryBean来说SqlSessionFactory和SqlSessionTemplate只需要其中一个就可以了,
	当两者都指定了的时候,SqlSessionFactory会被忽略。
	sqlSessionTemplateBeanName:指定需要使用的sqlSessionTemplate对应的bean名称。-->
	<bean class="org.mybatis.spring.mapper.MapperScannerConfigurer">
		<property name="basePackage" value="com.xxl.app.**.dao"/>
		<property name="markerInterface" value="com.xxl.app.base.dao.SqlMapper"/>
	</bean>


</beans>
mybaitis.xml
<?xml version="1.0" encoding="UTF-8"?>
<!DOCTYPE configuration PUBLIC "-//mybatis.org//DTD Config 3.0//EN" "http://mybatis.org/dtd/mybatis-3-config.dtd">
<configuration>
	<!-- 在这个文件放置一些全局性的配置
	<typeAliases>
		<typeAlias type="com.*.*.bean.*" alias="*"/>
	</typeAliases> -->
</configuration>
单元测试代码
package xxl.test.service;

import org.junit.Test;
import org.junit.runner.RunWith;
import org.springframework.beans.factory.annotation.Autowired;
import org.springframework.test.context.ContextConfiguration;
import org.springframework.test.context.junit4.SpringJUnit4ClassRunner;
import org.springframework.test.context.transaction.TransactionConfiguration;
import org.springframework.transaction.annotation.Transactional;

import com.xxl.app.base.service.IIndexService;

@ContextConfiguration(locations={"classpath:applicationContext-bean.xml"})
@RunWith(SpringJUnit4ClassRunner.class)
@Transactional
//如果是true不会改变数据库数据,如果是false会改变数据
@TransactionConfiguration(transactionManager="transactionManager",defaultRollback=true)
public class IndexService {

	@Autowired
	private IIndexService indexService;

	@Test
	public void TestIndex(){

		indexService.doIndex();
	}

}来源:oschina
链接:https://my.oschina.net/u/149945/blog/309128