前言:
LAMP是指:Linux(操作系统),Apache(Web服务器),MySQL/MariaDB(数据库),PHP/Perl/Python(脚本语言),所有组成产品各自独立的开源软件,组合在一起使用,就组成了目前互联网中流行的Web框架;与Java/J2EE架构相比,LAMP具有Web资源丰富,轻量,开发快速等特点,与微软的.NET架构相比,LAMP具有通用、跨平台、高性能、低价格的优势,因此LAMP无论是性能、质量还是价格都是企业搭建网站的首选平台。
工作原理:
分离式的LAMP架构,Apache,Mysql/MariaDB,PHP都部署在独立的服务器上,静态资源放在web服务器上,动态的页面放在php服务器上。
客户端请求访问Web站点,Web服务器接收用户的访问请求,如果是静态页面直接返回结果,如果是动态页面,则Web服务器通过FastCGI协议将动态页面交由php服务器处理,PHP服务器对动态页面的处理需要与数据库进行交互。处理完成之后,PHP服务器将处理结果交给Web服务器,由Web服务器向客户端返回结果。
实验案例:构建分离式LAMP平台;
(1)、
站点A:pma.chencer.org,PhpMyAdmin管理MySQL程序站点,使用https协议通信;
站点B:blog.chencer.org, Wordpress论坛站点;
(2)、PHP-fpm服务器部署xcache实现加速。
实验过程:
编译安装httpd:
系统版本:CentOS 6.6x86_64;
服务器IP:192.168.1.10;
httpd源码包:httpd-2.4.16.tar.bz2;
apr源码包:apr-1.5.2.tar.bz2;
apr-util源码包:apr-util-1.5.4.tar.bz2
官网:http://httpd.apache.org/
http://apr.apache.org/
安装编译环境:
# yum groupinstall "Server Platform Development" "Developmenttools"apr:
# tar xf apr-1.5.2.tar.bz2
# cd apr-1.5.2
# ./configure --prefix=/usr/local/apr
# make && make installapr-util:
# tar xf apr-util-1.5.4.tar.bz2
# cdapr-util-1.5.4
# ./configure --prefix=/usr/local/apr-util --with-apr=/usr/local/apr/
# make && make install
--with-apr=/usr/local/apr/ :指明apr安装位置;httpd:
# tar xf httpd-2.4.16.tar.bz2
# cd httpd-2.4.16
# ./configure --prefix=/usr/local/apache --sysconfdir=/etc/httpd --enable-so--enable-ssl --enable-cgi --enable-rewrite --with-zlib --with-pcre--with-apr=/usr/local/apr --with-apr-util=/usr/local/apr-util --enable-modules=all--enable-mpms-shared=all --with-mpm=event
# make && make installhttpd编译参数解释:
> --prefix=/usr/local/apache    :安装位置;
> --sysconfdir=/etc/httpd    :配置文件位置;
> --enable-so    :支持DSO动态装载模块;
> --enable-ssl    :支持SSL/TLS,可实现https协议访问,需要安装openssl-devel;
> --enable-cgi    :支持CGI脚本;
> --enable-rewrite    :支持URL重写;
> --with-zlib    :使用指定的zlib压缩库,不指定路径会自动寻找;
> --with-pcre    :使用指定的pcre库,增强的正则表达式分析工具;不指定路径会自动寻找 需已安装pcre-devel;
> --with-apr=/usr/local/apr    :指定依赖apr程序安装位置;
> --with-apr-util=/usr/local/apr-util    :指定依赖apr-util程序安装位置;
> --enable-modules=all    :支持动态启用模块;all:所有,most:常用;
> --enable-mpms-shared=all    :编译并共享模块;
> --with-mpm=event    :默认启用模块;{prefork|worker|event}
添加,并重读环境变量:
# vim /etc/profile.d/httpd.sh
> export PATH=/usr/local/apache/bin:$PATH
# source /etc/profile.d/httpd.sh
导出头文件:
# ln -sv /usr/local/apache/include/ /usr/include/httpd
导出man手册:
# vim /etc/man.config
> MANPATH /usr/local/apache/man修改主配置文件指定pidfile:
# vim /etc/httpd/httpd.conf
> PidFile"/usr/local/apache/logs/httpd.pid"
提供服务脚本:可使用rpm包安装提供的脚本修改使用;
# vim/etc/rc.d/init.d/httpd
> #!/bin/bash
> #
> # httpd        Startup script for the Apache HTTPServer
> #
> # chkconfig:- 85 15
> #description: The Apache HTTP Server is an efficient and extensible  \
> #             server implementing the current HTTP standards.
> #processname: httpd
> # config:/etc/httpd/conf/httpd.conf
> # config:/etc/sysconfig/httpd
> # pidfile:/var/run/httpd/httpd.pid
> #
> ### BEGININIT INFO
> # Provides:httpd
> #Required-Start: $local_fs $remote_fs $network $named
> # Required-Stop:$local_fs $remote_fs $network
> #Should-Start: distcache
> #Short-Description: start and stop Apache HTTP Server
> #Description: The Apache HTTP Server is an extensible server
> #  implementing the current HTTP standards.
> ### END INITINFO
>
> # Source functionlibrary.
> ./etc/rc.d/init.d/functions
>
> if [ -f/etc/sysconfig/httpd ]; then
>        . /etc/sysconfig/httpd
> fi
>
> # Starthttpd in the C locale by default.
> HTTPD_LANG=${HTTPD_LANG-"C"}
>
> # This willprevent initlog from swallowing up a pass-phrase prompt if
> # mod_sslneeds a pass-phrase from the user.
> INITLOG_ARGS=""
>
> # SetHTTPD=/usr/sbin/httpd.worker in /etc/sysconfig/httpd to use a server
> # with thethread-based "worker" MPM; BE WARNED that some modules may not
> # workcorrectly with a thread-based MPM; notably PHP will refuse to start.
>
> # Path tothe apachectl script, server binary, and short-form for messages.
> apachectl=/usr/local/apache/bin/apachectl
> httpd=${HTTPD-/usr/local/apache/bin/httpd}
> prog=httpd
> pidfile=${PIDFILE-/usr/local/apache/logs/httpd.pid}
> lockfile=${LOCKFILE-/var/lock/subsys/httpd}
> RETVAL=0
> STOP_TIMEOUT=${STOP_TIMEOUT-10}
>
> # Thesemantics of these two functions differ from the way apachectl does
> # things --attempting to start while running is a failure, and shutdown
> # when notrunning is also a failure.  So we just doit the way init scripts
> # areexpected to behave here.
> start() {
>         echo -n $"Starting $prog: "
>         LANG=$HTTPD_LANG daemon--pidfile=${pidfile} $httpd $OPTIONS
>         RETVAL=$?
>         echo
>         [$RETVAL = 0 ] && touch ${lockfile}
>         return $RETVAL
> }
>
> # Whenstopping httpd, a delay (of default 10 second) is required
> # beforeSIGKILLing the httpd parent; this gives enough time for the
> # httpdparent to SIGKILL any errant children.
> stop() {
>          echo -n $"Stopping $prog: "
>          killproc -p ${pidfile} -d${STOP_TIMEOUT} $httpd
>          RETVAL=$?
>          echo
>          [ $RETVAL = 0 ] && rm -f${lockfile} ${pidfile}
> }
> reload() {
>     echo -n $"Reloading $prog: "
>     if ! LANG=$HTTPD_LANG $httpd $OPTIONS -t>&/dev/null; then
>         RETVAL=6
>         echo $"not reloading due toconfiguration syntax error"
>         failure $"not reloading $httpd dueto configuration syntax error"
>     else
>         # Force LSB behaviour from killproc
>         LSB=1 killproc -p ${pidfile} $httpd-HUP
>         RETVAL=$?
>         if [ $RETVAL -eq 7 ]; then
>             failure $"httpd shutdown"
>         fi
>     fi
>     echo
> }
>
> # See how wewere called.
> case"$1" in
>   start)
>          start
>          ;;
>   stop)
>          stop
>          ;;
>   status)
>         status -p ${pidfile} $httpd
>          RETVAL=$?
>          ;;
>   restart)
>          stop
>          start
>          ;;
>   condrestart|try-restart)
>          if status -p ${pidfile} $httpd>&/dev/null; then
>                    stop
>                    start
>          fi
>          ;;
>   force-reload|reload)
>         reload
>          ;;
>   graceful|help|configtest|fullstatus)
>          $apachectl $@
>          RETVAL=$?
>          ;;
>   *)
>          echo $"Usage: $prog{start|stop|restart|condrestart|try-restart|force-reload|reload|status|fullstatus|graceful|help|configtest}"
>          RETVAL=2
> esac

> exit $RETVAL
脚本执行权限;
# chmod +x /etc/rc.d/init.d/httpd添加服务,启动服务;
# chkconfig httpd �add
# chkconfig httpd on
# service httpd start
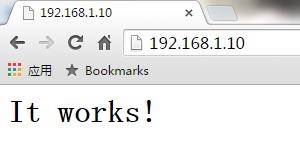
访问测试:
编译安装PHP-fpm:
系统版本:CentOS 6.6x86_64;
服务器IP:192.168.1.11
php源码包:php-5.4.43.tar.bz2;
官网:http://www.php.net/
安装编译环境;
# yum groupinstall "Server Platform Development" "Developmenttools" "Desktop Platform Development"安装依赖关系程序:
# yum install bzip2-devel libmcrypt-devel mhash-devel
注意:libmcrypt-devel和mhash-devel来自于epel源;PHP:
# tar xf php-5.4.43.tar.bz2
# cd php-5.4.43
# ./configure --prefix=/usr/local/php--with-mysql=mysqlnd --with-pdo-mysql=mysqlnd --with-mysqli=mysqlnd --with-openssl--enable-mbstring --with-freetype-dir --with-jpeg-dir --with-png-dir--with-zlib --enable-xml --with-libxml-dir=/usr --enable-sockets --enable-fpm--with-mcrypt --with-config-file-path=/etc--with-config-file-scan-dir=/etc/php.d --with-bz2
# make && makeinstall
PHP编译参数解释:
> --prefix=/usr/local/php    :安装位置;
> --with-mysql=mysqlnd    :指定MySQL安装位置,若MySQL安装于其他服务器,可以指定mysqlnd,使用本地MySQL驱动;
> --with-pdo-mysql=mysqlnd
> --with-mysqli=mysqlnd
> --with-openssl    :指定openssl位置;
> --enable-mbstring    :支持多种语言编码(utf-8等),可以正常转换的函数库;支持中文;
> --with-freetype-dir    :指定freetype目录位置,支持多种字体;freetype:字体处理工具;
> --with-jpeg-dir    :指定libjpeg目录位置,支持图片格式;
> --with-png-dir    :指定libpng目录位置,支持图片格式;
> --with-zlib    :使用指定的zlib压缩库位置;
> --enable-xml    :支持xml,xml:扩展标记语言;
> --with-libxml-dir=/usr    :指定xml库文件位置;
> --enable-sockets    :PHP支持sockets通信;
> --with-mcrypt    :指定mcrypt加密扩展库位置;
> --with-config-file-path=/etc    :配置文件目录位置;
> --with-config-file-scan-dir=/etc/php.d    :扩展配置文件目录位置;

分离式部署httpd和php-fpm;
> --enable-fpm    :支持FastCGI,PHP作为单独服务器必须启动此项;
> --with-bz2    :支持bz2压缩格式传输;

httpd和php安装在同一服务器上:
> --with-apxs2=/usr/local/apache/bin/apxs    :指定apache扩展模块位置;
> --enable-maintainer-zts    :支持apache多种MPM;
添加,并重读环境变量:
# vim /etc/profile.d/php-fpm.sh
> export PATH=/usr/local/php/bin:/usr/local/php/sbin:$PATH
# source /etc/profile.d/httpd.sh
导出头文件:
# ln -sv /usr/local/php/include/ /usr/include/httpd
为PHP提供配置文件;
# cp php.ini-production /etc/php.ini
    php.ini-development    :用于开发环境的配置文件;
php.ini-production :用于生产环境的配置文件;为PHP-fpm提供配置文件;
# cd /usr/local/php/etc/
# cp php-fpm.conf.default php-fpm.conf
# vim php-fpm.conf
> listen = 192.168.1.11:9000    :监听IP和端口;
> pm.max_children = 50    :最大并发相应量;
> pm.start_servers = 5    :启动php-fpm时,启动几个空闲进程;
> pm.min_spare_servers =2    :最小空闲进程数;
> pm.max_spare_servers =8    :最大空闲进程数;
> pid =/usr/local/php/var/run/php-fpm.pid :pid文件位置;为PHP-fpm提供服务脚本,并添加执行权限:
# cd /root/php-5.4.43
# cp sapi/fpm/init.d.php-fpm /etc/rc.d/init.d/php-fpm
# chmod + x/etc/rc.d/init.d/php-fpm
添加服务,启动服务;
# chkconfig php-fpm --add
# chkconfig php-fpm on
# service php-fpm start
# ps aux | grep php-fpm
# ss -tnl | grep :9000
安装二进制格式包MariaDB:
系统版本:CentOS 6.6x86_64;
服务器IP:192.168.1.12;
MariaDB二进制包:mariadb-5.5.44-linux-x86_64.tar.gz;
官网:https://mariadb.org/
新建逻辑卷挂载至数据目录;
# pvcreate /dev/sdb
# vgcreate -s 8M data /dev/sdb
# lvcreate -L 49G -n mydata data
# mke2fs -text4 �b 4096 /dev/data/mydata
# mkdir /data
# vim /etc/fstab
> /dev/data/mydata    /data    ext4    defaults    0 0

# mount �a
# mkdir -p /data/mydata
# groupadd -r mysql
# useradd -g mysql -r mysql
# chown -R mysql:mysql /data/mydata/
# chmod -R o-rx /data/mydata/
二进制安装设置;
# tar xf mariadb-5.5.44-linux-x86_64.tar.gz -C /usr/local/
# cd /usr/local/
# ln -sv mariadb-5.5.44-linux-x86_64 /mysql
# cd mysql/
# chown -R root:mysql ./*
# scripts/mysql_install_db --user=mysql --datadir=/data/mydata/
添加,并重读环境变量:
# vim /etc/profile.d/mysql.sh
> export PATH=/usr/local/mysql/bin:$PATH
# source /etc/profile.d/mysql.sh
导出头文件;
# ln -sv /usr/local/mysql/include/ /usr/include/mysql导出,并重读库文件;
# vim /etc/ld.so.conf.d/mysql.conf
> /usr/local/mysql/lib
# ldconfig
导出man手册;
# vim /etc/man.config
> MANPATH /usr/local/mysql/man
提供配置文件;
# mkdir -p /etc/mysql
# cp support-files/my-small.cnf /etc/mysql/my.cnf
# vim /etc/mysql/my.cnf
> [mysqld]
> thread_concurrency = 2    :值CPU个数乘以2;
> datadir = /data/mydata    :数据目录;
提供服务脚本,并添加执行权限:
# cp support-files/mysql.server /etc/rc.d/init.d/mysqld
# chmod +x /etc/rc.d/init.d/mysqld
启动,初始化数据库;
# chkconfig mysqld �add
# chkconfig mysqld on
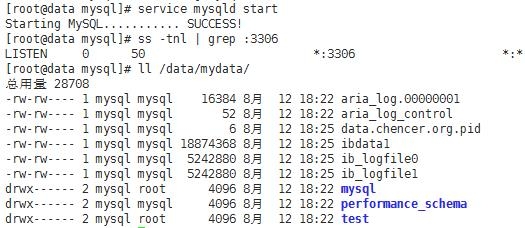
# service mysqld start
# ss -tnl | grep :3306
# ll /data/mydata/至此LAMP平台部署完成,接下来为PHP-fpm服务器部署xcache实现加速;
xcache:快速而且稳定的PHP opcode缓存,经过严格测试且被大量用于生产环境。
编译安装xcache:
xcache源码包:xcache-3.1.2.tar.bz2
官网:http://xcache.lighttpd.net/
xcache:
# tar xf xcache-3.1.2.tar.bz2
# cd xcache-3.1.2
# /usr/local/php/bin/phpize    :生成configure脚本;
# ./configure --enable-xcache --with-php-config=/usr/local/php/bin/php-config
# make && make install配置xcache:
# mkdir -p /etc/php.d
# cp xcache.ini /etc/php.d/
# vim /etc/php.d/xcache.ini
> extension =/usr/local/php/lib/php/extensions/no-debug-zts-20100525/xcache.so重启PHP-fpm服务:
# service php-fpm restartxcache已安装完成,接下来进行站点配置;
站点配置:
phpMyAdmin:phpMyAdmin-4.3.13.1-all-languages.tar.bz2
wordpress:wordpress-4.2.2-zh_CN.tar.gz
官网:http://www.phpmyadmin.net/
http://cn.wordpress.org/
Web服务器配置:
# vim /etc/httpd/httpd.conf
> #DocumentRoot"/usr/local/apache/htdocs"    :关闭中心主机;
> Include/etc/httpd/extra/httpd-vhosts.conf    :启用虚拟主机;

启用模块:
> LoadModule proxy_modulemodules/mod_proxy.so    :启用反向代理模块;
> LoadModuleproxy_fcgi_module modules/mod_proxy_fcgi.so    :启用实现FastCGI模块,此模块为mod_proxy.so的扩充;

支持PHP:
> <IfModuledir_module>
>     DirectoryIndex index.php index.html
> </IfModule>
> AddTypeapplication/x-httpd-php  .php
> AddTypeapplication/x-httpd-php-source  .phps
配置虚拟主机:
# vim /etc/httpd/extra/httpd-vhosts.conf
> <VirtualHost192.168.1.10:80>
>     DocumentRoot "/web/pma"
>     ServerName pma.chencer.org
>     ProxyRequests Off    :关闭正向代理;
>     ProxyPassMatch ^/(.*\.php)$fcgi://192.168.1.11:9000/web/pma/$1    :代理至PHP-fpm服务器;
>     <Directory "/web/pma">
>         Options none
>         AllowOverride none
>         Require all granted
>     </Directory>
> </VirtualHost>
>
> <VirtualHost192.168.1.10:80>
>     DocumentRoot "/web/blog"
>     ServerName blog.chencer.org
>     ProxyRequests Off
>     ProxyPassMatch ^/(.*\.php)$fcgi://192.168.1.11:9000/web/blog/$1
>     <Directory "/web/blog">
>         Options none
>         AllowOverride none
>         Require all granted
>     </Directory>
> </VirtualHost>
PHP站点文件部署:
# mkdir /web
# tar xf phpMyAdmin-4.3.13.1-all-languages.tar.bz2 -C /web/
# mv /web/phpMyAdmin-4.3.13.1-all-languages/ /web/pma
# tar xf wordpress-4.2.2-zh_CN.tar.gz -C /web/
# mv /web/wordpress/ /web/blog
连接数据库:
pma:
# cd /web/pma/
# cp config.sample.inc.php config.inc.php
# vim config.inc.php
> $cfg['blowfish_secret']= 'pma'; /* YOU MUST FILL IN THIS FOR COOKIE AUTH! */
> $cfg['Servers'][$i]['host']= '192.168.1.12';

Blog:
# cd /web/blog/
# cp wp-config-sample.php wp-config.php
# vim wp-config.php
> /** WordPress数据库的名称 */
> define('DB_NAME','blogdb');
>
> /** MySQL数据库用户名 */
> define('DB_USER','bloguser');
>
> /** MySQL数据库密码 */
> define('DB_PASSWORD','blogpass');
>
> /** MySQL主机 */
> define('DB_HOST','192.168.1.12');
创建数据库:
客户端测试:
客户端域名解析通过Hosts文件实现:
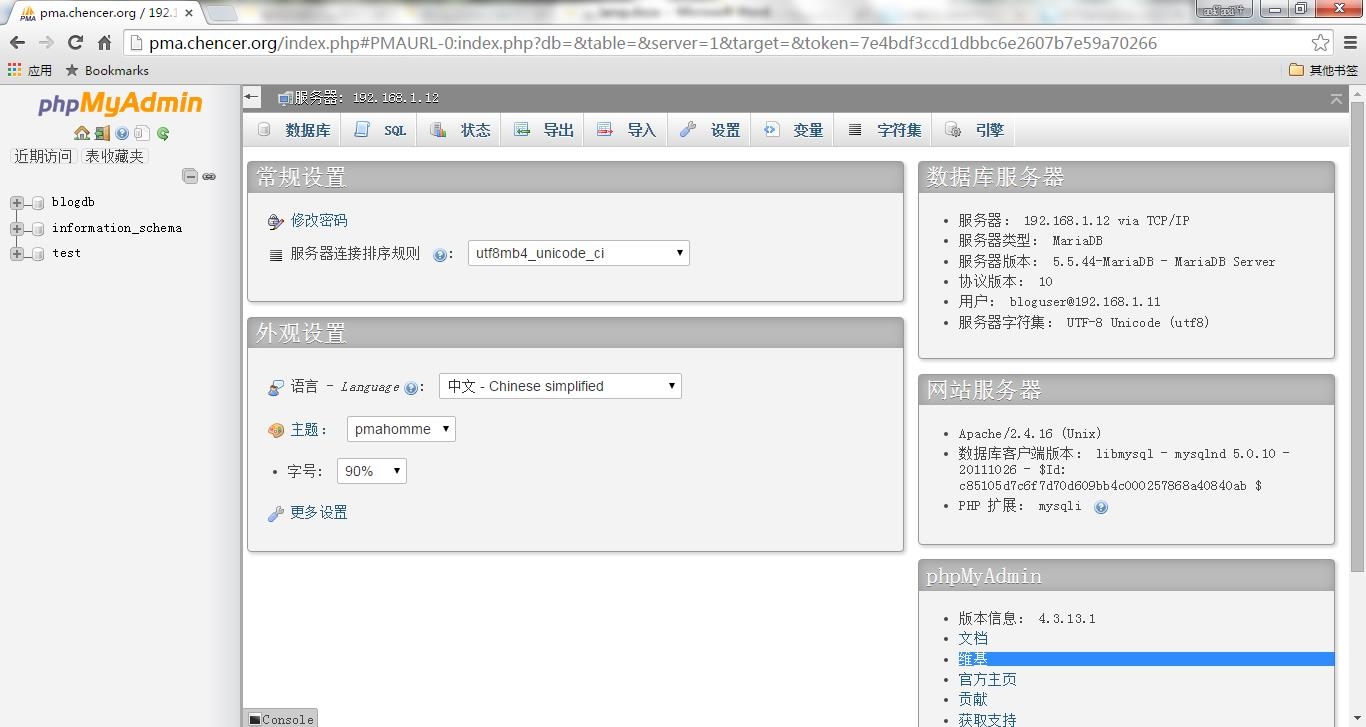
站点测试:
至此站点部署完毕,接下来为pma.chencer.org提供https协议。
为站点A提供https协议:
服务器自建CA,自签证书(详细信息见自建CA博客):
# (umask077 ; openssl genrsa -out /etc/pki/CA/private/cakey.pem 2048)
# openssl req -new -x509 -key /etc/pki/CA/private/cakey.pem -out /etc/pki/CA/cacert.pem -days 3655
# touch /etc/pki/CA/{index.txt,serial}
# echo 01 > /etc/pki/CA/serial
创建证书,签署请求;
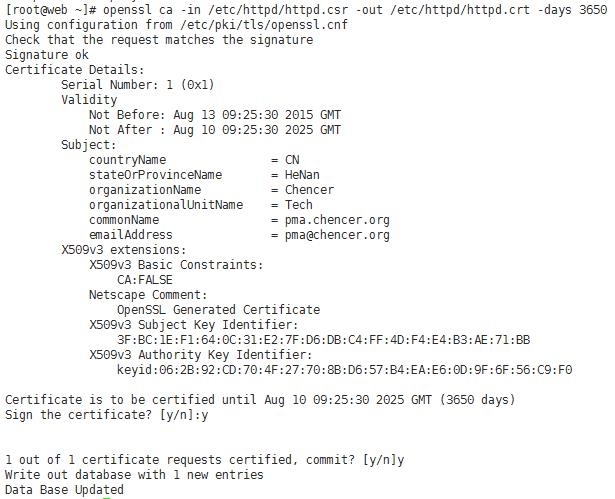
# (umask077 ; openssl genrsa -out /etc/httpd/httpd.key 2048)
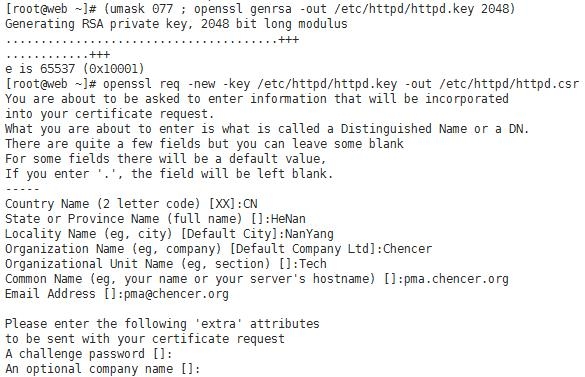
# openssl req -new -key /etc/httpd/httpd.key -out /etc/httpd/httpd.csr
# openssl ca -in/etc/httpd/httpd.csr -out /etc/httpd/httpd.crt -days 3650配置启用ssl功能:
# vim /etc/httpd/httpd.conf
启用ssl模块:
> LoadModulesocache_shmcb_module modules/mod_socache_shmcb.so
> LoadModulessl_module modules/mod_ssl.so

启用ssl功能:
> Include /etc/httpd/extra/httpd-ssl.conf配置ssl配置文件:
# vim /erc/httpd/extra/httpd-ssl.conf
> <VirtualHost 192.168.1.10:443>
> DocumentRoot "/web/pma"
> ServerName pma.chencer.org
> ProxyRequests Off
> ProxyPassMatch ^/(.*\.php)$ fcgi://192.168.1.11:9000/web/pma/$1
> <Directory "/web/pma">
>     Options none
>     AllowOverride none
>     Require all granted
> </Directory>
> SSLCertificateFile "/etc/httpd/httpd.crt"    :指定证书位置;
> SSLCertificateKeyFile "/etc/httpd/httpd.key"    :指定公钥位置;
> </VirtualHost>
测试语法,重启服务,查看端口:
客户端安装证书,测试站点:
结语:
源码编译安装分离式LAMP平台的介绍到此结束,由于源码编译不熟练,实验过程中遇到很多问题,也消耗了不少时间;接下来的学习中会对LAMP平台进行扩展应用,请关注后续博客;试验中如有遗漏和失误,欢迎各路大神来喷。
本文出自 “小马的学习记录” 博客,请务必保留此出处http://masachencer.blog.51cto.com/8683770/1684616
来源:oschina
链接:https://my.oschina.net/u/2359187/blog/540862

