JedisConnectionFactory中配置了哨兵后,会自动发现master节点,它是怎么做到的呢?
注:Spring-data-redis的版本: 1.8.7.RELEASE,Jedis的版本: 2.9.0.RELEASE
1.xml配置
List-1 properties文件省略了
<bean class="redis.clients.jedis.JedisPoolConfig" id="jedisPoolConfig">
    <property name="maxTotal" value="${redis.maxTotal}"/>
    <property name="maxIdle" value="${redis.maxIdle}"/>
    <property name="numTestsPerEvictionRun" value="${redis.numTestsPerEvictionRun}"/>
    <property name="timeBetweenEvictionRunsMillis" value="${redis.timeBetweenEvictionRunsMillis}"/>
    <property name="minEvictableIdleTimeMillis" value="${redis.minEvictableIdleTimeMillis}"/>
    <property name="softMinEvictableIdleTimeMillis"
              value="${redis.softMinEvictableIdleTimeMillis}"/>
    <property name="testOnReturn" value="${redis.testOnReturn}"/>
    <property name="maxWaitMillis" value="${redis.maxWaitMillis}"/>
    <property name="testOnBorrow" value="${redis.testOnBorrow}"/>
</bean>
<!-- redis集群配置 哨兵模式 -->
<bean class="org.springframework.data.redis.connection.RedisSentinelConfiguration" id="sentinelConfiguration">
    <property name="master">
        <bean class="org.springframework.data.redis.connection.RedisNode">
            <property name="name" value="${redis.master}"/>
        </bean>
    </property>
    <property name="sentinels">
        <set>
            <bean class="org.springframework.data.redis.connection.RedisNode">
                <constructor-arg name="host" value="${redis.sentinel.host1}"/>
                <constructor-arg name="port" value="${redis.sentinel.port1}"/>
            </bean>
            <bean class="org.springframework.data.redis.connection.RedisNode">
                <constructor-arg name="host" value="${redis.sentinel.host2}"/>
                <constructor-arg name="port" value="${redis.sentinel.port2}"/>
            </bean>
            <bean class="org.springframework.data.redis.connection.RedisNode">
                <constructor-arg name="host" value="${redis.sentinel.host3}"/>
                <constructor-arg name="port" value="${redis.sentinel.port3}"/>
            </bean>
        </set>
    </property>
</bean>
<bean id="redisConnectionFactory" class="org.springframework.data.redis.connection.jedis.JedisConnectionFactory">
    <constructor-arg name="sentinelConfig" ref="sentinelConfiguration"/>
    <constructor-arg name="poolConfig" ref="jedisPoolConfig"/>
    <property name="database" value="${redis.dbIndex}"/>
</bean>
这样我们就在JedisConnectionFactory中配置了pool和哨兵信息。
2.分析JedisConnectionFactory
看如下图1所示:

图1 JedisConnectionFactory的继承图
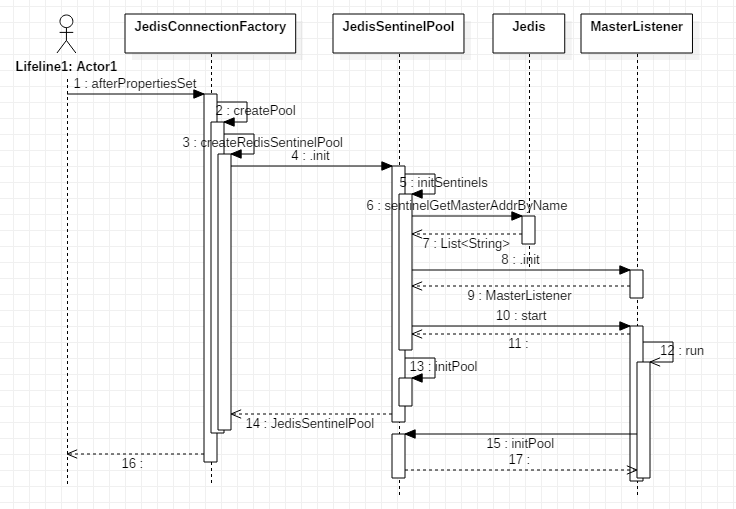
如果了解过SpringIOC的,那么看到InitializingBean,应该知道JedisConnectionFactory为什么继承它了。看如下图2所示

图2 JedisConnectionFactory的afterPropertiesSet时序图
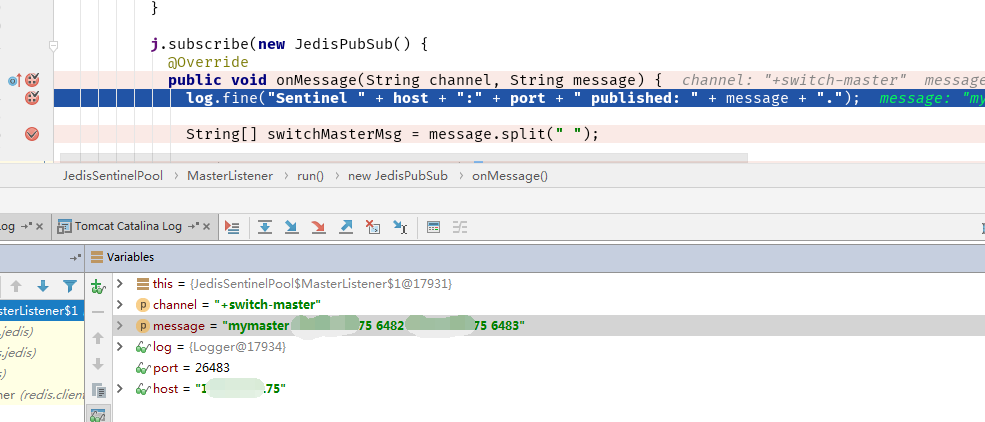
重点在步骤12中,MasterListener继承了Thread,它是个单独的线程,通过Jedis监听Redis的哨兵,如果收到master改变的消息,那么会修改JedisFactory。如下图3所示是MasterListener收到master节点变化的消息:

图3 MasterListener收到master改变的消息
图3中,message的内容表示,之前6482端口的redis是master,现在6483端口的才是master。
收到master改变的消息后,会修改JedisFactory,进而会影响connection的获取。值得注意的是,连接池底层上使用的是apache的common-pool的org.apache.commons.pool2.impl.GenericObjectPool,有兴趣的读者可以去看下common-pool的实现,我在这里就不再深入common-pool的实现。提示: dbcp连接池使用的也是common-pool,如果你理解了common-pool的实现,那么会明白连接池的很多参数是什么意思(比如maxActive、maxIdle等)。
来源:oschina
链接:https://my.oschina.net/u/2518341/blog/2052072
