BroadCastReceiver安卓的广播接收者
一、广播介绍
1.广播接收者作用以及机制
其实BroadcastReceiver就是应用程序间的全局大喇叭,即通信的一个手段, 系统自己在很多时候都会发送广播,比如电量低或者充足,刚启动完,插入耳机,输入法改变等, 发生这些时间,系统都会发送广播,这个叫系统广播,每个APP都会收到,如果你想让你的应用在接收到 这个广播的时候做一些操作,比如:系统开机后,偷偷后台跑服务哈哈,这个时候你只需要为你的应用 注册一个用于监视开机的BroadcastReceiver,当接收到开机广播就做写偷偷摸摸的勾当~ 当然我们也可以自己发广播,比如:接到服务端推送信息,用户在别处登录,然后应该强制用户下线回到 登陆界面,并提示在别处登录当然,这些等下都会写一个简单的示例帮大家了解广播给我们带来的好处.
2.项目中广播接收者的使用
BroadCastReceiver广播接受者,安卓四大组件之一
广播三要素:
(1)广播发送者 : 发送广播
(2)广播接收者(调频): 用于接收广播
(3)要处理的事情 :处理广播的相关信息, Intent有图对象
广播的使用场景:
(1)同一APP下多个组件之间传递数据(Activity/Fragment/Service之间传递数据)
(2)2个APP之间传递数据
技能get点:
(1)自定义广播接受者
(2)使用广播接受者进行电话拦截和短信拦截和系统电量的变化
3.广播接收者生命周期
静态注册和动态注册的区别:假如说Activity是接受者:
动态注册:
(1)广播接收者会跟Activity的生命周期的结束而结束;
(2)自由的控制注册和取消,有很大的灵活性
静态注册:
(1)广播接收者不会跟随Activity的生命周期的结束而结束,一直存在,即使应用程序关闭,也会被唤醒接受广播
(2)全局的广播
二、广播分类
1.无序广播发送 (也叫标准广播)
mSend2.setOnClickListener(new View.OnClickListener() {
            @Override
            public void onClick(View view) {
                Intent intent = new Intent();
                //设置频道
                intent.setAction("syf1");

                Bundle bundle = new Bundle();

                bundle.putString("name","镜");

                intent.putExtras(bundle);

                //标准无序广播
                sendBroadcast(intent);
            }
        });
2.有序广播
mSend4.setOnClickListener(new View.OnClickListener() {
            @Override
            public void onClick(View view) {

                Intent intent = new Intent();
                Bundle bundle = new Bundle();
                bundle.putString("name","有序1");
                intent.putExtras(bundle);
                intent.setAction("syf");
                sendOrderedBroadcast(intent,null);
            }
        });
//判断是否有序可以去截断
package com.example.day0304;

import android.content.BroadcastReceiver;
import android.content.Context;
import android.content.Intent;
import android.os.Bundle;
import android.util.Log;

public class MyReceiver2 extends BroadcastReceiver {
    private static final String TAG = "MyReceiver2";
    @Override
    public void onReceive(Context context, Intent intent) {
        Log.i("---", ""+TAG);
		//判断广播发送是否有序
        if (isOrderedBroadcast()){
            //截断
            abortBroadcast();
        }

    }
}
三、广播接受者
1.创建广播接收者
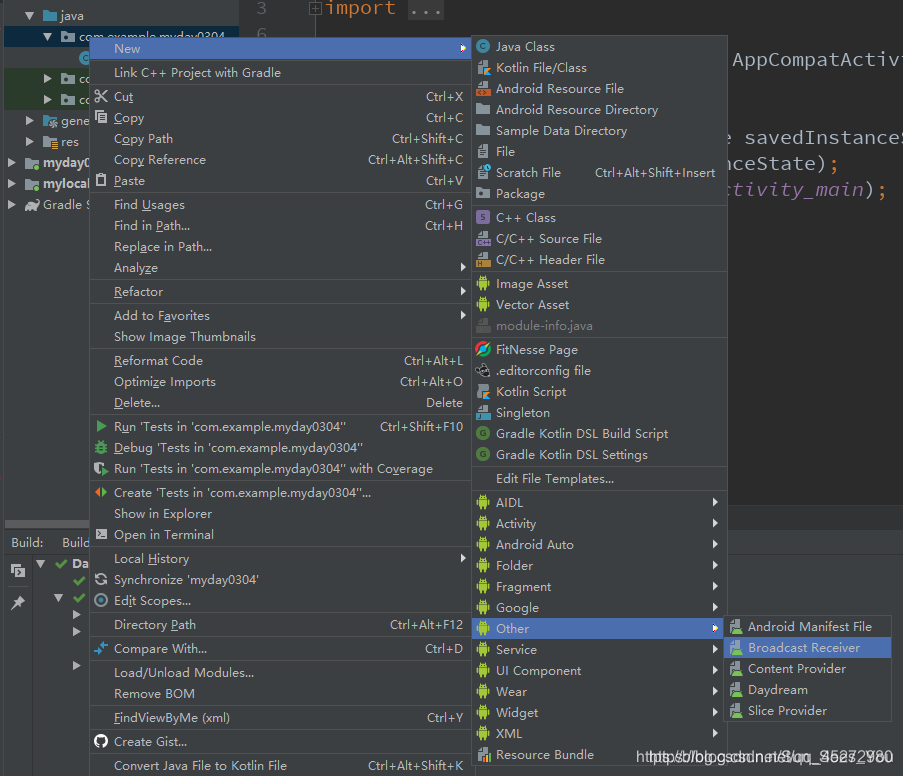
1.直接右键new,other,BroadCastReceiver创建
2.写一个类继承BroadcastReceiver
package com.example.day0304;

import android.content.BroadcastReceiver;
import android.content.Context;
import android.content.Intent;
import android.os.Bundle;
import android.util.Log;

public class MyReceiver extends BroadcastReceiver {

    private static final String TAG = "MyReceiver";

    @Override
    public void onReceive(Context context, Intent intent) {

    }
}
四、注册广播接受者
1.静态注册
<?xml version="1.0" encoding="utf-8"?>
<manifest xmlns:android="http://schemas.android.com/apk/res/android"
    package="com.example.day0304">

    <application
        android:allowBackup="true"
        android:icon="@mipmap/ic_launcher"
        android:label="@string/app_name"
        android:roundIcon="@mipmap/ic_launcher_round"
        android:supportsRtl="true"
        android:theme="@style/AppTheme">
        <receiver
            android:name=".MyReceiver"
            android:enabled="true"
            android:exported="true">
            <intent-filter>
                <action android:name="syf" />
                <action android:name="syf1" />
            </intent-filter>
        </receiver>

        <activity android:name=".MainActivity">
            <intent-filter>
                <action android:name="android.intent.action.MAIN" />

                <category android:name="android.intent.category.LAUNCHER" />
            </intent-filter>
        </activity>
    </application>

</manifest>
2.动态注册
mSend3.setOnClickListener(new View.OnClickListener() {
            @Override
            public void onClick(View view) {
                myReceiver2 = new MyReceiver2();
                IntentFilter intentFilter = new IntentFilter();
                intentFilter.addAction("syf2");
                registerReceiver(myReceiver2,intentFilter);

                Intent intent = new Intent();
                intent.setAction("syf2");

                sendBroadcast(intent);

            }
        });
//记得在activity中销毁
@Override
    protected void onDestroy() {
        super.onDestroy();
        unregisterReceiver(myReceiver2);

    }
其他:
package com.example.day12;

import android.content.BroadcastReceiver;
import android.content.Context;
import android.content.Intent;
import android.util.Log;

public class ScreenReceiver extends BroadcastReceiver {
   private static final String TAG = "ScreenReceiver";
   @Override
   public void onReceive(Context context, Intent intent) {
       Log.i(TAG, "onReceive: ------");
       String action = intent.getAction();
       if(Intent.ACTION_SCREEN_ON.equals(action)){ //不能用
           Log.i(TAG, "onReceive: 亮了");
       }else if(Intent.ACTION_SCREEN_OFF.equals(action)){//不能用
           Log.i(TAG, "onReceive: 暗了");
       }else if (Intent.ACTION_USER_PRESENT.equals(action)){
           Log.i(TAG, "onReceive: 唤醒了");
       }else if(Intent.ACTION_AIRPLANE_MODE_CHANGED.equals(action)){
           Log.i(TAG, "onReceive: 飞行了");
       }
   }
}
清单文件中注册
<receiver
           android:name=".ScreenReceiver"
           android:enabled="true"
           android:exported="true">
           <intent-filter android:priority="1000">
               <action android:name="android.intent.action.SCREEN_ON"></action>
               <action android:name="android.intent.action.SCREEN_OFF"></action>
               <action android:name="android.intent.action.USER_PRESENT"></action>
               <action android:name="android.intent.action.AIRPLANE_MODE"></action>
           </intent-filter>
       </receiver>
注意事项
不要在广播里添加过多逻辑或者进行任何耗时操作,因为在广播中是不允许开辟线程的, 当onReceiver( )方法运行较长时间(超过10秒)还没有结束的话,那么程序会报错(ANR), 广播更多的时候扮演的是一个打开其他组件的角色,比如启动Service,Notification提示, Activity等!
自定义广播接收者
来源:CSDN
作者:一点唇红
链接:https://blog.csdn.net/qq_45272980/article/details/104662858