ROS通信编程-----话题编程
作为嵌入式系统应用开发的重要支柱之一的ROS,是我们学习嵌入式开发的第一步,既要学习ROS,我们就得知道ROS怎么使用,今天,林君学长带大家开始学习ROS的第一步:ROS通信编程—话题编程
一、创建一个工作区
工作区可以作为一个独立的项目进行编译,存放ROS程序的源文件、编译文件和执行文件。
1、建立工作区的,命令如下:
打开ubuntu16.04的终端,依次输入以下3个命令创建我们的工作区
1)、创建名为ros的工作区
mkdir -p ~/ros/src
2)、进入创建工作区的src文件夹
cd ~/ros/src
3)、生成工作区
catkin_init_workspace


2、这时候工作区是空的,但是我们依然可以进行编译
1)、进入工作区
cd ~/ros/
2)、编译
catkin_make

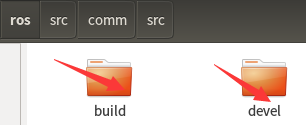
这时候,会在当前文件夹下生成devel,build这两个子文件夹,在devel文件夹下能看到几个setup.*sh文件
1)、当前文件夹下生成devel,build这两个子文件夹如下图
2)、devel文件夹下能看到几个setup.*sh文件
3、接下来把工作区在bash中注册
1)、bash注册
source devel/setup.bash
2)、验证是否已经在bash中注册可以使用如下命令:
echo $ROS_PACKAGE_PATH

如果能看到自己工作区的文件路径就说明已经成功了。
以上的工作区我们就创建成功了
二、创建一个ROS工程包
在一个工作区内,可能会包含多个ROS工程包。而最基本ROS工程包中会包括CmakeLists.txt和Package.xml这两个文件,其中Package.xml中主要包含本项目信息和各种依赖(depends),而CmakeLists.txt中包含了如何编译和安装代码的信息。
1、切换到我们的工作区
cd ~/ros/src

2、使用catkin_create_pkg命令去创建一个叫comm(通信)的包,这个包依靠std_msgs、roscpp、rospy。
catkin_create_pkg comm std_msgs rospy roscpp

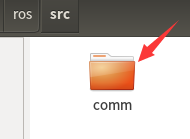
1)、创建的工程包如下图:
3、接下来在工作区编译这个工程包。
1)、进入工作区
cd ~/ros
2)、编译
catkin_make

经过以上步骤,我们的ROS工程包就建立好了
三、创建通信的发、收节点
节点(node)是连接到ROS网络中可执行的基本单元。我们在这创建一个发布者—“talker”节点,这个节点持续对外发布消息。
1、首先我们要把目录切换到我们的comm工程包中
cd ~/ros/src/comm

因为我们已经编译过这个工程包了,所以会在comm文件夹下看到CmakeList.txt、package.xml文件和include、src这两个目录。
2、进入src子目录
cd src

3、在src目录中创建一个talker.cpp文件,写一个发布(Publisher)节点
1)、创建一个名为talker.cpp文件
touch talker.cpp
2)、打开talker.cpp,并且将里面的内容替换为如下:
#include "ros/ros.h"
#include "std_msgs/String.h"
#include <sstream>
int main(int argc, char **argv)
{
  /**
   * The ros::init() function needs to see argc and argv so that it can perform
   * any ROS arguments and name remapping that were provided at the command line. For programmatic
   * remappings you can use a different version of init() which takes remappings
   * directly, but for most command-line programs, passing argc and argv is the easiest
   * way to do it.  The third argument to init() is the name of the node.
   *
   * You must call one of the versions of ros::init() before using any other
   * part of the ROS system.
   */
  ros::init(argc, argv, "talker");

  /**
   * NodeHandle is the main access point to communications with the ROS system.
   * The first NodeHandle constructed will fully initialize this node, and the last
   * NodeHandle destructed will close down the node.
   */
  ros::NodeHandle n;

  /**
   * The advertise() function is how you tell ROS that you want to
   * publish on a given topic name. This invokes a call to the ROS
   * master node, which keeps a registry of who is publishing and who
   * is subscribing. After this advertise() call is made, the master
   * node will notify anyone who is trying to subscribe to this topic name,
   * and they will in turn negotiate a peer-to-peer connection with this
   * node.  advertise() returns a Publisher object which allows you to
   * publish messages on that topic through a call to publish().  Once
   * all copies of the returned Publisher object are destroyed, the topic
   * will be automatically unadvertised.
   *
   * The second parameter to advertise() is the size of the message queue
   * used for publishing messages.  If messages are published more quickly
   * than we can send them, the number here specifies how many messages to
   * buffer up before throwing some away.
   */
  ros::Publisher chatter_pub = n.advertise<std_msgs::String>("chatter", 1000);

  ros::Rate loop_rate(10);

  /**
   * A count of how many messages we have sent. This is used to create
   * a unique string for each message.
   */
  int count = 0;
  while (ros::ok())
  {
    /**
     * This is a message object. You stuff it with data, and then publish it.
     */
    std_msgs::String msg;

    std::stringstream ss;
    ss << "hello world " << count;
    msg.data = ss.str();

    ROS_INFO("%s", msg.data.c_str());

    /**
     * The publish() function is how you send messages. The parameter
     * is the message object. The type of this object must agree with the type
     * given as a template parameter to the advertise<>() call, as was done
     * in the constructor above.
     */
    chatter_pub.publish(msg);

    ros::spinOnce();

    loop_rate.sleep();
    ++count;
  }
  return 0;
}
打开talker.cpp文件
gedit talker.cpp

替换内容
4、在src目录中创建一个listener.cpp文件,写一个订阅(Subscriber)节点
1)、创建一个名为listener.cpp文件
touch listener.cpp
2)、打开listener.cpp,并且将里面的内容替换为如下:
#include "ros/ros.h"
#include "std_msgs/String.h"

/**
 * This tutorial demonstrates simple receipt of messages over the ROS system.
 */
void chatterCallback(const std_msgs::String::ConstPtr& msg)
{
  ROS_INFO("I heard: [%s]", msg->data.c_str());
}

int main(int argc, char **argv)
{
  /**
   * The ros::init() function needs to see argc and argv so that it can perform
   * any ROS arguments and name remapping that were provided at the command line. For programmatic
   * remappings you can use a different version of init() which takes remappings
   * directly, but for most command-line programs, passing argc and argv is the easiest
   * way to do it.  The third argument to init() is the name of the node.
   *
   * You must call one of the versions of ros::init() before using any other
   * part of the ROS system.
   */
  ros::init(argc, argv, "listener");

  /**
   * NodeHandle is the main access point to communications with the ROS system.
   * The first NodeHandle constructed will fully initialize this node, and the last
   * NodeHandle destructed will close down the node.
   */
  ros::NodeHandle n;

  /**
   * The subscribe() call is how you tell ROS that you want to receive messages
   * on a given topic.  This invokes a call to the ROS
   * master node, which keeps a registry of who is publishing and who
   * is subscribing.  Messages are passed to a callback function, here
   * called chatterCallback.  subscribe() returns a Subscriber object that you
   * must hold on to until you want to unsubscribe.  When all copies of the Subscriber
   * object go out of scope, this callback will automatically be unsubscribed from
   * this topic.
   *
   * The second parameter to the subscribe() function is the size of the message
   * queue.  If messages are arriving faster than they are being processed, this
   * is the number of messages that will be buffered up before beginning to throw
   * away the oldest ones.
   */
  ros::Subscriber sub = n.subscribe("chatter", 1000, chatterCallback);

  /**
   * ros::spin() will enter a loop, pumping callbacks.  With this version, all
   * callbacks will be called from within this thread (the main one).  ros::spin()
   * will exit when Ctrl-C is pressed, or the node is shutdown by the master.
   */
  ros::spin();

  return 0;
}
打开listener.cpp文件
gedit listener.cpp
替换内容:
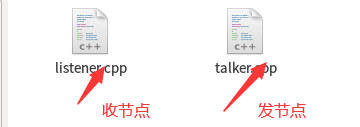
创建的两个节点如下图:
5、编辑Cmakelist.txt文件(注意:是comm项目包下的CMakelist文件)

打开这个文件,在文件末尾添加如下代码:
include_directories(include ${catkin_INCLUDE_DIRS})
add_executable(talker src/talker.cpp)
target_link_libraries(talker ${catkin_LIBRARIES})
add_dependencies(talker comm_generate_messages_cpp)
add_executable(listener src/listener.cpp)
target_link_libraries(listener ${catkin_LIBRARIES})
add_dependencies(listener comm_generate_messages_cpp)
注意:以上相邻代码之间不要有间隔哦,就是不要空一行,一定要相邻挨着,不然后面编译的时候回报错,这个林君也不知道怎么回事!有知道的小伙伴可以留言评论和林君讨论哦!
6、将目录切换到工作区目录,并执行catkin_make运行命令:
cd ~/ros
catkin_make

编译成功的话,会出现如下界面:
到这里呢,我们的节点创建也就完成了!接下来我们进入测试阶段吧!
四、测试程序的正确性
1、新开一个终端,启动ROS核心程序roscore。
roscore

记住,这是新的终端,并且,这个终端一直不要关闭
2、在开始运行我们的程序之前,在原来的终端、把程序注册
1)、切换为工作区
cd ~/ros
2)、程序注册
source ./devel/setup.bash

3、运行talker节点:
1)、在刚刚的终端输入以下命令:
rosrun comm talker

**记住,千万别忙按回车、不忙按回车、不忙按回车**看我后面步骤
4、接下来运行listener节点:
再新建一个终端,现在我们有三个终端了哦!输入以下命令:
1)、回到工作区
cd ~/ros
2)、程序注册
source ./devel/setup.bash
3)、运行listener节点
rosrun comm listener
这一步,不忙按回车哦、不忙按回车哦、不忙按回车哦
5、开始测试,在最开始的终端开始回车,切换到我们最后建立的终端,也开始回车!
在上面两部开始后,我们可以看到如下图的显示,
这表示订阅节点(listener)已经成功的接收到了发布节点(talker)发布的信息。至此,整个程序结束!
实验成功,我们可以关闭所有的终端了!
以上就是本次博客的全部内容啦,喜欢的小伙伴记得点赞、评论、转发、关注哦!
陈一月的又一天编程岁月!
来源:CSDN
作者:陈一月的编程岁月
链接:https://blog.csdn.net/qq_42451251/article/details/104650192