一:双缓冲原理
为了解决窗口刷新频率过快所带来的闪烁问题,利用双缓冲技术进行绘图。所谓双缓冲技术,就是将资源加载到内存,然后复制内存数据到设备DC(这个比较快),避免了直接在设备DC上绘图(这个比较慢)。打个简单的比方:有个画家在街边办了一个即时画展,在同一块画布上根据观众的要求画不同的图像,每当有一位观众制定要看什么画时,画家先把之前画布上的东西全部擦干净,再重新绘画。显然有一些经典的画像是大家都想看的,按照以前的老办法,画家每次都要重新画这幅图像,但这种擦了画,画了擦的方式很费时。所以画家想了一个办法,把这些经典画像预先用一块或几块画布画下来,等有人需要看时,把这些预备好的画布贴在现有画布的前面,这样就能满足观众的实时性要求。那么这些事先预备好的画布就相当于内存DC,把资源放在内存DC里,等到要刷新显示时,将内存DC上的东西“贴”到当前窗口DC上,就可以减少延时带来的闪烁问题,这就是双缓冲的原理。
详细介绍见后面的几片博文。下面举两个例子:
二: 例子
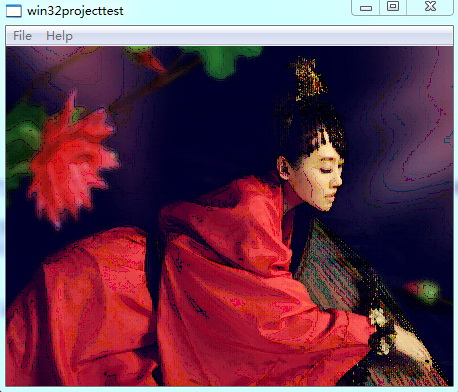
例子一:加载位图
代码:
LRESULT CALLBACK WndProc(HWND hWnd, UINT message, WPARAM wParam, LPARAM lParam)
{
	int wmId, wmEvent;
	PAINTSTRUCT ps;
	HDC hdc;

	switch (message)
	{
	case WM_COMMAND:
		wmId    = LOWORD(wParam);
		wmEvent = HIWORD(wParam);
		// Parse the menu selections:
		switch (wmId)
		{
		case IDM_ABOUT:
			DialogBox(hInst, MAKEINTRESOURCE(IDD_ABOUTBOX), hWnd, About);
			break;
		case IDM_EXIT:
			DestroyWindow(hWnd);
			break;
		default:
			return DefWindowProc(hWnd, message, wParam, lParam);
		}
		break;
	case WM_PAINT:
		hdc = BeginPaint(hWnd, &ps);
		// TODO: Add any drawing code here...
		myDraw(hdc);

		EndPaint(hWnd, &ps);
		break;
	case WM_DESTROY:
		PostQuitMessage(0);
		break;
	default:
		return DefWindowProc(hWnd, message, wParam, lParam);
	}
	return 0;
}
myDraw函数的实现:
const int g_picHeight = 1024;
const int g_picWidth  = 675;
void myDraw(HDC &dc)
{
	RECT rect;
	HBITMAP hOrgBitmap;
	HBITMAP hOldBitmap;
	int disHeight, disWidth;

	GetClientRect(g_hWnd, &rect);//获取客户区大小
	disHeight = rect.bottom-rect.top;
	disWidth = rect.right-rect.left;

	//加载图片
	hOrgBitmap = (HBITMAP)::LoadImage(hInst, _T("test2.bmp"), IMAGE_BITMAP, g_picWidth, g_picHeight, LR_LOADFROMFILE);

	HDC mDc = ::CreateCompatibleDC(dc);//创建当前上下文的兼容dc(内存DC)
	hOldBitmap = (HBITMAP)::SelectObject(mDc, hOrgBitmap);//将位图加载到内存DC

	//拷贝内存DC数据块到当前DC,自动拉伸
	::StretchBlt(dc, 0, 0, disWidth, disHeight, mDc, 0, 0, g_picWidth, g_picHeight, SRCCOPY);

	//恢复内存原始数据
	::SelectObject(mDc, hOldBitmap);

	//删除资源,防止泄漏
	::DeleteObject(hOrgBitmap);
	::DeleteDC(mDc);
}
结果:

调整窗口大小,发现无闪烁现象。
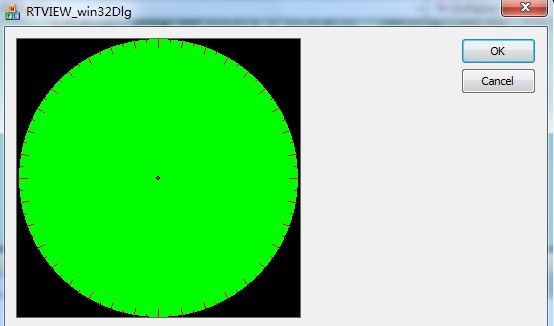
例子二:画各种直线和曲线。这是一个稍微复杂点的例子,是我平时做的一个demo。可以顺便熟悉一下Windows绘图的一些操作。
代码:
void CRTVIEW_win32DlgDlg::OnPaint()
{
	if (IsIconic())
	{
	       /********此段代码忽略*********/
	}
	else
	{
		CDialog::OnPaint(); //调用基类的默认控件绘制
		CRect ctrlRect;
		CStatic *pDegreePicCtrl = (CStatic *)GetDlgItem(IDC_STC_DEGREEPIC);
		pDegreePicCtrl->GetClientRect(&ctrlRect);//获取静态控件尺寸

		CDC *pdc = pDegreePicCtrl->GetWindowDC();//获取控件DC
		CDC dcMemory;
		dcMemory.CreateCompatibleDC(pdc);//创建内存DC


		CBitmap *pOldMapMemory;
		CBitmap mapMemory;
		mapMemory.CreateCompatibleBitmap(pdc, ctrlRect.Width(), ctrlRect.Height());//创建控件DC的兼容位图。其实就是与控件DC大小相同的一块区域
		pOldMapMemory = dcMemory.SelectObject(&mapMemory);//加载兼容位图,只有制定了“桌布”尺寸之后,你才能在内存DC上面绘图

		DrawDegreePicBkGrd(&dcMemory);//在内存DC上绘图
		pdc->BitBlt(0, 0, ctrlRect.Width(), ctrlRect.Height(), &dcMemory, 0, 0, SRCCOPY);//将内存DC上的内容复制到控件DC上
		dcMemory.SelectObject(pOldMapMemory);//还原原来的内存DC
		::DeleteObject(mapMemory);//删除兼容位图资源
		::DeleteDC(dcMemory);//删除内存DC
		ReleaseDC(pdc);//释放控件DC
	}
}
void CRTVIEW_win32DlgDlg::DrawDegreePicBkGrd(CDC *pdc)
{
	CRect stcRect, picRect;
	CStatic *pDegreePicCtrl = (CStatic *)GetDlgItem(IDC_STC_DEGREEPIC);
	pDegreePicCtrl->GetClientRect(&stcRect);
	if(stcRect.Width() > stcRect.Height()) {
		int diff = (stcRect.Width() - stcRect.Height()) / 2;
		picRect.left = stcRect.left + diff;
		picRect.right = stcRect.right - diff;
		picRect.top = stcRect.top;
		picRect.bottom = stcRect.bottom;
	} else {
		int diff = (stcRect.Height() - stcRect.Width()) / 2;
		picRect.left = stcRect.left;
		picRect.right = stcRect.right;
		picRect.top = stcRect.top + diff;
		picRect.bottom = stcRect.bottom - diff;
	}

	CBrush *pOldBrush;
	/**************画圆形***************/
	CBrush newBrush1;
	newBrush1.CreateSolidBrush(RGB(0, 255, 0));
	pOldBrush = pdc->SelectObject(&newBrush1);
	pdc->Ellipse(&picRect);

	/**************画原点***************/
	CRect orgRect(stcRect.Width()/2-2, stcRect.Height()/2-2, stcRect.Width()/2+2, stcRect.Height()/2+2);
	CBrush newBrush2;
	newBrush2.CreateSolidBrush(RGB(255,0,0));
	pOldBrush = pdc->SelectObject(&newBrush2);
	pdc->Ellipse(&orgRect);

	pdc->SelectObject(pOldBrush);

	/*************画刻度***************/
	CPoint center(stcRect.Width()/2, stcRect.Height()/2);
	double radias = (double)picRect.Width()/2;

	CPen newPen(PS_SOLID, 1, RGB(255,0,0));
	CPen *poldPen = pdc->SelectObject(&newPen);
	CPoint startPoint, endPoint;

	for(int i=0; i<360; i=i+5) {
		double cosval = cos(DEGREETORADIAN(i));
		double sinval = sin(DEGREETORADIAN(i));
		startPoint.x = center.x + int(radias * cosval); //当前角度对应的圆上的点的x坐标
		startPoint.y = center.y - int(radias * sinval); //当前角度对应的圆上的点的y坐标

		if(i%10 == 0) {
			endPoint.x = startPoint.x - int(10 * cosval);
			endPoint.y = startPoint.y + int(10 * sinval);
		} else {
			endPoint.x = startPoint.x - int(5 * cosval);
			endPoint.y = startPoint.y + int(5 * sinval);
		}
		pdc->MoveTo(startPoint);
		pdc->LineTo(endPoint);
	}
	pdc->SelectObject(poldPen);
}
效果:

三:小结
这两个例子里面,其实每次重绘都是重新申请内存DC,然后复制到窗口DC。虽然这样子比较繁琐,但是也不影响效果,如果在响应onpaint消息时,不擦除背景(如调用Invalidate(FALSE)),也不会产生闪烁。不过最好的办法,就是文章开头说的,只画一次,把那个内存DC的句柄保存下来,每次在onpaint里面重绘时,直接调用BitBlt复制即可。不过要注意这些句柄对象的销毁,以免内存泄漏。
下面这些文章也可以看看:
1 http://baike.baidu.com/view/1149326.htm
2 http://blog.csdn.net/xsc2001/article/details/5378601
3 http://www.cppblog.com/wrhwww/archive/2011/03/01/140913.html
4 http://www.cnblogs.com/afarmer/archive/2012/03/31/2427315.html
5 http://www.programlife.net/mfc-draw-pictures-with-memory-dc-buffer.html
6 http://blog.csdn.net/zxzerster/article/details/5659775
7 http://blog.csdn.net/yiruirui0507/article/details/6153607
8 http://blog.csdn.net/zicheng_lin/article/details/7179278
来源:https://www.cnblogs.com/wb-DarkHorse/p/3154387.html