前言
《SSM源码分析之Spring05-DI实现原理(基于Annotation 注入)》
《SSM源码分析之Spring06-IOC 容器中那些鲜为人知的事儿》
前面的章节我们主要看了一下在spring源码是如何设计管理bean的。这节我们用简单的几个类实现一个核心的IOC功能~
手写SpringV1.0
准备工作
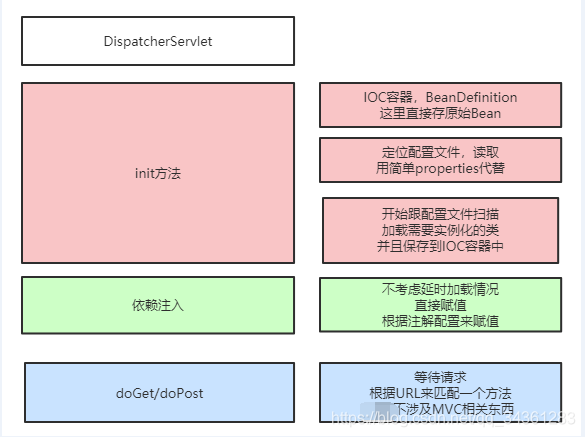
我们首先整理一下思路:
然后,创建一个maven项目,最后的项目结构如下:
pom.xml引入servlet依赖:
    <properties>
        <!-- dependency versions -->
        <servlet.api.version>2.4</servlet.api.version>
    </properties>

    <dependencies>
        <!-- requied start -->
        <dependency>
            <groupId>javax.servlet</groupId>
            <artifactId>servlet-api</artifactId>
            <version>${servlet.api.version}</version>
            <scope>provided</scope>
        </dependency>
        <!-- requied end -->
    </dependencies>
在web.xml中注册Servlet:(关于servlet这里不做过多解释,可以参考文章快速创建一个servlet并且在web.xml配置和使用它)
<?xml version="1.0" encoding="UTF-8"?>
<web-app xmlns:xsi="http://www.w3.org/2001/XMLSchema-instance"
	xmlns="http://java.sun.com/xml/ns/j2ee" xmlns:javaee="http://java.sun.com/xml/ns/javaee"
	xmlns:web="http://java.sun.com/xml/ns/javaee/web-app_2_5.xsd"
	xsi:schemaLocation="http://java.sun.com/xml/ns/j2ee http://java.sun.com/xml/ns/j2ee/web-app_2_4.xsd"
	version="2.4">
	<display-name>Spring Application</display-name>

	<servlet>
		<servlet-name>mvc</servlet-name>
		<servlet-class>com.xxx.vip.spring.servlet.DispatchServlet</servlet-class>
		<init-param>
			<param-name>contextConfigLocation</param-name>
			<param-value>classpath:application.properties</param-value>
		</init-param>
		<load-on-startup>1</load-on-startup>
	</servlet>

	<servlet-mapping>
		<servlet-name>mvc</servlet-name>
		<url-pattern>/*</url-pattern>
	</servlet-mapping>
</web-app>
application.properties配置文件:
scanPackage=com.xxx.vip.demo
templateRoot=layouts
DispatchServlet实现Bean的定位、加载、注册
public class DispatchServlet extends HttpServlet {

    private Properties contextConfig = new Properties();

    private Map<String,Object> beanMap = new ConcurrentHashMap<String,Object>();

    private List<String> classNames = new ArrayList<String>();


    @Override
    protected void doGet(HttpServletRequest req, HttpServletResponse resp) throws ServletException, IOException {
        this.doPost(req,resp);
    }

    @Override
    protected void doPost(HttpServletRequest req, HttpServletResponse resp) throws ServletException, IOException {

        System.out.println("---------- 调用doPost ----------");


    }

    @Override
    public void init(ServletConfig config) throws ServletException {

        //开始初始化的进程

        //定位
        doLoadConfig(config.getInitParameter("contextConfigLocation"));

        //加载
        doScanner(contextConfig.getProperty("scanPackage"));

        //注册
        doRegistry();

        //自动依赖注入

        //在Spring中是通过调用getBean方法才出发依赖注入的
        doAutowired();


//        DemoAction action = (DemoAction)beanMap.get("demoAction");
//        action.query(null,null,"Tom");

        //如果是SpringMVC会多设计一个HnandlerMapping

        //将@RequestMapping中配置的url和一个Method关联上
        //以便于从浏览器获得用户输入的url以后,能够找到具体执行的Method通过反射去调用
        initHandlerMapping();

    }

    private void initHandlerMapping() {
    }

    private void doRegistry() {

        if(classNames.isEmpty()){ return;}

        try{

            for(String className : classNames){
                Class<?> clazz = Class.forName(className);


                //在Spring中用的多个子方法来处理的
                if(clazz.isAnnotationPresent(Controller.class)){

                    String beanName = lowerFirstCase(clazz.getSimpleName());

                    //在Spring中在这个阶段不是不会直接put instance,这里put的是BeanDefinition
                    beanMap.put(beanName,clazz.newInstance());

                }else if(clazz.isAnnotationPresent(Service.class)){

                    Service service = clazz.getAnnotation(Service.class);

                    //默认用类名首字母注入
                    //如果自己定义了beanName,那么优先使用自己定义的beanName
                    //如果是一个接口,使用接口的类型去自动注入

                    //在Spring中同样会分别调用不同的方法 autowriedByName autowritedByType

                    String beanName = service.value();
                    if("".equals(beanName.trim())){
                        beanName = lowerFirstCase(clazz.getSimpleName());
                    }

                    Object instance = clazz.newInstance();

                    beanMap.put(beanName,instance);

                   Class<?>[] interfaces = clazz.getInterfaces();

                   for (Class<?> i :interfaces){
                       beanMap.put(i.getName(),instance);
                   }

                }else{
                    continue;
                }

            }


        }catch (Exception e){
            e.printStackTrace();
        }

    }

    private void doAutowired() {
        if(beanMap.isEmpty()){ return; }

        for (Map.Entry<String,Object> entry : beanMap.entrySet()) {

            Field [] fields = entry.getValue().getClass().getDeclaredFields();

            for (Field field : fields){

                if(!field.isAnnotationPresent(Autowried.class)){continue;}

                Autowried autowried = field.getAnnotation(Autowried.class);

                String beanName = autowried.value().trim();
                if("".equals(beanName)){
                    beanName = field.getType().getName();
                }
                field.setAccessible(true);

                try {
                    field.set(entry.getValue(),beanMap.get(beanName));
                } catch (IllegalAccessException e) {
                    e.printStackTrace();
                }

            }

        }
    }

    private void doScanner(String packageName) {

        URL url = this.getClass().getClassLoader().getResource("/" + packageName.replaceAll("\\.","/"));

        File classDir = new File(url.getFile());

        for (File file : classDir.listFiles()){
            if(file.isDirectory()){
                doScanner(packageName + "." +file.getName());
            }else {
                classNames.add(packageName + "." + file.getName().replace(".class",""));
            }
        }


    }

    private void doLoadConfig(String location) {
        //在Spring中是通过Reader去查找和定位对不对
        InputStream is = this.getClass().getClassLoader().getResourceAsStream(location.replace("classpath:",""));

        try {
            contextConfig.load(is);
        } catch (IOException e) {
            e.printStackTrace();
        }finally {
            try {
                if(null != is){is.close();}
            }catch (Exception e){
                e.printStackTrace();
            }

        }


    }


    private String lowerFirstCase(String str){
        char [] chars = str.toCharArray();
        chars[0] += 32;
        return String.valueOf(chars);
    }

}
自定义注解
Autowried
@Target({ElementType.FIELD})
@Retention(RetentionPolicy.RUNTIME)
@Documented
public @interface Autowried {
    String value() default  "";
}
Controller
@Target({ElementType.TYPE})
@Retention(RetentionPolicy.RUNTIME)
@Documented
public @interface Controller {

    String value() default  "";
}
RequestMapping
@Target({ElementType.TYPE,ElementType.METHOD})
@Retention(RetentionPolicy.RUNTIME)
@Documented
public @interface RequestMapping {
    String value() default  "";

}
RequestParam
@Target({ElementType.PARAMETER})
@Retention(RetentionPolicy.RUNTIME)
@Documented
public @interface RequestParam {
    String value() default  "";
}
Service
@Target({ElementType.TYPE})
@Retention(RetentionPolicy.RUNTIME)
@Documented
public @interface Service {
    String value() default  "";
}
测试
Service层:
public interface IDemoService {

	String get(String name);

}
实现类:
@Service
public class DemoService implements IDemoService {

	public String get(String name) {
		return "My name is " + name;
	}

}
Controller层:
@Controller
public class MyAction {

		@Autowried IDemoService demoService;

		@RequestMapping("/index.html")
		public void query(){

		}

}
带参数测试
@Controller
@RequestMapping("/demo")
public class DemoAction {

	@Autowried private IDemoService demoService;

	@RequestMapping("/query.json")
	public void query(HttpServletRequest req,HttpServletResponse resp,
		   @RequestParam("name") String name){
		String result = demoService.get(name);
		System.out.println(result);
//		try {
//			resp.getWriter().write(result);
//		} catch (IOException e) {
//			e.printStackTrace();
//		}
	}

	@RequestMapping("/edit.json")
	public void edit(HttpServletRequest req,HttpServletResponse resp,Integer id){

	}

}
后记
本节springV1.0的代码地址如下:手写spring的ioc容器
在后续章节,我们依次手写实现spring的AOP、springMVC等核心功能
来源:CSDN
作者:✎ℳ๓₯㎕雲淡風輕
链接:https://blog.csdn.net/qq_34361283/article/details/103544870