【MQTT】Java SSM开发MQTT,一篇就够了:服务器搭建+SSM框架容器+web端mqtt.js+arduino ESP8266开发接入
文章目录
- 【MQTT】Java SSM开发MQTT,一篇就够了:服务器搭建+SSM框架容器+web端mqtt.js+arduino ESP8266开发接入
- 最常用: win平台cmd客户端或Xshell端 常用的mosquitto指令
- 一、关于MQTT
- 二、关于mosquitto
- 三、下载paho.exe,win平台MQTT调试工具
- 四、win10安装mosquitto
- 五、win10使用 mosquitto
- 六、linux平台centOS7 安装 mosquitto
- 七、关于mosquitto中,内置主题的使用
- 八、融入SSM框架
- 1. pom.xml 导入jar包
- 2.MQTTUtil.class 工具类
- 3. MQTTClientService.class
- 4. BootService.class 由SSM框架加载完成后,启动
- 5 启动成功,使用客户端订阅发布测试
- 九、处理web页面,mqtt.js的使用
- 十、arduino开发 ESP8266 12F 中使用mqtt
最常用: win平台cmd客户端或Xshell端 常用的mosquitto指令
- 启动
mosquitto -c conf.d -v - 订阅(
-i设置名称 )mosquitto_sub -h 192.168.8.21 -t hello/world -u chen -P chen -v -i chen1 - 发布
mosquitto_pub -h 192.168.8.21 -u chen -P chen -t hello/world -m HELLO - 增加用户(
-c会清除其他用户)mosquitto_passwd -c ./passwd.d chen - 追加用户
mosquitto_passwd ./passwd.d chen - 自己的配置可以放到指定目录下,之后在conf中引用
include_dir /etc/mosquitto/conf - 关闭防火墙
systemctl stop firewalld.service
一、关于MQTT
MQTT(消息队列遥测传输)是ISO 标准(ISO/IEC PRF 20922)下基于发布/订阅范式的消息协议。它工作在 TCP/IP协议族上,是为硬件性能低下的远程设备以及网络状况糟糕的情况下而设计的发布/订阅型消息协议,我选用 mosquitto作为消息中间件,来搭建自己的MQTTserver服务器。
二、关于mosquitto
是一款实现了消息推送协议 MQTT v3.1/v3.1.1 的开源消息代理软件,提供轻量级的,支持可发布/可订阅的的消息推送模式,使设备对设备之间的短消息通信变得简单,比如现在应用广泛的低功耗传感器, 手机、嵌入式计算机、微型控制器等移动设备。
三、下载paho.exe,win平台MQTT调试工具
-
paho 用来测试MQTT服务器的主题订阅和发布,是个不错的调试工具.

链接:https://pan.baidu.com/s/1gmEIdqWjUSHckAjt6omyAw
提取码:gn6h -
安装完成后,paho调试软件的目录图

-
启动界面

-
paho 调试工具,界面,很简单实用,可以建立连接,连接MQTT服务器地址和端口号,订阅主题,发布主题内容。

-
在选项页可以设置MQTT的username 和password.

四、win10安装mosquitto
-
win端下载

链接:https://pan.baidu.com/s/1JLevb9LAI2i89892hBqm5Q 提取码:c20n -
win端安装过程:
- 双击进入安装页:

- 注意选择合适的路径:

- 安装完成后,软件目录如下:

- 双击进入安装页:
五、win10使用 mosquitto
-
查看阅读配置文件 mosquitto.conf ,其实,全是英文988行,看下去也是浪费时间,建议直接跳过。
-
直接点击mosquitto.exe,会用默认的配置启动程序,默认端口1883。不建议直接点击启动

-
cmd控制台启动mosquitto
-
进入mosquitto 安装目录下

-
在地址栏,直接输入cmd,之后回传确定,进入目录下的CMD控制台


-
新建 conf.d 文本文档, 后缀 *.d 我这里定义为自己的配置文件,目的是区分系统配置。

-
写入一下配置:
# 设置是否可以匿名登录 allow_anonymous false # MQTT服务的端口 port 1883 # 配置websocket接入的两行: listener 9001 protocol websockets -
CMD控制端启动
mosquitto -c conf.d -v
-
测试TCP连接服务
连接地址tcp://localhost:1883
订阅test主题
之后发布test主题内容HelloWorld,因为本机客户端有订阅test,也就能收到自己发布的
服务端收到对应主题订阅处理转发,测试通过。
-
测试通过websocket协议连接服务
使用在线websocket测试页,:http://mqtt.p2hp.com/websocket/
订阅和发布test主题,消息为Hello from websocket,发送显示页如下:
原win10 paho客户端也接收到消息:
-
测试完毕,这样的话,MQTT 、mosquitto 基础搭建和测试就已经完成。
至于 设置用户账号和密码、设置访问的主题控制,就很简单了。 -
设置连接MQTT服务器的用户的账号和密码
新建passwd.d 空白文本文件:
CMD控制台,设置账号和密码:我设置的账号为 chen。之后输入密码,和确认密码。mosquitto_passwd passwd.d chen
打开passwd.d 文本,生成了账号chen,和加密的密码值,也就完成了生成用户账号和密码。chen:$6$P7bJLkI5DbwZ6Bbt$RGBz39ubQSWMSt4Va7+e3nAmNEnil3/GRVyaiuKoPdIVnyC4HaIZoICYlk4PtpYNxEwbybZtjFqCtTNXdpC07A== -
测试账号和密码

使用账号密码连接成功:
故意使用错误账号密码连接失败:

验证完毕。 -
设置主题配置文件
新建acl.d
写入配置:# 设置用户 chen 有读取/订阅 主题 hello/world 的权限 user chen topic read hello/world # 设置用户 chen 有写入/发布 主题 hello/world 的权限 user chen topic write hello/world # 若不加第一行user chen ,直接设置 topic ,就是对所有用户生效 # topic write hh # topic read hh修改conf.d,添加
acl_file acl.d配置#设置用户的主题权限 acl_file acl.d -
重启 mosquitto 服务端,进行连接测试
发布test 主题,被拒绝:
发布hello/world 主题,成功
验证完毕!
-
六、linux平台centOS7 安装 mosquitto
推荐一种安装mosquitto 最为简单的方式:通过EPEL 软件库安装
-
添加EPEL软件库
yum install https://dl.fedoraproject.org/pub/epel/epel-release-latest-7.noarch.rpm
-
查看EPEL软件库结果(肯能会耗费些时间,可以跳过):
yum repolist all | grep enabled
-
查看 mosquitto软件包列表(可以跳过)
yum list all | grep mosquitto
-
可以查看mosquitto 相关信息(可以跳过):
yum info mosquitto
-
安装 mosquitto 软件包:
yum install mosquitto全部yes 安装完成 !
-
查看安装结果,可以看到版本号:
yum list installed | grep mosquitto
-
默认安装的配置文件存放在
/etc/mosquitto下
-
在这个目录下,建立自己的配置文件
conf.d passwd.d acl.dconf.d#设置是否可以匿名登录 allow_anonymous false # MQTT服务的端口 port 1883 # 配置websocket接入的两行: listener 9001 protocol websockets #设置用户账号密码 password_file /etc/mosquitto/passwd.d #设置用户的主题权限 acl_file /etc/mosquitto/acl.dpasswd.d为空就行,稍后指令生成acl.d#设置是否可以匿名登录 # 设置用户 chen 有读取/订阅 主题 hello/world 的权限 user chen topic read hello/world # 设置用户 chen 有写入/发布 主题 hello/world 的权限 user chen topic write hello/world # 若不加第一行user chen ,直接设置 topic ,就是对所有用户生效 # topic write hh # topic read hh -
生成用户账号密码:
mosquitto_passwd ./passwd.d chen
-
启动mosquitto
mosquitto -c conf.d -v-c 为使用 conf.d 配置文件, -v 为显示详细日志 -d 为 后台运行
-d 后台启动,结束的话直接 kill -9 1400 [root@pipi mosquitto]# mosquitto -c conf.d -v -d [root@pipi mosquitto]# ps -ef|grep mosquitto mosquit+ 1400 1 0 17:39 ? 00:00:00 mosquitto -c conf.d -v -d root 1402 952 0 17:39 pts/0 00:00:00 grep --color=auto mosquitto [root@pipi mosquitto]# kill -9 1400 [root@pipi mosquitto]# -
注意打开1883 9001 端口,或者测试时直接关闭防火墙
systemctl stop firewalld.service -
设置账号密码后,连接测试通过。

-
web页面端测试,websocket连接通过 url页面地址:

七、关于mosquitto中,内置主题的使用
很简单 ,相对于正常主题,使用即可:如
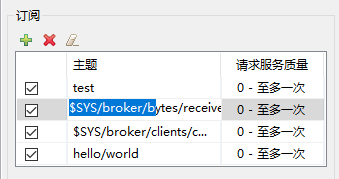
订阅mosquitto服务器状态各主题,注意放开用户的相应权限。
MQTT客户端可以通过订阅位于$SYS层次下的主题来查看mosquitto服务器的状态信息。标记为Static的主题对于每一次订阅只发布一次。其它所有主题每隔sys_interval(在mosquitto.conf文件或conf.d中配置)秒更新发布。如果sys_interval设置为0,系统就不发布更新。
$SYS中各主题说明如下:
$SYS/broker/bytes/received
自服务器启动以来共接收的字节数
$SYS/broker/bytes/sent
自服务器启动以来共发送的字节数
$SYS/broker/clients/connected,
$SYS/broker/clients/active (1.4版本已取消)
当前连接的客户端数量
$SYS/broker/clients/expired
超过有效期被断开连接的客户端数量,有效期通过persistent_client_expiration参数设置。
$SYS/broker/clients/disconnected,
$SYS/broker/clients/inactive (1.4版本已取消)
注册到服务器上的持久连接(clean seesion为假)但当前断开的客户端数量
$SYS/broker/clients/maximum
服务器同一时间连接的最大客户端数量
$SYS/broker/clients/total
有效和无效连接、注册到服务器上的总数。
$SYS/broker/connection/#
如果服务器设置了桥接,系统会提供一个主题来标识连接状态,默认使用$SYS/broker/connection/,
如果主题值为1表示连接激活,如果为0表示连接没有激活。
$SYS/broker/heap/current size
Mosquitto正在使用的堆内存大小。注意这个主题是否可以使用取决于系统编译时的相关参数设置。
$SYS/broker/heap/maximum size
Mosquitto使用的最大堆内存。这个参数是否有效也取决于系统编译时的相关参数设置。
$SYS/broker/load/connections/+
不同时间段内服务器接收到的connections包的平均数。最后的“+”可是1min,5min,15min。
分别表示1分钟,5分钟,15分钟的平均数。
$SYS/broker/load/bytes/received/+
不同时间段内服务器接收数据的平均字节数。最后的“+”可是1min,5min,15min。
$SYS/broker/load/bytes/sent/+
不同时间段内服务器发送数据的平均字节数。最后的“+”可是1min,5min,15min。
$SYS/broker/load/messages/received/+
不同时间段内服务器接收到的所有类型消息的平均数。最后的“+”可是1min,5min,15min。
$SYS/broker/load/messages/sent/+
不同时间段内服务器发送的所有类型的消息的平均数。最后的“+”可是1min,5min,15min。
$SYS/broker/load/publish/dropped/+
不同时间段内服务器丢弃的消息的平均数,这表明了那些持久连接但与服务器断开的客户端失去消息的速率。
最后的“+”可是1min,5min,15min。
$SYS/broker/load/publish/received/+
不同时间段内服务器接收的发布消息的平均数。最后的“+”可是1min,5min,15min。
$SYS/broker/load/publish/sent/+
不同时间段内服务器发送的发布消息的平均数。最后的“+”可是1min,5min,15min。
$SYS/broker/load/sockets/+
不同时间段内服务器打开的socket连接的平均数。最后的“+”可是1min,5min,15min。
$SYS/broker/messages/inflight
等待确认的Qos>0的消息的数量。
$SYS/broker/messages/received
自服务器启动以来接收的所有类型的消息总数。
$SYS/broker/messages/sent
自服务器启动以来发送的所有类型的消息总数。
$SYS/broker/messages/stored
服务器存储的消息的总数,包括保留消息和持久连接客户端的消息队列中的消息数。
$SYS/broker/publish/messages/dropped
由于inflight/queuing限制而直接丢弃的消息的总数,
相关设置请查看mosquitto.conf中max_inflight_messages 和max_queued_messages参数。
$SYS/broker/publish/messages/received
自服务器启动以来接收的发布消息的总数。
$SYS/broker/publish/messages/sent
自服务器启动以来发送的发布消息的总数。
$SYS/broker/retained messages/count
服务器保留的消息总数。
$SYS/broker/subscriptions/count
服务器订阅主题总数。
$SYS/broker/timestamp
Mosquitto软件build的详细时间(Static)。
$SYS/broker/uptime
Mosquitto启动时长(单位:秒)。
$SYS/broker/version
Mosquitto软件版本号(Static)。
至此,服务器配置,基本完毕,你也算是MQTT的小高手了之后就是Java SSM 框架的融合 和 web端适用 mqtt.js 连接的相关搭建。
八、融入SSM框架
1. pom.xml 导入jar包
		<dependency>
			<groupId>org.springframework.integration</groupId>
			<artifactId>spring-integration-mqtt</artifactId>
			<version>4.3.9.RELEASE</version>
		</dependency>
		<dependency>
			<groupId>org.eclipse.paho</groupId>
			<artifactId>org.eclipse.paho.client.mqttv3</artifactId>
			<version>1.2.2</version>
		</dependency>
2.MQTTUtil.class 工具类
主要用来处理发布方法pub
package com.chen.manage.mqtt_test;
import org.eclipse.paho.client.mqttv3.MqttClient;
import org.eclipse.paho.client.mqttv3.MqttConnectOptions;
import org.eclipse.paho.client.mqttv3.MqttDeliveryToken;
import org.eclipse.paho.client.mqttv3.MqttException;
import org.eclipse.paho.client.mqttv3.MqttMessage;
import org.eclipse.paho.client.mqttv3.MqttTopic;
import org.eclipse.paho.client.mqttv3.persist.MemoryPersistence;
/**
 * MQTT 基础工具类 ,主要用来发布消息,pub功能;<br>
 * 相关配置文件,可以抽取到配置文件中,由spring导入。
 *
 * @author chen
 */
public class MQTTUtil {
	// tcp://MQTT安装的服务器地址:MQTT定义的端口号
	public static final String HOST = "tcp://192.168.8.19:1883";
	// 定义MQTT的ID,可以在MQTT服务配置中指定
	private static final String clientid = "myManageMQTTServer";
	private MqttClient client;
	private MqttTopic mqttTopic;
	private String userName = "chen";
	private String passWord = "chen";

	/**
	 * 构造函数
	 *
	 * @throws MqttException
	 */
	public MQTTUtil(String topic) throws MqttException {
		// MemoryPersistence设置clientid的保存形式,默认为以内存保存
		client = new MqttClient(HOST, clientid, new MemoryPersistence());
		connect(topic);
	}

	/**
	 * 用来连接服务器
	 */
	private void connect(String topic) {
		MqttConnectOptions options = new MqttConnectOptions();
		options.setCleanSession(false);
		options.setUserName(userName);
		options.setPassword(passWord.toCharArray());
		// 设置超时时间
		options.setConnectionTimeout(10);
		// 设置会话心跳时间
		options.setKeepAliveInterval(20);
		try {
			// 设置回调
			client.setCallback(new PushCallback());
			client.connect(options);
			mqttTopic = client.getTopic(topic);
		} catch (Exception e) {
			e.printStackTrace();
		}
	}

	// 发送消息并获取回执
	public void publish(MqttMessage message) throws Exception {
		MqttDeliveryToken token = mqttTopic.publish(message);
		token.waitForCompletion();
		System.out.println("message is published completely! " + token.isComplete());
		System.out.println("messageId:" + token.getMessageId());
		token.getResponse();
		if (client.isConnected())
			client.disconnect(10000);
		System.out.print("Disconnected: delivery token \"" + token.hashCode()  );
		System.out.println("\" received: " + token.isComplete());
	}

	public String getUserName() {
		return userName;
	}
	public void setUserName(String userName) {
		this.userName = userName;
	}
	public String getPassWord() {
		return passWord;
	}
	public void setPassWord(String passWord) {
		this.passWord = passWord;
	}

	public MqttTopic getMqttTopic() {
		return mqttTopic;
	}

	public void setMqttTopic(MqttTopic mqttTopic) {
		this.mqttTopic = mqttTopic;
	}

}
3. MQTTClientService.class
主要当做一个客户端在SSM中运行,处理回调和返回订阅消息
package com.chen.manage.mqtt_test;
import org.eclipse.paho.client.mqttv3.IMqttDeliveryToken;
import org.eclipse.paho.client.mqttv3.MqttCallback;
import org.eclipse.paho.client.mqttv3.MqttClient;
import org.eclipse.paho.client.mqttv3.MqttConnectOptions;
import org.eclipse.paho.client.mqttv3.MqttException;
import org.eclipse.paho.client.mqttv3.MqttMessage;
import org.eclipse.paho.client.mqttv3.persist.MemoryPersistence;
import org.springframework.beans.factory.annotation.Autowired;
import org.springframework.stereotype.Service;

import com.chen.manage.pojo.Admin;
import com.chen.manage.service.AdminService;

/**
 * 模拟一个客户端接收消息
 * @author chen
 */
@Service
public class MQTTClientService {
	public static String str = "";
	public static final String HOST = "tcp://192.168.8.19:1883";
	// 服务器内置主题,用来监测当前服务器上连接的客户端数量($SYS/broker/clients/connected)
	// public static final String TOPIC1 = "$SYS/broker/clients/connected";
	public static final String TOPIC1 = "topic1";
	private static final String clientid = "client1";
	private MqttClient client;
	private MqttConnectOptions options;
	private String userName = "chen";
	private String passWord = "chen";

	@Autowired
	private AdminService adminService;
	public void start() {
		// host为主机名,clientid即连接MQTT的客户端ID,一般以唯一标识符表示,
		//MemoryPersistence设置clientid的保存形式,默认为以内存保存
		try {
			client = new MqttClient(HOST, clientid, new MemoryPersistence());
			// MQTT的连接设置
			options = new MqttConnectOptions();
			// 设置是否清空session,这里如果设置为false表示服务器会保留客户端的连接记录,
			//设置为true表示每次连接到服务器都以新的身份连接
			options.setCleanSession(false);
			// 设置连接的用户名
			options.setUserName(userName);
			// 设置连接的密码
			options.setPassword(passWord.toCharArray());
			// 设置超时时间 单位为秒
			options.setConnectionTimeout(10);
			// 设置会话心跳时间 单位为秒 服务器会每隔1.5*20秒的时间向客户端发送个消息
			//判断客户端是否在线,但这个方法并没有重连的机制
			options.setKeepAliveInterval(20);
			// 设置回调
			client.setCallback(new MqttCallback() {
				public void connectionLost(Throwable cause) {
					// 连接丢失后,一般在这里面进行重连,
					System.out.println("连接断开,可以做重连,只是简单处理:10秒后重连");
					try {
						Thread.sleep(10 * 1000);
						start();
					} catch (Exception e) {
						e.printStackTrace();
					}
				}
				public void deliveryComplete(IMqttDeliveryToken token) {
					System.out.println("deliveryComplete---------" + token.isComplete());
				}
				public void messageArrived(String topic, MqttMessage message)  {
					try {
						str = message.toString();
						System.out.println(" 从服务器收到的消息为:" + message.toString());
						Admin admin = adminService.queryById(Integer.valueOf(str));
						if (admin != null) {
							//查询数据库,如果有用户数据,则返回用户的相关属性,这里用手机号示例:
							System.out.println(admin.getPhone());
							//使用MQTT发送主题消息
							MQTTUtil mqttUtil = new MQTTUtil("topic11");
							MqttMessage message1 = new MqttMessage();
							message1.setId(1);
							message1.setQos(1);
							message1.setPayload(admin.getPhone().getBytes());
							mqttUtil.publish(message1);

						} else {
							System.out.println("admin is null");
						}
					} catch (Exception e) {
						e.printStackTrace();
					}
				}
			});
			// MqttTopic topic = client.getTopic(TOPIC1);
			// setWill方法,设置最终端口的通知消息:如果项目中需要知道客户端是否掉线可以调用该方法。
			// options.setWill(topic, "close".getBytes(), 2, true); //遗嘱
			client.connect(options);
			// 订阅消息
			int[] Qos = {1};
			String[] topic1 = {TOPIC1};
			client.subscribe(topic1, Qos);
		} catch (MqttException e1) {
			e1.printStackTrace();
		}
	}
}
4. BootService.class 由SSM框架加载完成后,启动
主要用来启动mqttClientService.start();方法,SSM加载完成后执行此方法。
package com.chen.manage.service;

import org.springframework.beans.factory.InitializingBean;
import org.springframework.beans.factory.annotation.Autowired;
import org.springframework.stereotype.Service;

import com.chen.manage.mqtt_test.MQTTClientService;
import com.chen.manage.netty2.EchoServer;
import com.chen.manage.nettyudp.NettyUdpServer;

import io.netty.channel.ChannelFuture;

/**
 * 系统启动后执行
 *
 * @author Fitz
 *
 */
@Service
public class BootService implements InitializingBean {
	//
	// @Autowired
	// private NettyTCPServer nettyTCPServer;
	@Autowired
	private EchoServer echoServer;
	@Autowired
	private NettyUdpServer nettyUdpServer;

	@Autowired
	private MQTTClientService mqttClientService;
	@Override
	public void afterPropertiesSet() throws Exception {
		mqttClientService.start();
	}
}
5 启动成功,使用客户端订阅发布测试


运行ok
九、处理web页面,mqtt.js的使用
1. paho-mqtt.js下载
链接:https://pan.baidu.com/s/1R2j1sbOhTL7Fak132b2crA
提取码:8zuz
2. jquery.min.js下载
链接:https://pan.baidu.com/s/1OIoDrBf63cmexOD_xSgMvg
提取码:w6eg
3. my_good_mqtt_test.jsp 实现调用
链接:https://pan.baidu.com/s/1awEe5rAwQNaEgLpPWeqC_Q
提取码:8fnm
<%@ page language="java" contentType="text/html; charset=UTF-8" pageEncoding="UTF-8"%>
<!DOCTYPE html>
<html>
<head>
<meta http-equiv="Content-Type" content="text/html; charset=utf-8"/>
    <title></title>
	<meta charset="utf-8" />
    <script src="/js_mqtt/jquery.min.js"></script>
    <script src="/js_mqtt/paho-mqtt.js"></script>
    <script type="text/javascript">
        //所有主题
        var allTopics = [
            { "Topic": "topic1", "Describe": "topic1" },
            { "Topic": "/data/alarm", "Describe": "警示" },
            { "Topic": "/data/message", "Describe": "消息" },
            { "Topic": "/data/notify", "Describe": "通知" }
        ];

        //选中订阅主题
        var selectedTopics = [];

        //选中发布主题
        var currentTopic;

        //客户端选项
        var option = {
            "ServerUri": "192.168.8.19",
            "ServerPort": 9001,
            "UserName": "chen",
            "Password": "chen",
            "ClientId": "",
            "TimeOut": 5,
            "KeepAlive": 100,
            "CleanSession": false,
            "SSL":false
        }

        //客户端
        var client;

        $(function () {
            BindSubTopics(allTopics);
            BindPubTopics(allTopics);

            //订阅主题选中事件
            $("#subTopics input[type=checkbox]").on("click", function () {
                var t = $(this).val();
                var topic;
                for(var i in allTopics){
                    var tmp = allTopics[i];
                    if (tmp.Topic == t) {
                        topic = tmp;
                    }
                }

                if ($(this).is(":checked")) {//选中
                    selectedTopics.push(topic);
                }
                else {//取消选择
                    if(selectedTopics.length>0){
                        for(var i in selectedTopics){
                            var tmp = selectedTopics[i];
                            if (tmp.Topic == t) {
                                selectedTopics.splice(i, 1);
                            }
                        }
                    }
                }

            });

            //发布主题选中事件
            $("#pubTopics").on("change", function () {
                var d = $("#pubTopics option:selected").text();
                var t = $("#pubTopics").val();
                currentTopic = { "Topic": t, "Describe": d }
                console.log(currentTopic);
            });

            //连接按钮点击事件
            $("#btnConnect").on("click", function () {
                if ($("#txtIp").val()!="") {
                    option.ServerUri = $("#txtIp").val();
                }
                else {
                    alert("请输入服务端IP!");
                    return;
                }

                if($("#txtPort").val()!=""){
                    option.ServerPort = Number($("#txtPort").val());
                }
                else {
                    alert("请输入端口号!");
                    return;
                }

                option.ClientId = guid();

                client = new Paho.Client(option.ServerUri, option.ServerPort, option.ClientId)

                client.onConnectionLost = onConnectionLost;
                client.onMessageArrived = onMessageArrived;

                client.connect({
                    invocationContext: {
                        host: option.ServerUri,//IP地址
                        port: option.ServerPort,//端口号
                        path: client.path,
                        clientId: option.ClientId//标识
                    },
                    timeout: option.TimeOut,//连接超时时间
                    keepAliveInterval: option.KeepAlive,//心跳间隔
                    cleanSession: option.CleanSession,//是否清理Session
                    useSSL: option.SSL,//是否启用SSL
                    userName: option.UserName,  //用户名
                    password: option.Password,  //密码
                    onSuccess: onConnect,//连接成功回调事件
                    onFailure: onError//连接失败回调事件
                });

            });

            //断开按钮点击事件
            $("#btnDisconnect").on("click", function () {
                client = null;

                enable($("#btnConnect"), true);
                enable($("#btnDisconnect"), false);
                enable($("#btnPublish"), false);
                enable($("#btnSubscribe"), false);
            });

            //订阅按钮点击事件
            $("#btnSubscribe").on("click", function () {
                if (!client) {
                    alert("请连接服务端");
                    return;
                }
                if(selectedTopics.length==0){
                    alert("请选择要订阅的主题!");
                    return;
                }

                var msg = "";
                for(var i in selectedTopics){
                    var t = selectedTopics[i];
                    client.subscribe(t.Topic);
                    msg+=t.Topic+";"
                }
                WriteToStatus("成功订阅主题:" + msg);
            });

            //发布按钮点击事件
            $("#btnPublish").on("click", function () {
                if(!client){
                    alert("请连接服务端");
                    return;
                }
                if (!currentTopic) {
                    alert("请选择要发布的主题!");
                    return;
                }
                if($("#txtContent").val()==""){
                    alert("请输入要发布的内容");
                    return;
                }

                var message = new Paho.Message($("#txtContent").val());
                message.destinationName = currentTopic.Topic;
                client.send(message);

                WriteToStatus("发布了主题为" + currentTopic.Topic + "的消息:" + $("#txtContent").val())
            });


        });

        //连接成功事件
        function onConnect() {
            WriteToStatus("连接成功!")

            enable($("#btnConnect"), false);
            enable($("#btnDisconnect"), true);
            enable($("#btnPublish"), true);
            enable($("#btnSubscribe"), true);
        }
        //连接失败事件
        function onError(e) {
            WriteToStatus("连接失败:" + e)

            enable($("#btnConnect"), true);
            enable($("#btnDisconnect"), false);
            enable($("#btnPublish"), false);
            enable($("#btnSubscribe"), false);
        }
        //连接断开事件
        function onConnectionLost(e) {
            if (e.errorCode !== 0) {
                WriteToStatus("连接异常断开:" + e.errorMessage);

                enable($("#btnConnect"), true);
                enable($("#btnDisconnect"), false);
                enable($("#btnPublish"), false);
                enable($("#btnSubscribe"), false);
            }
        }
        //接收消息事件
        function onMessageArrived(data) {
            WriteToStatus("收到消息:" + data.payloadString);
        }

        //绑定订阅主题
        function BindSubTopics(topics) {
            var html = "";
            for (var i = 0; i < topics.length;i++){
                var topic = topics[i];
                html += topic.Describe;
                html += '<input type="checkbox" value="'+topic.Topic+'"/>';
            }
            $("#subTopics").html(html);
        }

        //绑定发布主题
        function BindPubTopics(topics) {
            var html = "";
            for (var i = 0; i < topics.length; i++) {
                var topic = topics[i];
                html += '<option value="' + topic.Topic + '">' + topic.Describe + '</option>';
            }
            $("#pubTopics").html(html);
        }

        //状态输出
        function WriteToStatus(data) {
            var now = new Date();
            var message = '[' + now.toLocaleTimeString() + ']' + data;
            console.log(message);
            $("#logResult").append('<li>' + message + '</li>');
        }

        //生成GUID
        function guid() {
            function S4() {
                return (((1 + Math.random()) * 0x10000) | 0).toString(16).substring(1);
            }
            return (S4() + S4() + "-" + S4() + "-" + S4() + "-" + S4() + "-" + S4() + S4() + S4());
        }

        //切换按钮状态
        function enable(button,enabled) {
            if (enabled) {
                button.removeAttr("disabled");
            }
            else {

                button.attr("disabled", "disabled");
            }
        }

    </script>
</head>
<body>
    <table>
        <tr>
            <td></td>
            <td><input id="txtIp" type="text" value="192.168.8.19"/></td>
            <td><input id="txtPort" type="text" value="9001"/></td>
            <td><input id="btnConnect" type="button" value="连接"/></td>
            <td><input id="btnDisconnect" type="button" value="断开" disabled="disabled"/></td>
            <td></td>
        </tr>
        <tr>
            <td></td>
            <td colspan="3">
                <div id="subTopics">
                </div>
            </td>
            <td><input id="btnSubscribe" type="button" value="订阅" disabled="disabled"/></td>
            <td></td>
        </tr>
        <tr>
            <td></td>
            <td colspan="4">
                <ul id="logResult"></ul>
            </td>
            <td></td>
        </tr>
        <tr>
            <td></td>
            <td>
                <select id="pubTopics">
                </select>
            </td>
            <td colspan="2"><input id="txtContent" type="text"/></td>
            <td><input id="btnPublish" type="button" value="发布" disabled="disabled"/></td>
            <td></td>
        </tr>
    </table>
</body>
</html>
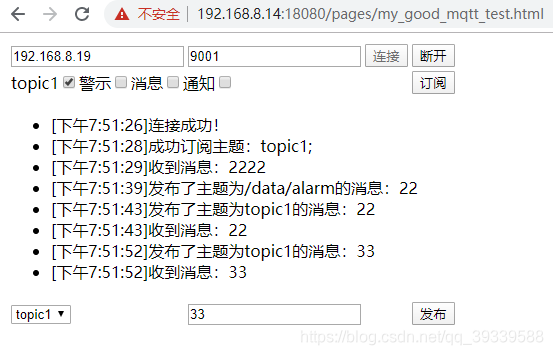
4. 测试成功

十、arduino开发 ESP8266 12F 中使用mqtt
1.首选项,加载开发板
http://arduino.esp8266.com/stable/package_esp8266com_index.json
2. 加载开发板库

3. 选择开发板WeMos D1R1

4. 加载 mqtt库,这里使用 PubSubClient

5. mqtt_esp8266.ino, arduino烧录硬件,硬件即可完成MQTT通信。
K02_mqtt_esp8266.ino
链接:https://pan.baidu.com/s/1WuvgZ7mKqA91Wfd90JpzDw
提取码:og2n
/*
 Basic ESP8266 MQTT example

 This sketch demonstrates the capabilities of the pubsub library in combination
 with the ESP8266 board/library.

 It connects to an MQTT server then:
  - publishes "hello world" to the topic "outTopic" every two seconds
  - subscribes to the topic "inTopic", printing out any messages
    it receives. NB - it assumes the received payloads are strings not binary
  - If the first character of the topic "inTopic" is an 1, switch ON the ESP Led,
    else switch it off

 It will reconnect to the server if the connection is lost using a blocking
 reconnect function. See the 'mqtt_reconnect_nonblocking' example for how to
 achieve the same result without blocking the main loop.

 To install the ESP8266 board, (using Arduino 1.6.4+):
  - Add the following 3rd party board manager
  - under "File -> Preferences -> Additional Boards Manager URLs":
       http://arduino.esp8266.com/stable/package_esp8266com_index.json
  - Open the "Tools -> Board -> Board Manager" and click install for the ESP8266"
  - Select your ESP8266 in "Tools -> Board"

*/


#include <ESP8266WiFi.h>
#include <PubSubClient.h>

// Update these with values suitable for your network.

const char* ssid = "Iot Lab";
const char* password = "WXshiNNN";
const char* mqtt_server = "192.168.8.14";

WiFiClient espClient;
PubSubClient client(espClient);
long lastMsg = 0;
char msg[50];
int value = 0;

void setup_wifi() {

  delay(10);
  // We start by connecting to a WiFi network
  Serial.println();
  Serial.print("Connecting to ");
  Serial.println(ssid);

  WiFi.begin(ssid, password);

  while (WiFi.status() != WL_CONNECTED) {
    delay(500);
    Serial.print(".");
  }

  randomSeed(micros());

  Serial.println("");
  Serial.println("WiFi connected");
  Serial.println("IP address: ");
  Serial.println(WiFi.localIP());
}

void callback(char* topic, byte* payload, unsigned int length) {
  Serial.print("Message arrived [");
  Serial.print(topic);
  Serial.print("] ");
  for (int i = 0; i < length; i++) {
    Serial.print((char)payload[i]);
  }
  Serial.println();

  // Switch on the LED if an 1 was received as first character
  if ((char)payload[0] == '1') {
    // Turn the LED on (Note that LOW is the voltage level
    digitalWrite(BUILTIN_LED, LOW);
    // but actually the LED is on; this is because
    // it is active low on the ESP-01)
  } else {
 	 // Turn the LED off by making the voltage HIGH
    digitalWrite(BUILTIN_LED, HIGH);
  }

}

void reconnect() {
  // Loop until we're reconnected
  while (!client.connected()) {
    Serial.print("Attempting MQTT connection...");
    // Create a random client ID
    String clientId = "ESP8266Client-";
    clientId += String(random(0xffff), HEX);
    // Attempt to connect
    if (client.connect(clientId.c_str())) {
      Serial.println("connected");
      // Once connected, publish an announcement...
      client.publish("outTopic", "hello world");
      // ... and resubscribe //硬件订阅这个主题,其他发布到这个主题,就可以通信
      //接收其他程序的消息:
      client.subscribe("inTopic");
    } else {
      Serial.print("failed, rc=");
      Serial.print(client.state());
      Serial.println(" try again in 5 seconds");
      // Wait 5 seconds before retrying
      delay(5000);
    }
  }
}

void setup() {
  // Initialize the BUILTIN_LED pin as an output
  pinMode(BUILTIN_LED, OUTPUT);

  Serial.begin(115200);
  setup_wifi();
  client.setServer(mqtt_server, 8883);
  client.setCallback(callback);
}

void loop() {

  if (!client.connected()) {
    reconnect();
  }
  client.loop();

  long now = millis();
  if (now - lastMsg > 2000) {
    lastMsg = now;
    ++value;
    snprintf (msg, 50, "hello world #%ld", value);
    Serial.print("Publish message: ");
    Serial.println(msg);
    //向外发送消息数据
    client.publish("outTopic", msg);
  }
}
结束 2020-1-3
看见即是有缘,多谢关注,多谢私信交流,多谢推荐技术好文。 在前进的路上,我们永不停息!
来源:CSDN
作者:Goldchenn
链接:https://blog.csdn.net/qq_39339588/article/details/103816835


