LNMP平台构建实验 +bbs社区搭建
LNMP 平台构建+bbs社区搭建: 有nginx 环境、 mysql 环境、 php环境 ,bbs社区搭建
一、nginx软件部署
1、关闭防护墙,安全机制
[root@localhost ~]# iptables -F
[root@localhost ~]# setenforce 0
[root@localhost ~]# systemctl stop firewalld
2、上传nginx安装包 nginx-1.6.0.tar.gz
3、安装nginx相关的依赖包
[root@localhost ~]# rpm -q pcre-devel zlib-devel penssl-devel
未安装软件包 pcre-devel
未安装软件包 zlib-devel
未安装软件包 penssl-devel
[root@localhost ~]# yum -y install pcre-devel zlib-devel openssl-devel gcc gcc-c++ make
4、创建nginx运行用户和组
[root@localhost ~]# useradd -M -s /sbin/nologin nginx //-M不为用户建立初始化宿主目录,-s 指定用户登录的shell
5、解压nginx安装包,解压到指定安装路径
[root@localhost ~]# tar xf nginx-1.6.0.tar.gz -C /usr/src
[root@localhost ~]# hostname nginx
[root@localhost ~]# bash
[root@nginx ~]#
6、编译安装nginx,并进行配置编译
[root@nginx nginx-1.6.0]# ./configure --prefix=/usr/local/nginx --user=nginx --group=nginx --with-http_stub_status_module --with-http_ssl_module --with-http_flv_module --with-http_gzip_static_module && make && make install //--with表示支持模块
[root@nginx nginx-1.6.0]# ln -s /usr/local/nginx/sbin/nginx /usr/local/bin/
[root@nginx nginx-1.6.0]# ll /usr/local/nginx/sbin/nginx
-rwxr-xr-x. 1 root root 5098448 11月 14 14:51 /usr/local/nginx/sbin/nginx
[root@nginx nginx-1.6.0]# cd conf
[root@nginx conf]#
[root@nginx conf]# nginx -t //检查nginx配置文件是否出错
nginx: the configuration file /usr/local/nginx/conf/nginx.conf syntax is ok
nginx: configuration file /usr/local/nginx/conf/nginx.conf test is successful
[root@nginx conf]# netstat -anpt |grep :80
tcp 0 0 0.0.0.0:80 0.0.0.0:* LISTEN 6150/nginx: master
[root@nginx conf]# killall -3 nginx
[root@nginx conf]# netstat -anpt |grep :80
[root@nginx conf]# nginx
[root@nginx conf]# netstat -anpt |grep :80
tcp 0 0 0.0.0.0:80 0.0.0.0:* LISTEN 6168/nginx: master
二、基于源码包安装mysql数据库
1、安装mysql依赖包
[root@nginx ~]# yum -y install ncurses-devel cmake
2、上传mysql安装包 mysql-5.7.24.tar.gz
3、创建mysql运行用户和组
[root@nginx ~]# useradd -M -s /sbin/nologin mysql
4、解压mysql安装包到指定安装路径
[root@nginx ~]# tar xf mysql-5.7.24.tar.gz -C /usr/src/
5、安装mysql 并进行编译配置
·上传boost安装包 boost_1_59_0.tar.gz //目的是为了防止安装目前SQL时报错
[root@nginx ~]# cd /usr/src/mysql-5.7.24/
[root@nginx mysql-5.7.24]# mkdir /usr/local/boost
[root@nginx ~]# tar xf boost_1_59_0.tar.gz -C /usr/local/boost/
[root@nginx ~]# cd /usr/src/mysql-5.7.24/
[root@nginx mysql-5.7.24]# cmake -DCMAKE_INSTALL_PREFIX=/usr/local/mysql -DDEFAULT_CHARSET=utf8 -DDEFAULT_COLLATION=utf8_general_ci -DWITH_EXTRA_CHARSETS=all -DSYSCONFDIR=/etc -DWITH_BOOST=/usr/local/boost && make && make install //可能需要半个小时
6、mysql安装后的调整
[root@nginx ~]# cd /usr/src/mysql-5.7.24/
[root@nginx mysql-5.7.24]#chown -R mysql:mysql /usr/local/mysql/
[root@nginx mysql-5.7.24]# vim /etc/my.cnf
1 [mysqld]
2 datadir=/usr/local/mysql/data
3 socket=/tmp/mysql.sock
11 [mysqld_safe]
12 log-error=/usr/local/mysql/data/mysql.log
13 pid-file=/usr/local/mysql/data/mysql.pid
保存退出
7、初始化数据库
[root@nginx mysql-5.7.24]# cd
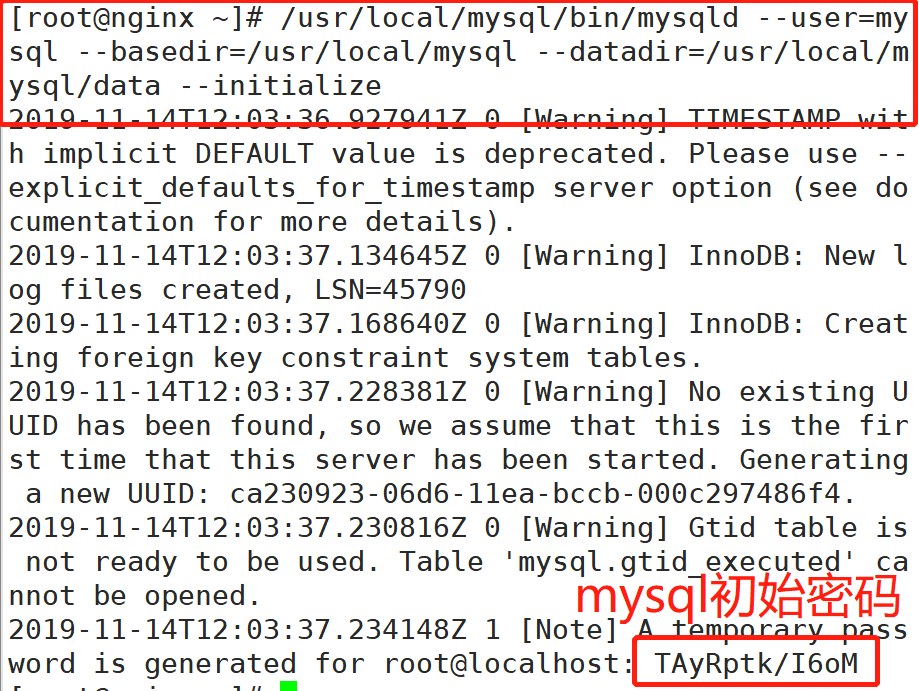
[root@nginx ~]# /usr/local/mysql/bin/mysqld --user=mysql --basedir=/usr/local/mysql --datadir=/usr/local/mysql/data --initialize

8、设置环境变量
[root@nginx ~]# cd /usr/src/mysql-5.7.24/
[root@nginx mysql-5.7.24]# echo "PATH=$PATH:/usr/local/mysql/bin" >> /etc/profile
[root@nginx mysql-5.7.24]# source /etc/profile
9、启动mysql
[root@nginx mysql-5.7.24]# /usr/local/mysql/support-files/mysql.server start
Starting MySQL.Logging to '/usr/local/mysql/data/mysql.log'.
SUCCESS!
10、修改MySQL用户密码
[root@nginx mysql-5.7.24]# cd
[root@nginx ~]# mysqladmin -u root -p'TAyRptk/I6oM' password '123456'
mysqladmin: [Warning] Using a password on the command line interface can be insecure.
Warning: Since password will be sent to server in plain text, use ssl connection to ensure password safety.
11、登录mysql用户
[root@nginx ~]# mysql -u root -p'123456'
mysql> exit
Bye
三、php环境搭建
1、安装php所依赖的安装包
[root@nginx ~]# yum -y install gd libxml2-devel libjpeg-devel libpng-devel
2、上传php-5.6.39.tar.gz 安装包,解压软件包
[root@nginx ~]# tar xf php-5.6.39.tar.gz -C /usr/src/
3、编译配置
[root@nginx ~]# cd /usr/src/php-5.6.39/
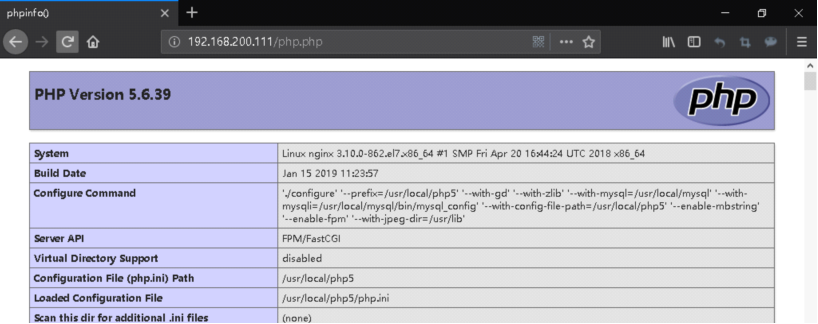
[root@nginx php-5.6.39]# ./configure --prefix=/usr/local/php5 --with-gd --with-zlib --with-mysql=/usr/local/mysql --with-mysqli=/usr/local/mysql/bin/mysql_config --with-config-file-path=/usr/local/php5 --enable-mbstring --enable-fpm --with-jpeg-dir=/usr/lib && make && make install
4、安装后的调整
[root@nginx php-5.6.39]# cp php.ini-production /usr/local/php5/php.ini
[root@nginx php-5.6.39]# ln -s /usr/local/php5/bin/* /usr/local/bin/
[root@nginx php-5.6.39]# ln -s /usr/local/php5/sbin/* /usr/local/sbin/
5、安装ZendGuardLander
【1】上传zend-loader-php5.6-linux-x86_64_update1.tar.gz 软件包
【2】解压并修改相关配置文件
[root@nginx ~]# tar xf zend-loader-php5.6-linux-x86_64_update1.tar.gz -C /usr/src/
[root@nginx ~]# cd /usr/src/zend-loader-php5.6-linux-x86_64/
[root@nginx zend-loader-php5.6-linux-x86_64]# cp ZendGuardLoader.so /usr/local/php5/lib/php/
[root@nginx zend-loader-php5.6-linux-x86_64]# vim /usr/local/php5/php.ini
2031 zend_extension=/usr/local/php5/lib/php/ZendGuard
Loader.so
2032 zend_loader.enable=1
//在最末行添加以上内容 保存退出
6、配置nginx支持php环境
[root@nginx zend-loader-php5.6-linux-x86_64]# cd
[root@nginx ~]# cd /usr/local/php5/etc/
[root@nginx etc]# cp php-fpm.conf.default php-fpm.conf
[root@nginx etc]# useradd -M -s /sbin/nologin php
[root@nginx etc]# vim php-fpm.conf
25 pid = run/php-fpm.pid //确认pid文件位置
149 user = php //运行用户
150 group = php //运行组
241 pm.max_children = 50 //最多空闲进程数
246 pm.start_servers = 20 //启动时开启的进程数
251 pm.min_spare_servers = 5 //最少空闲进程数
256 pm.max_spare_servers = 35 //最大空闲进程数
保存退出
7、启动
[root@nginx etc]# /usr/local/sbin/php-fpm
[root@nginx etc]# netstat -anpt |grep php-fpm
tcp 0 0 127.0.0.1:9000 0.0.0.0:* LISTEN 18744/php-fpm: mast
###为了方便管理#######创建一个nginx与php一同启动的服务脚本
[root@nginxetc]# vim /etc/init.d/nginx
#!/bin/bash
# chkconfig: 2345 99 20
# description: Nginx Server Control Script
PROG="/usr/local/nginx/sbin/nginx"
PIDF="/usr/local/nginx/logs/nginx.pid"
PROG_FPM="/usr/local/sbin/php-fpm"
PIDF_FPM="/usr/local/php5/var/run/php-fpm.pid"
case "$1" in
start)
$PROG
$PROG_FPM
;;
stop)
kill -s QUIT $(cat $PIDF)
kill -s QUIT $(cat $PIDF_FPM)
;;
restart)
$0 stop
$0 start
;;
reload)
kill -s HUP $(cat $PIDF)
;;
*)
echo "Usage: $0 (start|stop|restart|reload)"
exit 1
esac
exit 0
8、配置nginx支持php解析
方法一:
[root@nginxetc]# vim /usr/local/nginx/conf/nginx.conf
server {
……
location ~ \.php$ {//访问.php页面的配置段
}
}
方法二: 较为常见
[root@nginx ~]# vim /usr/local/nginx/conf/nginx.conf
listen 80;
server_name localhost;
root html/bbs;
index index.php index.html index.htm;
}
root html; //PHP网页文档根目录
fastcgi_pass 127.0.0.1:9000; //php-fpm的监听地址
fastcgi_index index.php; //php首页文件
}
nginx: the configuration file /usr/local/nginx/conf/nginx.conf syntax is ok
nginx: configuration file /usr/local/nginx/conf/nginx.conf test is successful
<?php
phpinfo();
?>

10、编写mysql.php文件
[root@nginx ~]# cat /usr/local/nginx/html/mysql.php
<?php
$link=mysqli_connect('localhost','root','123456'); //连接mysql数据库
if($link) echo "<h1>恭喜你,大功告成!!</h1>"; //连接成功则返回信息
mysqli_close(); //关闭数据库连接
?>
11、在浏览器中输入192.168.200.66/mysql.php

四、部署ComsenzDiscuz BBS论坛系统
1、上传ComsenzDiscuz 安装包ComsenzDiscuz-DiscuzX-master.zip,解压
[root@nginx ~]# uzip ComsenzDiscuz-DiscuzX-master.zip
[root@nginxDiscuzX]# ls upload/
admin.phpapi.php config crossdomain.xml favicon.ico group.phpindex.php m misc.phpportal.phpsearch.php static uc_client
api archiver connect.php data forum.phphome.php install member.phpplugin.php robots.txt source template uc_server
2、上传bbs代码
[root@nginxDiscuzX]# mv upload/ /usr/local/nginx/html/bbs
3、浏览器访问http://192.168.200.66/bbs/install/index.php

4、设置权限及模板文件
[root@nginx~]# cd /usr/local/nginx/html/bbs/config/
[root@nginxconfig]# cp config_global_default.php config_global.php
[root@nginxconfig]# cp config_ucenter_default.php config_ucenter.php
[root@nginx~]# cd /usr/local/nginx/html/bbs
[root@nginxbbs]#chmod -R 777 config/ data/ uc_client/ uc_server/


5、准备数据库并配置相关授权
[root@nginx~]#mysql -uroot -p123456
mysql> create database bbs;
Query OK, 1 row affected (0.00 sec)
mysql> grant all on bbs.* to 'bbs'@'localhost' identified by 'bbs123456';
Query OK, 0 rows affected, 1 warning (0.07 sec)
mysql> flush privileges;
Query OK, 0 rows affected (0.00 sec)


[root@nginx~]# vim /usr/local/nginx/conf/nginx.conf
user nginxnginx;
worker_processes 2;
error_log logs/error.log;
pid logs/nginx.pid;
worker_rlimit_nofile 102400;
events {
use epoll;
worker_connections 4096;
}
http {
include mime.types;
default_type application/octet-stream;
log_format main '$remote_addr - $remote_user [$time_local] "$request" '
'$status $body_bytes_sent "$http_referer" '
'"$http_user_agent" "$http_x_forwarded_for"';
access_log logs/access.log main;
sendfile on;
keepalive_timeout 65;
server {
listen 80;
server_name localhost;
charset utf-8;
location / {
root html/bbs;
index index.php index.html index.htm;
}
location ~ \.php$ {
root html/bbs;
fastcgi_pass 127.0.0.1:9000;
fastcgi_indexindex.php;
include fastcgi.conf;
}
location /status {
stub_status on;
access_log off;
}
error_page 500 502 503 504 /50x.html;
location = /50x.html {
root html;
}
}
}
[root@nginxetc]#killall -HUP nginx
6、访问192.168.200.66
