基于Kubernetes部署PostgreSQL可以获得快速伸缩、故障转移、在线修复等优点。在《Kubernetes快速部署高可用PostgreSQL》中介绍了使用Stolon项目进行部署的方法和步骤。集群安装完毕后,可以通过pgsql命令行工具进行操作。我们更希望有一个WebUI的图形化工具,这里介绍pgAdmin4的安装和使用(以Ubuntu 18.04LTS为例)。

- 关于pgadm4工具:https://wiki.postgresql.org/wiki/Apt
- 其它PostgreSQL管理工具: https://wiki.postgresql.org/wiki/Community_Guide_to_PostgreSQL_GUI_Tools#pgAdmin_4
- Helm install: https://github.com/helm/charts/tree/master/stable/postgresql
1、安装pgadm4
获得 repository key,在 https://www.postgresql.org/media/keys/ACCC4CF8.asc,如下:
sudo apt-get install curl ca-certificates
curl https://www.postgresql.org/media/keys/ACCC4CF8.asc | sudo apt-key add -
创建安装源描述文件 /etc/apt/sources.list.d/pgdg.list。操作系统分发版名称为 codename-pgdg。在下面的例子中,需要将 stretch 替换为你所用的deb/ubuntu版本(可以使用命令 lsb_release -c来确定版本号),如下:
deb http://apt.postgresql.org/pub/repos/apt/ stretch-pgdg main
自动获取版本号并创建安装源的元文件,如下:
sudo sh -c 'echo "deb http://apt.postgresql.org/pub/repos/apt/ $(lsb_release -cs)-pgdg main" > /etc/apt/sources.list.d/pgdg.list'
然后,更新软件包的列表,并安装:
sudo apt-get update

# 安装postgresql服务器,这里我使用K8s的集群,不需要安装。
#sudo apt-get install postgresql-11

# 安装pgadmin4,用于管理postgresql服务器。
sudo apt-get install pgadmin4
2、使用pgadmin4
输入命令pgadmin4,启动管理服务:
supermap@podc01:~/openthings/stolon-chart$ pgadmin4
Python path:  "/usr/lib/python3/dist-packages"
Python Home:  ""
Webapp path:  "/usr/share/pgadmin4/web/pgAdmin4.py"
NOTE: Configuring authentication for DESKTOP mode.
pgAdmin 4 - Application Initialisation
======================================
将会自动打开浏览器,并启动管理页面。
在管理页面添加之前在《Kubernetes快速部署高可用PostgreSQL》设置的服务器10.1.1.201,端口30900,数据库postgres。
- 用户名stolon,登录口令通过下面方法获取。
PGPASSWORD=$(kubectl get secret --namespace stolon waxen-seal-stolon -o jsonpath="{.data.pg_su_password}" | base64 --decode; echo)

echo $PGPASSWORD
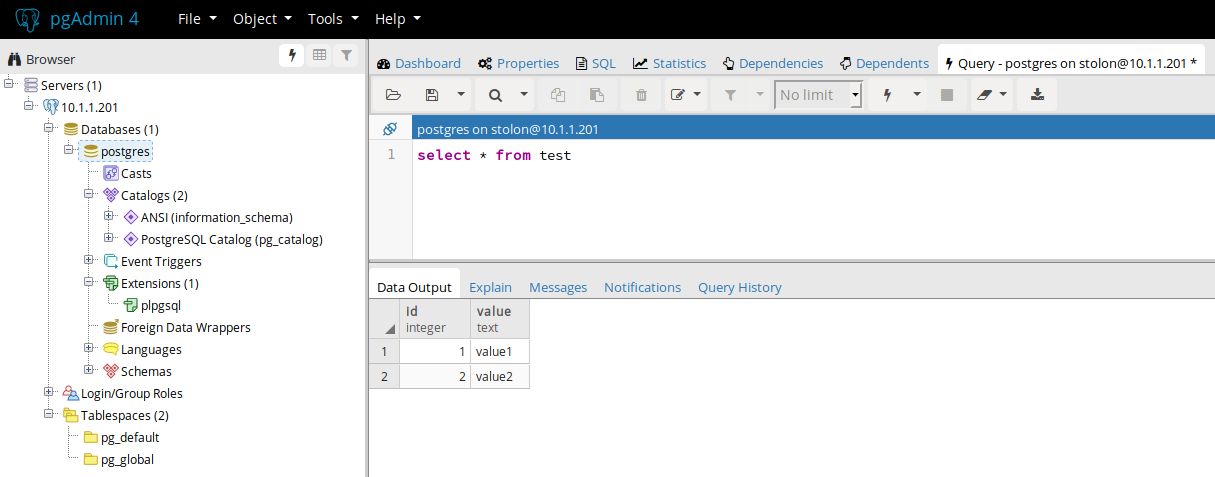
然后登录到该PostgreSQL服务,打开页面:

选中Databases/postgres,然后在菜单tool选择Query tool,打开查询页面,输入:
select * from test3、在容器中运行pgadmin4
容器镜像位于:
拉取容器镜像:
# https://hub.docker.com/r/dpage/pgadmin4

docker pull dpage/pgadmin4
运行容器实例,注意将管理端口映射出来。
docker pull dpage/pgadmin4 docker run -p 980:80 \ -e "PGADMIN_DEFAULT_EMAIL=user@domain.com" \ -e "PGADMIN_DEFAULT_PASSWORD=SuperSecret" \ -d dpage/pgadmin4运行加密的TLS容器,使用配置 config/storage 目录在 /private/var/lib/pgadmin(宿主机),如下:
docker pull dpage/pgadmin4 docker run -p 9443:443 \ -v "/private/var/lib/pgadmin:/var/lib/pgadmin" \ -v "/path/to/certificate.cert:/certs/server.cert" \ -v "/path/to/certificate.key:/certs/server.key" \ -e "PGADMIN_DEFAULT_EMAIL=user@domain.com" \ -e "PGADMIN_DEFAULT_PASSWORD=SuperSecret" \ -e "PGADMIN_ENABLE_TLS=True" \ -d dpage/pgadmin4注意:
- 为了减少端口冲突,我将端口80和443分别映射到了980和9443,因为这两个端口经常被其他的服务所占用。
参考:
4、在kubernetes中运行pgadmin4
4.1 准备helm chart
通过 helm chart来进行安装,获得模版:
git clone https://github.com/jjcollinge/pgadmin-chart缺省配置文件values.yaml 将使pgAdmin部署可以通过IP地址和plaintext HTTP进行访问。
http访问
为了使pgAdmin 实例使用域名进行plaintext HTTP访问,需要:
- 设置
service.type为NodePort - 设置
ingress.enabled为true - 保留静态 IP 在 Kubernetes cluster (使用 e.g.
gcloud compute addresses create my-pgadmin-static-ip --globalfor GCP) - 设置
ingress.staticIPReservation为静态IP address,为上面第三步创建。 - 在域名注册服务中,创建一条记录指向该静态IP地址,为上面第三步创建。
https访问
为了访问 pgAdmin 实例,通过域名和HTTPS,,则需要如下的设置:
- Set
ingress.tls.enabledtotrue - Set
ingress.tls.clusterIssuerto the name of a cert-managerClusterIssuerdeployed in your Kubernetes cluster - Set
ingress.tls.externalDNSNameto the (fully-qualified) domain name you registered in step 5
4.2 安装helm chart
使用helm的命令进行安装,这里安装到命名空间stolon里,与之前的postgreSQL安装到了一个命名空间。
helm install --name pgadmin4 --namespace stolon缺省的登录账号:
- username: pgadmin4@pgadmin.org
- password: admin
这个可以在value.yaml中修改,或者通过如下方式在安装时进行设置:
helm install --set pgadmin.username=myuser,pgadmin.password=mypassword --name pgadmin4 --namespace stolon
更多参考:
- 为私有Kubernetes集群创建LoadBalancer服务
- Helm chart that deploys a pgAdmin instance to your Kubernetes, https://github.com/jjcollinge/pgadmin-chart
- Deploy a distributed AI stack to a multi-host or single-host Kubernetes, https://github.com/jay-johnson/deploy-to-kubernetes
来源:oschina
链接:https://my.oschina.net/u/2306127/blog/2993304