安装工具:
1./sshSecure CRT.exe
2.FTPCuteFTP Professional.exe
3..TFTPTftpd32.exe
uboot的相关指令:
1.q--
2.menu--
3.print--
4.set--
5.save--
6.reset--U-boot
0
8.
9.help--help <cmd>--
10.mtd--flash
TFTP工具在Nandflash上烧写裸板程序
1.0.安装远程(串口/ssh)调试工具:Secure CRT.exe
Norflash
uboot.
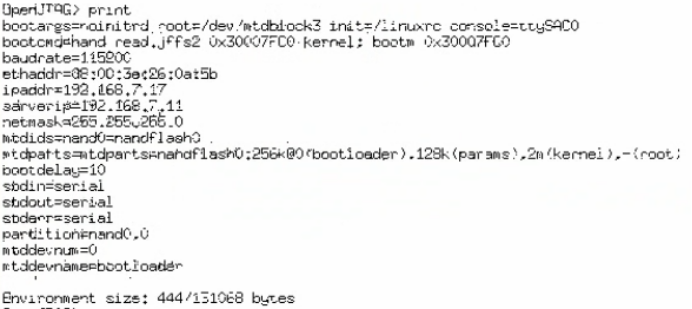
1.1.OpenJTAG> print
bootargs=noinitrd root=/dev/mtdblock3 init=/linuxrc console=ttySAC0
bootcmd=nand read.jffs2 0x30007FC0 kernel; bootm 0x30007FC0
bootdelay=2
baudrate=115200
ethaddr=08:00:3e:26:0a:5b
netmask=255.255.255.0
mtdids=nand0=nandflash0
mtdparts=mtdparts=nandflash0:256k@0(bootloader),128k(params),2m(kernel),-(root)
stdin=serial
stdout=serial
stderr=serial
partition=nand0,0
mtddevnum=0
mtddevname=bootloader
ipaddr=192.168.10.4
serverip=192.168.10.2
Environment size: 443/131068 bytes
1.2.设置windows和目标板uboot的IP
a.璁剧疆PCIP
192.168.10.2
255.255.255.0
192.168.10.1
DNS
PCPC“ipconfig all”DNSpingWindows
配置防火墙:sudo ufw allow from 192.168.10.1

b.IPWindowsIP
OpenJTAG> set ipaddr 192.168.10.4
TFTP WindowsIP
OpenJ
1.3.打开Tftpd32.exe
lcd.bin192.168.10.2
1.4.uboot
a.tftp 30000000 lcd.bin
b.nand erase bootloader
c.nand write 30000000 bootloader
TFTP工具(Tftpd32.exe)在Nandflash上重烧整个系统
2.1.norflash上的uboot给nandflash烧写uboot
a.tftp 30000000 u-boot.bin
b.nand erase bootloader
c.nand write 30000000 bootloader
2.2.norflash上的uboot给nandflash烧写内核
a.tftp 30000000 uImage
b.nand erase kernel
2.3.norflash上的uboot给nandflash烧写文件系统
b.nand erase root
or
a.tftp 30000000 fs_qtopia.jffs2
b.nand erase root
NFS在Nandflash上重烧整个系统
2.4.Linux服务器下通过nfs给nandflash烧写内核和文件系统
澶辫触
b.nand erase kernel
a.nfs 30000000 192.168.10.3:/work/nfs_root/tmp/fs.yaffs2
b.nand erase root
Linux上的DNW重烧整个系统
2.5.把Linux上的DNW考到服务器的/bin下,在服务器进行如下操作:
$ sudo chmod +x /bin/dnw
$ sudo chmod +s /bin/dnw
VMwareUSB
$ lsusb //USB
ubootk
$ /bin/dnw arch/arm/boot/uImage //USB
ubuntu服务器
3.1.VMware
3.2.ubuntu
3.3.璁剧疆VMware
//”
“/璁剧疆//”“”
3.4VMwareubuntu
3.5SecureCRTsshLinux
Hostname:192.168.10.3
Usernamebook
Key:123456
work
# sudo chown book:book /work -R
3.6TFTPCuteFTP Professional.exe
192.168.10.1
Windows:192.168.10.2
Linux192.168.10.3
Linux192.168.10.4
--------------------------ip----------------------------
ifconfig -a
a.:
# ifconfig eth3 192.168.10.3 netmask 255.255.255.0
b.:
Linux服务器:
auto lo
iface lo inet loopback
# The primary network interface
auto eth3
iface eth3 inet static
address 192.168.10.3
netmask 255.255.255.0
gateway 192.168.10.1
#network 192.168.10.0
#broadcast 192.168.10.255
# sudo /etc/init.d/networking restart
Linux目标板:
# sudo vi /etc/init.d/rcS
#!/bin/sh
ifconfig eth0 192.168.10.4
或者
$ sudo ifconfig eth0 192.168.10.4
$ sudo ifconfig eth0 down // poen it
---------------------default gateway---------------------
Linux服务器:
a.:
# route add default gw 192.168.10.1
b.:
# vim /etc/network/interfaces
-------------------------------DNS---------------------------
Linux服务器:
search chotim.com
nameserver 192.168.1.1
# sudo /etc/init.d/networking restart
--------------------------host name-----------------------
Linux服务器:
sudo /bin/hostname
sudo /bin/hostname newname
/bin/hostname
--------------------------------------------------------------------
uboot和目标板的Linux原始内核打补丁,制作根文件系统
4.1.uboot
\000_\CD1\system
:work/system/u-boot-1.1.6
c.$ patch -p1 < ../u-boot-1.1.6_jz2440.patch
d.$ cd ..
e.$ tar cjf u-boot-1.1.6_jz2440.tar.bz2 u-boot-1.1.6 //Windowssource insight
f.$ cd u-boot-1.1.6/
g.$ make 100ask24x0_config
h.$ make ///work/system/u-boot-1.1.6/u-boot.bin
4.2.Linux--uImage
a.$ tar xjf linux-2.6.22.6.tar.bz2
b.$ cd linux-2.6.22.6/
c.$ patch -p1 < ../linux-2.6.22.6_jz2440.patch
d.$ cd ..
e.$ tar cjf linux-2.6.22.6_jz2440.tar.bz2 linux-2.6.22.6 //Windowssource insight
f.$ cd linux-2.6.22.6/
g.$ cp config_ok .config
/work/system/linux-2.6.22.6/arch/arm/boot/uImage
4.3.-- fs.yaffs2
a.$ sudo tar xjf fs_mini_mdev.tar.bz2
//Yaffs2mkyaffs2imagework/linux/tools/bin
b.$ sudo cp mkyaffs2image /bin
c.$ sudo chmod +x /bin/mkyaffs2image
d.$ cd /work/nfs_root/tmp/
/work/nfs_root/tmp/fs.yaffs2
//
a.nfs 30000000 192.168.10.3:/work/nfs_root/tmp/fs.yaffs2
b.nand erase root
mount指令将NFS作为根文件系统
5.1.mount/work/nfs_root/mnt
1.Linuxnfs:
sudo apt-get install nfs-kernel-server portmap
vi /etc/exports/work/nfs_root *(rw,sync,no_root_squash)
sudo /etc/init.d/nfs-kernel-server restart //nfs
2.nfs# mount -t nfs -o nolock,vers=2 192.168.10.3:/work/nfs_root /mnt
# mount -t nfs -o nolock,vers=2 192.168.10.3:/work/nfs_root/tmp/fs_mini_mdev /mnt
5.2.NFS
nfsroot=[<server-ip>:]<root-dir>[,<nfs-options>]
ip=<client-ip>:<server-ip>:<gw-ip>:<netmask>:<hostname>:<device>:<autoconf>
SDRAM
OpenJTAG> set bootargs noinitrd root=/dev/mtdblock3 init=/linuxrc console=ttySAC0
OpenJTAG> save
OpenJTAG> reset
//0ubootping通Linuxnfs.
OpenJTAG> set bootargs noinitrd root=/dev/nfs nfsroot=192.168.10.3:/work/nfs_root/tmp/fs_mini_mdev ip=192.168.10.4:192.168.10.3:192.168.10.1:255.255.255.0::eth0:off init=/linuxrc console=ttySAC0
OpenJTAG> save
OpenJTAG> reset
5.2./etc/init.d/rcSnfs目录:
a.rcS
# vi /etc/init.d/rcS
#!/bin/sh
ifconfig eth0 192.168.10.4
mount -a
mkdir /dev/pts
mount -t devpts devpts /dev/pts
echo /sbin/mdev > /proc/sys/kernel/hotplug
mdev -s
mount -t nfs -o nolock,vers=2 192.168.10.3:/work/nfs_root/tmp/fs_mini_mdev /mnt
b.reboot
NFS挂载的文件夹,在服务器进行交叉编译,在目标板进行测试验证
6.1.Linux
(1).
$ cd first_drv/
$ vi Makefile //KERN_DIR = /work/system/linux-2.6.22.6
(2).
$ arm-linux-gcc -o firstdrvtest firstdrvtest.c
6.2.nfsmount/mnt
# /work/nfs_root/tmp/fs_mini_mdev/drivers_and_test/first_drv/
Usage :
./firstdrvtest <on|off>
# ./firstdrvtest on // led on
# ./firstdrvtest off // led off
七、修改编译器版本和驱动
7.1.arm-linux-gcc-x.x.x
1.
$ tar xjf arm-linux-gcc-3.4.5-glibc-2.3.6.tar.bz2
$ cd /arm-linux-gcc-3.4.5-glibc-2.3.6/bin
2.PATH,/work/tools/gcc-3.4.5-glibc-2.3.6/bin
$ vi /etc/environment
PATH="/usr/local/sbin:/usr/local/bin:/usr/sbin:/usr/bin:/sbin:/bin:/usr/games:/work/tools/gcc-3.4.5-glibc-2.3.6/bin"
3.
$ export PATH=/usr/local/sbin:/usr/local/bin:/usr/sbin:/usr/bin:/sbin:/bin:/usr/games:/work/tools/gcc-3.4.5-glibc-2.3.6/bin
7.2.(TQ2440MINI2440)LCDDM9000
1.\CD1\drivers_and_test\10th_lcd\4th\lcd.c/work/system/linux-2.6.22.6/drivers/video
$ cd /work/system/linux-2.6.22.6/drivers/video
$ vi Makefile
八、裸机驱动
xxx.S xxx.c xxx.lds Makefile
xxx.o xxx._elf xxx.bin xxx.dis
tftpnfsnandflash04KBSRAM
8.1.裸机程序的启动
NorFlash0
NandFlashNandFlash4KSRAMSRAM0
1.NandFlash
2.
3.
4.
5.SDRAM
1.
0x00000000SDRAM
0x30000000SDRAM
2.MMU:1M4096
3.NandFlashRAM
8.2.
1.
2.
3.
4.
5.
6.
7.
8.3.;
FCLK400MHz,cpu
HCLK100MHz~133MHzSDRAM
PCLK50MHzUart
u-boot原理分析
9.1.bootloader
1.
flashsdram;
sdram;
2.
usb;
sd
9.2.uboot启动后要做的事:
0.
1.
2.
3.SDRAM
4.flashSDRAM
5.SP
6.
7.BSS
6.start.armboot,c
ubootMakefile
1.cpu/arm920t/start.S
2.board/100ask24x0/u-boot.lds
ubootTEXT_BASE=0x33f80000board/100ask24x0/config.mk
uboot
1.s=getenv("bootcmd"); //
run_command(s); //
3.readline(); //menu
run_command(s);
而make distclean要清除所有生成的文件。
flash分区:
MTDPARTS_DEFAULT
name size offset
from 0 to 256k is bootloader: 0x00040000 0x00000000
next 128K is params: 0x00020000 0x00040000
next 2M is kernel: 0x00200000 0x00060000
next all is root: 0x0fda0000 0x00260000
OpenJTAG> mtd
active partition: nand0,0 - (bootloader) 0x00040000 @ 0x00000000
defaults:
mtdparts: mtdparts=nandflash0:256k@0(bootloader),128k(params),2m(kernel),-(root)
9.3.u-boot源代码分析:
1.uboot///
2.uboot/Makefile
3.uboot
4.
1flash: nand.read();
2do_boot
auImage
bTAG
bd->bi_boot_params
setup_start_tag(bd);
setup_memery_tag(bd);
setup_commandline_tag(bd, commandline);
bootargs=noinitrd root=/dev/mtdblock3 init=/linuxrc console=ttySAC0
setup_end_tag(bd);
c
theKernel(0, bd->bi_arch_numer, bd->bi_boot_params);
// bd->bi_arch_numer = MACH_TYPE_S3C2440;ID
// bd->bi_boot_params = 0x30000100;

十、内核启动流程
10.1.///
patch -p<1> <>
10.2./Makefile/Kconfig
(1)
method1: make menuconfig
method2: use default config,change little in directory of "arch/arm/configs".
make xxx_defconfigmake menuconfig,
(2)Makefile
uboot// in arch/arm/kernel/head.s
,ID
璁剧疆arm920CPUID caches
MMU
BSSCPU IDprocessor id
璺宠浆__machine_arch_typestart_kernel()init/main.cc
Linux
reset_init()
10.3.
start_kernel()
-setup_arch() //uboot
uboot
+do_early_param
-unknown_bootoption
+obsolete_checksetup
-reset_init()
+kernel_init()
prepare_namespace()
mount_root() //
init_post() //
十一、构建最小根文件系统
11.1.
busybox->init_main
parse_inittab
file = fopen(INITTAB, "r"); //"/etc/inittab"
new_init_action //new_init_actioninit_action_list
//
run_actions(SYSINIT);
waitfor //process
run(a) //
delete_init_action
run_actions(WAIT);
run_actions(ONCE);
while(1)
{
run_actions(RESPAWN);
run_actions(ASKFIRST);
wpid = wait(NULL); //
while (wpid > 0) {
a->pid = 0;
}
}
Format for inittab: <id>:<runlevels>:<action>:<process>
<id>:/dev/id,to specify the controlling tty: stdin, stdout, stderr, printf, scanf, err
<runlevels>: The runlevels field is completely ignored.
<process>:Specifies the process to be executed and it's command line.
exp:new_init_action(ASKFIRST, "-/bin/sh", "/dev/tty2");
11.2.
busyboxinit/sbin/init
/etc/inittab
cprintf/fopen/fwrite...
11.3.
a.配置、编译busybox
win10CD1\system\busybox-1.7.0
linux/work/system
$ tar xjf busybox-1.7.0.tar.bz2
make menuconfig/make/make install
$ vi Makefile //
$ make menuconfig
$ mkdir -p /work/nfs_root/first_fs
$ make CONFIG_PREFIX=/work/nfs_root/first_fs install //
b.
$ mkdir dev
$ sudo mknod console c 5 1
$ sudo mknod null c 5 3
c./etc/inittab
$ cd /work/nfs_root/first_fs/
$ mkdir etc
$ vi etc/inittab //
console::askfirst:-/bin/sh
d.C
$ cd /work/tools/gcc-3.4.5-glibc-2.3.6/arm-linux/lib
$ mkdir /work/nfs_root/first_fs/lib
$ cp *.so* /work/nfs_root/first_fs/lib -d
bin dev etc lib linuxrc sbin usr