上次分享的这篇文章
有褒有贬,有人说这篇文章中的方法成为他研究linux内核的分水岭,有人说
只告诉了怎么找patch,whatever,绝大多数人还是比较认可,至少我觉得对我帮助很大。
同样的方法用来研究Intel IOMMU,觉得也是事半功倍。
最近iommu大神 Joerg Roedel(MAINTAINER)在帮助我处理客户的一个intel iommu的问题,所以就这个机会深入研究一下intel iommu。
事前材料准备:
git clone https://github.com/torvalds/linux.git
git clone https://github.com/qemu/qemu.git
https://software.intel.com/sites/default/files/managed/c5/15/vt-directed-io-spec.pdf
SUSE sles11sp1 发行版
首先在linux内核主线找到哪位大神首先引进Intel iommu功能的补丁,
一条命令就能找到:
[jeff@localhost linux]$ gitlogdate | grep -i iommu | grep -i intel > ./patch/intel-iommu.patch可以清楚看到是这位"Keshavamurthy, Anil S" 大神引入的intel-iommu功能
[jeff@localhost linux]$ vim ./patch/intel-iommu.patch308 358dd8a 2007-10-21 Keshavamurthy, Anil S intel-iommu: fix for IOMMU early crash309 f76aec7 2007-10-21 Keshavamurthy, Anil S intel-iommu: optimize sg map/unmap calls310 49a0429 2007-10-21 Keshavamurthy, Anil S Intel IOMMU: Iommu floppy workaround311 e820482 2007-10-21 Keshavamurthy, Anil S Intel IOMMU: Iommu Gfx workaround312 3460a6d 2007-10-21 Keshavamurthy, Anil S Intel IOMMU: DMAR fault handling support313 7d3b03c 2007-10-21 Keshavamurthy, Anil S Intel IOMMU: Intel iommu cmdline option - forcedac314 eb3fa7c 2007-10-21 Keshavamurthy, Anil S Intel IOMMU: Avoid memory allocation failures in dma map api calls315 ba39592 2007-10-21 Keshavamurthy, Anil S Intel IOMMU: Intel IOMMU driver316 f8de50e 2007-10-21 Keshavamurthy, Anil S Intel IOMMU: IOVA allocation and management routines317 a9c55b3 2007-10-21 Keshavamurthy, Anil S Intel IOMMU: clflush_cache_range now takes size param318 994a65e 2007-10-21 Keshavamurthy, Anil S Intel IOMMU: PCI generic helper function319 10e5247 2007-10-21 Keshavamurthy, Anil S Intel IOMMU: DMAR detection and parsing logic
好,首先看下第一个patch commit: 10e5247 ,看到当时是2007年光景,v2.6.23
commit 10e5247f40f3bf7508a0ed2848c9cae37bddf4bcRefs: v2.6.23-6633-g10e5247Author: Keshavamurthy, Anil S <anil.s.keshavamurthy@intel.com>AuthorDate: Sun Oct 21 16:41:41 2007 -0700Commit: Linus Torvalds <torvalds@woody.linux-foundation.org>CommitDate: Mon Oct 22 08:13:18 2007 -0700
v2.6.23正好对应着SUSE sles11sp1发行版的内核版本,那就在这个实验环境中开干了,首先对10e5247~1在linux内核仓库中打个tag,然后把tag的代码移出去,然后一个个打上”Keshavamurthy, Anil S“ 的原始patch开始深入研究, 接下来的步骤就是仔细阅读大神的patch,git am patch-files之后慢慢调试之路。在这个过程中自然会对intel-iommu的功能逐渐熟悉,因为有一点,他的原始patch自己都阐明不清楚引入进内核的原因以及功能,linus也不会merge进主线。
下面来看iommu的功能是什么。
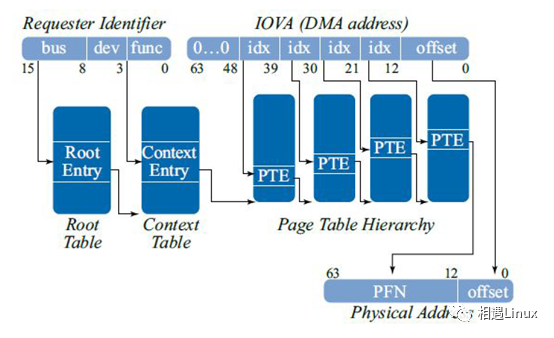
对于cpu而言,cpu看到的是VA(虚拟地址),然后经过硬件MMU的翻译之后就变成了PA(物理地址),同样的对于PCI设备而言,它看到的IOVA,经过IOMMU翻译之后就变成了PA(物理地址),MMU翻译VA->PA过程经过页表,IOMMU翻译IOVA->PA同样要经过页表,这样一看,它的功能其实也不过如此。
这几个patch做的工作就是解析bios通过acpi表(dmar标记的acpi表)提供给操作系统的iommu特性(一堆寄存器基地址,用来使能IOMMU功能,设置页表基地址等)和针对pci设备,填入下面这张映射表,当设备进行dma时,对访问的IOVA进行重定位。同样的对于虚拟机guest,host提前在下面这张表中设置好guest所能访问的PA,让guest进行直接操作设备进行DMA时逃不过host的五指山。

下面是我分析intel iommu原始patch的分析过程(仅供参考):
Linux内核首先探测intel iommu硬件功能:
start_kernel()mem_init()pci_iommu_alloc()detect_intel_iommu()1878 void __init detect_intel_iommu(void)1879 {1882 if (early_dmar_detect()) {1883 iommu_detected = 1;1884 }1885 }
解析dmar:
315 int __init early_dmar_detect(void){/* 从bios提供的ACPI表中中获取dmar(也是ACPI表,标签是”dmar”)信息 */320 status = acpi_get_table(ACPI_SIG_DMAR, 0,321 (struct acpi_table_header **)&dmar_tbl);}arch/x86/kernel/pci-dma_64.c349 /* Must execute after PCI subsystem */350 fs_initcall(pci_iommu_init);pci_iommu_init()intel_iommu_init()dmar_table_init()parse_dmar_table()dmar_parse_one_drhd()/* struct dmar_drhd_unit 结构加入dmar_drhd_units 列表*/dmar_parse_one_rmrr()/* struct dmar_rmrr_unit结构加入 dmar_rmrr_units 列表*/
dmesg打印:
DMAR:DRHD (flags: 0x00000001)
base: 0x00000000fed9000
初始化dmar:
intel_iommu_init()dmar_init_reserved_ranges()/* 保留iova地址(包括IOAPIC,其实是LAPIC,防止DMA操作访问时触发MSI中断和每个pci设备的mmio空间 防止dma操作点对点操作 */intel_iommu_init()init_dmars()/** 一个struct dmar_drhd_unit对应着一个struct intel_iommu*/alloc_iommu()iommu_alloc_root_entry(iommu);alloc_iommu(struct dmar_drhd_unit *drhd){struct intel_iommu *iommu;iommu->cap = dmar_readq(iommu->reg + DMAR_CAP_REG);iommu->ecap = dmar_readq(iommu->reg + DMAR_ECAP_REG);iommu_init_domains(iommu);iommu->reg = ioremap(drhd->reg_base_addr, PAGE_SIZE_4K);drhd->iommu = iommu;}
Intel VT-d手册

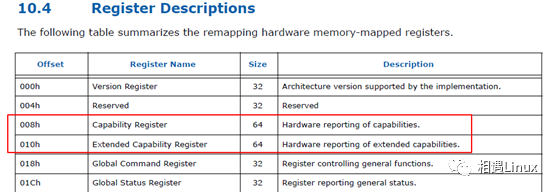
iommu->cap 参考intel VT-d(figure 10-44)
iommu初始化domain
iommu使用domain限定每个设备访问的IOVA范围:
iommu_init_domains(struct intel_iommu *iommu){nlongs = BITS_TO_LONGS(ndomains);iommu->domain_ids = kcalloc(nlongs, sizeof(unsigned long), GFP_KERNEL);iommu->domains = kcalloc(ndomains, sizeof(struct dmar_domain *),GFP_KERNEL);/* ndomains 的个数一般为65535 */}
初始化iommu root entry:
171 /*172 * 0: Present173 * 1-11: Reserved174 * 12-63: Context Ptr (12 - (haw-1))175 * 64-127: Reserved176 */177 struct root_entry {178 u64 val;179 u64 rsvd1;180 };iommu_alloc_root_entry(struct intel_iommu *iommu){…struct root_entry *root;root = (struct root_entry *)alloc_pgtable_page();iommu->root_entry = root;}iommu_prepare_rmrr_dev(rmrr, pdev);iommu_set_root_entry(iommu);iommu_enable_translation(iommu);iommu_set_root_entry(struct intel_iommu *iommu){dmar_writeq(iommu->reg + DMAR_RTADDR_REG,virt_to_phys(addr));}
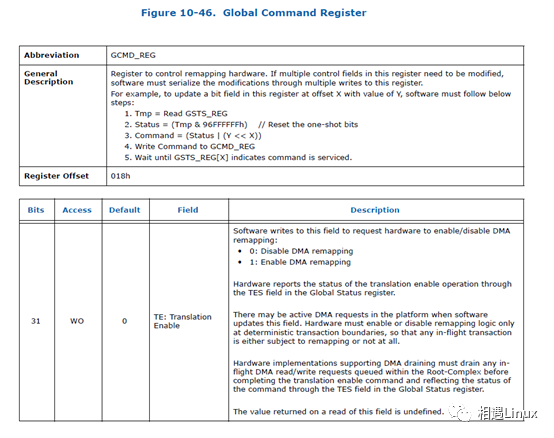
iommu_enable_translation(struct intel_iommu *iommu){writel(iommu->gcmd|DMA_GCMD_TE,iommu->reg + DMAR_GCMD_REG);/* #define DMA_GCMD_TE (((u32)1) << 31) */}
Enable iommu参考 intel VT-d

intel_iommu_init()dma_ops = &intel_dma_ops;1787 static struct dma_mapping_ops intel_dma_ops = {1788 .alloc_coherent = intel_alloc_coherent,1789 .free_coherent = intel_free_coherent,1790 .map_single = intel_map_single,1791 .unmap_single = intel_unmap_single,1792 .map_sg = intel_map_sg,1793 .unmap_sg = intel_unmap_sg,1794 };
qemu启动选项中打开vtd_dmar_translate trace-trace enable="vtd_dmar_translate"
qemu启动脚本:
#!/bin/bashstty intr ^l/home/jeff/git/qemu/x86_64-softmmu/qemu-system-x86_64 \-qmp tcp:localhost:4444,server,nowait \-cpu kvm64,+vmx, \--enable-kvm \-smp cores=1,threads=1 \-machine q35,accel=kvm,kernel-irqchip=split \-trace enable="vtd_dmar_translate" \-device intel-iommu,intremap=on \-display none -monitor unix:/tmp/qemu-monitor,server,nowait \-nographic \-m 100M \-kernel ./bzImage \-device edu \-hda ./ramdisk \-append "root=/dev/sda rw iowait init=/linuxrc noibrs noibpb nopti nospectre_v2 nospectre_v1 l1tf=off nospec_store_bypass_disable no_stf_barrier mds=off mitigations=off loglevel=8 console=ttyS0 intel_iommu=on"
intel_map_single()
__intel_map_single() 打开调试输出打印
1590 pr_info("Device %s request: %lx@%llx mapping: %lx@%llx, dir %d\n",1591 pci_name(pdev), size, (u64)addr,1592 (iova->pfn_hi - iova->pfn_lo + 1) << PAGE_SHIFT_4K,1593 (u64)(iova->pfn_lo << PAGE_SHIFT_4K), dir);
qemu 和linux内核打印的IOVA和PA的映射关系:
Device 0000:00:1f.2 request: 400@2203000 mapping: 1000@fff6e000, dir 1 (kernel dmesg)vtd_dmar_translate dev 00:1f.02 iova 0xfff6e000 -> gpa 0x2203000 mask 0xfff (qemu print)
以ATA设备开启DMA引擎为例:
ahci_start_engine()ahci_port_start()mem = dmam_alloc_coherent(dev, AHCI_PORT_PRIV_DMA_SZ, &mem_dma,GFP_KERNEL);/* dmam_alloc_coherent 对应 intel_alloc_coherent()获取虚拟地址和iova地址*/703 static void ahci_start_engine(struct ata_port *ap)704 {705 void __iomem *port_mmio = ahci_port_base(ap);706 u32 tmp;707708 WARN_ON(1);709 /* start DMA */710 tmp = readl(port_mmio + PORT_CMD);711 tmp |= PORT_CMD_START;712 writel(tmp, port_mmio + PORT_CMD);713 readl(port_mmio + PORT_CMD); /* flush */714 }PORT_CMD_START = (1 << 0),/* Enable port DMA engine */
参考:
https://www.kernel.org/doc/Documentation/DMA-API-HOWTO.txt
dmam_alloc_coherent()static void * intel_alloc_coherent(struct device *hwdev, size_t size,dma_addr_t *dma_handle, gfp_t flags)*dma_handle = intel_map_single(hwdev, vaddr, size, DMA_BIDIRECTIONAL);intel_map_single()__intel_map_single()domain= get_domain_for_dev(pdev,DEFAULT_DOMAIN_ADDRESS_WIDTH);iommu_alloc_iova()/*获取pci设备对应的dmar_domain,获取不到就为pci设备申请一个dmar_domain */dmar_domain 相当于对pci设备能访问的iova地址访问进行限定static int domain_init(struct dmar_domain*domain, int guest_width{domain_reserve_special_ranges(domain);domain->pgd =(struct dma_pte *)alloc_pgtable_page();}
申请一个struct device_domain_info 结构:
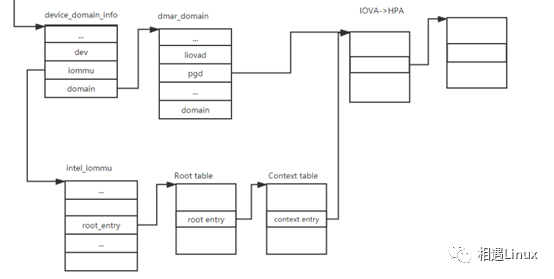
get_domain_for_dev(){...info = alloc_devinfo_mem();info->bus = bus;info->devfn = devfn;info->dev = NULL;info->domain = domain;...list_add(&info->link,&domain->devices);list_add(&info->global,&device_domain_list);/* 把device_domain_info加入到device_domain_list全局链表 */}
下图中把domain->pgd设置进context_entry中:

(完)
本文分享自微信公众号 - 相遇Linux(LinuxJeff)。
如有侵权,请联系 support@oschina.cn 删除。
本文参与“OSC源创计划”,欢迎正在阅读的你也加入,一起分享。
来源:oschina
链接:https://my.oschina.net/u/4581933/blog/4380001