docker仓库之分布式Harbor
harbor介绍
Harbor是一个用于存储和分发 Docker 镜像的企业级 Registry 服务器, 由vmware 开源,其 通过添加一些企业必需的功能特性,例如安全、标识和管理等,
扩展了开源 Docker Distribution 。作为一个企业级私有 Registry 服务器,Harbor 提供了更好的性能和安全。提升用户使用 Registry 构建和运行环境传 输镜像的效率。 Harbor 支持安装在多个Registry 节点的镜像资源复制,镜像全部
保存在私有 Registry 中, 确保数据和知识产权在公司内部网络中管控, 另外,Harbor 也提供了高级的安全特性,诸如用户管理,访问控制和活动审计等,
官网地址: https://vmware.github.io/harbor/cn/ cn/,官方 github 地址:https://github.com/vmware/harbor
Harbor功能官方介绍:
基于角色的访问控制:用户与Docker 镜像仓库通过“项目”进行组织管理,一个用户可以对多个镜像仓库在同一命名空间( project )里有不同的权限。
镜像复制:镜像可以在多个Registry 实例中复制(同步)。尤其适合于负载均衡,高可用,混合云和多云的场景。
图形化用户界面:用户可以通过浏览器来浏览,检索当前Docker 镜像仓库,管理项目和命名空间。
AD/LDAP支: Harb or 可以集成企业内部已有的 AD/LDAP ,用于鉴权认证管理。审计管理:所有针对镜像仓库的操作都可以被记录追溯,用于审计管理。国际化:已拥有英文、中文、德文、日文和俄文的本地化版本。更多的语言将会添加进来。
RESTful API :提供给管理员对于 Harbor 更多的操控 , 使得与其它管理软件集成变得更容易。
部署简单:提供在线和离线两种安装工具,也可以安装到 vSphere 平台 (OVA 方式 虚拟设备。
实战一:实现docker私有仓库的搭建之harbor
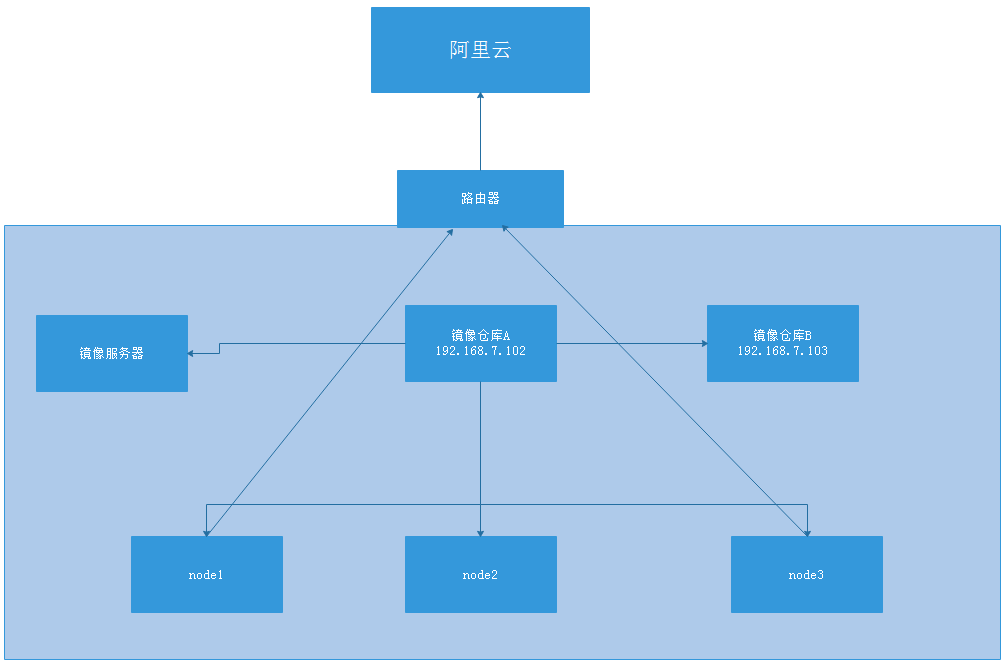
架构图

实现原理:将镜像仓库A和镜像仓库B作为主从复制,实现镜像的高可用,如果不在公司内部制作镜像私有仓库,多个服务器直接去阿里云等公网去下载仓库,需要经过出口时,需要占用出口防火墙的带宽,都去出口拉取镜像,就会将出口带宽全部占用完,影响业务的正常运行,通常此带宽能上万兆就上万兆,上不了就做网卡绑定。
环境准备
| 类型 | IP | 角色 |
| A | 192.168.7.100 | docker-1 |
| B | 192.168.7.101 | docker-2 |
| C | 192.168.7.102 | harbor-1 |
| D | 192.168.7.103 | barbor-2 |
| 资源 | 容量 | 描述 |
|---|---|---|
| CPU | 最小2 CPU | 4 CPU是首选 |
| 内存 | 最小4GB | 8GB是首选 |
| 磁盘 | 最小40GB | 160GB是首选 |
搭建harbor需要的磁盘空间很大,在此实验时,我将磁盘额外添加了200G的磁盘,需要将此磁盘进行格式化(ftype=1)和挂载。
1、在C和D主机添加磁盘并进行格式化
1、将添加的/dev/sdb磁盘进行格式化,先查看格式化磁盘帮助
[root@centos-7 src]# mkfs.xfs --help
mkfs.xfs: invalid option -- '-'
unknown option --
Usage: mkfs.xfs
/* blocksize */		[-b log=n|size=num]
/* metadata */		[-m crc=0|1,finobt=0|1,uuid=xxx]
/* data subvol */	[-d agcount=n,agsize=n,file,name=xxx,size=num,
			    (sunit=value,swidth=value|su=num,sw=num|noalign),
        		    sectlog=n|sectsize=num
/* force overwrite */	[-f]
/* inode size */	[-i log=n|perblock=n|size=num,maxpct=n,attr=0|1|2,
			    projid32bit=0|1]
/* no discard */	[-K]
/* log subvol */	[-l agnum=n,internal,size=num,logdev=xxx,version=n
			    sunit=value|su=num,sectlog=n|sectsize=num,
			    lazy-count=0|1]
/* label */		[-L label (maximum 12 characters)]
/* naming */		[-n log=n|size=num,version=2|ci,ftype=0|1]   # 格式化ftype=1需要加上-n选项
/* no-op info only */	[-N]
/* prototype file */	[-p fname]
/* quiet */		[-q]
/* realtime subvol */	[-r extsize=num,size=num,rtdev=xxx]
/* sectorsize */	[-s log=n|size=num]
/* version */		[-V]
			devicename
2、开始格式化新加的磁盘/dev/sdb
[root@centos-7 src]# mkfs.xfs  -n ftype=1 /dev/sdb
meta-data=/dev/sdb               isize=512    agcount=4, agsize=13107200 blks
         =                       sectsz=512   attr=2, projid32bit=1
         =                       crc=1        finobt=0, sparse=0
data     =                       bsize=4096   blocks=52428800, imaxpct=25
         =                       sunit=0      swidth=0 blks
naming   =version 2              bsize=4096   ascii-ci=0 ftype=1
log      =internal log           bsize=4096   blocks=25600, version=2
         =                       sectsz=512   sunit=0 blks, lazy-count=1
realtime =none                   extsz=4096   blocks=0, rtextents=0
可以查看此时格式 化后的类型
[root@centos-7 docker]# xfs_info /dev/sdb
meta-data=/dev/sdb               isize=512    agcount=4, agsize=13107200 blks
         =                       sectsz=512   attr=2, projid32bit=1
         =                       crc=1        finobt=0 spinodes=0
data     =                       bsize=4096   blocks=52428800, imaxpct=25
         =                       sunit=0      swidth=0 blks
naming   =version 2              bsize=4096   ascii-ci=0 ftype=1
log      =internal               bsize=4096   blocks=25600, version=2
         =                       sectsz=512   sunit=0 blks, lazy-count=1
realtime =none                   extsz=4096   blocks=0, rtextents=0
3、查询格式化后的磁盘UUID号,然后挂载到配置文件中,进行开机启动
[root@centos-7 src]# blkid
/dev/sr0: UUID="2019-09-11-19-02-53-00" LABEL="CentOS 7 x86_64" TYPE="iso9660" PTTYPE="dos"
/dev/sda1: UUID="64d9f83a-34c5-4025-94ff-504ca7a00a3f" TYPE="xfs"
/dev/sda2: UUID="W0Fol6-811p-efEd-MKeI-mpyz-4vym-nbnIW8" TYPE="LVM2_member"
/dev/mapper/centos-root: UUID="1a05193c-173d-4e5c-ac1d-bb68085b4294" TYPE="xfs"
/dev/mapper/centos-swap: UUID="f72b951f-b5d6-4572-a4a6-46e93c5080fd" TYPE="swap"
/dev/sdb: UUID="76c9a1d5-f2a8-4fc1-aae9-24e7d9b25cf1" TYPE="xfs"    #  /dev/sdb的磁盘UUID号
[root@centos-7 src]# vim /etc/fstab
4、新建一个目录,将磁盘挂载到指定的目录,并修改配置文件进行挂载
[root@centos-7 docker]# mkdir /var/lib/docker  # 创建挂载的目录
[root@centos-7 docker]# cat /etc/fstab

#
# /etc/fstab
# Created by anaconda on Sat Jan  4 16:31:31 2020
#
# Accessible filesystems, by reference, are maintained under '/dev/disk'
# See man pages fstab(5), findfs(8), mount(8) and/or blkid(8) for more info
#
/dev/mapper/centos-root /                       xfs     defaults        0 0
UUID=64d9f83a-34c5-4025-94ff-504ca7a00a3f /boot                   xfs     defaults        0 0
/dev/mapper/centos-swap swap                    swap    defaults        0 0
UUID="76c9a1d5-f2a8-4fc1-aae9-24e7d9b25cf1" /var/lib/docker xfs   defaults  0 0  # 将磁盘的唯一UUID号挂载到指定的目录下
[root@centos-7 docker]# mount -a  # 使挂载的目录生效
5、查看挂载的情况,此时已经挂载到指定的目录下

2、在C和D安装docker容器并启动
1、在阿里云官网下载docker的yum源
[root@centos-7 yum.repos.d]# cd /etc/yum.repos.d
[root@centos-7 yum.repos.d]# wget https://mirrors.aliyun.com/docker-ce/linux/centos/docker-ce.repo
2、开始安装docker-ce包
# yum install docker-ce -y3、启动docker容器
# systemctl start docker3、开始配置harbor
harbor下载路径:https://github.com/goharbor/harbor/releases
1、将下载的hrrbor文件存放在/usr/local/src目录下,并解压harbor文件
[root@centos-7 harbor]# cd /usr/local/src
[root@centos-7 harbor]#wget https://storage.googleapis.com/harbor-releases/release-1.7.0/harbor-offline-installer-v1.7.5.tgz
[root@centos-7 harbor]# tar xvf harbor-offline-installer-v1.7.5.tgz
2、进入到解压后的harbor目录下,修改harbor.cfg配置文件
[root@centos-7 harbor]# cd /usr/local/src/harbor
[root@centos-7 harbor]# vim harbor.cfg
hostname = 192.168.7.102
harbor_admin_password = 123456
max_job_workers = 2:最大cpu数,小于等于自己服务器的硬件
3、安装epel源,然后安装docker-compose包,此软件起到加载容器的作用
[root@centos-7 harbor]# yum install epel-release  -y
[root@centos-7 harbor]# yum install docker-compose  -y
4、开始安装harbor软件
[root@centos-7 harbor]# cd /usr/local/src/harbor
[root@centos-7 harbor]# ./install.sh5、使用http://192.168.7.102网站登录,用户名是admin,密码是123456,在D仓库也同样操作,创建一个baseimages项目

6、在C和D主机都创建一个公开的镜像仓库,起名为baseimages

4、在A和B主机修改docker配置文件
1、修改systemd配置文件,指向私有仓库的IP地址,才能登录到私有仓库上
[root@centos-7 ~]# vim /lib/systemd/system/docker.service
ExecStart=/usr/bin/dockerd -H fd:// --containerd=/run/containerd/containerd.sock  --insecure-registry 192.168.7.102  --insecure-registry 192.168.7.103
#主要添加了--insecure-registry 192.168.7.102  --insecure-registry 192.168.7.103 此IP地址是指向仓库IP地址
2、重启docker服务
# systemctl daemon-reload
# systemctl restart docker
3、给docker镜像打标签
[root@centos-7 ~]# docker images  #查看镜像内容
REPOSITORY                             TAG                 IMAGE ID            CREATED             SIZE
tomcat-app1                            v1                  5aff93ee47dd        4 hours ago         931MB
centos-haproxy                         v1.8.17             e3bd19c3d590        4 hours ago         1.13GB
tomcat-app2                            v1                  e9ae6fd8cf53        4 hours ago         931MB
<none>                                 <none>              f85e80d3c22d        4 hours ago         931MB
<none>                                 <none>              a116b46ec794        6 hours ago         931MB
<none>                                 <none>              b3e996ab23a4        6 hours ago         1.13GB
<none>                                 <none>              7fe7c398269e        7 hours ago         931MB
tomcat-base                            8.5.37              21ab497620f2        10 hours ago        917MB
jdk-base                               1.8.0.192           830c0d4f0279        11 hours ago        903MB
centos-base                            7.6.1810            d12613615be1        11 hours ago        507MB
192.168.7.102/baseimages/centos-base   7.6.1810            d12613615be1        11 hours ago        507MB
centos                                 7.6.1810            0f3e07c0138f        3 months ago        220MB
centos                                 latest              0f3e07c0138f        3 months ago        220MB
[root@centos-7 ~]# docker  tag centos-base:7.6.1810  192.168.7.102/baseimages/centos-base:7.6.1810  #给docker镜像打标签,必须打标签才能上传,否则无法上传
4、登录镜像仓库并上传打了标签的镜像
[root@centos-7 ~]# docker login  192.168.7.102
username admin
password   #密码是123456

[root@centos-7 ~]# docker push 192.168.7.102/baseimages/centos-base:7.6.1810  #登录成功就可以上传镜像了
5、在B主机进行下载镜像到本地linux上,需要登录到harbor地址即可
[root@centos-7 harbor]# docker login 192.168.7.102  #登录
Username: admin
Password:
WARNING! Your password will be stored unencrypted in /root/.docker/config.json.
Configure a credential helper to remove this warning. See
https://docs.docker.com/engine/reference/commandline/login/#credentials-store

Login Succeeded
[root@centos-7 harbor]# docker pull 192.168.7.102/baseimages/centos-base:7.6.1810  #下载刚才的镜像
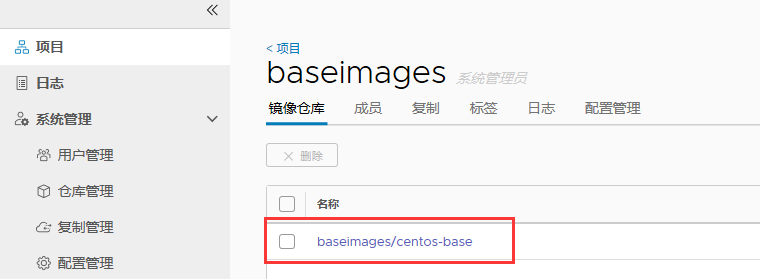
下载镜像路径如下图:

5、创建harbor私有仓库的高可用
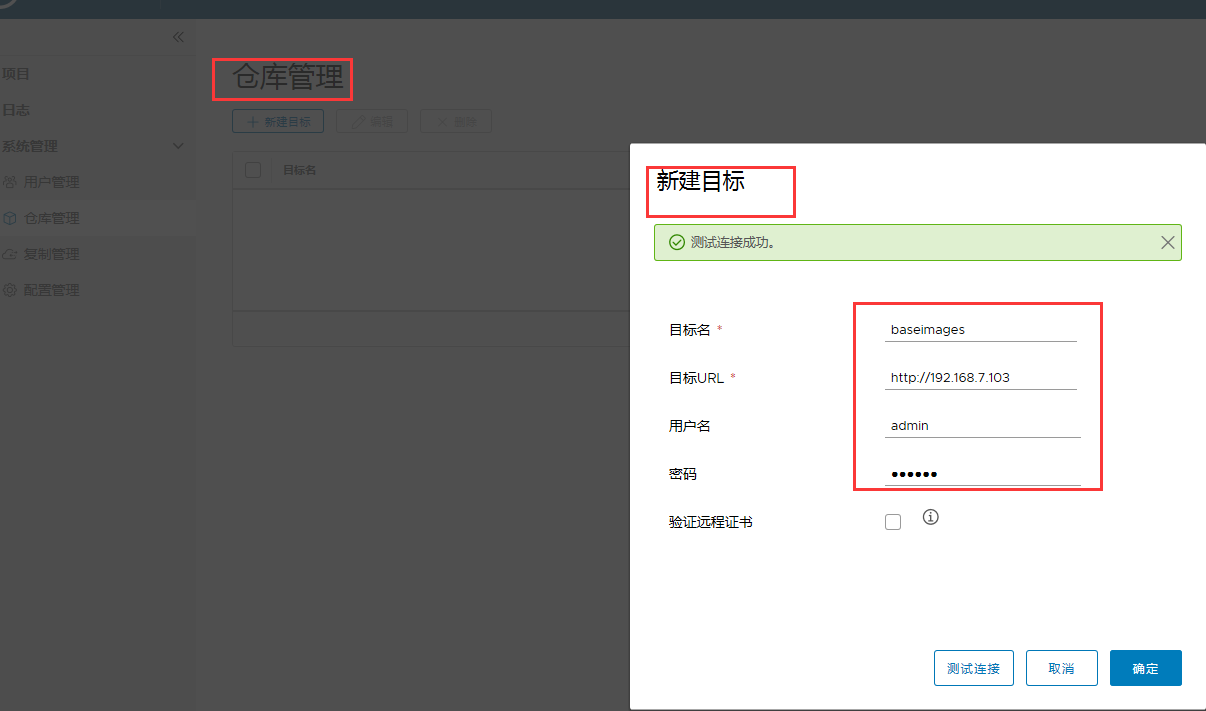
1、在C和D主机网页进行设置,写入C和D主机的对方的IP地址

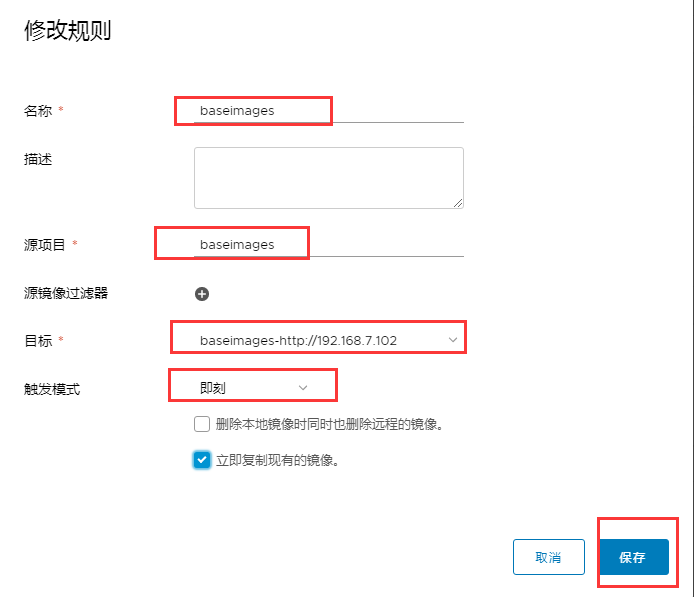
2、在C和D主机创建复制管理规则

3、可以看到前面上传的centos-base:7.6.1810标签镜像已经在两个私有仓库中。
C仓库上传后的镜像

D仓库上传后的镜像

控制harbor服务
控制harbor服务的命令,需要切换到解压后的目录下执行:
[root@centos-7 harbor]# docker-compose stop  #停止harbor服务
Stopping nginx              ... done
Stopping harbor-jobservice  ... done
Stopping harbor-portal      ... done
Stopping harbor-core        ... done
Stopping registryctl        ... done
Stopping harbor-db          ... done
Stopping registry           ... done
Stopping redis              ... done
Stopping harbor-adminserver ... done
Stopping harbor-log         ... done
[root@centos-7 harbor]# docker-compose start  #启动服务
Starting log         ... done
Starting registry    ... done
Starting registryctl ... done
Starting postgresql  ... done
Starting adminserver ... done
Starting core        ... done
Starting portal      ... done
Starting redis       ... done
Starting jobservice  ... done
Starting proxy       ... done
[root@centos-7 harbor]# docker-compose pause  #暂停服务
Pausing harbor-log         ... done
Pausing harbor-adminserver ... done
Pausing redis              ... done
Pausing registry           ... done
Pausing harbor-db          ... done
Pausing registryctl        ... done
Pausing harbor-core        ... done
Pausing harbor-portal      ... done
Pausing harbor-jobservice  ... done
Pausing nginx              ... done
如果想设置为开机启动,只需要将启动程序存在/etc/rc.d/rc.local下,并加上执行权限即可。
[root@centos-7 ~]# vim /etc/rc.d/rc.local
cd /usr/local/src/harbor && docker-compose start

[root@centos-7 ~]# chmod +x /etc/rc.d/rc.local  #加上执行权限即可
来源:oschina
链接:https://my.oschina.net/u/4395639/blog/4073098