简单的玩了下opencv里头的aruco,用的手机相机,手机装了个 ip摄像头,这样视频就可以传到电脑上了。

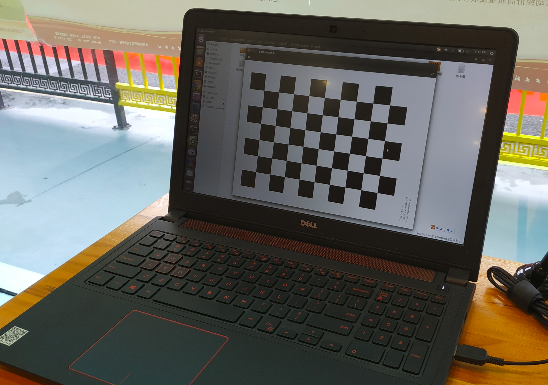
首先是标定,我没打印chessboard,直接在电脑屏幕上显示,拍了17张,大概如下:

又在手机上装了个 尺子 之类的app,比划着量了下,每个格子大概是18.1 mm,这个棋盘是10 x 7的棋盘。
要pip install opencv-contrib-python才有扩展模块,扩展模块中包含aruco
然后标定了一下:


 1 import cv2
 2 import numpy as np
 3 import glob
 4 import matplotlib.pyplot as plt
 5 import matplotlib.patches as patches
 6
 7
 8 # 找棋盘格角点
 9
10 criteria = (cv2.TERM_CRITERIA_EPS + cv2.TERM_CRITERIA_MAX_ITER, 30, 0.001) # 阈值
11 #棋盘格模板规格
12 w = 9   # 10 - 1
13 h = 6   # 7  - 1
14 # 世界坐标系中的棋盘格点,例如(0,0,0), (1,0,0), (2,0,0) ....,(8,5,0),去掉Z坐标,记为二维矩阵
15 objp = np.zeros((w*h,3), np.float32)
16 objp[:,:2] = np.mgrid[0:w,0:h].T.reshape(-1,2)
17 objp = objp*18.1  # 18.1 mm
18
19 # 储存棋盘格角点的世界坐标和图像坐标对
20 objpoints = [] # 在世界坐标系中的三维点
21 imgpoints = [] # 在图像平面的二维点
22
23 images = glob.glob('./chessboard/*.jpg')  #   拍摄的十几张棋盘图片所在目录
24
25 i = 1
26 for fname in images:
27
28     img = cv2.imread(fname)
29     gray = cv2.cvtColor(img,cv2.COLOR_BGR2GRAY)
30     # 找到棋盘格角点
31     ret, corners = cv2.findChessboardCorners(gray, (w,h),None)
32     # 如果找到足够点对,将其存储起来
33     if ret == True:
34         print("i:", i)
35         i = i+1
36
37         cv2.cornerSubPix(gray,corners,(11,11),(-1,-1),criteria)
38         objpoints.append(objp)
39         imgpoints.append(corners)
40         # 将角点在图像上显示
41         cv2.drawChessboardCorners(img, (w,h), corners, ret)
42         cv2.namedWindow('findCorners', cv2.WINDOW_NORMAL)
43         cv2.resizeWindow('findCorners', 810, 405)
44         cv2.imshow('findCorners',img)
45         cv2.waitKey(1)
46 cv2.destroyAllWindows()
47 #%% 标定
48 ret, mtx, dist, rvecs, tvecs = \
49     cv2.calibrateCamera(objpoints, imgpoints, gray.shape[::-1], None, None)
50
51
52 print("ret:",ret  )
53 print("mtx:\n",mtx)      # 内参数矩阵
54 print("dist:\n",dist   )   # 畸变系数   distortion cofficients = (k_1,k_2,p_1,p_2,k_3)
55 print("rvecs:\n",rvecs)   # 旋转向量  # 外参数
56 print("tvecs:\n",tvecs ) # 平移向量 # 外参数标定结果里对aruco有用的是 mtx 和 dist。
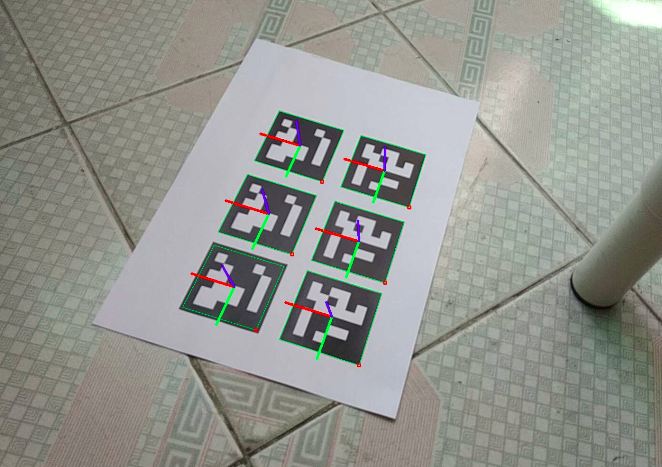
然后打印包含aruco的marker的纸,运行下面的代码就可以玩了:


 1 import numpy as np
 2 import time
 3 import cv2
 4 import cv2.aruco as aruco
 5
 6 #with np.load('webcam_calibration_output.npz') as X:
 7 #    mtx, dist, _, _ = [X[i] for i in ('mtx','dist','rvecs','tvecs')]
 8
 9 #mtx =
10 #2946.48    0    1980.53
11 #0    2945.41    1129.25
12 #0    0    1
13
14 mtx = np.array([
15         [2946.48,       0, 1980.53],
16         [      0, 2945.41, 1129.25],
17         [      0,       0,       1],
18         ])
19 #我的手机拍棋盘的时候图片大小是 4000 x 2250
20 #ip摄像头拍视频的时候设置的是 1920 x 1080,长宽比是一样的,
21 #ip摄像头设置分辨率的时候注意一下
22
23
24 dist = np.array( [0.226317, -1.21478, 0.00170689, -0.000334551, 1.9892] )
25
26 video = "http://admin:admin@192.168.1.2:8081/"   # 手机ip摄像头
27 # 根据ip摄像头在你手机上生成的ip地址更改,右上角可修改图像分辨率
28
29 cap = cv2.VideoCapture(video)
30
31
32 font = cv2.FONT_HERSHEY_SIMPLEX #font for displaying text (below)
33
34 #num = 0
35 while True:
36     ret, frame = cap.read()
37     # operations on the frame come here
38
39     gray = cv2.cvtColor(frame, cv2.COLOR_BGR2GRAY)
40     aruco_dict = aruco.Dictionary_get(aruco.DICT_6X6_250)
41     parameters =  aruco.DetectorParameters_create()
42
43     '''
44     detectMarkers(...)
45         detectMarkers(image, dictionary[, corners[, ids[, parameters[, rejectedI
46         mgPoints]]]]) -> corners, ids, rejectedImgPoints
47     '''
48
49     #lists of ids and the corners beloning to each id
50     corners, ids, rejectedImgPoints = aruco.detectMarkers(gray,
51                                                           aruco_dict,
52                                                           parameters=parameters)
53
54 #    if ids != None:
55     if ids is not None:
56
57         rvec, tvec, _ = aruco.estimatePoseSingleMarkers(corners, 0.05, mtx, dist)
58         # Estimate pose of each marker and return the values rvet and tvec---different
59         # from camera coeficcients
60         (rvec-tvec).any() # get rid of that nasty numpy value array error
61
62 #        aruco.drawAxis(frame, mtx, dist, rvec, tvec, 0.1) #Draw Axis
63 #        aruco.drawDetectedMarkers(frame, corners) #Draw A square around the markers
64
65         for i in range(rvec.shape[0]):
66             aruco.drawAxis(frame, mtx, dist, rvec[i, :, :], tvec[i, :, :], 0.03)
67             aruco.drawDetectedMarkers(frame, corners)
68         ###### DRAW ID #####
69 #        cv2.putText(frame, "Id: " + str(ids), (0,64), font, 1, (0,255,0),2,cv2.LINE_AA)
70
71
72     else:
73         ##### DRAW "NO IDS" #####
74         cv2.putText(frame, "No Ids", (0,64), font, 1, (0,255,0),2,cv2.LINE_AA)
75
76     # Display the resulting frame
77     cv2.imshow("frame",frame)
78
79     key = cv2.waitKey(1)
80
81     if key == 27:         # 按esc键退出
82         print('esc break...')
83         cap.release()
84         cv2.destroyAllWindows()
85         break
86
87     if key == ord(' '):   # 按空格键保存
88 #        num = num + 1
89 #        filename = "frames_%s.jpg" % num  # 保存一张图像
90         filename = str(time.time())[:10] + ".jpg"
91 cv2.imwrite(filename, frame)最后效果如下:

来源:oschina
链接:https://my.oschina.net/u/4285472/blog/4401327