Dubbo、Rocket MQ底层都是用了Netty应用框架
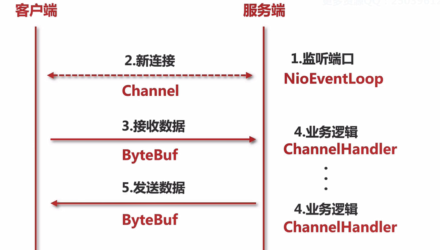
服务端:
public class ServerBoot {
private static final int PORT = 8000;
public static void main(String[] args) {
Server server = new Server(PORT);
server.start();
}
}
public class Server {
private ServerSocket serverSocket;
public Server(int port) {
try {
this.serverSocket = new ServerSocket(port);//相当于服务器启动了,并且监听了端口号port
System.out.println("服务端启动成功,端口:" + port);
} catch (IOException exception) {
System.out.println("服务端启动失败");
}
}
public void start() {
new Thread(new Runnable() {
@Override
public void run() {
doStart();
}
}).start();
}
private void doStart() {
while (true) {
try {
Socket client = serverSocket.accept();//等待客户端
new ClientHandler(client).start();
} catch (IOException e) {
System.out.println("服务端异常");
}
}
}
}
public class ClientHandler {
public static final int MAX_DATA_LEN = 1024;
private final Socket socket;
public ClientHandler(Socket socket) {
this.socket = socket;
}
public void start() {
System.out.println("新客户端接入");
new Thread(new Runnable() {
@Override
public void run() {
doStart();
}
}).start();
}
private void doStart() {
try {
InputStream inputStream = socket.getInputStream();
while (true) {
byte[] data = new byte[MAX_DATA_LEN];
int len;
while ((len = inputStream.read(data)) != -1) {
String message = new String(data, 0, len);
System.out.println("客户端传来消息: " + message);
socket.getOutputStream().write(data);
}
}
} catch (IOException e) {
e.printStackTrace();
}
}
}
客户端:
public class Client {
private static final String HOST = "127.0.0.1";
private static final int PORT = 8000;
private static final int SLEEP_TIME = 5000;
public static void main(String[] args) throws IOException {
final Socket socket = new Socket(HOST, PORT);
new Thread(new Runnable() {
@Override
public void run() {
System.out.println("客户端启动成功!");
while (true) {
try {
String message = "hello world";
System.out.println("客户端发送数据: " + message);
socket.getOutputStream().write(message.getBytes());
} catch (Exception e) {
System.out.println("写数据出错!");
}
sleep();
}
}
}).start();
}
private static void sleep() {
try {
Thread.sleep(SLEEP_TIME);
} catch (InterruptedException e) {
e.printStackTrace();
}
}
}
Netty组件
NioEventLoop:监听客户端连接,处理客户端的读写

Channel: 表示一个连接,可以理解每一个请求,就是一个Channel
ChannelHandler: 核心处理业务就在这里,用于处理业务请求
ChannelPipeline: 用于保存处理过程需要用到的ChannelHandler和ChannelHandlerContext
Netty服务端启动
public final class Server {
public static void main(String[] args) throws Exception {
EventLoopGroup bossGroup = new NioEventLoopGroup(1);
EventLoopGroup workerGroup = new NioEventLoopGroup();
try {
ServerBootstrap b = new ServerBootstrap();
b.group(bossGroup, workerGroup)
.channel(NioServerSocketChannel.class)
.childOption(ChannelOption.TCP_NODELAY, true)
.childAttr(AttributeKey.newInstance("childAttr"), "childAttrValue")
.handler(new ServerHandler())
.childHandler(new ChannelInitializer<SocketChannel>() {
@Override
public void initChannel(SocketChannel ch) {
ch.pipeline().addLast(new AuthHandler());
//..
}
});
ChannelFuture f = b.bind(8888).sync();
f.channel().closeFuture().sync();
} finally {
bossGroup.shutdownGracefully();
workerGroup.shutdownGracefully();
}
}
}
创建服务端Channel ---------初始化服务端Channel -----------注册selector ---------端口绑定
1.bind()[用户代码入口]
initAndRegister()[初始化并注册]
newChannel()[创建服务端channel]
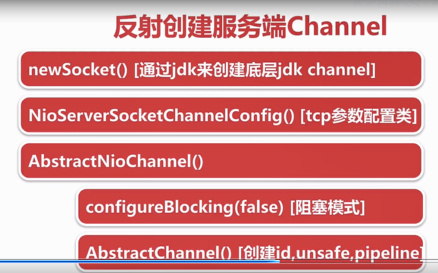
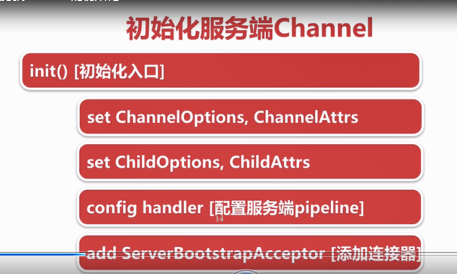
init()[初始化服务端channel]
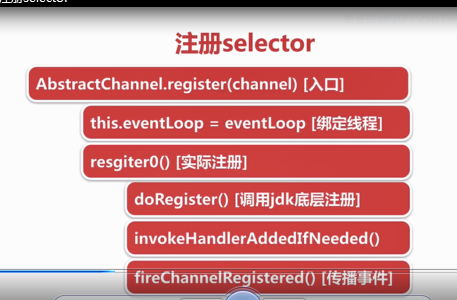
注册selector
端口绑定:
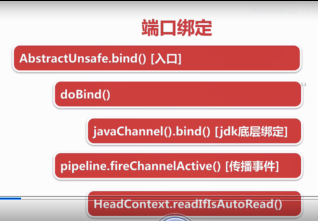
来源:oschina
链接:https://my.oschina.net/u/4009436/blog/4475964