可以使用WebFlux的WebClient类很方便的对网络请求进行代理处理操作,我想Spring Cloud Gateway中主要用的就是WebClient进行操作,这里简单介绍一下WebClient的用法,想要深度学习的话,看一下Spring Cloud Gateway源码准没错
一些用法
流数据
首先创建一个server端,用于产生一些网络服务:
- Employee为员工类
- EmployeeFaker为通过javafaker包生成的一些数据
- EmployeeController生成一些服务,其中getEmployee为每一秒生成一个Employee对象,因为是流数据使用
APPLICATION_STREAM_JSON_VALUE进行传输
@Data
@Builder
@NoArgsConstructor
@AllArgsConstructor
class Employee {
    Long id;
    String name;
    Integer age;
    Integer salary;
    String phoneNumber;
    String address;
}

class EmployeeFaker extends Employee{
    private final Faker f = new Faker(Locale.CHINA);

    public EmployeeFaker (long i) {
        id = i;
        name = f.name().fullName();
        age = f.random().nextInt(20, 50);
        salary = f.number().numberBetween(1, 2000)*1000;
        phoneNumber = f.phoneNumber().cellPhone();
        address = f.address().streetName();
    }
}

@RestController
@RequestMapping("server")
class EmployeeController {

    @GetMapping(produces = MediaType.APPLICATION_STREAM_JSON_VALUE)
    public Flux<Employee> getEmployee() {
        return Flux.interval(Duration.ofSeconds(1))
                .map(EmployeeFaker::new);
    }

    @PostMapping(produces = MediaType.APPLICATION_JSON_VALUE)
    public Mono<String> post (@RequestBody String info) {
        return Mono.just(info)
                .map(i -> "post info :  " + i);
    }
}
运行之后测试服务:
使用WebClient编写接收:
- 这里通过WebClient访问localhost:8080/server
- 然后将结果转为Flux
- 然后进行筛选,只留年龄小于25的返回
@GetMapping(produces = MediaType.APPLICATION_STREAM_JSON_VALUE)
public Flux<Employee> proxyEmploy() {
    return WebClient.create("localhost:8080/server")
            .get()
            .retrieve()
            .bodyToFlux(Employee.class)
            .log()
            .filter(i -> i.getAge() < 25);
}
看下结果:

流程大概为:
访问localhost:8080/client-> webClient 访问localhost:8080/server -> server返回结果-> filter-> client 返回结果
post请求
创建post服务:
- 将post的内容加上
post info:
@PostMapping(produces = MediaType.APPLICATION_JSON_VALUE)
public Mono<String> post (@RequestBody String info) {
    return Mono.just(info)
            .map(i -> "post info :  " + i);
}

对应的webclient服务:
- 传入的内容通过body写入请求中
- 通过访问将结果前加proxy -> 字符返回
@PostMapping(produces = MediaType.APPLICATION_JSON_VALUE)
public Mono<String> proxyPost (@RequestBody Mono<String> info) {
    return WebClient.builder() // 除了使用create快速生成 外还可以使用builder创建
            .baseUrl("localhost:8080/server")
            .build()
            .post()
            .body(info, String.class)  // 将info body 写入 proxy请求的body中
            .retrieve()
            .bodyToMono(String.class)
            .map(i -> "proxy -> " + i);
}
结果跟预期一致:
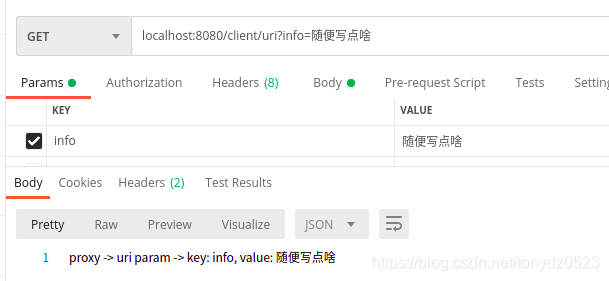
get请求传参(uri处理)
众所周知get传参两种方法:
- queryParam:
localhost:8080/client/uri?info=随便写点啥&info2=s通过问好分隔path和参数&分隔不同参数 - path:通过path中的路由传递参数
queryParam
- 创建一个测试服务通过query传参
@GetMapping(value = "uri", produces = MediaType.APPLICATION_JSON_VALUE)
public Mono<String> uri(@RequestParam("info") String info) {
    return Mono.just(info)
            .map(i -> "uri param -> key: info, value: " + i);
}

- webclient接收端
@GetMapping(value = "uri", produces = MediaType.APPLICATION_JSON_VALUE)
public Mono<String> proxyUri (@RequestParam("info") String info) {
    return WebClient.builder()
            .baseUrl("http://localhost:8080/server")
            .build()
            .get()
            .uri(u -> u.path("/uri")
                    .queryParam("info", info)
                    .build()
            )
            .retrieve()
            .bodyToMono(String.class)
            .map(i -> "proxy -> " + i);
}

path传参
- server
@GetMapping(value = "{info}", produces = MediaType.APPLICATION_JSON_VALUE)
public Mono<String> uriPath(@PathVariable String info) {
    return Mono.just(info)
            .map(i -> "uri param -> key: info, value: " + i);
}
- proxy
@GetMapping(value = "{info}", produces = MediaType.APPLICATION_JSON_VALUE)
public Mono<String> proxyUriPath (@PathVariable String info) {
    return WebClient.builder()
            .baseUrl("http://localhost:8080/server")
            .build()
            .get()
            .uri(u -> u.path("/{info}")
                    .build(info)
            )
            .retrieve()
            .bodyToMono(String.class)
            .map(i -> "proxy -> " + i);
}

过滤 filter 使用
- 在build时可以添加过滤
- 可以添加多个

- 可以通过
ExchangeFilterFunction.ofResponseProcessor和ExchangeFilterFunction.ofRequestProcessor对分别对request和response做处理
private ExchangeFilterFunction logResponse () {
    return ExchangeFilterFunction.ofResponseProcessor(c -> {
        c.headers().asHttpHeaders()
                .forEach((k, vs) -> vs.forEach(v -> log.info("Response header: {} {}", k, v)));
        return Mono.just(c);
    });
}
代码
来源:oschina
链接:https://my.oschina.net/u/4343260/blog/4493871