前言
概述
作为一个开发人员特别是后端随时需要一些中间件以便于调试。例如mysql,redis,zookeeper.每次都需要安装配置,启动关闭启动。
为了解决这些问题常见方案如下所示
1使用虚拟机吗,在虚拟机中安装相关中间件
2使用docker,在docker中安装相关中间件
3本地安装相关中间件,配置,使用
案例分析
我以zookeeper为例简述这三种方法的利弊
安装便捷程度对比
方案1-【安装虚拟机->更新虚拟机基础软件->linux安全性,账户,防火墙各种配置->网络环境以及固定ip等配置->shell连接配置】->搜索安装包->解压移动到某目录->配置文件修改->配置环境变量->启动服务->使用
操作一次可反复使用,还可以带走
方案2- docker pull->搜索docker和中间件参数->编写启动命令,或dockerfile->docker run
方案3-解压移动到某目录->配置文件修改->配置环境变量->启动服务->使用->关机或者系统大的更新->又需要重新配置
不可带走,系统重大更新或者回滚需要反复安装配置
便捷程度排行
2>1>3
对机器的健康程度对比
第一种特比吃硬盘和内存,会让电脑发热,毕竟同时运行多个os。mac的硬件是apple定制的。虚拟机啥的不是什么正统玩法。
出现问题,机器疯狂发热不知道该干嘛,只能整个虚拟机关掉
第二种特别吃内存,还让电脑疯狂发热,几万块RMB的mpb啊,肉疼啊
出现问题机器疯狂发热 可关掉容器,还是不行可关闭docker服务,但是还是有残留进程继续发热。
第三种没有前两者的毛病
另外前面两种会在系统中残留大量垃圾文件
健康对比
3>1>2
汇总
有没有对系统健康但是又方便的方式使用这些中间件呢?
有的。就是大名鼎鼎的homebrew
homebrew介绍
hombrew是一款macos下的软件包管理软件,原理类似于centos yum命令或者ubantu(debian)的 apt-get
安装
/usr/bin/ruby -e "$(curl -fsSL https://raw.githubusercontent.com/Homebrew/install/master/install)"
/usr/bin/ruby -e "$(curl -fsSL https://raw.githubusercontent.com/Homebrew/install/master/install)"
如果安装不了可以这样安装
git clone git://mirrors.ustc.edu.cn/homebrew-core.git/ /usr/local/Homebrew/Library/Taps/homebrew/homebrew-core
卸载
/usr/bin/ruby -e "$(curl -fsSL https://raw.githubusercontent.com/Homebrew/install/master/uninstall)"
更换源
替换homebrew默认源(源代码仓库)
cd "$(brew --repo)"
git remote set-url origin git://mirrors.ustc.edu.cn/brew.git
替换homebrew-core源(核心软件仓库)
cd "$(brew --repo)/Library/Taps/homebrew/homebrew-core"
git remote set-url origin git://mirrors.ustc.edu.cn/homebrew-core.git
替换homebrew-bottles(预编译二进制软件包)
echo 'export HOMEBREW_BOTTLE_DOMAIN=https://mirrors.ustc.edu.cn/homebrew-bottles' >> ~/.bash_profile
source ~/.bash_profile
命令概述
安装软件,如:brew install mysql
卸载软件,如:brew remove mysql
搜索软件,如:brew search mysql
更新软件,如:brew upgrade mysql
查看安装列表, 如:brew list
查看安装路径, 如:brew list mysql
更新Homebrew,如:brew update
检查homebrew问题, brew doctor --verbose
brew cask
brew cask主要用来下载一些带界面的应用软件,下载好后会自动安装,并能在mac中直接运行使用
ruby -e "$(curl -fsSL https://raw.githubusercontent.com/Homebrew/install/master/install)" < /dev/null 2> /dev/null ; brew install caskroom/cask/brew-cask 2> /dev/null
git clone git://mirrors.ustc.edu.cn/homebrew-cask.git/ /usr/local/Homebrew/Library/Taps/homebrew/homebrew-cask --depth=1
原理简单介绍
homebrew其实就是一个巨大的git项目,里面放好了各种中间件编译安装配置的脚本以及源码和可执行文件 需要的时候就拉取相关内容。
然后根据中间件的不同,秩序相关安装配置工作
安装举例-zookeeper
brew install zookeeper

启动命令贴心的在安装好了之后告诉我们了
brew services start zookeeper
或者
zkServer start
建议全部用前面得吧,统一格式便于记忆
然后。。翻车了。

由于版本问题,环境变量不对了,所以需要更新下
brew update

哈哈😃,用另外一个了

告诉了你配置文件在哪,并且贴心的告知了你进程号
不用再自己ps -ef_grep 了。。。
brew和yum的区别
1 brew最好不要用root(sudo)运行
2 brew是基于git的,而yum是自己实现的 服务器-客户端的一个大型软件
....待整理
注意改成zsh之后brew没提示了。。
设置步骤:
安装 HomeBrew 的补全文件,默认是安装到 /usr/local/Cellar/ 路径。执行命令如下:
brew install zsh-completions
1
将 zsh-completions 的路径导入,否则找不到该文件仍无效,将下面两命令,复制到 .zshrc 里面如下:
fpath=(/usr/local/Cellar/zsh-completions/0.31.0/share/zsh-completions $fpath)
autoload -Uz compinit
compinit
1
2
注:zsh-completions/你实际版本号/
验证补全生效
本章结束,下次我们在一起初步学习如何按照相关中间件mysql
附录-解决各种问题
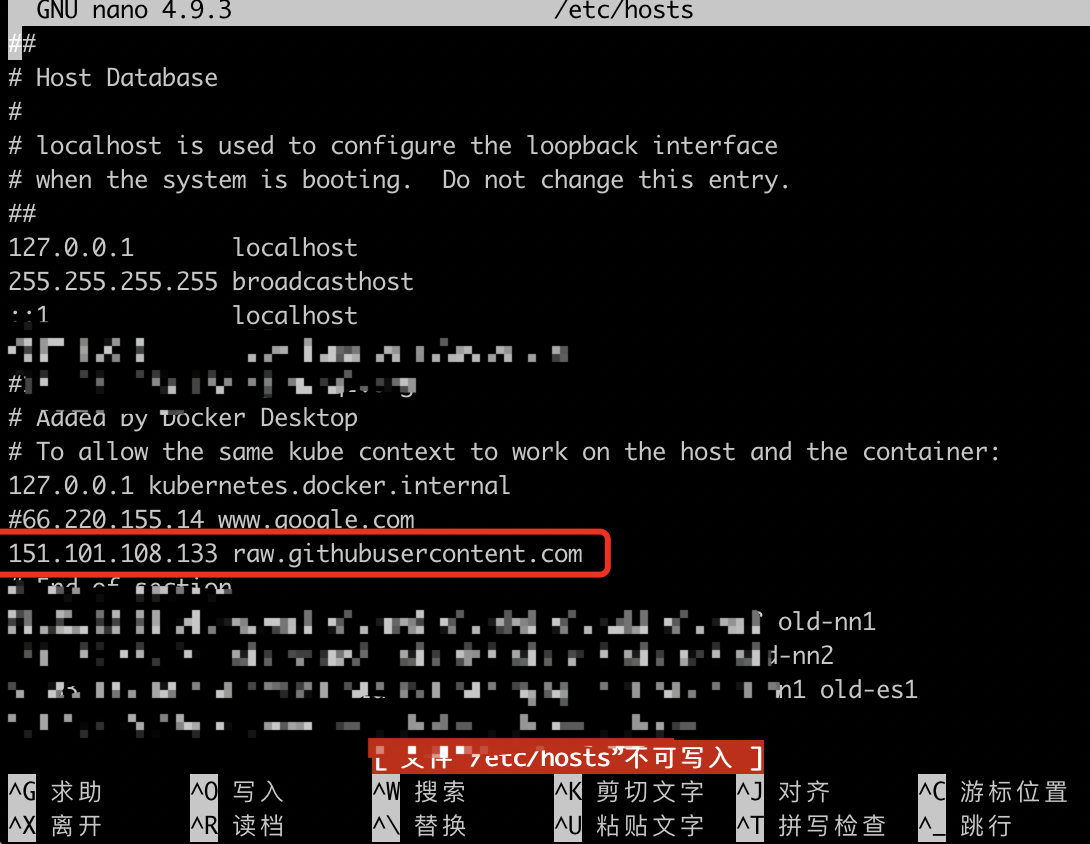
1 如果raw.githubusercontent.com 访问不了 例如403 请改host文件
nano /etc/hosts
如果没nano vi也可以
151.101.108.133

2安装完了执行命令 -bash:brew:command not found
sudo vim .bash_profile
export PATH**=/usr/local/bin:$PATH** source .bash_profile to make change work。
/usr/bin/ruby -e "$(curl -fsSL https://raw.githubusercontent.com/Homebrew/install/master/install)"
如果profile 被玩坏了 例如ls cd命令都不行了 恢复:
export PATH=/usr/local/sbin:/usr/local/bin:/sbin:/bin:/usr/sbin:/usr/bin:/root/bin
3换了中科大的源还是不好使
那就换成清华的源
# brew 程序本身,Homebrew/Linuxbrew 相同
git -C "$(brew --repo)" remote set-url origin https://mirrors.tuna.tsinghua.edu.cn/git/homebrew/brew.git

# 以下针对 mac OS 系统上的 Homebrew
git -C "$(brew --repo homebrew/core)" remote set-url origin https://mirrors.tuna.tsinghua.edu.cn/git/homebrew/homebrew-core.git
git -C "$(brew --repo homebrew/cask)" remote set-url origin https://mirrors.tuna.tsinghua.edu.cn/git/homebrew/homebrew-cask.git
git -C "$(brew --repo homebrew/cask-fonts)" remote set-url origin https://mirrors.tuna.tsinghua.edu.cn/git/homebrew/homebrew-cask-fonts.git
git -C "$(brew --repo homebrew/cask-drivers)" remote set-url origin https://mirrors.tuna.tsinghua.edu.cn/git/homebrew/homebrew-cask-drivers.git

# 以下针对 Linux 系统上的 Linuxbrew
git -C "$(brew --repo homebrew/core)" remote set-url origin https://mirrors.tuna.tsinghua.edu.cn/git/homebrew/linuxbrew-core.git

# 更换后测试工作是否正常
brew update
复原
# brew 程序本身,Homebrew/Linuxbrew 相同
git -C "$(brew --repo)" remote set-url origin https://github.com/Homebrew/brew.git

# 以下针对 mac OS 系统上的 Homebrew
git -C "$(brew --repo homebrew/core)" remote set-url origin https://github.com/Homebrew/homebrew-core.git
git -C "$(brew --repo homebrew/cask)" remote set-url origin https://github.com/Homebrew/homebrew-cask.git
git -C "$(brew --repo homebrew/cask-fonts)" remote set-url origin https://github.com/Homebrew/homebrew-cask-fonts.git
git -C "$(brew --repo homebrew/cask-drivers)" remote set-url origin https://github.com/Homebrew/homebrew-cask-drivers.git

# 以下针对 Linux 系统上的 Linuxbrew
git -C "$(brew --repo homebrew/core)" remote set-url origin https://github.com/Homebrew/linuxbrew-core.git

# 更换后测试工作是否正常
brew update
4

等一会
来源:oschina
链接:https://my.oschina.net/u/3071527/blog/4281403