- 目录
- 1.前言
- 2.JpGraph类库基本使用
- 2.1安装和配置
- 2.2JpGraph类库的实例
- 2.2.1折线坐标图(X-Y坐标图)
- 2.2.2解决中文乱码问题
- 3. 图文代码实战
- 3.1折线坐标图(X-Y-Y坐标图)
- 3.2柱形图
- 3.3饼图
- 3.4饼图3D
- 4.总结
1.前言
jpgraph是一种专门用于绘制统计图的运行库,使用jpgraph创建统计图时,只需要给出相应的数据,就能设置统计图标题和统计图类型即可;可以生成X-Y坐标图,X-Y-Y坐标图,柱形图,饼图,3D饼图等统计图,并会自动生成坐标轴,坐标轴刻度,图例等信息,帮助我们快速生成所需样式.
代码分享:https://github.com/mtdgclub/JpGraph
2.JpGraph类库基本使用
2.1安装和配置
下载地址:https://jpgraph.net/download/
只需要解压文件拷贝src文件到项目文件夹即可使用
2.2JpGraph类库的实例
2.2.1折线坐标图(X-Y坐标图)
<?php
//引入相关文件
require_once 'src/jpgraph.php';
require_once 'src/jpgraph_line.php';
$graph = new Graph(600, 400);//创建画布
//设置横纵坐标刻度样式 lin 直线 text 文本 int 整数 log 对数  使用方法: X+Y形式:textint
$aAxisType = 'textint';
$graph->SetScale($aAxisType);
//设置统计图的标题
$graph->title->SetFont(FF_CHINESE);
$graph->title->Set('这是一张统计图');
//模拟数据
$data = [0 => 17,1 => 20,2 => 30,3 => 40,4 => 50,5 => 30,6 => 25,7 => 54,8 => 29,9 => 13,10 => 37,11 => 16];
//得到linePlot对象
$linePlot = new LinePlot($data);
//设置图例
$linePlot->SetLegend('统计图图例');
//将统计图添加到画布上
$graph->Add($linePlot);
//设置统计图的颜色,一定要在添加画布之后才设置,否则无效
$linePlot->SetColor('red');
//输出画布
$graph->Stroke();
//保存为图片
//$graph->Stroke('./test.png');
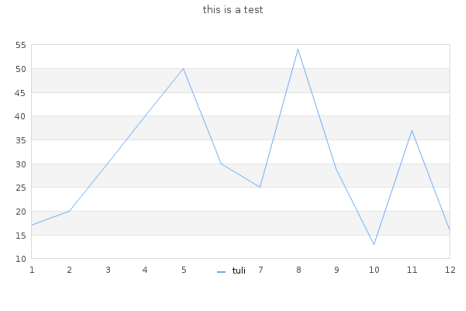
生成如下图所示:

2.2.2解决中文乱码问题
找到jpgraph_ttf.inc.php,配置支持标题中文,修改配置如下:
//要想支持中文配置,需要修改配置文件jpgraph_ttf.inc.php
//搜索CHINE_TTF_FONT,修改常量的值支持中文字体
//define('CHINESE_TTF_FONT','SIMYOU.TTF');
//$graph->title->SetFont(FF_CHINESE);
3. 图文代码实战
3.1折线坐标图(X-Y-Y坐标图)
<?php
//引入类库
require_once 'src/jpgraph.php';
require_once 'src/jpgraph_line.php';

$data = array(0 => -21, 1 => -3, 2 => 12, 3 => 19, 4 => 23, 5 => 29, 6 => 30, 7 => 22, 8 => 26, 9 => 18, 10 => 5, 11 => -10);//第一条数据
$data2y = array(0 => 3, 1 => 12, 2 => 18, 3 => 30, 4 => 28, 5 => 33, 6 => 43, 7 => 39, 8 => 36, 9 => 29, 10 => 15, 11 => 10);//第二条数据
//得到Graph对象
$graph = new Graph(400, 400);
//设置X和Y轴样式及Y轴的最大值最小值
$graph->SetScale("textint", -30, 50);
//设置右侧Y轴样式及其最大值最小值
$graph->SetY2Scale("int", -30, 50);
//设置图像样式,加入阴影
$graph->SetShadow();
//设置图像边界范围
$graph->img->setMargin(40, 30, 50, 70);
//设置标题
$graph->title->Set("this is a test X-Y-Y");
//得到曲线实例
$linePlot = new LinePlot($data);
//得到第二条曲线
$linePlot2y = new LinePlot($data2y);
//将曲线加入到图像中
$graph->Add($linePlot);
$graph->Add($linePlot2y);
//设置三个坐标轴名称
$graph->xaxis->title->Set("Month");
$graph->yaxis->title->Set("beijing");
$graph->y2axis->title->Set("ShangHai");
//设置两条曲线的颜色
$linePlot->SetColor('red');
$linePlot2y->SetColor('black');
//设置两条曲线的图例
$linePlot->SetLegend("Beijing");
$linePlot2y->SetLegend("Shanghai");
//设置图例样式
$graph->legend->setlayout(LEGEND_HOR);
$graph->legend->Pos(0.45, 0.9, "center", "bottom");
//将图像输出到浏览器
$graph->Stroke();
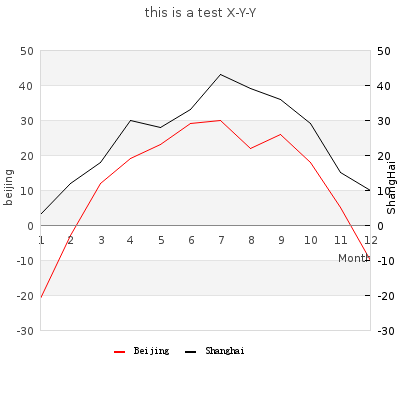
生成如下图所示:

3.2柱形图
<?php

//引入类库
require_once 'src/jpgraph.php';
require_once 'src/jpgraph_bar.php';
//柱形图模拟数据
$data = array(0 => -21, 1 => -3, 2 => 12, 3 => 19, 4 => 23, 5 => 29, 6 => 30, 7 => 22, 8 => 26, 9 => 18, 10 => 5, 11 => -10);
//创建背景图
$graph = new Graph(400, 300);
//设置刻度样式
$graph->SetScale("textlin");
//设置边界范围
$graph->img->SetMargin(30, 30, 80, 30);
//设置标题
$graph->title->Set("BarPlot test");
//得到柱形图对象
$barPlot = new BarPlot($data);
//设置柱形图图例
$barPlot->SetLegend("beijing");
//显示柱形图代表数据的值
$barPlot->value->show();
//将柱形图加入到背景图
$graph->Add($barPlot);
//设置柱形图填充颜色
$barPlot->setfillcolor('yellow');
//设置边框颜色
$barPlot->SetColor('red');
//将柱形图输出到浏览器
$graph->Stroke();
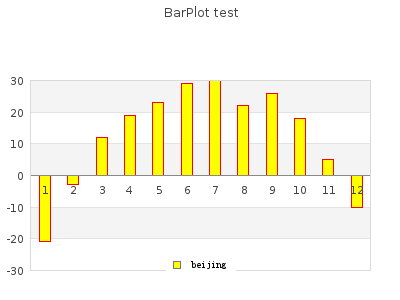
生成如下图所示:

3.3饼图
<?php

require_once "src/jpgraph.php";
require_once "src/jpgraph_pie.php";
require_once "src/jpgraph_pie3d.php";
//模拟数据
$data = array(0 => 3.5, 1 => 4.6, 2 => 9.1, 3 => 21.9, 4 => 42.3, 5 => 90.7, 6 => 183.5, 7 => 127.5, 8 => 61.4, 9 => 33.5, 10 => 11.5, 11 => 4.4);
//创建画布
$graph = new PieGraph(800, 500);
//设置图像边界范围
$graph->img->SetMargin(30, 30, 80, 30);
//设置标题
$graph->title->Set("PiePlot Test");
//得到饼图对象
$piePlot3d = new PiePlot3D($data);
//设置图例
$piePlot->SetLegends(array(1,2,3,4,5,6,7,8,9,10,11,12));
//设置图例
$piePlot3d->SetLegends(array("Jan", "Feb", "Mar", "Apr", "May", "Jun", "Jul", "Aug", "Sep", "Oct", "Nov", "Dec"));
//设置图例位置
$graph->legend->Pos(0.01, 0.45, "left", "top");
//添加到画布中
//$graph->Add($piePlot);
$graph->Add($piePlot3d);
//输出
$graph->Stroke();
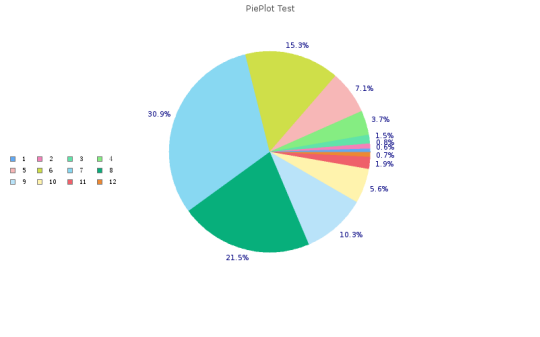
生成如下图所示:

3.4饼图3D
<?php

require_once "src/jpgraph.php";
require_once "src/jpgraph_pie.php";
require_once "src/jpgraph_pie3d.php";
//模拟数据
$data = array(0 => 3.5, 1 => 4.6, 2 => 9.1, 3 => 21.9, 4 => 42.3, 5 => 90.7, 6 => 183.5, 7 => 127.5, 8 => 61.4, 9 => 33.5, 10 => 11.5, 11 => 4.4);
//创建画布
$graph = new PieGraph(800, 500);
//设置图像边界范围
$graph->img->SetMargin(30, 30, 80, 30);
//设置标题
$graph->title->Set("PiePlot Test");
//得到饼图对象
$piePlot3d = new PiePlot3D($data);
//设置图例
$piePlot3d->SetLegends(array("Jan", "Feb", "Mar", "Apr", "May", "Jun", "Jul", "Aug", "Sep", "Oct", "Nov", "Dec"));
//设置图例位置
$graph->legend->Pos(0.01, 0.45, "left", "top");
//添加到画布中
//$graph->Add($piePlot);
$graph->Add($piePlot3d);
//输出
$graph->Stroke();
4.总结
通过本次学习,让我们能够很好地学会使用图像展示数据,这对后台的统计显得更为直观,而且通过学习使用JpGraph类库,能够让我们在后端实现图形的创建和渲染,而不一定要全靠前端实现,这是一次很好地学习体验。
来源:oschina
链接:https://my.oschina.net/mtdg/blog/4296016