SpringCloud第七章,升级篇,服务注册与发现Eureka、Zookeeper和Consule
一、基础概念
1、服务治理
传统的远程RPC远程调用框架中,管理每个服务与服务之间的依赖关系比较复杂。所以需要使用服务治理,用于管理服务与服
务之间的依赖关系,可以实现服务调用、负载均衡、容错等。实现服务的注册与发现。

Eureka模块就是用来实现服务治理的
2、服务注册与发现
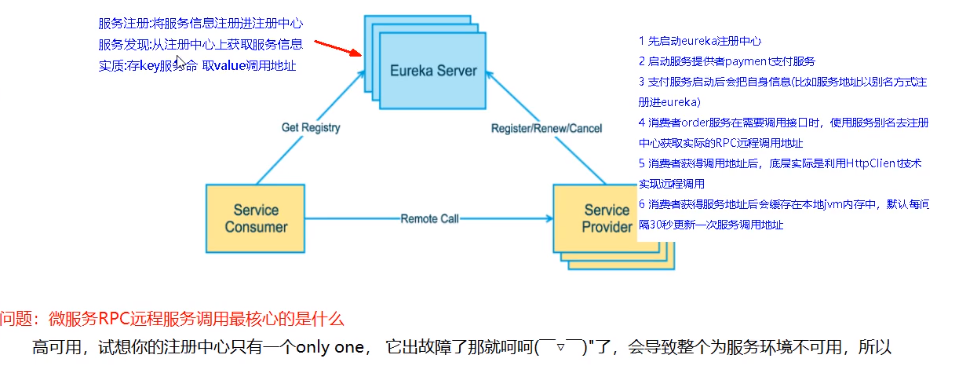
Eureka采用了CS的设计架构,
Eureka Server作为服务注册功能的服务器,他是服务注册中心。而系统中的其他服务,使用Eureka的客户端连接到
Eureka Server,并维持心跳链接。这样系统的维护人员就可以通过Eureka Server来监控系统中各个微服务是否正常
运行。

在服务注册与发现中,有一个注册中心。当服务器启动的时候,会把当前自己服务器的信息比如服务通讯地址以别名的方式
注册到注册中心上。另一方,服务消费者以该别名的方式去注册中心上获取实际的服务通讯地址,然后再实现本地RPC调用。

RPC远程调用框架的设计思想在于:注册中心。因为使用注册中心管理每个服务与服务之间的依赖关系。
在任何RPC远程调用框架中,都会有一个注册中心(存放服务地址相关信息)。
二、Eureka
Eureka包含两个组件 Eureka Server和Eureka Client,Eureka Server 提供服务注册服务。Eureka Client通过注册中心进行访问。
<!--Eureka Server-->
<dependency>
    <groupId>org.springframework.cloud</groupId>
    <artifactId>spring-cloud-starter-netflix-eureka-server</artifactId>
</dependency>

<!--Eureka Client-->
<dependency>
    <groupId>org.springframework.cloud</groupId>
    <artifactId>spring-cloud-starter-netflix-eureka-client</artifactId>
</dependency>
Eureka Server 提供服务注册服务。
	各微服务节点通过配置启动后,会在EurekaServer中进行注册。这样EurekaServer中的服务注册表中就会存储所有
可用服务节点的信息,各服务节点的信息就可以在界面中直观看到。

Eureka Client通过注册中心进行访问。
	是一个java客户端,用于简化EurekaServer的交互,客户端同时也具备一个内置的、使用轮询round-robin负载
算法的负载均衡器。在应用启动后,将会向EurekaServer发送心跳(默认周期为30s)如果EurekaServer在多个心跳周期内没有收到某个节点的心跳,EurekaServer将会从服务注册表中将这个服务节点移除(默认90s)。
1、单机Eureka服务构建
1.1、Eureka构建
new maven module
moduleName   cloud-Eureka-server-7001
parentProject  cloud_2020
groupId      com.lee.springcloud
artifactId    cloud_2020
packaging     jar
POM
<?xml version="1.0" encoding="UTF-8"?>
<project xmlns="http://maven.apache.org/POM/4.0.0"
         xmlns:xsi="http://www.w3.org/2001/XMLSchema-instance"
         xsi:schemaLocation="http://maven.apache.org/POM/4.0.0 http://maven.apache.org/xsd/maven-4.0.0.xsd">
    <parent>
        <artifactId>cloud_2020</artifactId>
        <groupId>com.lee.springcloud</groupId>
        <version>1.0-SNAPSHOT</version>
    </parent>
    <modelVersion>4.0.0</modelVersion>

    <artifactId>cloud-Eureka-server-7001</artifactId>

    <dependencies>

        <!--eureka-server-->
        <dependency>
            <groupId>org.springframework.cloud</groupId>
            <artifactId>spring-cloud-starter-netflix-eureka-server</artifactId>
        </dependency>

        <dependency>
            <groupId>com.lee.springcloud</groupId>
            <artifactId>cloud-api-commons</artifactId>
            <version>${project.version}</version>
        </dependency>

		<!--springboot-->
        <dependency>
            <groupId>org.springframework.boot</groupId>
            <artifactId>spring-boot-starter-web</artifactId>
        </dependency>
        <dependency>
            <groupId>org.springframework.boot</groupId>
            <artifactId>spring-boot-starter-actuator</artifactId>
        </dependency>

        <!--通用配置-->
        <dependency>
            <groupId>org.springframework.boot</groupId>
            <artifactId>spring-boot-devtools</artifactId>
            <scope>runtime</scope>
            <optional>true</optional>
        </dependency>
        <dependency>
            <groupId>org.projectlombok</groupId>
            <artifactId>lombok</artifactId>
            <optional>true</optional>
        </dependency>
        <dependency>
            <groupId>org.springframework.boot</groupId>
            <artifactId>spring-boot-starter-test</artifactId>
            <scope>test</scope>
        </dependency>
    </dependencies>

</project>
application.yml
server:
  port: 7001

eureka:
  instance:
    hostname: localhost
  client:
    register-with-eureka: false #表示不向注册中心注册自己
    fetch-registry: false #不需要去注册中心获取其他服务
    service-url:
      defaultZone: http://${eureka.instance.hostname}:${server.port}/eureka/ #单机 指向自己
主启动类
package com.lee.springcloud;

import org.springframework.boot.SpringApplication;
import org.springframework.boot.autoconfigure.SpringBootApplication;
import org.springframework.cloud.netflix.eureka.server.EnableEurekaServer;

//这是Eureka server
@EnableEurekaServer
@SpringBootApplication
public class EurekaMain7001 {

    public static void main(String[] args) {
        SpringApplication.run(EurekaMain7001.class,args);
    }
}
测试:
http://localhost:7001/

下面我们要将服务的提供者provider和服务的消费者consumer都注入eureka中
1.2、cloud-provider-payment-8001构建
POM添加
<!--Eureka client-->
<dependency>
    <groupId>org.springframework.cloud</groupId>
    <artifactId>spring-cloud-starter-netflix-eureka-client</artifactId>
</dependency>
application.yml添加
eureka:
  client:
    register-with-eureka: true #向eureka server注册自己
    fetch-registry: true #需要去注册中心获取其他服务的地址
    service-url:
      defaultZone: http://localhost:7001/eureka ##指向Eureka服务注册中心

#原来的配置 表示自己向Eureka server注册时,自己的服务名称
spring:
  application:
    name: cloud-payment-service #自己的服务名称
主启动类添加
//表示自己是Eureka的客户端
@EnableEurekaClient
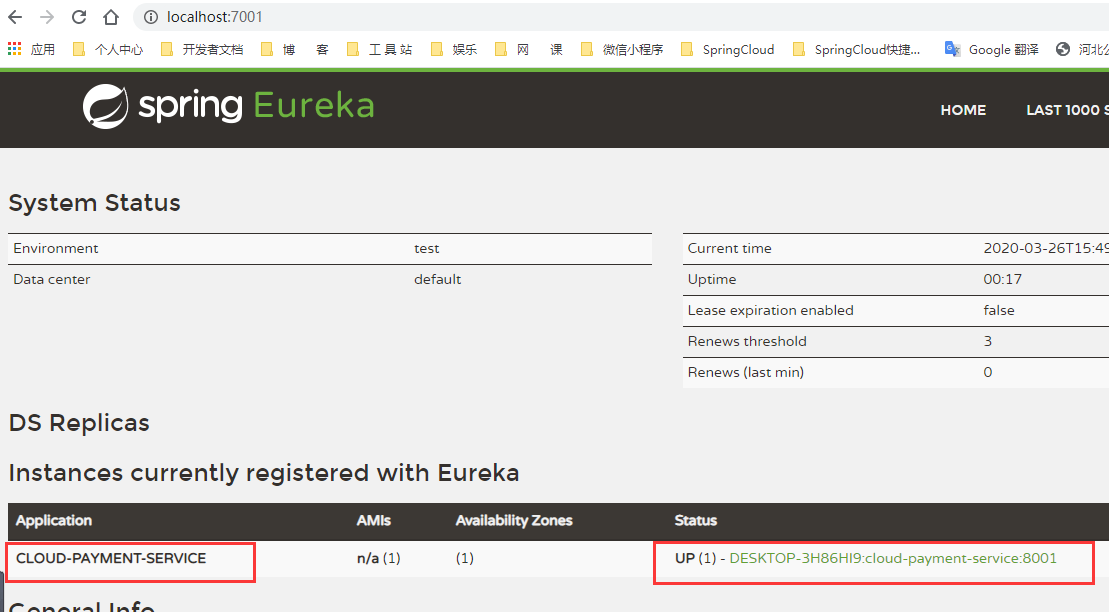
测试:
##启动eureka provider,刷新Eureka   查看是否注册
http://localhost:7001/
1.3、cloud-consumer-order-80构建
几乎同cloud-provider-payment-8001一样
POM添加
<!--Eureka client-->
<dependency>
    <groupId>org.springframework.cloud</groupId>
    <artifactId>spring-cloud-starter-netflix-eureka-client</artifactId>
</dependency>
application.yml添加
spring:
  application:
    name: cloud-consumer-order #表示自己向Eureka server注册时,自己的服务名称
eureka:
  client:
    register-with-eureka: true #向eureka server注册自己
    fetch-registry: true #需要去注册中心获取其他服务的地址
    service-url:
      defaultZone: http://localhost:7001/eureka #指向Eureka服务注册中心
主启动类添加
//表示自己是Eureka的客户端
@EnableEurekaClient
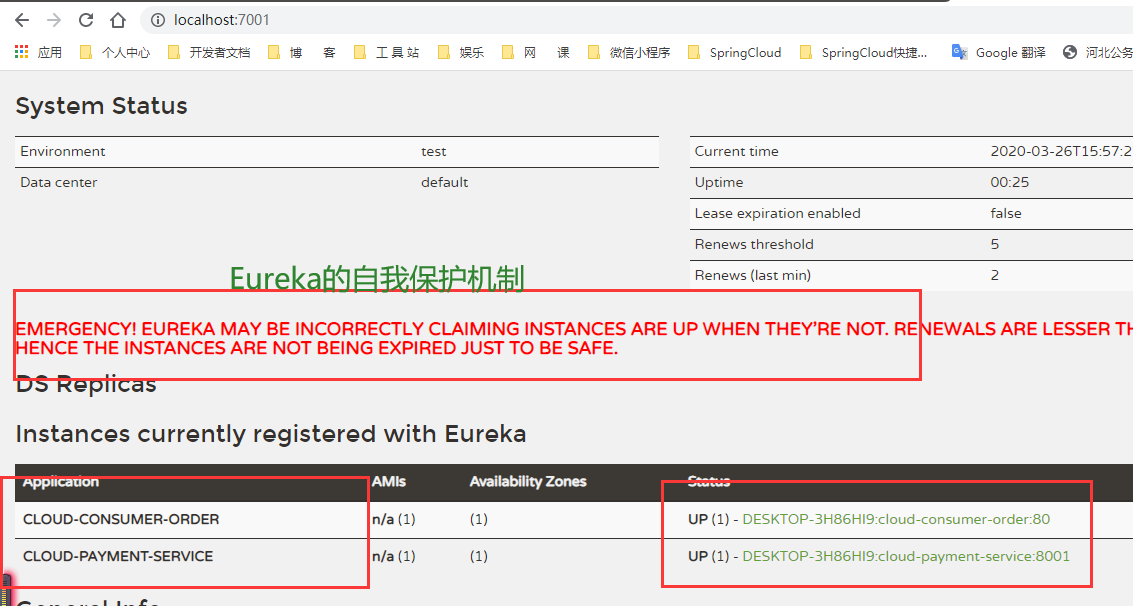
测试:
##启动eureka provider和consumer,刷新Eureka   查看是否注册
http://localhost:7001/
1.4、修改消费者访问机制
原来consumer-order访问provider-payment的方法是通过指定provider的真实地址使用RestTemplate直接进行访问的(Eureka并未参与其中):
private static final String PAYMENT_URL = "http://localhost:8001/";

restTemplate.postForObject(PAYMENT_URL + "/payment/create", payment, CommonResult.class);

restTemplate.getForObject(PAYMENT_URL + "/payment/get/" + id, CommonResult.class, id);
现在,我们要将consumer-order通过provider-payment向Eureka注册的服务名称,在Eureka server中进行查找provider-payment的真实地址,然后再进行访问(Eureka参与其中):
现修改consumer-order的controller如下:
package com.lee.springcloud.controller;

import com.lee.springcloud.entities.CommonResult;
import com.lee.springcloud.entities.Payment;
import org.springframework.web.bind.annotation.*;
import org.springframework.web.client.RestTemplate;

import javax.annotation.Resource;

@RestController
@RequestMapping("/consumer")
public class OrderController {

    //这是provider-payment-8001的真实路径
    //private static final String PAYMENT_URL = "http://localhost:8001/";

    //这是provider-payment-8001在Eureka Server中注册的‘服务名称’
    private static final String PAYMENT_URL = "http://CLOUD-PAYMENT-SERVICE";

    @Resource
    private RestTemplate restTemplate;

    @PostMapping("/payment/create")
    public CommonResult<Payment> create(@RequestBody Payment payment) {
        return restTemplate.postForObject(PAYMENT_URL + "/payment/create", payment, CommonResult.class);
    }

    @GetMapping("/payment/get/{id}")
    public CommonResult<Payment> getPaymentById(@PathVariable("id") Long id) {
        return restTemplate.getForObject(PAYMENT_URL + "/payment/get/" + id, CommonResult.class, id);
    }


}
修改配置类如下:
package com.lee.springcloud.config;

import org.springframework.cloud.client.loadbalancer.LoadBalanced;
import org.springframework.context.annotation.Bean;
import org.springframework.context.annotation.Configuration;
import org.springframework.web.client.RestTemplate;

/**
 * 配置类
 */
@Configuration
public class ApplicationContextConfig {


    //标注此注解后,RestTemplate就具有了客户端负载均衡能力
    //必须添加此注解,否则java.net.UnknownHostException: CLOUD-PAYMENT-SERVICE
    @LoadBalanced
    @Bean
    public RestTemplate restTemplate(){
        return new RestTemplate();
    }

}
测试:
##启动Eureka  provider consumer

http://localhost/consumer/payment/get/2
结果:
<CommonResult>
    <code>200</code>
    <message>查询数据成功 :Payment(id=2, serial=002)</message>
    <data/>
</CommonResult>
2、Eureka集群构建
为了防止Eureka服务的单节点故障,实现高可用,我们需要搭建Eureka集群。
2.1、cloud-Eureka-server-7002
参考cloud-Eureka-server-7001创建cloud-Eureka-server-7002
host文件修改
#路径 C:\Windows\System32\drivers\etc\hosts

127.0.0.1  eureka7001.com
127.0.0.1  eureka7002.com
application.yml文件修改
##cloud-Eureka-server-7001配置如下:
server:
  port: 7001

spring:
  application:
    name: cloud-eureka-server #eureka服务端实例名称
eureka:
  instance:
    hostname: eureka7001.com   #其实还是localhost
  client:
    register-with-eureka: false #表示不向注册中心注册自己
    fetch-registry: false #不用去注册中心获取其他服务的地址
    service-url:
      #defaultZone: http://${eureka.instance.hostname}:${server.port}/eureka/ #单机 指向自己
      defaultZone: http://eureka7002.com:7002/eureka #集群 指向另一个Eureka Server服务地址


##cloud-Eureka-server-7002配置如下:
server:
  port: 7002

spring:
  application:
    name: cloud-eureka-server #eureka服务端实例名称
eureka:
  instance:
    hostname: eureka7002.com #其实还是localhost
  client:
    register-with-eureka: false #表示不向注册中心注册自己
    fetch-registry: false #不用去注册中心获取其他服务的地址
    service-url:
      #defaultZone: http://${eureka.instance.hostname}:${server.port}/eureka/ #单机 指向自己
      defaultZone: http://eureka7001.com:7001/eureka #集群 指向另一个Eureka Server服务地址
测试:
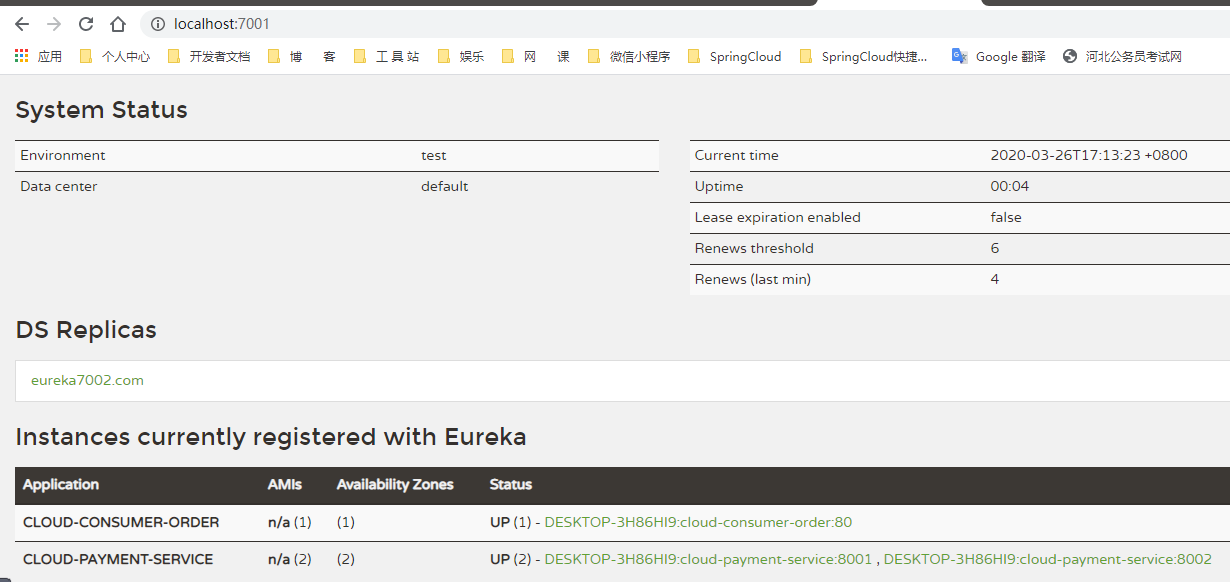
访问:http://localhost:7001/ 和 http://localhost:7002/
结果:
页面分别出现
DS Replicas
	eureka7002.com
和
DS Replicas
	eureka7001.com
2.2、cloud-provider-payment-8001修改集群
修改application.yml如下:
eureka:
  client:
    register-with-eureka: true #向eureka server注册自己
    fetch-registry: true #需要去注册中心获取其他服务的地址
    service-url:
      #defaultZone: http://localhost:7001/eureka #单机 指向Eureka服务注册中心
      defaultZone: http://eureka7001.com:7001/eureka,http://eureka7002:7002.com/eureka #集群 执行Eureka服务注册中心
2.3、cloud-consumer-order-80修改集群
修改application.yml如下:
同上
eureka:
  client:
    register-with-eureka: true #向eureka server注册自己
    fetch-registry: true #需要去注册中心获取其他服务的地址
    service-url:
      #defaultZone: http://localhost:7001/eureka #单机 指向Eureka服务注册中心
      defaultZone: http://eureka7001.com:7001/eureka,http://eureka7002:7002.com/eureka #集群 指向eureka服务注册中心
2.4、创建cloud-provider-payment-8002
参考cloud-provider-payment-8001创建cloud-provider-payment-8002
为了区分8001和8002,现修改他们的controller如下
@Slf4j
@RequestMapping("/payment")
@RestController
public class PaymentController {

    @Resource
    private PaymentService paymentService;

    //为了区分调用的哪个8001和8002两个provider
    @Value("${server.port}")
    private String serverPort;


    @PostMapping("/create")
    public CommonResult create(@RequestBody Payment payment) {
        int result = paymentService.create(payment);
        log.info("插入数据的ID:\t" + payment.getId());
        log.info("插入结果:" + result);
        if (result > 0) {
            return new CommonResult(200, "插入数据成功 serverPort:"+serverPort +result);
        } else {
            return new CommonResult(444, "插入数据失败 serverPort"+serverPort, null);
        }
    }

    @GetMapping("/get/{id}")
    public CommonResult getPaymentById(@PathVariable("id") Long id) {
        Payment payment = paymentService.getPaymentById(id);
        log.info("***查询结果O(∩_∩)O哈哈~:" + payment);
        if (payment != null) {
            return new CommonResult(200, "查询数据成功 serverPort:"+serverPort + payment);
        } else {
            return new CommonResult(444, "没有对应记录 serverPort"+serverPort, null);
        }
    }
}
测试:
##分别启动Eureka7001  Eureka7002 provider8001 provider8002 consumer  访问如下:

http://localhost:7001/
http://localhost:7002/
http://localhost/consumer/payment/get/2
结果:
说明:
访问 http://localhost/consumer/payment/get/2时,轮询调用8001和8002的controller
从打印信息中可以看到:
{"code":200,"message":"查询数据成功 serverPort:8002 Payment(id=2, serial=002)","data":null}
{"code":200,"message":"查询数据成功 serverPort:8001 Payment(id=2, serial=002)","data":null}
3、actuator微服务信息完善
POM
<!--这个配置原来已经添加了-->
<!--springboot-->
<dependency>
    <groupId>org.springframework.boot</groupId>
    <artifactId>spring-boot-starter-web</artifactId>
</dependency>

<dependency>
    <groupId>org.springframework.boot</groupId>
    <artifactId>spring-boot-starter-actuator</artifactId>
</dependency>
Application.yml新增
eureka:
	instance:
		instance-id: cloud-provider-payment-8001
		prefer-ip-address: true #是否显示服务IP地址

#其他服务类似
4、Eureka服务发现
eureka服务发现是将注册进eureka的服务 服务名称 地址 端口等暴露出来的服务
以cloud-provider-payment-8001为例:
添加一个DiscoveryController类
package com.lee.springcloud.controller;

import lombok.extern.slf4j.Slf4j;
import org.springframework.cloud.client.ServiceInstance;
import org.springframework.cloud.client.discovery.DiscoveryClient;
import org.springframework.web.bind.annotation.GetMapping;
import org.springframework.web.bind.annotation.RequestMapping;
import org.springframework.web.bind.annotation.RestController;

import javax.annotation.Resource;
import java.util.List;

@Slf4j
@RestController
@RequestMapping("/eureka")
public class DiscoveryController {

    @Resource
    private DiscoveryClient discoveryClient;

    @GetMapping("/discovery")
    public Object discovery(){
        List<String> services = discoveryClient.getServices();
        for(String s: services){
            log.info("==================================");
            log.info("----->service :"+s);
            List<ServiceInstance> instances = discoveryClient.getInstances(s);
            for (ServiceInstance si : instances){
                log.info("   ---->"+si.getServiceId()+"  "+si.getInstanceId()+"  "+si.getHost()+"  "+si.getPort()+"  "+si.getUri());
            }
            log.info("==================================");
        }
        return this.discoveryClient;
    }
}
启动类添加注解
package com.lee.springcloud;

import org.mybatis.spring.annotation.MapperScan;
import org.springframework.boot.SpringApplication;
import org.springframework.boot.autoconfigure.SpringBootApplication;
import org.springframework.cloud.client.discovery.EnableDiscoveryClient;
import org.springframework.cloud.netflix.eureka.EnableEurekaClient;

//服务发现
@EnableDiscoveryClient
//表示自己是Eureka的客户端
@EnableEurekaClient
@SpringBootApplication
@MapperScan("com.lee.springcloud.dao")
public class PaymentMain8001 {

    public static void main(String[] args) {
        SpringApplication.run(PaymentMain8001.class,args);
    }
}
测试:
http://localhost:8001/eureka/discovery
结果:
浏览器打印:
{"services":["cloud-consumer-order","cloud-payment-service"],"order":0}


console打印:
: ==================================
: ----->service :cloud-consumer-order
:    ---->CLOUD-CONSUMER-ORDER  cloud-consumer-order-80  192.168.0.117  80  http://192.168.0.117:80
: ==================================
: ==================================
: ----->service :cloud-payment-service
:    ---->CLOUD-PAYMENT-SERVICE  cloud-provider-payment-service-8002  192.168.0.117  8002  http://192.168.0.117:8002
:    ---->CLOUD-PAYMENT-SERVICE  cloud-provider-payment-service-8001  192.168.0.117  8001  http://192.168.0.117:8001
: ==================================
5、Eureka自我保护
5.1、概述:
保护模式主要用于一组eureka client和eureka server之间存在网络分区场景下的保护。

   一旦进入保护模式:eureka server将会尝试保护其服务注册表中的信息,不再删除服务注册表中的数据,也就是
不会注销任何微服务。

	换一句话说,就是,某时刻一个微服务不可用了,eureka server不会立刻清理,依旧会对该服务信息进行保存。

	属于CAP原理中的AP:A高可用  P分区容错性

1、为什么会产生eureka自我保护机制?
	为防止eureka client本可以正常运行,但是与eureka server网络不通的情况下,eureka server出现立刻将
eureka client服务剔除的情况。

2、什么事自我保护模式?
	默认情况下,如果eureka server在一定时间内没有接收到某个微服务实例的心跳(60s),eureka server将会
注销该实例。
	但是当网络分区故障发生时(延迟、卡顿、拥挤),微服务与eureka server之间无法正常通信,以上行为就可能变得非常危险了。-----因为微服务本身是非常健康的,此时本不应该注销这个服务。
	eureka通过"自我保护模式"解决这个问题:当eureka server在短时间内丢失过多客户端时(可能发生了网络分区故
障),那么eureka server节点就会进入自我保护模式。

	宁可保留错误的服务注册信息,也不盲目注销任何可能健康的服务实例。使用自我保护模式使得eureka 集群更加健壮
、稳定。
5.2、相关配置
###################Eureka Server#############################
#默认为true,开启eureka自我保护机制
eureka.server.enable-self-preservation=true
# 扫描失效服务的间隔时间(单位毫秒,默认是60*1000)即60秒
eureka.server.eviction-interval-timer-in-ms=5000
#设置 eureka server同步失败的等待时间 默认 5分
#在这期间,它不向客户端提供服务注册信息
eureka.server.wait-time-in-ms-when-sync-empty=5
#设置 eureka server同步失败的重试次数 默认为 5 次
eureka.server.number-of-replication-retries=5
#自我保护系数(默认0.85)
eureka.server.renewal-percent-threshold=0.49

##################Eureka client###############################
#Eureka客户端向服务端发送心跳的时间间隔,单位为秒(默认是30秒)
eureka.instance.lease-renewal-interval-in-seconds=30
#Eureka服务端在收到最后一次心跳后等待时间上限 ,单位为秒(默认是90秒),超时剔除服务
eureka.instance.lease-expiration-duration-in-seconds=90
三、Zookeeper
Zookeeper是一个分布式协调工具,可以替代Eureka实现注册中心功能。
因为有些公司的项目是从dubbo转变springcloud的,所以zookeeper也成为了一种注册中心的选择。
这里只说zookeeper的单机版配置。
1、Zookeeper简单安装
##下载
1>、wget https://mirrors.tuna.tsinghua.edu.cn/apache/zookeeper/zookeeper-3.4.9/zookeeper-3.4.14.tar.gz

##解压
2>、tar -zxvf zookeeper-3.4.9.tar.gz

##重命名
3>、mv zookeeper-3.4.9 zookeeper

##移动
4>、mv zookeeper /opt/

5>、修改配置文件

cd /opt/zookeeper/conf
cp zoo_sample.cfg zoo.cfg
vi zoo.cfg

# The number of milliseconds of each tick
tickTime=2000
# The number of ticks that the initial
# synchronization phase can take
initLimit=10
# The number of ticks that can pass between
# sending a request and getting an acknowledgement
syncLimit=5
# the directory where the snapshot is stored.
# do not use /tmp for storage, /tmp here is just
# example sakes.
dataDir=/opt/zookeeper/data/data
# the port at which the clients will connect
clientPort=2181
dataLogDir=/opt/zookeeper/data/log
server.1=localhost:2888:3888

6>、启动
./zkServer.sh start

7、关闭
./zkServer.sh stop

8、其他
如放开2181阿里ESC的防火墙配置等不再详说
2、创建cloud-provider-payment-8004
new maven module
moduleName   cloud-provider-payment-8004
parentProject  cloud_2020
groupId      com.lee.springcloud
artifactId    cloud_2020
packaging     jar
创建完成后 父工程POM文件会多了个标签
错误的POM演示
<?xml version="1.0" encoding="UTF-8"?>
<project xmlns="http://maven.apache.org/POM/4.0.0"
         xmlns:xsi="http://www.w3.org/2001/XMLSchema-instance"
         xsi:schemaLocation="http://maven.apache.org/POM/4.0.0 http://maven.apache.org/xsd/maven-4.0.0.xsd">
    <parent>
        <artifactId>cloud_2020</artifactId>
        <groupId>com.lee.springcloud</groupId>
        <version>1.0-SNAPSHOT</version>
    </parent>
    <modelVersion>4.0.0</modelVersion>
    <packaging>jar</packaging>
    <artifactId>cloud-provider-payment-8004</artifactId>

    <dependencies>

        <dependency>
            <groupId>com.lee.springcloud</groupId>
            <artifactId>cloud-api-commons</artifactId>
            <version>${project.version}</version>
        </dependency>


        <!--SpringBoot整合Zookeeper客户端 其实这里zk会产生jar包冲突-->
        <dependency>
            <groupId>org.springframework.cloud</groupId>
            <artifactId>spring-cloud-starter-zookeeper-discovery</artifactId>
        </dependency>

        <dependency>
            <groupId>org.springframework.boot</groupId>
            <artifactId>spring-boot-starter-web</artifactId>
        </dependency>
        <dependency>
            <groupId>org.springframework.boot</groupId>
            <artifactId>spring-boot-starter-actuator</artifactId>
        </dependency>


        <dependency>
            <groupId>org.springframework.boot</groupId>
            <artifactId>spring-boot-devtools</artifactId>
            <scope>runtime</scope>
            <optional>true</optional>
        </dependency>
        <dependency>
            <groupId>org.projectlombok</groupId>
            <artifactId>lombok</artifactId>
            <optional>true</optional>
        </dependency>
        <dependency>
            <groupId>org.springframework.boot</groupId>
            <artifactId>spring-boot-starter-test</artifactId>
            <scope>test</scope>
        </dependency>
    </dependencies>


</project>
application.yml
server:
  port: 8004

spring:
  application:
    name: cloud-provider-payment # 服务别名---注册zookeeper到注册中心的名称
  cloud:
    zookeeper:
      connect-string: zk服务器的IP:2181
主启动类
package com.lee.springcloud;

import org.springframework.boot.SpringApplication;
import org.springframework.boot.autoconfigure.SpringBootApplication;
import org.springframework.cloud.client.discovery.EnableDiscoveryClient;

/**
 * 该注解用于向使用consul或者zookeeper作为注册中心时注册服务
 * 同时也可以用于对外服务暴露-服务发现
 */
@EnableDiscoveryClient
@SpringBootApplication
public class PaymentZkMain8004 {

    public static void main(String[] args) {
        SpringApplication.run(PaymentZkMain8004.class,args);
    }
}
Controller
package com.lee.springcloud.controller;

import lombok.extern.slf4j.Slf4j;
import org.springframework.beans.factory.annotation.Value;
import org.springframework.web.bind.annotation.RequestMapping;
import org.springframework.web.bind.annotation.RestController;

import java.util.UUID;

/**
 * 这里不再像cloud-provider-payment-8001和8002一样写service等方法了
 * 直接写一个controller方法
 */
@Slf4j
@RestController
public class PaymentController {

    @Value("${server.port}")
    private String serverPort;

    @RequestMapping(value = "payment/zk")
    public String paymentZk() {
        log.info("SpringCloud with zookeeper:----->"+serverPort);
        return "SpringCloud with zookeeper:" + serverPort + "\t" + UUID.randomUUID().toString();
    }

}
测试
启动ZK
启动cloud-provider-payment-8004
报jar包冲突
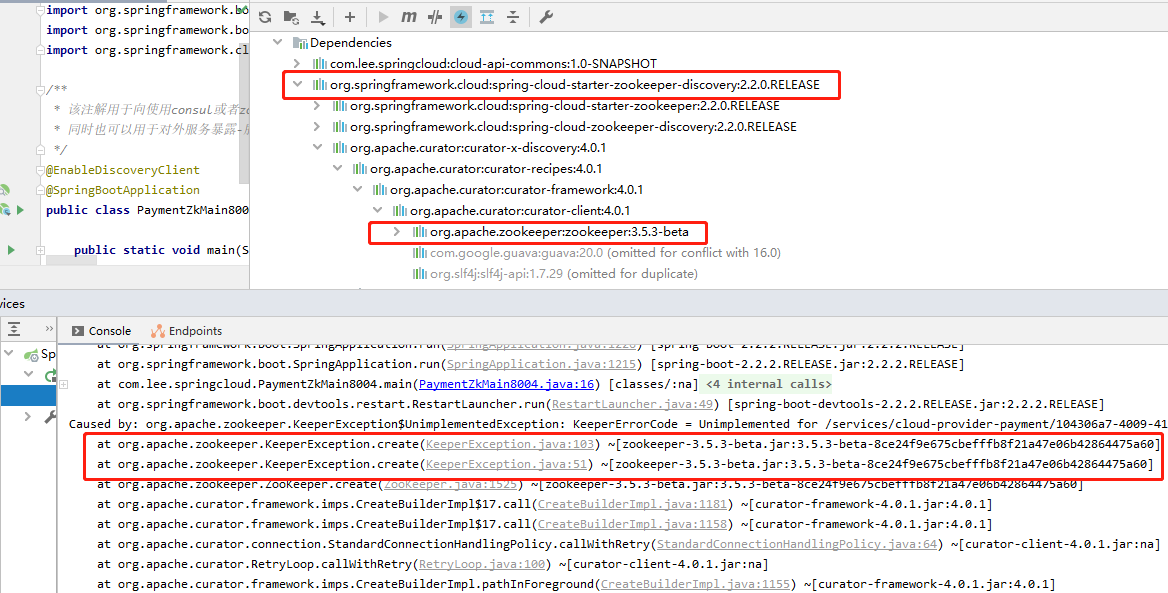
解决方案:修改POM
<!--SpringBoot整合Zookeeper客户端-->
<dependency>
    <groupId>org.springframework.cloud</groupId>
    <artifactId>spring-cloud-starter-zookeeper-discovery</artifactId>
    <exclusions>
        <!--先排除自带的zookeeper3.5.3-->
        <exclusion>
            <groupId>org.apache.zookeeper</groupId>
            <artifactId>zookeeper</artifactId>
        </exclusion>
    </exclusions>
</dependency>

<!--添加zookeeper 3.4.9版本,同zk服务器版本一致-->
<dependency>
    <groupId>org.apache.zookeeper</groupId>
    <artifactId>zookeeper</artifactId>
    <version>3.4.9</version>
    <type>pom</type>
</dependency>
结果:

{
  "name": "cloud-provider-payment",
  "id": "64c897d0-85ef-42ab-854d-424adae6ebc9",
  "address": "DESKTOP-3H86HI9",
  "port": 8004,
  "sslPort": null,
  "payload": {
    "@class": "org.springframework.cloud.zookeeper.discovery.ZookeeperInstance",
    "id": "application-1",
    "name": "cloud-provider-payment",
    "metadata": {}
  },
  "registrationTimeUTC": 1585305270235,
  "serviceType": "DYNAMIC",
  "uriSpec": {
    "parts": [
      {
        "value": "scheme",
        "variable": true
      },
      {
        "value": "://",
        "variable": false
      },
      {
        "value": "address",
        "variable": true
      },
      {
        "value": ":",
        "variable": false
      },
      {
        "value": "port",
        "variable": true
      }
    ]
  }
}
3、创建cloud-consumer-order-81
new maven module
moduleName   cloud-consumer-order-81
parentProject  cloud_2020
groupId      com.lee.springcloud
artifactId    cloud_2020
packaging     jar
创建完成后 父工程POM文件会多了个标签
POM
<?xml version="1.0" encoding="UTF-8"?>
<project xmlns="http://maven.apache.org/POM/4.0.0"
         xmlns:xsi="http://www.w3.org/2001/XMLSchema-instance"
         xsi:schemaLocation="http://maven.apache.org/POM/4.0.0 http://maven.apache.org/xsd/maven-4.0.0.xsd">
    <parent>
        <artifactId>cloud_2020</artifactId>
        <groupId>com.lee.springcloud</groupId>
        <version>1.0-SNAPSHOT</version>
    </parent>
    <modelVersion>4.0.0</modelVersion>

    <artifactId>cloud-consumer-order-81</artifactId>

    <dependencies>
        <dependency>
            <groupId>com.lee.springcloud</groupId>
            <artifactId>cloud-api-common</artifactId>
            <version>${project.version}</version>
        </dependency>
        <dependency>
            <groupId>org.springframework.boot</groupId>
            <artifactId>spring-boot-starter-web</artifactId>
        </dependency>
        <!--SpringBoot整合Zookeeper客户端-->
        <dependency>
            <groupId>org.springframework.cloud</groupId>
            <artifactId>spring-cloud-starter-zookeeper-discovery</artifactId>
            <exclusions>
                <!--先排除自带的zookeeper3.5.3-->
                <exclusion>
                    <groupId>org.apache.zookeeper</groupId>
                    <artifactId>zookeeper</artifactId>
                </exclusion>
            </exclusions>
        </dependency>
        <!--添加zookeeper3.4.9版本-->
        <dependency>
            <groupId>org.apache.zookeeper</groupId>
            <artifactId>zookeeper</artifactId>
            <version>3.4.9</version>
        </dependency>
        <dependency>
            <groupId>org.springframework.boot</groupId>
            <artifactId>spring-boot-starter-actuator</artifactId>
        </dependency>
        <dependency>
            <groupId>org.springframework.boot</groupId>
            <artifactId>spring-boot-devtools</artifactId>
            <scope>runtime</scope>
            <optional>true</optional>
        </dependency>
        <dependency>
            <groupId>org.projectlombok</groupId>
            <artifactId>lombok</artifactId>
            <optional>true</optional>
        </dependency>
        <dependency>
            <groupId>org.springframework.boot</groupId>
            <artifactId>spring-boot-starter-test</artifactId>
            <scope>test</scope>
        </dependency>
    </dependencies>

</project>
application.yml
server:
  port: 81
spring:
  application:
    # 服务别名
    name: cloud-consumer-order
  cloud:
    zookeeper:
      # 注册到zookeeper地址
      connect-string: zk服务器IP:2181
主启动类
package com.lee.springcloud;

import org.springframework.boot.SpringApplication;
import org.springframework.boot.autoconfigure.SpringBootApplication;
import org.springframework.cloud.client.discovery.EnableDiscoveryClient;

/**
 * 该注解用于向使用consul或者zookeeper作为注册中心时注册服务
 * 同时也可以用于对外服务暴露-服务发现
 */
@EnableDiscoveryClient
@SpringBootApplication
public class ConsumerZkMain81 {

    public static void main(String[] args) {
        SpringApplication.run(ConsumerZkMain81.class,args);
    }
}
config
package com.lee.springcloud.config;

import org.springframework.cloud.client.loadbalancer.LoadBalanced;
import org.springframework.context.annotation.Bean;
import org.springframework.context.annotation.Configuration;
import org.springframework.web.client.RestTemplate;

@Configuration
public class ApplicationContextConfig {

    @Bean
    @LoadBalanced
    public RestTemplate getRestTemplate() {
        return new RestTemplate();
    }

}
controller
package com.lee.springcloud.controller;

import lombok.extern.slf4j.Slf4j;
import org.springframework.web.bind.annotation.GetMapping;
import org.springframework.web.bind.annotation.RestController;
import org.springframework.web.client.RestTemplate;

import javax.annotation.Resource;

@Slf4j
@RestController
public class OrderController {

    public static final String INVOKE_URL = "http://cloud-provider-payment";

    @Resource
    private RestTemplate restTemplate;

    @GetMapping("/consumer/payment/zk")
    public String paymentInfo() {
        return restTemplate.getForObject(INVOKE_URL + "/payment/zk", String.class);
    }


}
测试
启动zk、cloud-provider-payment-8004、cloud-consumer-order-81
浏览:
http://localhost:81/consumer/payment/zk
结果:
SpringCloud with zookeeper:8004 05acbb42-6e89-4803-bc99-6f8117bc1ecc
知识点:
各微服务注册进zookeeper中的节点是:临时节点。
四、Consul
1、Consul概述
consul是一套开源的分布式服务发现和配置管理系统。
consul提供了微服务系统中的服务治理、配置中心、控制总线等功能。这些功能中的每一个都可以根据需要单独使用,也可以一起使用构建全方位的服务网络。
官网:https://www.consul.io/intro/index.html
下载地址:https://www.consul.io/downloads.html
如何跟springcloud一起使用:https://www.springcloud.cc/spring-cloud-consul.html
2、安装并运行consul
由于国内主流都使用springcloud alibaba的Nacos作为注册中心,所以这里就简单的拿windows版做下运用。
下载完成后,只有一个consul.exe

执行consul agent -dev,以开发者模式运行。

访问http://localhost:8500

3、创建cloud-provider-payment-8006
new maven module
moduleName   cloud-provider-payment-8006
parentProject  cloud_2020
groupId      com.lee.springcloud
artifactId    cloud_2020
packaging     jar
创建完成后 父工程POM文件会多了个标签
POM
<?xml version="1.0" encoding="UTF-8"?>
<project xmlns="http://maven.apache.org/POM/4.0.0"
         xmlns:xsi="http://www.w3.org/2001/XMLSchema-instance"
         xsi:schemaLocation="http://maven.apache.org/POM/4.0.0 http://maven.apache.org/xsd/maven-4.0.0.xsd">
    <parent>
        <artifactId>cloud_2020</artifactId>
        <groupId>com.lee.springcloud</groupId>
        <version>1.0-SNAPSHOT</version>
    </parent>
    <modelVersion>4.0.0</modelVersion>

    <artifactId>cloud-provider-payment-8006</artifactId>

    <dependencies>
        <!--SpringCloud consul-server-->
        <dependency>
            <groupId>org.springframework.cloud</groupId>
            <artifactId>spring-cloud-starter-consul-discovery</artifactId>
        </dependency>


        <dependency>
            <groupId>com.lee.springcloud</groupId>
            <artifactId>cloud-api-common</artifactId>
            <version>${project.version}</version>
        </dependency>
        <dependency>
            <groupId>org.springframework.boot</groupId>
            <artifactId>spring-boot-starter-web</artifactId>
        </dependency>
        <dependency>
            <groupId>org.springframework.boot</groupId>
            <artifactId>spring-boot-starter-actuator</artifactId>
        </dependency>
        <dependency>
            <groupId>org.springframework.boot</groupId>
            <artifactId>spring-boot-devtools</artifactId>
            <scope>runtime</scope>
            <optional>true</optional>
        </dependency>
        <dependency>
            <groupId>org.projectlombok</groupId>
            <artifactId>lombok</artifactId>
            <optional>true</optional>
        </dependency>
        <dependency>
            <groupId>org.springframework.boot</groupId>
            <artifactId>spring-boot-starter-test</artifactId>
            <scope>test</scope>
        </dependency>
    </dependencies>

</project>
application.yml
server:
  port: 8006
spring:
  application:
    name: cloud-provider-payment
  cloud:
    consul:
      host: 127.0.0.1 # consul注册中心地址
      port: 8500
      discovery:
        hostname: 127.0.0.1
        service-name: ${spring.application.name}
主启动类
package com.lee.springcloud;

import org.springframework.boot.SpringApplication;
import org.springframework.boot.autoconfigure.SpringBootApplication;
import org.springframework.cloud.client.discovery.EnableDiscoveryClient;

/**
 * 该注解用于向使用consul或者zookeeper作为注册中心时注册服务
 * 同时也可以用于对外服务暴露-服务发现
 */
@EnableDiscoveryClient
@SpringBootApplication
public class PaymentConsulMain8006 {

    public static void main(String[] args) {
        SpringApplication.run(PaymentConsulMain8006.class,args);
    }
}
Controller
package com.lee.springcloud.controller;

import org.springframework.beans.factory.annotation.Value;
import org.springframework.web.bind.annotation.RequestMapping;
import org.springframework.web.bind.annotation.RestController;

import java.util.UUID;

/**
 * 这里不再像cloud-provider-payment-8001和8002一样写service等方法了
 * 直接写一个controller方法
 */
@RestController
public class PaymentController {

    @Value("${server.port}")
    private String serverPort;

    @RequestMapping(value = "payment/consul")
    public String paymentZk() {
        return "SpringCloud with consul:" + serverPort + "\t" + UUID.randomUUID().toString();
    }

}
测试:
启动consul:

访问:http://localhost:8500/  查看节点情况
4、创建cloud-consumer-order-82
new maven module
moduleName   cloud-consumer-order-82
parentProject  cloud_2020
groupId      com.lee.springcloud
artifactId    cloud_2020
packaging     jar
创建完成后 父工程POM文件会多了个标签
POM
<?xml version="1.0" encoding="UTF-8"?>
<project xmlns="http://maven.apache.org/POM/4.0.0"
         xmlns:xsi="http://www.w3.org/2001/XMLSchema-instance"
         xsi:schemaLocation="http://maven.apache.org/POM/4.0.0 http://maven.apache.org/xsd/maven-4.0.0.xsd">
    <parent>
        <artifactId>cloud_2020</artifactId>
        <groupId>com.lee.springcloud</groupId>
        <version>1.0-SNAPSHOT</version>
    </parent>
    <modelVersion>4.0.0</modelVersion>

    <artifactId>cloud-consumer-order-82</artifactId>

    <dependencies>
        <!--SpringCloud consul-server-->
        <dependency>
            <groupId>org.springframework.cloud</groupId>
            <artifactId>spring-cloud-starter-consul-discovery</artifactId>
        </dependency>


        <dependency>
            <groupId>com.lee.springcloud</groupId>
            <artifactId>cloud-api-common</artifactId>
            <version>${project.version}</version>
        </dependency>
        <dependency>
            <groupId>org.springframework.boot</groupId>
            <artifactId>spring-boot-starter-web</artifactId>
        </dependency>
        <!--监控-->
        <dependency>
            <groupId>org.springframework.boot</groupId>
            <artifactId>spring-boot-starter-actuator</artifactId>
        </dependency>
        <!--热部署-->
        <dependency>
            <groupId>org.springframework.boot</groupId>
            <artifactId>spring-boot-devtools</artifactId>
            <scope>runtime</scope>
            <optional>true</optional>
        </dependency>
        <dependency>
            <groupId>org.projectlombok</groupId>
            <artifactId>lombok</artifactId>
            <optional>true</optional>
        </dependency>
        <dependency>
            <groupId>org.springframework.boot</groupId>
            <artifactId>spring-boot-starter-test</artifactId>
            <scope>test</scope>
        </dependency>
    </dependencies>

</project>
Application.yml
server:
  port: 82
spring:
  application:
    name: cloud-consumer-order
  cloud:
    consul:
      host: 127.0.0.1 # consul注册中心地址
      port: 8500
      discovery:
        hostname: 127.0.0.1
        service-name: ${spring.application.name}
主启动类
package com.lee.springcloud;

import org.springframework.boot.SpringApplication;
import org.springframework.boot.autoconfigure.SpringBootApplication;
import org.springframework.cloud.client.discovery.EnableDiscoveryClient;

/**
 * 该注解用于向使用consul或者zookeeper作为注册中心时注册服务
 * 同时也可以用于对外服务暴露-服务发现
 */
@EnableDiscoveryClient
@SpringBootApplication
public class ConsumerConsulMain82 {

    public static void main(String[] args) {
        SpringApplication.run(ConsumerConsulMain82.class,args);
    }
}
config
package com.lee.springcloud.config;

import org.springframework.cloud.client.loadbalancer.LoadBalanced;
import org.springframework.context.annotation.Bean;
import org.springframework.context.annotation.Configuration;
import org.springframework.web.client.RestTemplate;

@Configuration
public class ApplicationContextConfig {

    @Bean
    @LoadBalanced
    public RestTemplate getRestTemplate() {
        return new RestTemplate();
    }

}
Controller
package com.lee.springcloud.controller;

import lombok.extern.slf4j.Slf4j;
import org.springframework.web.bind.annotation.GetMapping;
import org.springframework.web.bind.annotation.RestController;
import org.springframework.web.client.RestTemplate;

import javax.annotation.Resource;

@Slf4j
@RestController
public class OrderController {

    public static final String INVOKE_URL = "http://cloud-provider-payment";

    @Resource
    private RestTemplate restTemplate;

    @GetMapping("/consumer/payment/consul")
    public String paymentInfo() {
        return restTemplate.getForObject(INVOKE_URL + "/payment/consul", String.class);
    }


}
测试:
启动consul、cloud-provider-payment-8006、cloud-consumer-order-82

访问:http://localhost:82/consumer/payment/consul
五、三个注册中心对比
1、先复习下CAP原则
CAP原则又称CAP定理,指的是在一个分布式系统中中, Consistency(一致性)、 Availability(可用性)、Partition tolerance(分区容错性),三者不可得兼。 CAP原则的精髓就是要么AP,要么CP,要么AC,但是不存在CAP。
| C | Consistency | 一致性 |
|---|---|---|
| A | Availability | 可用性 |
| P | Partition tolerance | 分区容错性 |
2、三者区别
| 组件名 | 语言 | CAP | SpringCloud集成 |
|---|---|---|---|
| Eureka | Java | AP | 已集成 |
| Zookeeper | Java | CP | 已集成 |
| Consul | Go | CP | 已集成 |
AP即是:如果两个服务器没有完成数据同步,仍然能够对外提供服务。
CP是:如果两个服务器没有完成数据同步,则不再进行对外提供服务,知道数据同步完成。
===============================================================
SpringCloud Alibaba Nacos作为服务注册中心的部分,将在后面的文章中写
来源:oschina
链接:https://my.oschina.net/ngc7293/blog/3212710
