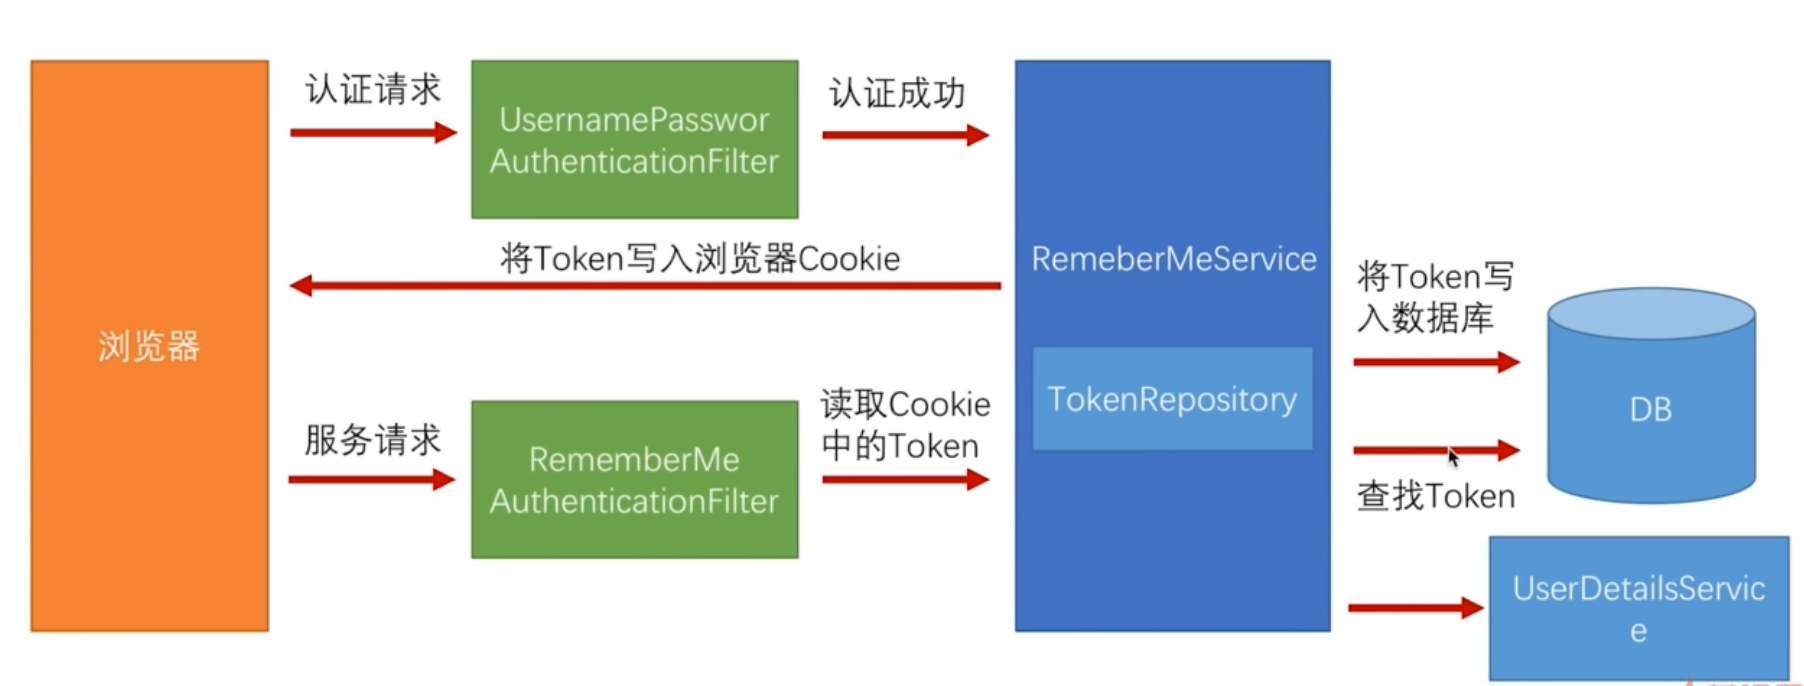
简介
登录页面添加记住我功能,下次无需再填账号密码直接登录。
记住我功能基础原理

在security中认证过滤链中的
org.springframework.security.web.authentication.rememberme.RememberMeAuthenticationFilter过滤器来实现的 ,当没有其他的认证过滤器处理的时候,记住我这个过滤器就尝试工作。
实现记住我的功能
给登录页面增加记住我选项
<!DOCTYPE html>
<html lang="en">
<head>
    <meta charset="UTF-8">
    <title>标准登录页面</title>
</head>
<body>
<h2>标准登录页面</h2>
<h3>表单登录</h3>
<form action="/authentication/form" method="post">
    <table>
        <tr>
            <td>用户名:</td>
            <td><input type="text" name="username"></td>
        </tr>
        <tr>
            <td>密码:</td>
            <td><input type="password" name="password"></td>
        </tr>
        <tr>
            <td>验证码:</td>
            <td><input type="text" name="imageCode" placeholder="验证码"/>
                <img src="/code/image"/></td>
        </tr>
        <tr>
            <td>
            </td>
            <td>
                <!--名称是固定的-->
                <input type="checkbox" value="true" name="remember-me">记住我
            </td>
        </tr>
        <tr>
            <td colspan="2">
                <button type="submit">登录</button>
            </td>
        </tr>
    </table>
</form>
</body>
</html>
nam的名称是以下类中被定义
org.springframework.security.config.annotation.web.configurers.RememberMeConfigurer

private static final String DEFAULT_REMEMBER_ME_NAME = "remember-me";
改造配置BrowserSecurityConfig类
package com.spring.security;

import com.spring.security.authentication.HkAuthenticationFailureHandler;
import com.spring.security.authentication.HkAuthenticationSuccessHandler;
import com.spring.security.properties.SecurityProperties;
import com.spring.security.validate.code.ValidateCodeFilter;
import org.springframework.beans.factory.annotation.Autowired;
import org.springframework.context.annotation.Bean;
import org.springframework.context.annotation.Configuration;
import org.springframework.security.config.annotation.web.builders.HttpSecurity;
import org.springframework.security.config.annotation.web.configuration.WebSecurityConfigurerAdapter;
import org.springframework.security.core.userdetails.UserDetailsService;
import org.springframework.security.crypto.bcrypt.BCryptPasswordEncoder;
import org.springframework.security.crypto.password.PasswordEncoder;
import org.springframework.security.web.authentication.UsernamePasswordAuthenticationFilter;
import org.springframework.security.web.authentication.rememberme.JdbcTokenRepositoryImpl;
import org.springframework.security.web.authentication.rememberme.PersistentTokenRepository;

import javax.sql.DataSource;

@Configuration
public class BrowserSecurityConfig extends WebSecurityConfigurerAdapter {

    @Autowired
    private SecurityProperties securityProperties;

    @Autowired
    private HkAuthenticationSuccessHandler hkAuthenticationSuccessHandler;

    @Autowired
    private HkAuthenticationFailureHandler hkAuthenticationFailureHandler;

    @Autowired
    private ValidateCodeFilter validateCodeFilter;

    // 数据源是需要在使用处配置数据源的信息
    @Autowired
    private DataSource dataSource;

    // 之前已经写好的 MyUserDetailsService
    @Autowired
    private UserDetailsService userDetailsService;

    @Bean
    public PasswordEncoder passwordEncoder() {
        return new BCryptPasswordEncoder();
    }

    @Bean
    public PersistentTokenRepository persistentTokenRepository() {
        // org.springframework.security.config.annotation.web.configurers.RememberMeConfigurer.tokenRepository
        JdbcTokenRepositoryImpl jdbcTokenRepository = new JdbcTokenRepositoryImpl();
        jdbcTokenRepository.setDataSource(dataSource);
        // 该对象里面有定义创建表的语句
        //create table persistent_logins (username varchar(64) not null, series varchar(64) primary key, token varchar(64) not null, last_used timestamp not null)
        // 可以设置让该类来创建表
        // 但是该功能只用使用一次,如果数据库已经存在表则会报错
        //jdbcTokenRepository.setCreateTableOnStartup(true);
        //两种方法二选一
        return jdbcTokenRepository;
    }

    @Override
    protected void configure(HttpSecurity http) throws Exception {
        //配置
        http.addFilterBefore(validateCodeFilter, UsernamePasswordAuthenticationFilter.class) // 添加验证码校验过滤器
                .formLogin()
                .loginPage("/authentication/require")//登录页面路径
                // 处理登录请求路径
                .loginProcessingUrl("/authentication/form")
                .successHandler(hkAuthenticationSuccessHandler) // 处理登录成功
                .failureHandler(hkAuthenticationFailureHandler) // 处理登录失败
                .and()
                // 从这里开始配置记住我的功能
                .rememberMe()
                .tokenRepository(persistentTokenRepository())
                // 新增过期配置,单位秒
                .tokenValiditySeconds(securityProperties.getBrowser().getRememberMeSeconds())
                // userDetailsService 是必须的。不然就报错
                .userDetailsService(userDetailsService)
                .and()
                .authorizeRequests() // 授权配置
                //不需要认证的路径
                .antMatchers("/authentication/require","/signIn.html","/code/image",securityProperties.getBrowser().getLoginPage(),"/failure").permitAll()
                .anyRequest() // 所有请求
                .authenticated() // 都需要认证
                .and().csrf().disable();
    }
}
记住我过期时间放到系统配置,怎么配置就不讲了。
从数据库获取到记住我的token后,验证成功,则通过userDetailsService获取用户信息,然后在框架中写入认证信息,完成登录。
测试
启动项目访问:http://127.0.0.1:8080/index.html
登录勾选记住我:

查看数据库

重启服务直接访问http://127.0.0.1:8080/hello 也不需要重新登录。
来源:oschina
链接:https://my.oschina.net/u/1046143/blog/3186490