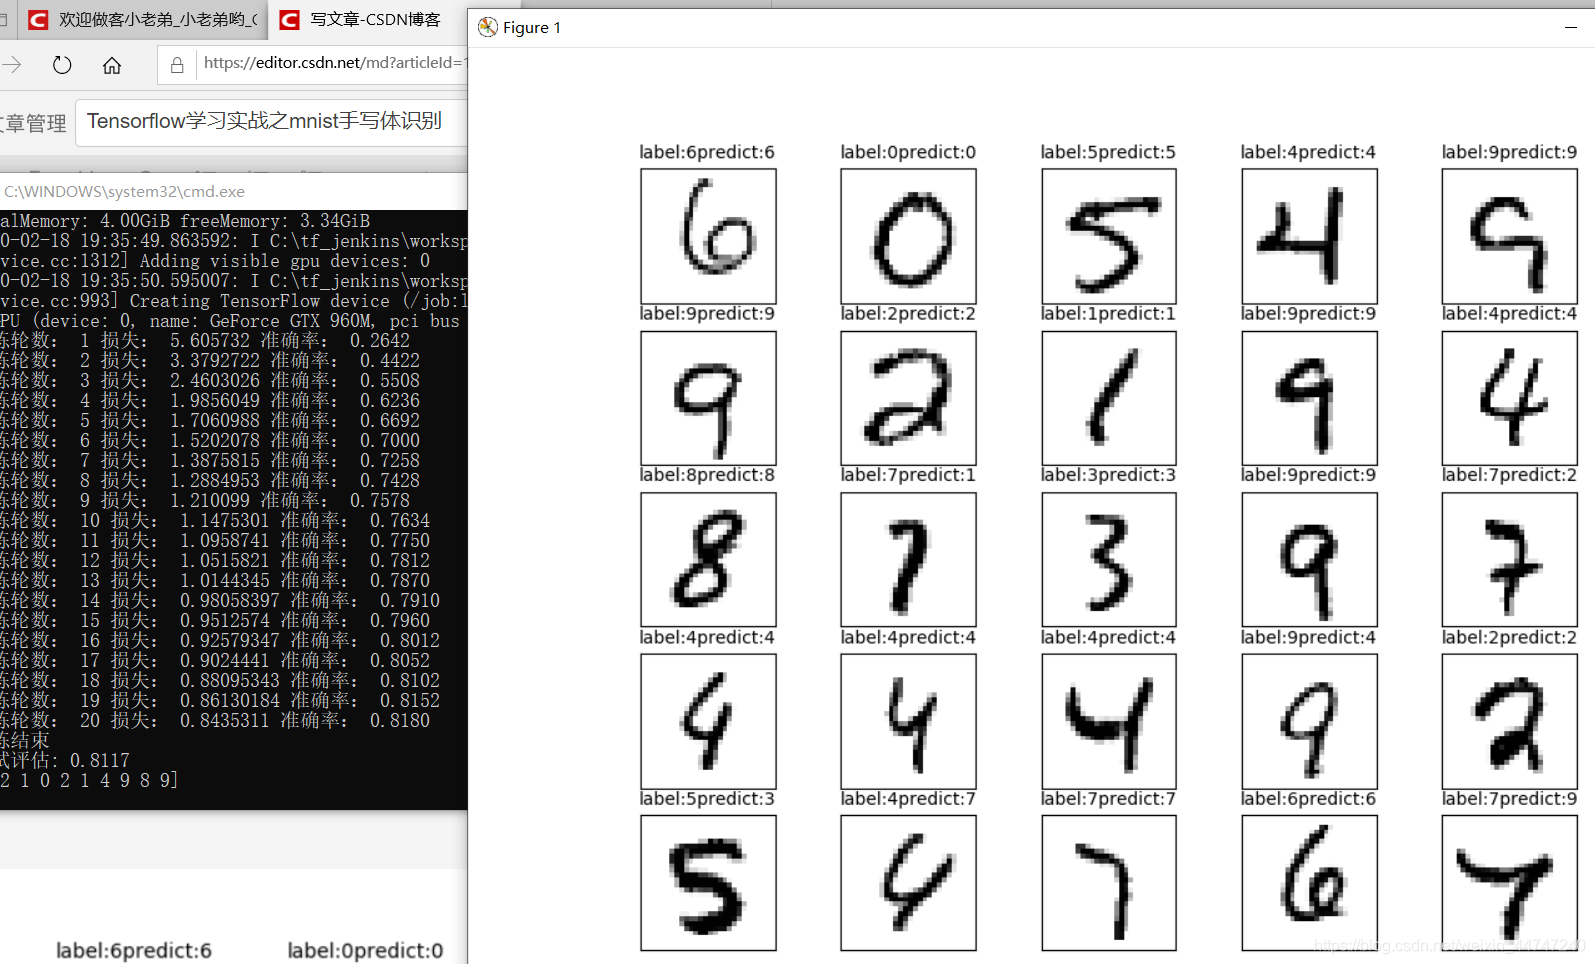
Tensorflow继续学习,今天是入门级的mnist手写体识别,改变前两次的线性回归,这次是逻辑回归,这样随之改变的是损失函数等
Tensorflow里面有一个examples的MNIST的手写,直接运行会自动下载。
训练了20次,效果还不错,慢慢的理解,把以前不懂得好多东西,学习中慢慢得到补充
收获:
reshape,行优先,逐行排列,相当于把一整行数字排列后按reshape得行列填充进去,我的理解相当于图像里得resize
one hot独热编码,一个为1,其余所有为0,适用于分类任务,是一种稀疏向量,扩展到欧氏空间更适用于分类任务,使用one-hot得优势很明显,1-3和8-3,更相似于3,如果不使用one-hot而直接使用1-9编码,1-3更加相似,不符合
通过argmax可以把独热编码中得最大值取出来,即把标签得出
训练-》验证,验证通过后,到最后用测试集进行测试
Sigmod函数更适应于逻辑回归
Softmax函数可以延伸至多分类,但多分类相加为1
损失函数使用的是交叉熵,相当于两个概率分布之间的距离
先上图结果图:
数据准备
import tensorflow as tf
import matplotlib.pyplot as plt
import numpy as np
import tensorflow.examples.tutorials.mnist.input_data as input_data
#tensorflow自带minist_examples,运行后目录下若无,会自动下载,独热编码
mnist=input_data.read_data_sets("minist_data/",one_hot=True)
#输出训练集等数量
print('训练集',mnist.train.num_examples,'验证集:',mnist.validation.num_examples,'测试集:',mnist.test.num_examples)
#labels 10分类,one_hot编码
print('train_image_shape:',mnist.train.images.shape,'labels_image_shape:',mnist.train.labels.shape)
构建模型
#占位符
x=tf.placeholder(tf.float32,[None,784],name='x')
y=tf.placeholder(tf.float32,[None,10],name='y')
#定义变量,w=784*10,10类
w=tf.Variable(tf.random_normal([784,10]),name='w')
b=tf.Variable(tf.zeros([10]),name='b')
#一个神经元,前向计算,得到y进行分类
forward =tf.matmul(x,w)+b
#softmax进行多分类
pred=tf.nn.softmax(forward)
#参数
train_epochs=20
learning_rate=0.01
batch_size=100#小批次训练
total_batch=int(mnist.train.num_examples/batch_size)#一轮训练的批次
display_step=1#显示粒度
#定义损失函数 交叉熵
loss_function=tf.reduce_mean(-tf.reduce_sum(y*tf.log(pred),
                                            reduction_indices=1))
#定义优化器
optimizer=tf.train.GradientDescentOptimizer(learning_rate).minimize(loss_function)
#定义准确率,判断是否相等
correct_prediction=tf.equal(tf.argmax(pred,1),tf.argmax(y,1))
#bool值转换成浮点数
accuracy=tf.reduce_mean(tf.cast(correct_prediction,tf.float32))
训练模型
#初始化
sess=tf.Session()
init=tf.global_variables_initializer()
sess.run(init)
#进入训练
for epoch in range (train_epochs):
    #小批量训练
    for batch in range(total_batch):
        #分割数据
        xs,ys =mnist.train.next_batch(batch_size)
        sess.run(optimizer,feed_dict={x:xs,y:ys})
    #每批次训练完进行验证集的验证
    loss,acc=sess.run([loss_function,accuracy],feed_dict={x:mnist.validation.images,y:mnist.validation.labels})
    if(epoch+1)% display_step ==0:
        print("训练轮数:",epoch+1,"损失:",loss,"准确率:","{:.4f}".format(acc))
print("训练结束")
评估结果
#评估
acc_test= sess.run(accuracy,feed_dict={x:mnist.test.images,y:mnist.test.labels})
print("测试评估:",acc_test)
predict_result=sess.run(tf.argmax(pred,1),feed_dict={x:mnist.test.images})
print(predict_result[0:10])
可视化显示
#显示结果
def plot_images(images,#图像
                labels,#标签
                prediction,#准确率
                index,#起始位置
                num=10):
    #获取图表
    fig=plt.gcf()
    #设置图表大小
    fig.set_size_inches(10,12)
    #设置最多显示
    if num>25:
        num=25
    for i in range(0,num):
        ax=plt.subplot(5,5,i+1)
        ax.imshow(np.reshape(images[index],(28,28)),cmap='binary')
        title="label:"+str(np.argmax(labels[index]))
        if len(prediction)>0:
            title+="predict:"+str(prediction[index])
        ax.set_title(title,fontsize=10)
        ax.set_xticks([])
        ax.set_yticks([])
        index+=1
    plt.show()
plot_images(mnist.test.images,
            mnist.test.labels,
            predict_result,100,25)
来源:CSDN
作者:小老弟哟
链接:https://blog.csdn.net/weixin_44747240/article/details/104380949