css3新特性:
1.css3重要模块:
1.1选择器
1.2盒模型
1.3背景和边框
1.4文字特效
1.5 2D/3D转换
1.6动画
1.7多列布局
1.8用户界面
css3可继承的属性:
字体:font,font-size,font-weight,font-family,font-style,font-variant,
颜色:color。
列表:list-style,list-style-type,list-style-position,list-style-image.
文字:letter-spacing,word-spacing,white-space,line-height,text-decoration,text-transform,text-indent,text-align。
所有元素可继承:visibility和cursor。
2.css3边框
2.1 border-radius//圆角
<div>border-radius</div>

div{
    border:2px solid #a1a1a1;
    padding:10px 40px;
    background:#dddddd;
    width:30px;
    border-radius:25px;
    -webkit-border-radius:25px;
    -ms-border-radius:25px;
    -o-border-radius:25px;
    -moz-border-radius:25px;
}
2.2 box-shadow //阴影盒
<div></div>
div{
    width:300px;
    height:200px;
    background:yellow;
    box-shadow:10px(h-shadow) 10px(v-shadow) 5px(blur) 10px(spread)  #888;    //四边    box-shadow: -2px 0 5px green,0 -2px 5px blue,0 2px 5px red,2px 0 5px yellow;
}

box-shadow:h-shadow(必须,水平阴影的位置,默认right,负值为left),v-shadow(必须,垂直阴影的位置,默认bottom,负值为top。),blur(可选,模糊的距离),spread(可选,阴影的大小比如10px(扩大10px),允许负值),color(可选。阴影的颜色),inset(可选,从外层的阴影(开始时)改变阴影内侧阴影)
2.3 border-image //边界图片
使用的图片素材可多样化。
<div id="round">这里,图像平铺(重复)来填充该区域。</div>
<br>
<div id="stretch">这里,图像被拉伸以填充该区域。</div>

div
{
    border:15px solid transparent;
    width:250px;
    padding:10px 20px;
}

#round
{
    -webkit-border-image:url(border.png) 30 30 round; /* Safari 5 and older */
    -o-border-image:url(border.png) 30 30 round; /* Opera */
    border-image:url(border.png) 30 30 round;
}

#stretch
{
    -webkit-border-image:url(border.png) 30 30 stretch; /* Safari 5 and older */
    -o-border-image:url(border.png) 30 30 stretch; /* Opera */
    border-image:url(border.png) 30 30 stretch;
}
语法:boder-image:source(url(地址)),slice(图像边界向内偏移),width(图像边界的宽度),outset(用于指定在边框外部绘制border-image-area的量),repeat(用于设置图像边界是否应重复(repeat),拉伸(stretch),或填满(round))
3背景图片
background-image;//可支持多张图片
background-size;//设置图片的尺寸大小
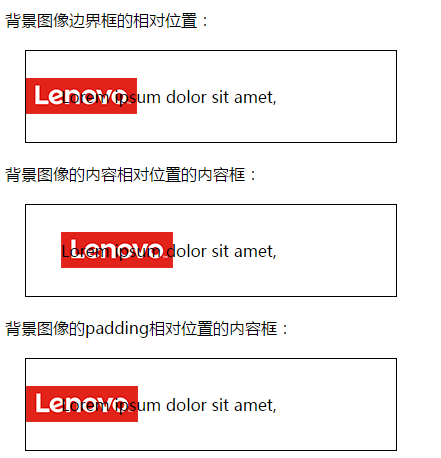
backgruond-origin;//指定了背景图片的位置区域
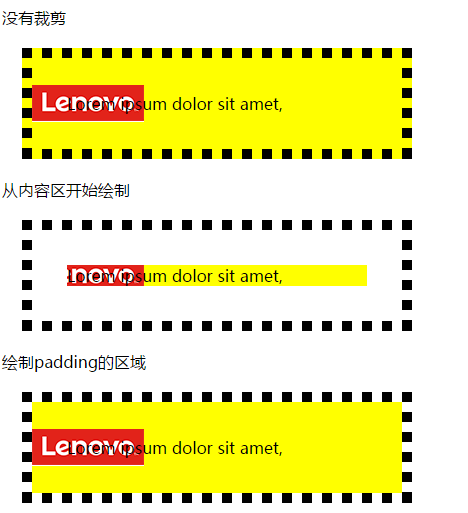
background-clip;//背景裁剪属性是从指定位置开始绘制
3.1.background-image
body
{
    background-image:url(123.png),url(456.png);   background-position:right bottom,letf top;
    background-repeat:no-repeat, repeat;
}

>第一张填充,位置在右下,第二张填充位置在左上。
3.2.background-size
css3以前,背景图像大小由图像的实际大小来决定的,现在css3中可以指定背景图片大小。
可指定像素或者百分比大小,指定的大小是相对于父元素的宽度和高度的百分比大小。
body{
    background:url(123.png);
    background-size:80px 60px;
    background-repeat:no-repeat;
    padding-top:40px;
}
body{
    background:url(123.png);
    background-size:100% 100%;
    background-repeat:no-repeat;
    padding-top:40px;
}
3.3.background-origin;
div{
     margin: 20px;
     width: 300px;
     border:1px solid black;
     padding:35px;
     background-image:url(img/20170604001124.png);
     background-repeat:no-repeat;
     background-position:left;
}
#div1{
     background-origin:border-box;
 }#div2{
      background-origin:content-box;
}#div3{    background-origin:padding-box;}
<p>背景图像边界框的相对位置:</p>
 <div id="div1">
     Lorem ipsum dolor sit amet,
 </div>

 <p>背景图像的内容相对位置的内容框:</p>
 <div id="div2">
    Lorem ipsum dolor sit amet,
 </div><p>背景图像的padding相对位置的内容框:</p><div id="div3">   Lorem ipsum dolor sit amet, </div>

3.4.background-clip;
div{
    margin: 20px;
    width: 300px;
    border:10px dotted black;
        padding:35px;
    background-image:url(img/20170604001124.png);
    background-repeat:no-repeat;
    background-position:left;
    background-color: yellow;
}
#div1{
    background-clip:border-box;
}
#div2{
    background-clip:content-box;
}
#div3{
    background-clip:padding-box;
}


<p>没有裁剪</p>
<div id="div1">
   Lorem ipsum dolor sit amet,
</div>
<p>从内容区开始绘制</p>
<div id="div2">
    Lorem ipsum dolor sit amet,
</div>
<p>绘制padding的区域</p>
<div id="div3">
    Lorem ipsum dolor sit amet,
</div>

补充下:
- 用逗号隔开每组 background 的缩写值;
- 如果有 size 值,需要紧跟 position 并且用 "/" 隔开;
- 如果有多个背景图片,而其他属性只有一个(例如 background-repeat 只有一个),表明所有背景图片应用该属性值。
- background-color 只能设置一个
4.渐变(Gradients)
css3渐变可以让你在两种或者多个指定的颜色之间显示平稳的过度。
css3定义了两种渐变方式
- 线性渐变(Linear Gradients)- 向下/向上/向左/向右/对角方向
- 径向渐变(Radial Gradients)- 由它们的中心定义
语法:background:linear-gradients,radial-gradients。
线性渐变
从上到下,红色到绿色再到蓝色
#bgg{
    width: 200px;
    height: 100px;
    background: linear-gradient(red,green,blue);
}

从左到右,红到蓝
#bgg{
    width: 200px;
    height: 100px;
    background: -webkit-linear-gradient(right, red, blue);
    background: -moz-linear-gradient(right, red, blue);
    background: -o-linear-gradient(right, red, blue);
    background: linear-gradient(to right, red, blue);
}


从左上角到右下角的线性渐变:
#bgg{
  background: -webkit-linear-gradient(left top, red , blue);
  background: -o-linear-gradient(bottom right, red, blue);
  background: -moz-linear-gradient(bottom right, red, blue);
  background: linear-gradient(to bottom right, red , blue);
}
带有指定的角度的线性渐变:
#bgg{
  background: -webkit-linear-gradient(180deg, red, blue);
  background: -o-linear-gradient(180deg, red, blue);
  background: -moz-linear-gradient(180deg, red, blue);
  background: linear-gradient(180deg, red, blue);
}

从左到右的线性渐变,带有透明度:
#bgg{
  background: -webkit-linear-gradient(left,rgba(255,0,0,0),rgba(255,0,0,1));
  background: -o-linear-gradient(right,rgba(255,0,0,0),rgba(255,0,0,1));
  background: -moz-linear-gradient(right,rgba(255,0,0,0),rgba(255,0,0,1));
  background: linear-gradient(to right, rgba(255,0,0,0), rgba(255,0,0,1));
}

径向渐变

形状为圆形的径向渐变:
#bgg{
  background: -webkit-radial-gradient(circle, red, yellow, green);
  background: -o-radial-gradient(circle, red, yellow, green);
  background: -moz-radial-gradient(circle, red, yellow, green);
  background: radial-gradient(circle, red, yellow, green);
}

颜色结点不均匀分布的径向渐变:
#bgg{
  background: -webkit-radial-gradient(red 5%, green 15%, blue 60%);
  background: -o-radial-gradient(red 5%, green 15%, blue 60%);
  background: -moz-radial-gradient(red 5%, green 15%, blue 60%);
  background: radial-gradient(red 5%, green 15%, blue 60%);
}

颜色结点均匀分布的径向渐变:
#grad {
  background: -webkit-radial-gradient(red, green, blue);
  background: -o-radial-gradient(red, green, blue);
  background: -moz-radial-gradient(red, green, blue);
  background: radial-gradient(red, green, blue);
}
5.2D转换
5.1 translate()//根据左(x轴)和顶部(y轴)位置给定的参数,从当前元素位置移动。
//从左边移动50个像素,并且从顶部移动100个像素。div{
   transform: translate(50px,100px);
    -ms-transform: translate(50px,100px);
    -webkit-transform: translate(50px,100px);
}//垂直水平居中
div{  position:absolute;  top:50%;  left:50%;
   transform: translate(-50%,-50%);
    -ms-transform: translate(-50%,-50%);
    -webkit-transform: translate(-50%,-50%);
}
5.2 rotate()//在一个给定度数顺时针旋转的元素。负值是云校园的,这样是元素逆时针旋转
顺时针旋转30度。
div{
    transform:rotate(30deg);
    -ms-transform:rotate(30deg);
    -webkit-transform: rotate(30deg);
}
逆时针旋转30度。
div{
    transform:rotate(-30deg);
    -ms-transform:rotate(-30deg);
    -webkit-transform: rotate(-30deg);
}
5.3 scale()//该元素增加或减少的大小,取决于宽度(x轴)和高度(y轴)的参数。
第一个参数是原来大小的2倍,第二个参数是原来高度的3倍。
div{
    -ms-transform:scale(2,3); /* IE 9 */
    -webkit-transform: scale(2,3); /* Safari */
    transform: scale(2,3); /* 标准语法 */
}
5.4 skew()//包含两个参数值,分别表示x轴和y轴倾斜的角度,如果第二个参数为空,则默认为0,参数为负数表示向相反方向倾斜。
语法:transform:skew(<angle>[,<angle>]);

向左倾斜30度,向底部倾斜20度
div
{
transform: skew(30deg,20deg);
-ms-transform: skew(30deg,20deg); /* IE 9 */
-webkit-transform: skew(30deg,20deg); /* Safari and Chrome */
}

向右倾斜30度,向顶部倾斜20度
div
{
transform: skew(-30deg,-20deg);
-ms-transform: skew(-30deg,-20deg); /* IE 9 */
-webkit-transform: skew(-30deg,-20deg); /* Safari and Chrome */
}
5.5 matrix()//有6个参数,包含旋转,缩放,平移,和倾斜功能
旋转30度div
{
transform:matrix(0.866,0.5,-0.5,0.866,0,0);
-ms-transform:matrix(0.866,0.5,-0.5,0.866,0,0); /* IE 9 */
-webkit-transform:matrix(0.866,0.5,-0.5,0.866,0,0); /* Safari and Chrome */
}
5.3D转换
和2D转换不同之处在于可以设置x,y,z。(opera不支持3d),
比如设置一个倾斜,2d用skew方法,3d则用rotateZ方法。
transform方法:
1.matrix3d;定义3d转换,使用16个值得4*4矩阵。
2.translate3d(x,y,z):定义3d转换。
3.scale3d(x,y,z):定义3d缩放
4.rotate3d(x,y,z,angle);定义3d旋转。
6.用户界面
1.box-sizing:border-box;在容器内边距和边框里面绘制。| content-box;在容器外边距和边框设定的内容区绘制。| inherit 继承父元素的box-sizing属性。
2.resize;规定是否可以由用户调整元素的尺寸。
注释:如果希望此属性生效,需要设置元素的overflow属性,值可以使auto,hidden,scroll。
resize: none | both | horizontal | vertical
none:用户无法调整元素的尺寸,
both:用户可调整元素的高度和宽度,
horizontal:用户可以调整元素的宽度。
vertical:用户可以调整元素的高度。
outline-offset:是容器以外的轮廓,也可以控制它的偏移。
轮廓与边框有两点不同:1.它不占空间,2.可能是个非矩形。
div
{
border:2px solid black;
outline:2px solid red;
outline-offset:15px;
}
多列
1.column-count:创建多列
div
{
-moz-column-count:3;     /* Firefox */
-webkit-column-count:3; /* Safari 和 Chrome */
column-count:3;
}
2.column-gap :规定列之间的间隔
div
{
-moz-column-gap:40px;        /* Firefox */
-webkit-column-gap:40px;    /* Safari 和 Chrome */
column-gap:40px;
}
3.column-rule :设置列与列之间的宽度,样式,和颜色规则。
div
{
-moz-column-rule:3px outset #ff0000;    /* Firefox */
-webkit-column-rule:3px outset #ff0000;    /* Safari and Chrome */
column-rule:3px outset #ff0000;
}
7.动画
自定义动画:@keyframes 和animation属性(ie10以上支持)
当您在@keyframes中创建动画时,请把它捆绑在某个选择器上,否则不会产生动画效果。
通过规定至少以下两项css动画属性,即可将动画绑定到选择器。
1.规定动画的名称。
2.规定动画的时长。如果不规定时长,则默认为0.
实例:把myfirst动画捆绑到div元素上,时长5秒。
div
{
animation: myfirst 5s;
-moz-animation: myfirst 5s;    /* Firefox */
-webkit-animation: myfirst 5s;    /* Safari 和 Chrome */
-o-animation: myfirst 5s;    /* Opera */
}

@keyframes myfirst
{
from {background: red;}
to {background: yellow;}
}

@-moz-keyframes myfirst /* Firefox */
{
from {background: red;}
to {background: yellow;}
}

@-webkit-keyframes myfirst /* Safari 和 Chrome */
{
from {background: red;}
to {background: yellow;}
}

@-o-keyframes myfirst /* Opera */
{
from {background: red;}
to {background: yellow;}
}
也可以这样定义动画。
当动画为25%及50%时改变背景颜色,然后当动画100%完成时再次改变。
@keyframes myfirst
{
0%   {background: red;}
25%  {background: yellow;}
50%  {background: blue;}
100% {background: green;}
}

@-moz-keyframes myfirst /* Firefox */
{
0%   {background: red;}
25%  {background: yellow;}
50%  {background: blue;}
100% {background: green;}
}

@-webkit-keyframes myfirst /* Safari 和 Chrome */
{
0%   {background: red;}
25%  {background: yellow;}
50%  {background: blue;}
100% {background: green;}
}

@-o-keyframes myfirst /* Opera */
{
0%   {background: red;}
25%  {background: yellow;}
50%  {background: blue;}
100% {background: green;}
}
改变背景颜色和位置
@keyframes myfirst
{
0%   {background: red; left:0px; top:0px;}
25%  {background: yellow; left:200px; top:0px;}
50%  {background: blue; left:200px; top:200px;}
75%  {background: green; left:0px; top:200px;}
100% {background: red; left:0px; top:0px;}
}

@-moz-keyframes myfirst /* Firefox */
{
0%   {background: red; left:0px; top:0px;}
25%  {background: yellow; left:200px; top:0px;}
50%  {background: blue; left:200px; top:200px;}
75%  {background: green; left:0px; top:200px;}
100% {background: red; left:0px; top:0px;}
}

@-webkit-keyframes myfirst /* Safari 和 Chrome */
{
0%   {background: red; left:0px; top:0px;}
25%  {background: yellow; left:200px; top:0px;}
50%  {background: blue; left:200px; top:200px;}
75%  {background: green; left:0px; top:200px;}
100% {background: red; left:0px; top:0px;}
}

@-o-keyframes myfirst /* Opera */
{
0%   {background: red; left:0px; top:0px;}
25%  {background: yellow; left:200px; top:0px;}
50%  {background: blue; left:200px; top:200px;}
75%  {background: green; left:0px; top:200px;}
100% {background: red; left:0px; top:0px;}
}
css3过渡
transition
过渡是元素从一种样式逐渐改变成另外一种效果。
要实现这一点,必须规定者两项内容:
1.规定你希望吧效果添加到哪个css属性上。
2.规定效果时长。不规定则为0.
/*可单项*/div
{
transition: width 2s;
-moz-transition: width 2s;    /* Firefox 4 */
-webkit-transition: width 2s;    /* Safari 和 Chrome */
-o-transition: width 2s;    /* Opera */
}
div:hover
{
width:300px;
}//可多项,也可全部,设置all就行。div
{
transition: width 2s, height 2s, transform 2s;
-moz-transition: width 2s, height 2s, -moz-transform 2s;
-webkit-transition: width 2s, height 2s, -webkit-transform 2s;
-o-transition: width 2s, height 2s,-o-transform 2s;
}
css3文本效果
1.text-shadow:文本阴影您能够规定水平阴影、垂直阴影、模糊距离,以及阴影的颜色:
h1
{
text-shadow: 5px 5px 5px #FF0000;
}
2.word-wrap:换行
//文本换行p {word-wrap:break-word;}//单词换行p{word-wrap:break-word}//...
-webkit-transition: width 2s;    /* Safari 和 Chrome */
-o-transition: width 2s;
来源:https://www.cnblogs.com/MJ-MY/p/8035270.html