Spring容器的基本实现
Intellij IDEA ,Spring5.0.1
下面会以一个简单的案例来谈一谈Spring容器的基本实现。
一、搭建Spring的简单工程
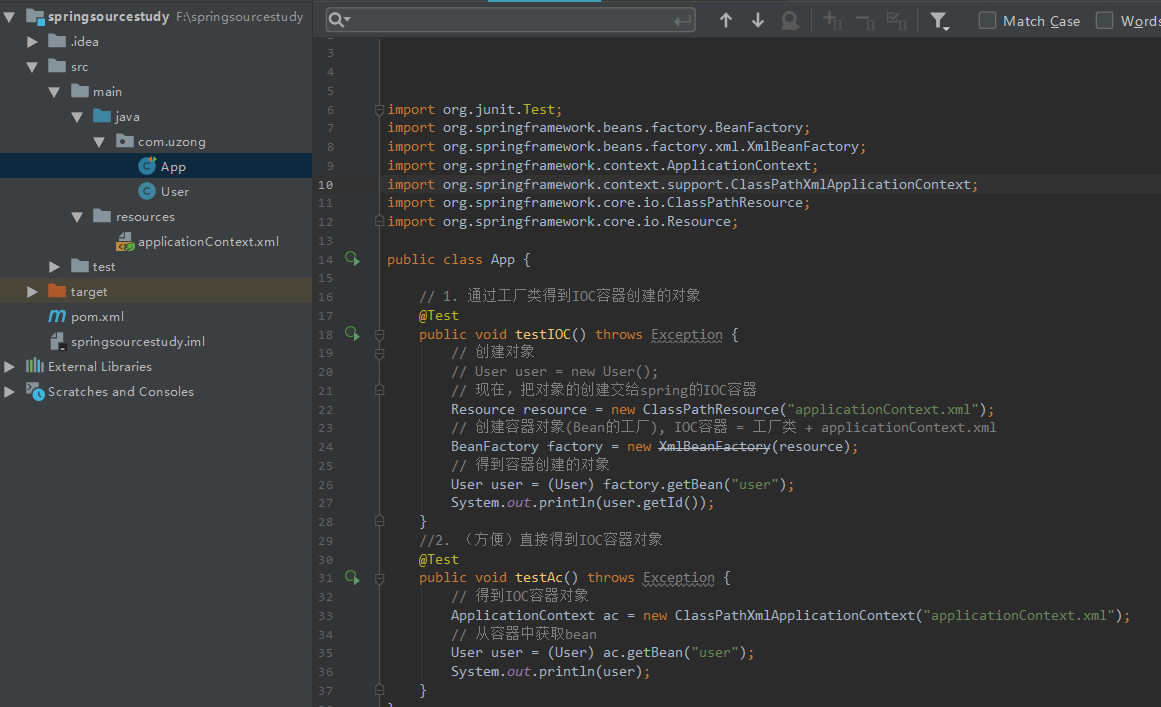
搭建简单的Spring工程,目录结构如下:创建一个User对象,编写一个appliacationContext.xml;将User交个Spring去管理。然后从容器中获取该对象

接下来针对下面这段代码进行展开讲解:
    @Test
    public void testIOC() throws Exception {
        // 创建对象
        // User user = new User();
        // 现在,把对象的创建交给spring的IOC容器
        Resource resource = new ClassPathResource("applicationContext.xml");
        // 创建容器对象(Bean的工厂), IOC容器 = 工厂类 + applicationContext.xml
        BeanFactory factory = new XmlBeanFactory(resource);
        // 得到容器创建的对象
        User user = (User) factory.getBean("user");
    }
二、认识一下核心类
2.1 DefaultListableBeanFactory
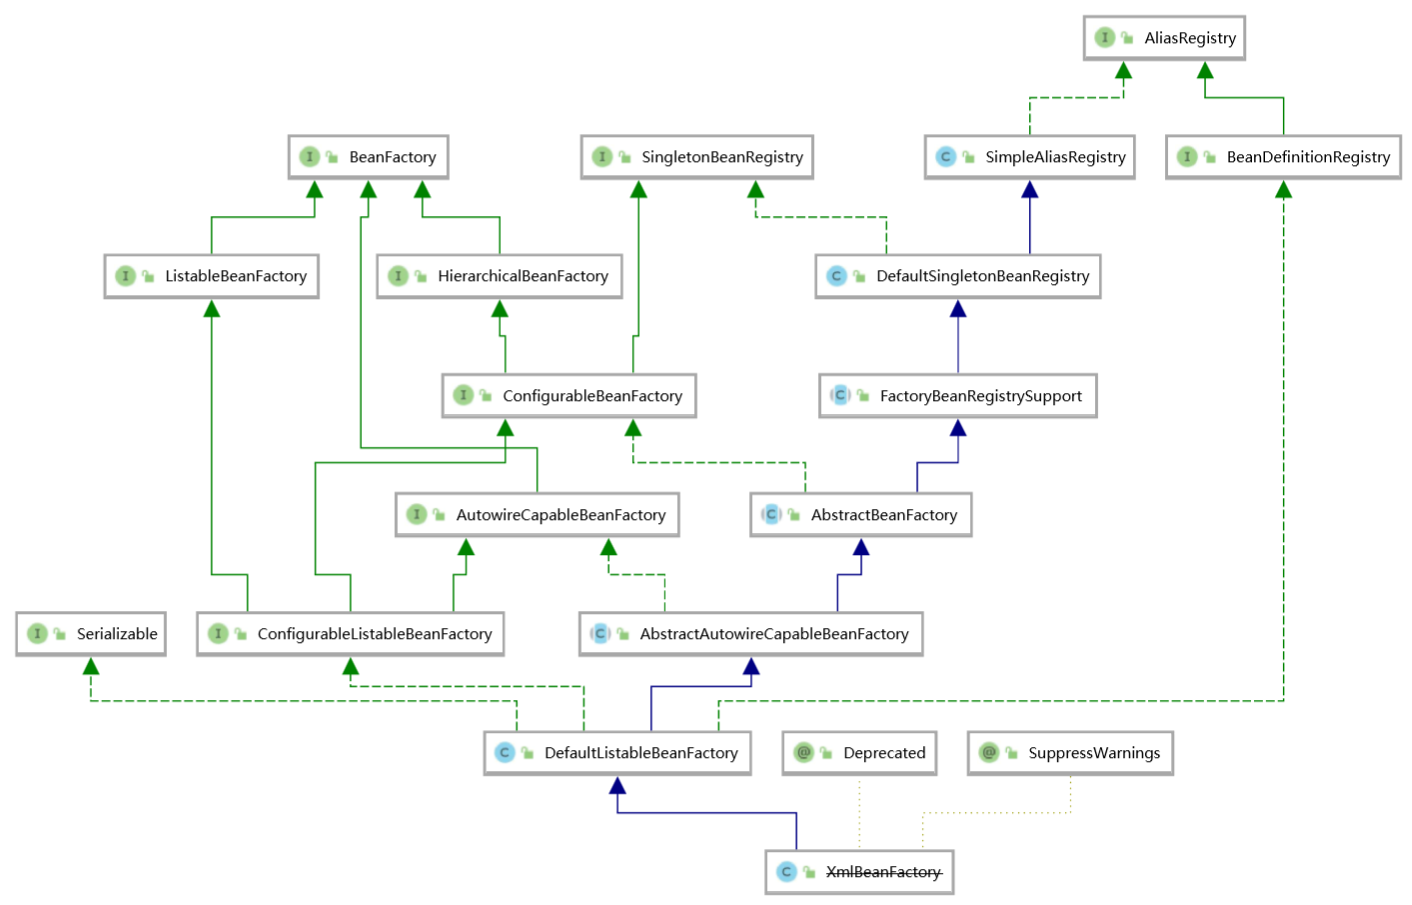
查看一下XmlBeanFactory的继承类图,如下所示: 注意:XmlBeanFactory已经过时,但是还是有必要去研究一下它的实现原理。
XmlBeanFactory 继承了DefaultListableBeanFactory; 是整个Bean加载的核心部分,是Spring注册及加载Bean的默认实现
此次挑选几个简单介绍上图中各个类的作用
AliasRegistry: 定义对alias的增删改查操作接口SimpleAliasRegistry: 主要使用 map 作为 alias 的缓存,并对接口 AliasRegistry 进行 实现。
public class SimpleAliasRegistry implements AliasRegistry {

	/** Map from alias to canonical name */
	private final Map<String, String> aliasMap = new ConcurrentHashMap<>(16);


	@Override
	public void registerAlias(String name, String alias) {
		Assert.hasText(name, "'name' must not be empty");
		Assert.hasText(alias, "'alias' must not be empty");
		if (alias.equals(name)) {
			this.aliasMap.remove(alias);
		}
		else {
			String registeredName = this.aliasMap.get(alias);
			if (registeredName != null) {
				if (registeredName.equals(name)) {
					// An existing alias - no need to re-register
					return;
				}
				if (!allowAliasOverriding()) {
					throw new IllegalStateException("Cannot register alias '" + alias + "' for name '" +
							name + "': It is already registered for name '" + registeredName + "'.");
				}
			}
			checkForAliasCircle(name, alias);
			this.aliasMap.put(alias, name);
		}
	}
	……
}
SingletonBeanRegistry:定义对单例的注册及获取BeanFactory:定义获取 bean 及 bean 的各种属性。DefaultS ingletonBeanRegistry:对接口 SingletonBeanRegistry 各函数的实现
……
DefaultListableBeanFactory: 综合上面所有功能, 主要是对 bean 注册后的处理
XmlBeanFactory对DefaultListableBeanFactorγ类进行了扩展,主要用于从 XML 文档中读 取 BeanDefinition。关注类:XmlBeanDefinitionReader,这个类将解析XML最核心的类
2.2 XmlBeanDefinitionReader
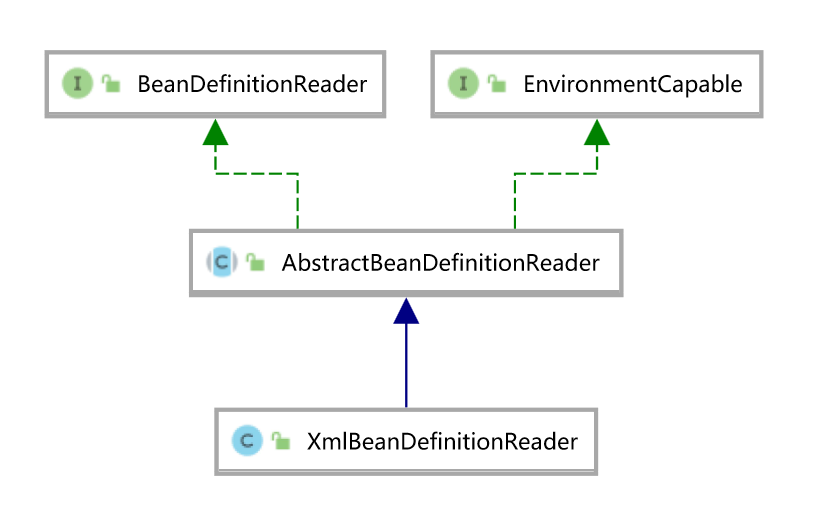
Spring读取xml配置文件; XmlBeanDefinitionReader
BeanDefinitionReader:主要定义资源文件读取并转换为 BeanDefinition 的各个功能。

三、容器的基础 XmlBeanFactory
后面的内容都是围绕下面这个句代码展开:
BeanFactory factory = new XmlBeanFactory(new ClassPathResource("applicationContext.xml"));
3.1 Resource
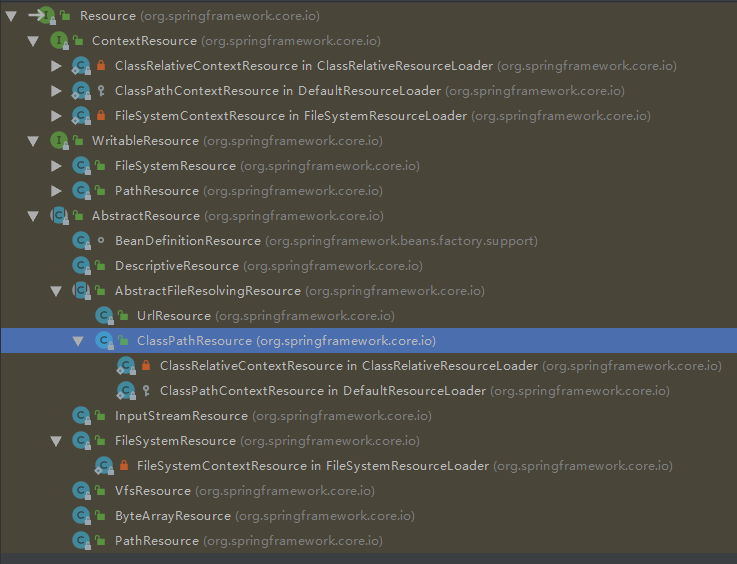
对不同来源的资源文件都有相应的 Resource 实现。
- 文件( FileSystemResource )、
- Classpath 资源( ClassPathResource )、
- URL 资源( UrResource )、
- InputStream 资源( InputStreamResource )、
- Byte 数组( ByteArrayResource )等。
 Resource采用了策略模式,针对不同的资源读取采用不同类。在工作中也可以直接使用API.
四、加载过程
第一步:读取Resource
new ClassPathResource("applicationContext.xml")
第二步:调用XmlBeanFactory构造器
public XmlBeanFactory(Resource resource) throws BeansException {
	this(resource, null);
}
第三步:调用重载构造器
public XmlBeanFactory(Resource resource, BeanFactory parentBeanFactory) throws BeansException {
 	super(parentBeanFactory);
	this.reader.loadBeanDefinitions(resource);
}
第四步:ignoreDependencyInterface 的主要功能是 忽略给定接口的自动装配功能
调用父类的构造方法
/**
 * Create a new AbstractAutowireCapableBeanFactory.
 */
public AbstractAutowireCapableBeanFactory() {
	super();
	ignoreDependencyInterface(BeanNameAware.class);
	ignoreDependencyInterface(BeanFactoryAware.class);
	ignoreDependencyInterface(BeanClassLoaderAware.class);
}
第五步:loadBeanDefinitionsthis.reader.load.Bean.Definitions(resource)才是资源加载的真正实现
/**
 * Load bean definitions from the specified XML file.
 * @param resource the resource descriptor for the XML file
 * @return the number of bean definitions found
 * @throws BeanDefinitionStoreException in case of loading or parsing errors
 */
@Override
public int loadBeanDefinitions(Resource resource) throws BeanDefinitionStoreException {
	return loadBeanDefinitions(new EncodedResource(resource));
}
第六步:loadBeanDefinitions 具体实现
/**
 * Load bean definitions from the specified XML file.  通过指定的xml文件中加载bean  definitions
 * @param encodedResource the resource descriptor for the XML file,
 * allowing to specify an encoding to use for parsing the file
 * @return the number of bean definitions found
 * @throws BeanDefinitionStoreException in case of loading or parsing errors
 */
public int loadBeanDefinitions(EncodedResource encodedResource) throws BeanDefinitionStoreException {
	Assert.notNull(encodedResource, "EncodedResource must not be null");
	if (logger.isInfoEnabled()) {
		logger.info("Loading XML bean definitions from " + encodedResource.getResource());
	}
    // 获取当前已经在的encodedResource资源
	Set<EncodedResource> currentResources = this.resourcesCurrentlyBeingLoaded.get();
	if (currentResources == null) {
		currentResources = new HashSet<>(4);
		this.resourcesCurrentlyBeingLoaded.set(currentResources);
	}
	if (!currentResources.add(encodedResource)) {
		throw new BeanDefinitionStoreException(
				"Detected cyclic loading of " + encodedResource + " - check your import definitions!");
	}
	try {
		InputStream inputStream = encodedResource.getResource().getInputStream();
		try {
		  //lnputSource  全路径 org.xml.sax
			InputSource inputSource = new InputSource(inputStream);
			if (encodedResource.getEncoding() != null) {
				inputSource.setEncoding(encodedResource.getEncoding());
			}
			//逻辑的核心部分
			return doLoadBeanDefinitions(inputSource, encodedResource.getResource());
		}
		finally {
			inputStream.close();
		}
	}
……
}
第七步:loadBeanDefinitions 具体实现
	/**
	 * Actually load bean definitions from the specified XML file.
	 * @param inputSource the SAX InputSource to read from
	 * @param resource the resource descriptor for the XML file
	 * @return the number of bean definitions found
	 * @throws BeanDefinitionStoreException in case of loading or parsing errors
	 * @see #doLoadDocument
	 * @see #registerBeanDefinitions
	 */
	protected int doLoadBeanDefinitions(InputSource inputSource, Resource resource)
			throws BeanDefinitionStoreException {
		try {
		 // 加载xml文件,并得到对应的Documnet
			Document doc = doLoadDocument(inputSource, resource);
			//根据返回的Document注册Bean信息
			return registerBeanDefinitions(doc, resource);
		}
	……
	}
补充:获取XML的验证模式
对xml验证模式有: DTD 和 XSD
第八步:验证模式的读取
通过getValidationModeForResource 获取到验证方式
/**
	 * Gets the validation mode for the specified {@link Resource}. If no explicit
	 * validation mode has been configured then the validation mode is
	 * {@link #detectValidationMode detected}.
	 * <p>Override this method if you would like full control over the validation
	 * mode, even when something other than {@link #VALIDATION_AUTO} was set.
	 */
	protected int getValidationModeForResource(Resource resource) {
		int validationModeToUse = getValidationMode();
		//如果手动指定了验证仪式则使用指定的验证模式
		if (validationModeToUse != VALIDATION_AUTO) {
			return validationModeToUse;
		}
		///如果未指定则使川l 向动检测
		int detectedMode = detectValidationMode(resource);
		if (detectedMode != VALIDATION_AUTO) {
			return detectedMode;
		}
		// Hmm, we didn't get a clear indication... Let's assume XSD,
		// since apparently no DTD declaration has been found up until
		// detection stopped (before finding the document's root tag).
		return VALIDATION_XSD;
	}
自动检测验证模式的功能是在函数 detectValidationMode方法中实现的,在detectValidationMode 函数中又将自动检测验证模式的工作委托给了专门处理类XmlValidationModeDetector,调用detectValidationMode方法
/**
 * Detect the validation mode for the XML document in the supplied {@link InputStream}.
 * Note that the supplied {@link InputStream} is closed by this method before returning.
 * @param inputStream the InputStream to parse
 * @throws IOException in case of I/O failure
 * @see #VALIDATION_DTD
 * @see #VALIDATION_XSD
 */
public int detectValidationMode(InputStream inputStream) throws IOException {
	// Peek into the file to look for DOCTYPE.
	BufferedReader reader = new BufferedReader(new InputStreamReader(inputStream));
	try {
		boolean isDtdValidated = false;
		String content;
		while ((content = reader.readLine()) != null) {
			content = consumeCommentTokens(content);
			//如果读取的行是空或者是注释则略过
			if (this.inComment || !StringUtils.hasText(content)) {
				continue;
			}
			//是否包含DOCTYPE
			if (hasDoctype(content)) {
				isDtdValidated = true;
				break;
			}
			//读取到< 开头
			if (hasOpeningTag(content)) {
				// End of meaningful data...
				break;
			}
		}
		return (isDtdValidated ? VALIDATION_DTD : VALIDATION_XSD);
	}
	catch (CharConversionException ex) {
		// Choked on some character encoding...
		// Leave the decision up to the caller.
		return VALIDATION_AUTO;
	}
	finally {
		reader.close();
	}
}
第九步:获取Document
/**
 * Actually load the specified document using the configured DocumentLoader.
 * @param inputSource the SAX InputSource to read from
 * @param resource the resource descriptor for the XML file
 * @return the DOM Document
 * @throws Exception when thrown from the DocumentLoader
 * @see #setDocumentLoader
 * @see DocumentLoader#loadDocument
 */
protected Document doLoadDocument(InputSource inputSource, Resource resource) throws Exception {
//读取委托给documentLoader去执行;DefaultDocumentLoader真正执行
	return this.documentLoader.loadDocument(inputSource, getEntityResolver(), this.errorHandler,
			getValidationModeForResource(resource), isNamespaceAware());
}
第十步:DefaultDocumentLoader中的loadDocument方法
	/**
	 * Load the {@link Document} at the supplied {@link InputSource} using the standard JAXP-configured
	 * XML parser.
	 */
	@Override
	public Document loadDocument(InputSource inputSource, EntityResolver entityResolver,
			ErrorHandler errorHandler, int validationMode, boolean namespaceAware) throws Exception {
		//获取DocumentBuilderFactory,在创建DocumentBuilder。进而解析inputSource来返回Document对象
		DocumentBuilderFactory factory = createDocumentBuilderFactory(validationMode, namespaceAware);
		if (logger.isDebugEnabled()) {
			logger.debug("Using JAXP provider [" + factory.getClass().getName() + "]");
		}
		DocumentBuilder builder = createDocumentBuilder(factory, entityResolver, errorHandler);
		return builder.parse(inputSource);
	}
第十一步:EntityResolver用法
如果 SAX 应用程序需要实现自定义处理外部实体,则必须实现此接口并使用 setEntityResolver 方法向 SAX 驱动器注册一个实例
第十二步:解析及注册Beandefinitions
当把文件转换为Document后,接下来的提取及注册bean是重头戏。 XmlBeanDefinitionReader.java
	/**
	 * Register the bean definitions contained in the given DOM document.
	 * Called by {@code loadBeanDefinitions}.
	 * <p>Creates a new instance of the parser class and invokes
	 * {@code registerBeanDefinitions} on it.
	 * @param doc the DOM document 通过前面的loadDocument而来
	 * @param resource the resource descriptor (for context information)
	 * @return the number of bean definitions found
	 * @throws BeanDefinitionStoreException in case of parsing errors
	 * @see #loadBeanDefinitions
	 * @see #setDocumentReaderClass
	 * @see BeanDefinitionDocumentReader#registerBeanDefinitions
	 */
	public int registerBeanDefinitions(Document doc, Resource resource) throws BeanDefinitionStoreException {
		BeanDefinitionDocumentReader documentReader = createBeanDefinitionDocumentReader();
        //记录统计前 BeanDefinition的加载个数
		int countBefore = getRegistry().getBeanDefinitionCount();
		//加载和注册bean
		documentReader.registerBeanDefinitions(doc, createReaderContext(resource));
		return getRegistry().getBeanDefinitionCount() - countBefore;
	}
第十四步:通过DefaultBeanDefinitionDocumentReader
	/**
	 * This implementation parses bean definitions according to the "spring-beans" XSD
	 * (or DTD, historically).
	 * <p>Opens a DOM Document; then initializes the default settings
	 * specified at the {@code <beans/>} level; then parses the contained bean definitions.
	 */
	@Override
	public void registerBeanDefinitions(Document doc, XmlReaderContext readerContext) {
		this.readerContext = readerContext;
		logger.debug("Loading bean definitions");
		//提取到Root
		Element root = doc.getDocumentElement();
		doRegisterBeanDefinitions(root);
	}
上面的步骤可以算作是XML加载解析的准备,下面是真正的解析开始
第十五步:解析doRegisterBeanDefinitions
	/**
	 * Register each bean definition within the given root {@code <beans/>} element.
	 */
	protected void doRegisterBeanDefinitions(Element root) {
		// Any nested <beans> elements will cause recursion in this method. In
		// order to propagate and preserve <beans> default-* attributes correctly,
		// keep track of the current (parent) delegate, which may be null. Create
		// the new (child) delegate with a reference to the parent for fallback purposes,
		// then ultimately reset this.delegate back to its original (parent) reference.
		// this behavior emulates a stack of delegates without actually necessitating one.
		BeanDefinitionParserDelegate parent = this.delegate;
		this.delegate = createDelegate(getReaderContext(), root, parent);

		if (this.delegate.isDefaultNamespace(root)) {
			String profileSpec = root.getAttribute(PROFILE_ATTRIBUTE);
			if (StringUtils.hasText(profileSpec)) {
				String[] specifiedProfiles = StringUtils.tokenizeToStringArray(
						profileSpec, BeanDefinitionParserDelegate.MULTI_VALUE_ATTRIBUTE_DELIMITERS);
				if (!getReaderContext().getEnvironment().acceptsProfiles(specifiedProfiles)) {
					if (logger.isInfoEnabled()) {
						logger.info("Skipped XML bean definition file due to specified profiles [" + profileSpec +
								"] not matching: " + getReaderContext().getResource());
					}
					return;
				}
			}
		}
		//protected方法,留个子类实现
		preProcessXml(root);
		parseBeanDefinitions(root, this.delegate);
		postProcessXml(root);

		this.delegate = parent;
	}
第十六步:parseBeanDefinitions
/**
 * Parse the elements at the root level in the document:
 * "import", "alias", "bean".
 * @param root the DOM root element of the document
 */
protected void parseBeanDefinitions(Element root, BeanDefinitionParserDelegate delegate) {
	if (delegate.isDefaultNamespace(root)) {
		NodeList nl = root.getChildNodes();
		for (int i = 0; i < nl.getLength(); i++) {
			Node node = nl.item(i);
			if (node instanceof Element) {
				Element ele = (Element) node;
				if (delegate.isDefaultNamespace(ele)) {
					//默认
					parseDefaultElement(ele, delegate);
				}
				else {
					//自定义命名空间解析
					delegate.parseCustomElement(ele);
				}
			}
		}
	}
	else {
		delegate.parseCustomElement(root);
	}
}
上面的代码大致完成了XML的解析的准备,并且正式进入解析元素的阶段,针对默认和自定义的标签解析将在下一章节进行。
参考《Spring深度源码解析》第二章
来源:CSDN
作者:一碗面
链接:https://blog.csdn.net/qq_31156277/article/details/103835066