01
1.后端端口号和前端不同,
2.前端接收问题
3.@RequestBody
@RequestBody主要用来接收前端传递给后端的json字符串中的数据的(请求体中的数据的);
GET方式无请求体,所以使用@RequestBody接收数据时,前端不能使用GET方式提交数据,而是用POST方式进行提交。
在后端的同一个接收方法里,@RequestBody 与@RequestParam()可以同时使用,@RequestBody最多只能有一个,而@RequestParam()可以有多个。
注:一个请求,只有一个RequestBody;一个请求,可以有多个RequestParam
1 什么是跨域(理解)

跨域 就是跨域名来访问的数据
域名: www.baidu.com(ip 192.168.0.1) www.taobao.com(ip 192.168.0.2) – 属于跨域
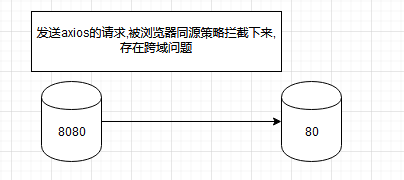
localhost:8080 — >localhost:80 --(属于跨域)
www.wenku.baidu.com www.tieba.baidu.com --二级域名 – 跨域
192.168.0.3 192.168.0.4
2. 跨域不一定存在跨域问题
什么情况下存在跨域问题:
跨域问题: 浏览器 针对ajax请求的时候,如果不同的服务,存在跨域
浏览器机制: 同源策略拦截跨域的访问
3 怎么解决跨域问题? --面试题
(1) jsonp方式 --json变种
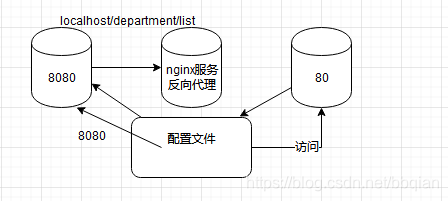
localhost/department/list – >
缺点:
需要服务支持
只能发起GET请求
(2) nginx 反向代理 --现在不用
以前:[外链图片转存失败,源站可能有防盗链机制,建议将图片保存下来直接上传(img-iTL17ZeC-1578051393122)(笔记.assets/image-20200103102359784.png)]
nginx方案:
缺点:需要安装nginx才能使用
(3)方案3 – 服务器允许cors这些请求
什么是cors
同源(相同协议,相同域名,相同端口)
cors: 一个w3c标准 跨域资源共享"(Cross-origin resource sharing)


服务器怎么允许这些 / get/post/delete/put/options /patch
解决方案:
(1)写一个配置类
(2)spring通过注解支持
CrossOrigin 注意: 4.2版本以后支持
4 前后端crud(重点掌握)
4.1 新增
<el-dialog title="新增" v-model="addFormVisible" :close-on-click-modal="false">
			<el-form :model="addForm" label-width="80px" :rules="addFormRules" ref="addForm">
				<el-form-item label="部门名称" prop="name">
					<el-input v-model="addForm.name" auto-complete="off"></el-input>
				</el-form-item>

			</el-form>
			<div slot="footer" class="dialog-footer">
				<el-button @click.native="addFormVisible = false">取消</el-button>
				<el-button type="primary" @click.native="addSubmit" :loading="addLoading">提交</el-button>
			</div>
		</el-dialog>
	//显示新增界面
			handleAdd: function () {
				this.addFormVisible = true;
				//清空表单
				this.addForm = {
					name: ''
				};
			}
			//新增
			addSubmit: function () {
			    //提交之前的验证工作
				this.$refs.addForm.validate((valid) => {
					if (valid) {
						this.$confirm('确认提交吗?', '提示', {}).then(() => {
							this.addLoading = true;
                            //addForm={name:''} 新增form表单  para = {name:''}
							let para = Object.assign({}, this.addForm);
						    //发送保存请求
						//	addUser(para).then((res) => {
                            this.$http.put("/department/save",para).then(res=>{
								this.addLoading = false;

								this.$message({
									message: '提交成功',
									type: 'success'
								});
								//重置表单
								this.$refs['addForm'].resetFields();
								//关闭新增对话框
								this.addFormVisible = false;
								this.getDepartments();
							});
						});
					}
				});
			},
4.2 修改
	<!--编辑界面-->
		<el-dialog title="编辑" v-model="editFormVisible" :close-on-click-modal="false">
			<el-form :model="editForm" label-width="80px" :rules="editFormRules" ref="editForm">
				<el-form-item label="部门名称" prop="name">
					<el-input v-model="editForm.name" auto-complete="off"></el-input>
				</el-form-item>

			</el-form>
			<div slot="footer" class="dialog-footer">
				<el-button @click.native="editFormVisible = false">取消</el-button>
				<el-button type="primary" @click.native="editSubmit" :loading="editLoading">提交</el-button>
			</div>
		</el-dialog>
	//显示编辑界面
			handleEdit: function (index, row) {
			    //弹出修改表单
				this.editFormVisible = true;
				//回显 row id name
				this.editForm = Object.assign({}, row);
			},
			editSubmit: function () {
			    //验证是否正确
				this.$refs.editForm.validate((valid) => {
					if (valid) {
						this.$confirm('确认提交吗?', '提示', {}).then(() => {
							this.editLoading = true;
                            console.log(this.editForm);
							let para = Object.assign({}, this.editForm);
                            this.$http.post("/department/update",para).then(res=>{
								this.editLoading = false;

								this.$message({
									message: '提交成功',
									type: 'success'
								});
								this.$refs['editForm'].resetFields();
								this.editFormVisible = false;
								this.getDepartments();
							});
						});
					}
				});
			}
4.3 删除
//删除
			handleDel: function (index, row) {

				this.$confirm('确认删除该记录吗?', '提示', {
					type: 'warning'
				}).then(() => {
				    //删除代码
					this.listLoading = true;

					//获取id值
                    this.$http.delete('/department/delete/'+row.id).then(res=>{
				//	removeUser(para).then((res) => {
						this.listLoading = false;
						//NProgress.done(); resultAjax
                        let {isSuccess,msg} = res.data;
                        if(isSuccess) {
                            this.$message({
                                message: '删除成功',
                                type: 'success'
                            });
                        }else{
                            this.$message({
                                message: msg,
                                type: 'error'
                            });
                        }
						this.getDepartments();
					});
				}).catch(() => {

				});
			}
4.4 查询
getDepartments() {
			    //分页 过滤
				let para = {
					page: this.page,
					name: this.filters.name
				};
				this.listLoading = true;

				//发送请求 到后台去查询数据
				this.$http.patch("/department/list",para).then(res=>{
					this.departments = res.data;
					this.listLoading = false;
				});

			}
5 svn(掌握)
什么svn:
代码管理工具 版本控制工具
svn:使用团队开发中
5.1 安装svn服务端
安装的步骤:傻瓜式安装 下一步 下一步
5.2 svn客户端
安装的步骤:傻瓜式安装 下一步 下一步
5.3 操作svn(掌握)
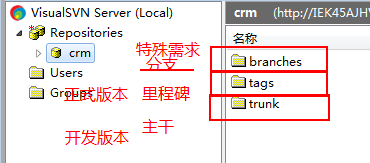
1)创建仓库
[外链图片转存失败,源站可能有防盗链机制,建议将图片保存下来直接上传(img-U2T6oI5s-1578051393148)(笔记.assets/image-20200103142623132.png)]
2)检出
代码
3)提交/更新
4)处理冲突
什么情况 会存在冲突?
多个人在去修改同一个文件的,如果修改的版本号不一致 就可以出现
5)idea操作svn
import
check out
6 项目里面
团队协作项目 – 以后在公司里面模式 一模一样
(1) 组长(项目经理) (4-6)
选择项目
a) 在选择一台作为服务器 (svn服务端 mysql) -->看你们组里面哪个电脑好一点
b) 项目经理(找一个人) 你们选择的项目 (搭建后台结构+前台结构) 上传svn去
其他组员就从上面进行下载
c) 创建数据库的 整个组的人都使用同一个库 (服务器 创建数据库)
其他人员连接服务器库
! 在这里插入图片描述
组员连接:
组员在连接的时候,把防火墙关闭
d) svn提交的 特殊文件特殊处理 – 注意事项
(1)第一次 搭建项目那个人把代码 全部提交到svn
组员可以下载 – 全部代码
(2)以后 组员修改的内容 --提交自己修改的java代码 向
idea配置文件 不提交
target文件不用提交
db.properites
做项目的时候,记住备份
(img-zwimjW13-1578051393154)]
[外链图片转存中…(img-zlDw1yQz-1578051393168)]
组员连接:
组员在连接的时候,把防火墙关闭
d) svn提交的 特殊文件特殊处理 – 注意事项
(1)第一次 搭建项目那个人把代码 全部提交到svn
组员可以下载 – 全部代码
(2)以后 组员修改的内容 --提交自己修改的java代码 向
idea配置文件 不提交
target文件不用提交
db.properites
做项目的时候,记住备份
来源:CSDN
作者:bbqian
链接:https://blog.csdn.net/bbqian/article/details/103825747