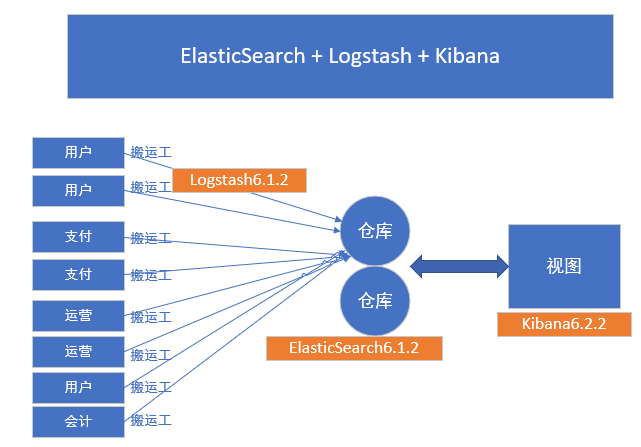
ElasticSearch + Logstash + kibana
1、介绍:
Logstash:搬运工
ElasticSearch:搜索引擎
Kilbana:可视化系统

ElasticSearch是基于lucene的搜索框架,它提供了一个分布式多用户能力的全文搜索引擎。
基于restful web接口
上手容易,拓展节点方便。
可用于存储和检索海量数据,接近时实检索,海量数据量增加,搜索性能几乎不受影响。
分布式搜索框架,副本机制,自动发现节点,保障可用性。

阿里云服务器 快速安装ElasticSearch
简介:阿里云ecs介绍,wget命令下载安装包,快速部署 elasticSearch节点
linux下使用wget下载jdk8:
进到目录/usr/local/software
wget --no-cookies --no-check-certificate --header "Cookie: gpw_e24=http%3A%2F%2Fwww.oracle.com%2F; oraclelicense=accept-securebackup-cookie" "http://download.oracle.com/otn-pub/java/jdk/8u141-b15/336fa29ff2bb4ef291e347e091f7f4a7/jdk-8u141-linux-x64.tar.gz"
vim /etc/profile
加入
export JAVA_HOME=/usr/local/src/jdk8/jdk1.8.0_141
export JAVA_BIN=/usr/local/src/jdk8/jdk1.8.0_141
export PATH=$PATH:$JAVA_HOME/bin
export CLASSPATH=.:$JAVA_HOME/lib/dt.jar:$JAVA_HOME/lib/tools.jar
export JAVA_HOME JAVA_BIN PATH CLASSPATH
source /etc/profile 让配置文件马上生效
使用wget 下载elasticsearch安装包
wget https://artifacts.elastic.co/downloads/elasticsearch/elasticsearch-6.2.2.tar.gz
解压
tar -zxvf elasticsearch-6.2.2.tar.gz
执行:./elasticsearch 会报错
chmod -R 777 ./
su - xdclass
curl localhost:9200 linux查看本地服务器
配置es出现相关问题处理:
1、问题一
Java HotSpot(TM) 64-Bit Server VM warning: INFO: os::commit_memory(0x00000000c5330000, 986513408, 0) failed; error='Cannot allocate memory' (errno=12)
#
# There is insufficient memory for the Java Runtime Environment to continue.
# Native memory allocation (mmap) failed to map 986513408 bytes for committing reserved memory.
# An error report file with more information is saved as:
# /usr/local/software/temp/elasticsearch-6.2.2/hs_err_pid1912.log
解决:内存不够,购买阿里云的机器可以动态增加内存,至少需要2G内存
2、问题二
[root@iZwz95j86y235aroi85ht0Z bin]# ./elasticsearch
[2018-02-22T20:14:04,870][WARN ][o.e.b.ElasticsearchUncaughtExceptionHandler] [] uncaught exception in thread [main]
org.elasticsearch.bootstrap.StartupException: java.lang.RuntimeException: can not run elasticsearch as root
at org.elasticsearch.bootstrap.Elasticsearch.init(Elasticsearch.java:125) ~[elasticsearch-6.2.2.jar:6.2.2]
at org.elasticsearch.bootstrap.Elasticsearch.execute(Elasticsearch.java:112) ~[elasticsearch-6.2.2.jar:6.2.2]
at org.elasticsearch.cli.EnvironmentAwareCommand.execute(EnvironmentAwareCommand.java:86) ~[elasticsearch-6.2.2.jar:6.2.2]
at org.elasticsearch.cli.Command.mainWithoutErrorHandling(Command.java:124) ~[elasticsearch-cli-6.2.2.jar:6.2.2]
解决:用非root用户
添加用户:useradd -m xiang
然后设置密码:passwd xiang
给予用户所有权限需要使用root权限来授权:chmod -R 777 ./ (./表示当前目录)
切换到用户:su - xiang
/usr/local/src/elasticsearch/elasticsearch-6.2.2
3、问题三
./elasticsearch
Exception in thread "main" java.nio.file.AccessDeniedException: /usr/local/software/temp/elasticsearch-6.2.2/config/jvm.options
解决:权限不够 chmod 777 -R 当前es目录
常见配置问题资料:https://www.jianshu.com/p/c5d6ec0f35e0
ElasticSearch目录的基本结构
核心配置文件:config
1、elasticsearch.yml
主配置文件
cluster.name:集群名称,同一网段自动加入
node.name:节点名称
http.port:http端口
2、jvm.options
虚拟机参数配置文件,配置heap堆一样
3、log4j2.properties
配置集群:
复制ElasticSearch文件包启动即可
注意事项:本地启动多个节点,复制es安装包的时候,需要删除里面data目录里面的资料,不然无法加入集群
ElasticSearch基础概念
ElasticSearch的index索引,Document文档、副本,分片,多节点等概念。
通俗的解释
在ElasticSearch中,文档归属于一种类型(type),而这些类型存在于索引(index)中,索引名称必须是小写。

分片shards
1、数据量特大,没有足够大的硬盘空间来一次性存储,
2、且一次性搜索那么多的数据,响应跟不上es提供把数据进行分片存储,这样方便进行拓展和提高吞吐
副本replicas
分片的拷贝,当主分片不可用的时候,副本就充当主分片进行使用
Elasticsearch中的每个索引分配5个主分片和1个副本
如果你的集群中至少有两个节点,你的索引将会有5个主分片和另外5个复制分片(1个完全拷贝),这样每个索引总共就有10个分片。
search搜索语句入门之URL搜索
健康检查
http://localhost:9200/_cat/health?v
http://localhost:9201/_cluster/health(推荐
状态说明
green:正常
yellow: 集群正常 数据正常,部分副本不正常
red: 集群部分正常,数据可能丢失,需要紧急修复
查询节点列表
http://localhost:9200/_cat/nodes?v
查看所有索引
http://localhost:9200/_cat/indices?v
补充:
curl
-X 指定http的请求方法 有HEAD GET POST PUT DELETE
-d 指定要传输的数据
-H 指定http请求头信息
新增索引
curl -XPUT 'localhost:9201/blog_test?pretty'
curl -XPUT 'localhost:9201/blog?pretty'
删除索引
curl -XDELETE 'localhost:9200/blog_test?pretty'
新增一条记录,并指定为article类型,ID为1
curl -XPUT -H "Content-Type: application/json" 'localhost:9201/blog/article/2?pretty' -d '
{
  "title": "东邪西毒",
  "content":"我知道那个人不会再来,但我还是在等,我在门口坐了两天两夜"
}'
ID查询记录
curl -XGET 'localhost:9201/blog/article/1'
curl -XGET 'localhost:9201/blog/article/1?pretty'(美化推荐)
搜索
curl -XGET 'http://localhost:9201/blog/article/_search?q=title:小D'
外网访问ElasticSearch
1、配置文件:
修改ElasticSearch配置:elasticsearch.yml
取消注释并修改为:network.host 0.0.0.0
修改后会有一些启动错误,可以查看上面链接,或者百度进行解决。
2、阿里云需要在安全防火墙开放端口
query dsl
1、Domain Specific Language 领域特定语言
2、ElasticSearch提供了完整的dsl查询语句,基于json定义查询
3、用于构造复杂的查询语句
curl查询(空格处理不当,会出问题)
curl -XPOST -H "Content-Type: application/json" 'http://localhost:9201/blog/article/_search' -d '{
    "query" : {
        "term" : { "title" : "东" }
    }
}'
bool查询入门
        {
          "query": {
            "bool": {
              "must": [
                { "match": { "title": "elk" } }
              ],
              "must_not": [
                { "match": { "title": "小D" } }
              ]
            }
          }
        }
filter查询入门(filtered语法已经在5.0版本后移除了,在2.0时候标记过期,改用filter )
    参考地址:https://www.elastic.co/guide/en/elasticsearch/reference/5.0/query-dsl-filtered-query.html
    {
      "query": {
        "bool": {
          "filter": {
            "range": {
              "PV": {
                "gt": 15
              }
            }
          },
          "must": {
            "match": {
              "title": "ELK"
            }
          }
        }
      }
    }
总结:(官网参考 https://www.elastic.co/guide/en/elasticsearch/reference/current/query-filter-context.html)
1、大部分filter的速度快于query的速度
2、filter不会计算相关度得分,且结果会有缓存,效率高
3、全文搜索、评分排序,使用query
4、是非过滤,精确匹配,使用filter
postman工具
Logstash

什么是logstash (文档地址 https://www.elastic.co/guide/en/logstash/current/index.html)
开源的日志收集引擎,具备实时传输的能力
读取不同的数据源,并进行过滤,开发者自定义规范输出到目的地
日志来源多(如系统日志,应用日志,服务器日志等)
流程讲解
logstash通过管道pipeline进行传输,必选的两个组件是输入input和输出output,还有个可选过滤器filter
logstash将数据流中等每一条数据称之为一个event,即读取每一行数据的行为叫做事件
#输入
input {
...
}
# 过滤器
filter {
...
}
# 输出
output {
...
}
下载安装:
下载地址: https://www.elastic.co/downloads/logstash
在linux解压即可:
启动:在bin目录下 ./logstash -e 'input {stdin {}} output {stdout {}}'
启动会有些慢
需要java8 不支持java9
目录文件说明
https://www.elastic.co/guide/en/logstash/6.2/dir-layout.html
配置讲解
https://www.elastic.co/guide/en/logstash/6.2/logstash-settings-file.html
logstash.yml 修改 pipeline.workers,根据CPU核数增加1到2即可
jvm.options 修改 xms和xmx为相同,一般是系统内存三份之二
日志文件输入输出
简介:讲解Logstash采集日志和输送日志流程测试,包括input,filter和output元素的测试
bin/logstash -f test1.conf
./logstash -f ../config/test1.conf
codec的使用( Coder/decoder 两个单词首字母缩写)
Codec: 解码编码 数据格式
好处 更方便logstash与支持自定义数据格式的运维产品进行使用
logstash更细化的处理流程
input->decode->filter->encode->output
1、设置配置文件

input {
         # 从文件读取日志信息 输送到控制台
    file {
        path => "/usr/local/src/elasticsearch/elasticsearch-6.2.2/logs/elasticsearch.log"
        #codec => "json" ## 以JSON格式读取日志
        type => "elasticsearch"
        start_position => "beginning"
        }
    }

    # filter {
    #
    # }

    output {
        # 标准输出
        # stdout {}
        # 输出进行格式化,采用Ruby库来解析日志
         stdout { codec => rubydebug }
    }


==========================================


输出结果:
{
          "type" => "elasticsearch",
       "message" => "[2018-03-24T14:39:54,536][INFO ][o.e.g.GatewayService     ] [node-xiang] recovered [2] indices into cluster_state",
          "host" => "iz2ze6bvf2t30pcc1l1jc1z",
          "path" => "/usr/local/src/elasticsearch/elasticsearch-6.2.2/logs/elasticsearch.log",
    "@timestamp" => 2018-03-24T06:39:55.091Z,
      "@version" => "1"
}
2、filter使用
例子
切割插件mutate,随意输入一串以|分割的字符,比如 "123|000|ttter|sdfds*=123|dfwe

配置二 test2_filter.conf
========================================
        input {
           stdin {}
        }

        filter {
            mutate {
                split => ["message", "|"]
            }
        }

        output {
            # 标准输出
            # stdout {}
            # 输出进行格式化,采用Ruby库来解析日志
             stdout { codec => rubydebug }
        }
========================================


输入结果:
xiang|ning|xiang|wang|ning|n^Hj
{
      "@version" => "1",
       "message" => [
        [0] "xiang",
        [1] "ning",
        [2] "xiang",
        [3] "wang",
        [4] "ning",
        [5] "n\bj"
    ],
    "@timestamp" => 2018-03-24T06:55:42.822Z,
          "host" => "iz2ze6bvf2t30pcc1l1jc1z"
}
3、logstash案例实战之读取日志输出到elasticsearch
简介:从日志文件中读取日志,输出到elasticsearch集群中
logstash配置文件
配置三 test3_es.conf

========================================
input {
file {
path => "/Users/jack/Desktop/person/elk/elasticsearch-6.1.1/logs/elasticsearch.log"
type => "elasticsearch"
start_position => "beginning" #从文件开始处读写
}
}

output{
elasticsearch{
hosts=>["127.0.0.1:9201"]
index => "es-message-%{+YYYY.MM.dd}"
}
stdout{codec => rubydebug}
}
========================================

验证
查看索引列表 http://localhost:9201/_cat/indices?v
查看数据 http://localhost:9201/es-message-2018.02.26/_search
Kibana可视化工具
下载及安装:wget https://artifacts.elastic.co/downloads/kibana/kibana-6.2.2-linux-x86_64.tar.gz
解压 tar -zxvf kibana-6.2.2-linux-x86_64.tar.gz
访问地址
本机:localhost:5601
阿里云机器:http://120.79.160.143:5601
阿里云外网访问
开放端口,修改配置文件 confing目录下的kibana.yml
server.host: "0.0.0.0"
守护进程后台启动
nohup XXX &
tail - f nohup.out
kibana基本介绍、和elasticSearch版本兼容问题
简介:讲解什么是kibana,目录文件讲解,配置等
官网文档地址:https://www.elastic.co/guide/en/kibana/current/setup.html
ELK
注意事项
1、kibana和elsticserch版本不能差别大,否则无法正常使用 比如 Kibana 6.x 和 Elasticsearch 2.x不能正常使用
2、运行比Kibana更高版本的Elasticsearch通常可以工作 例如Kibana 5.0和Elasticsearch 5.1
3、小版本差异会有一些警告出现,除非两者升级到相同的版本
windows下安装启动文档
https://www.elastic.co/guide/en/kibana/current/windows.html
kibana.yml常见配置项
elasticsearch.pingTimeout 日常用的ping
elasticsearch.requestTimeout 读取es的超时时间
elasticsearch.url es主机地址
elasticsearch.username es鉴权的用户名
elasticsearch.password es鉴权的密码
kibana面板讲解和功能使用说明
简介:讲解kibana的web界面,各个模块划分,功能的基本使用
kibana状态及服务器资源使用率
http://120.79.160.143:5601/status
基础操作文档:https://www.elastic.co/guide/en/kibana/current/getting-started.html
1、创建索引表达式
使用*统配符,去匹配ES中的一个或多个索引(如果没有匹配,无法点击下一步)
2、discover面板发现数据
可以指定时间进行查询
可以使显示的字段
查询索引的数据,可以使用lucence语法进行查询
项目实战系列之《采集业务应用日志》配置
简介:选择日志源,配置logstash采集并输送到elasticSeach
常见问题解决
1、JVM内存溢出导致的 ES或者Logstash服务启不来,报错 insufficient memory
解决:升级机器的内存和CPU;
或者改elasticSeach和logstash的JVM.option,最大堆内存xmx和初始堆内存xms
2、ES启动报错
seccomp unavailable: CONFIG_SECCOMP not compiled into kernel, CONFIG_SECCOMP and CONFIG_SECCOMP_FILTER are needed
修改elasticsearch.yml 添加一下内容
bootstrap.memory_lock: false 为了避免内存和磁盘之间的swap
bootstrap.system_call_filter: false
3、ERROR: bootstrap checks failed
max virtual memory areas vm.max_map_count [65530] is too low, increase to at least
临时设置:sudo sysctl -w vm.max_map_count=262144
永久修改:
修改/etc/sysctl.conf 文件,添加 “vm.max_map_count”设置
并执行:sysctl -p
项目实战系列之Kibana图形、报表分析
简介:讲解业务应用日志在Kibana上的可视化分析,柱状图,饼状图等
官方文档地址:
https://www.elastic.co/guide/en/kibana/current/tutorial-load-dataset.html
下载数据集
wget https://download.elastic.co/demos/kibana/gettingstarted/accounts.zip
解压 unzip accounts.zip
导入数据到es中
curl -H 'Content-Type: application/x-ndjson' -XPOST 'localhost:9201/bank/account/_bulk?pretty' --data-binary @accounts.json
示例地址
https://www.elastic.co/guide/en/kibana/current/tutorial-visualizing.html
来源:https://www.cnblogs.com/xiangyuqi/p/8634981.html
