概述
链表:通过一组任意的存储单元来存储线性表的数据,这组存储单元可以是连续或不连续的。
每个节点包括:
1)数据域(当前节点的数值)
2)指针域(存储下一个节点的位置)
各个节点通过指针域串起来,像一条链子,所以叫“链表”。
单链表:每个节点只有一个指向直接后继节点的指针,所以叫“单链表”。
链表是一种常见的基础数据结构,它是一种线性表,但在内存中它并不是顺序存储的,它是以链式进行存储的,每一个节点里存放的是下一个节点的“指针”。在Java中的数据分为引用数据类型和基础数据类型,在Java中不存在指针的概念,但是对于链表而言的指针,指的就是引用数据类型的地址。
链表和数组都是线性的数据结构,对于数组而言其长度是固定的,由于在内存中其是连续的,因此更适合做查找与遍历,而链表在内存中是并不是顺序存储的,但是由于其是通过“指针”构成的,因此在插入、删除时比较数组更为的方便。
下面的代码通过内部类并结合递归的方式来实现了一个简单的用Java语言描述的链表的数据结构。
链表数据结构的定义
首先来看一下,链表数据结构的定义,代码如下:
class NodeManager { private Node root; // 根节点 private int currentIndex = 0; // 节点的序号,每次操作从0开始 public void add(int data) {} public void delNode(int data) {} public void print() {} public boolean findNode(int data) {} public boolean updateNode(int oldData, int newData) {} // 向索引之前插入 public void insert(int index, int data) {} // 谁拥有数据,谁提供方法 class Node { private int data; private Node next; // 把当前类型作为属性 public Node(int data) { this.data = data; } public void setData(int data) { this.data = data; } public int getData() { return data; } // 添加节点 public void addNode(int data) {} // 删除节点 public void delNode(int data) {} // 输出所有节点 public void printNode() {} // 查找节点是否存在 public boolean findNode(int data) {} // 修改节点 public boolean updateNode(int oldData, int newData) {} // 插入节点 public void insertNode(int index, int data) {} } } 对于链表的定义来说,NodeManager类是用来管理链表操作的,而成员内部类Node是用于提供链表数据与链式结构的。对于类的使用者来说,并不直接访问数据,因此操作的是NodeManager类,而内部类Node提供了真正的数据管理,因此Node类需要提供真正的数据操作方法,对于NodeManager类中也需要提供一套由外部来操作链表的方法。因此,在NodeManager类和Node类中都提供了看似相同的方法,但实际的意义并不相同。
下面来查看NodeManager类和Node类中的add()方法,代码如下:
public void add(int data) { if ( root == null ) { root = new Node(data); } else { root.addNode(data); } } // 添加节点 public void addNode(int data) { if ( this.next == null ) { this.next = new Node(data); } else { this.next.addNode(data); } } 代码中上面的方法是NodeManager类中的方法,而下面的方法是Node类中的方法。
在Manager类中提供了一个root的成员变量,它用于管理链表的头节点,因此在添加节点时,会先判断root是否为空,如果为空则直接将节点由root来进行保存,如果root不为空,则通过Node类中的addNode()方法来进行添加,添加到思路是找到当前链表的最后一个节点,并将新添加到节点赋值给最后一个节点的next成员变量中。
链表增删改查
对于链表的其他操作也是相同的思路,关于链表增删改查和输出的完整代码如下:
class NodeManager { private Node root; // 根节点 private int currentIndex = 0; // 节点的序号,每次操作从0开始 public void add(int data) { if ( root == null ) { root = new Node(data); } else { root.addNode(data); } } public void delNode(int data) { if ( root == null ) return ; if ( root.getData() == data ) { Node tmp = root; root = root.next; tmp = null; } else { root.delNode(data); } } public void print() { if ( root != null ) { System.out.print(root.getData() + " "); root.printNode(); System.out.println(); } } public boolean findNode(int data) { if ( root == null ) return false; if ( root.getData() == data ) { return true; } else { return root.findNode(data); } } public boolean updateNode(int oldData, int newData) { if ( root == null ) return false; if ( root.getData() == oldData ) { root.setData(newData); return true; } else { return root.updateNode(oldData, newData); } } // 向索引之前插入 public void insert(int index, int data) { if ( index < 0 ) return ; currentIndex = 0; if ( index == currentIndex ) { Node newNode = new Node(data); newNode.next = root; root = newNode; } else { root.insertNode(index, data); } } // 谁拥有数据,谁提供方法 class Node { private int data; private Node next; // 把当前类型作为属性 public Node(int data) { this.data = data; } public void setData(int data) { this.data = data; } public int getData() { return data; } // 添加节点 public void addNode(int data) { if ( this.next == null ) { this.next = new Node(data); } else { this.next.addNode(data); } } // 删除节点 public void delNode(int data) { if ( this.next != null ) { if ( this.next.getData() == data ) { Node tmp = this.next; this.next = this.next.next; tmp = null; } else { this.next.delNode(data); } } } // 输出所有节点 public void printNode() { if ( this.next != null ) { System.out.print(this.next.getData() + " "); this.next.printNode(); } } // 查找节点是否存在 public boolean findNode(int data) { if ( this.next != null ) { if ( this.next.getData() == data ) { return true; } else { return this.next.findNode(data); } } return false; } // 修改节点 public boolean updateNode(int oldData, int newData) { if ( this.next != null ) { if ( this.next.getData() == oldData ) { this.next.setData(newData); return true; } else { return this.next.updateNode(oldData, newData); } } return false; } // 插入节点 public void insertNode(int index, int data) { currentIndex ++; if ( index == currentIndex ) { Node newNode = new Node(data); newNode.next = this.next; this.next = newNode; } else { this.next.insertNode(index, data); } } } } 以上就是链表基本操作的完整代码,下面写一个调用的代码进行测试,代码如下:
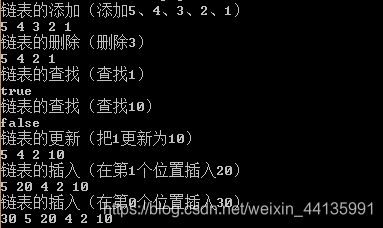
public class LinkList { public static void main(String[] args) { NodeManager nm = new NodeManager(); System.out.println("链表的添加(添加5、4、3、2、1)"); nm.add(5); nm.add(4); nm.add(3); nm.add(2); nm.add(1); nm.print(); System.out.println("链表的删除(删除3)"); nm.delNode(3); nm.print(); System.out.println("链表的查找(查找1)"); System.out.println(nm.findNode(1)); System.out.println("链表的查找(查找10)"); System.out.println(nm.findNode(10)); System.out.println("链表的更新(把1更新为10)"); nm.updateNode(1, 10); nm.print(); System.out.println("链表的插入(在第1个位置插入20)"); nm.insert(1, 20); nm.print(); System.out.println("链表的插入(在第0个位置插入30)"); nm.insert(0, 30); nm.print(); } } 将代码编译、运行,结果如下图:
