写在前面的话
做很多图像算法的时候,我们经常需要用到模板运算(如sobel图像边缘检测、中值滤波、均值滤波等等),处理这些问题的时候,我们可以借助altera提供的移位寄存器IP核来简化我们的设计,从而提高设计效率。本节,梦翼师兄和大家一起学习这个适合用于模板运算的移位寄存器IP核的用法。
功能要求
假设数据在一个ROM中以如下图所示的方式存放,列加行的值作为该数的地址(如e的地址就是8+1=9)。
|
address |
0 |
1 |
2 |
3 |
4 |
5 |
6 |
7 |
|
0 |
a |
d |
g |
j |
m |
p |
aa |
bb |
|
8 |
b |
e |
h |
k |
n |
q |
dd |
cc |
|
16 |
c |
f |
i |
l |
o |
r |
ee |
ff |
|
24 |
s |
t |
u |
v |
w |
rr |
gg |
hh |
|
…… |
y |
z |
uu |
vv |
ww |
|
ii |
jj |
在图像处理领域,要实现Sobel或者均值滤波等算法,则需要按照3*3矩阵的格式提取数据,如下图所示:(现在想要每次取出3列数据为一组,如第一列数据:a、b、c 第二列数据:d、e、f 第三列数据:g、h、i)

解决方案:在这儿我想给大家介绍一个叫做Shift_register的 IP核来实现这种功能,而且还有很重要的一点就是我们可以利用这种方法来实现流水线操作,我们暂且就将其看做是移位寄存的“FIFO”吧。
如果我们将该IP核配置成如下图所示的两个“FIFO”,那么我们从ROM中取数的原理就可以用下图表示:
 有两个“FIFO”,长度都是8。ROM中的数据从in端口输入,每次地址加一。
用一个计数器cnt作为ROM的地址线,cnt每增加1,ROM就会输出新的数据并通过in[7:0]端口进入shift_register,同时shift_register中的所有数据就会同步向前移位一次,当计数到16时:

下一个时钟到来时候开始同时取值shiftout0、shiftout1、shiftout2
操作步骤
首先建立一个深度为256,字节位宽为8,初始值为0到255的ROM IP核(参考:5.2节)。
接下来设置移位寄存器的IP核:
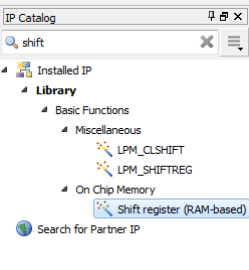
在右侧的IP核搜索的编辑区,键入shift,在菜单栏中找到并双击【Shift register】
 选择语言类型为Verilog,并命名,然后点击【OK】

设置位宽为8bit,设置有2个“fifo”,每个“fifo”的深度为8。然后点击【NEXT】

选择shift_reg_inst.v,点击【Finish】
 顶层架构设计

模块功能介绍
|
模块名 |
功能描述 |
|
counter |
给出rom的地址,以及移位寄存器的输出使能 |
|
rom |
Rom IP核,负责提供源数据 |
|
shift_register |
输出一定形式的数据 |
|
shift_reg |
连接各子模块 |
端口和内部连线描述
顶层模块端口介绍
|
端口名 |
端口说明 |
|
clk |
系统时钟输入 |
|
Rst_n |
系统复位 |
|
shiftout0 |
数据输出 |
|
Shiftout1 |
数据输出 |
|
Shiftout2 |
数据输出 |
系统内部连线介绍
|
连线名 |
连线说明 |
|
shift_en |
输出使能信号 |
|
cnt |
给rom的地址信号 |
|
in |
rom提供的初始数据 |
代码解释
Counter模块代码
|
/**************************************************** * Engineer : 梦翼师兄 * QQ : 761664056 * The module function:给出了rom的地址,以及移位寄存器的输出使能*****************************************************/ 00 module counter ( 01 clk, //系统时钟输入 02 rst_n, //系统复位 03 cnt, //rom地址 04 shift_en //输出使能信号 05 ); 06 //模块输入 07 input clk;//系统时钟输入 08 input rst_n;//系统复位 09 //模块输出 10 output reg [7:0] cnt;//rom地址 11 output reg shift_en;//输出使能信号 12 13 always @ (posedge clk or negedge rst_n) 14 begin 15 if (!rst_n) //复位清零 16 begin 17 cnt <= 0; 18 shift_en <= 0; 19 end 20 else 21 begin 22 if (cnt >= 16) //cnt计数为16的时候表示shift_register中的两个fifo值已经移入 23 begin 24 cnt <= cnt+1; 25 shift_en <= 1; 26 end 27 else 28 cnt <= cnt + 1; 29 end 30 end 31 32 33 endmodule |
Shift_register模块代码
|
/**************************************************** * Engineer : 梦翼师兄 * QQ : 761664056 * E_mail : zxopenwjf@126.com * The module function:进行移位输出 *****************************************************/ 00 module shift_register ( 01 clk, //系统时钟 02 rst_n, //系统复位 03 in, //rom给出的数据 04 shiftout0, //输出数据 05 shiftout1, //输出数据 06 shiftout2, //输出数据 07 shift_en //输出使能 08 ); 09 //系统输入 10 input clk; //系统时钟 11 input rst_n;//系统复位 12 input [7:0] in;//rom给出的数据 13 input shift_en;//输出使能 14 //系统输出 15 output [7:0] shiftout0; //输出数据 16 output [7:0] shiftout1;//输出数据 17 output [7:0] shiftout2;//输出数据 18 //定义中间连线 19 wire [15:0] taps; 20 21 assign shiftout0 = shift_en ? in : 0 ;//shift_en为真值时,shiftout0 = in 22 assign shiftout1 = shift_en ? taps [7:0] : 0 ;//shift_en为真值时,shiftout1 = taps [7:0] 23 assign shiftout2 = shift_en ? taps [15:8] : 0 ;//shift_en为真值时,shiftout2 = taps [15:8] 24 //调用IP核 25 my_shift my_shift_inst ( 26 .clock ( clk ), //系统时钟 27 .shiftin ( in ), //rom给出的数据 28 .shiftout (), //shiftout和taps中的数据一样,所以只用一个 29 .taps ( taps ) 30 ); 31 32 endmodule |
顶层连接
|
/**************************************************** * Engineer : 梦翼师兄 * QQ : 761664056
* The module function:顶层连接*****************************************************/ 00 module shift_reg ( 01 clk, //系统时钟输入 02 rst_n, //系统复位 03 shiftout0, //输出有效数据 04 shiftout1, //输出有效数据 05 shiftout2 //输出有效数据 06 ); 07 //系统输入 08 input clk; //系统时钟输入 09 input rst_n;//系统复位 10 //系统输出 11 output [7:0] shiftout0; //输出有效数据 12 output [7:0] shiftout1; //输出有效数据 13 output [7:0] shiftout2; //输出有效数据 14 //定义中间连线 15 wire [7:0] cnt; //rom的地址 16 wire [7:0] in; //rom中的数据 17 wire shift_en; //输出使能 18 //调用rom 19 my_rom my_rom_inst ( 20 .address ( cnt ), //rom的地址 21 .clock ( clk ), //时钟 22 .q (in ) //rom的输出数据 23 ); 24 //实例化counter 25 counter counter ( 26 .clk(clk), //系统时钟输入 27 .rst_n(rst_n),//系统复位 28 .cnt(cnt), //rom的地址 29 .shift_en(shift_en)//输出使能 30 ); 31 //实例化shift_register 32 shift_register shift_register ( 33 .clk(clk), //系统时钟输入 34 .rst_n(rst_n), //系统复位 3 .in(in), //移位寄存器的输入数据 36 .shift_en(shift_en), //输出使能 37 .shiftout0(shiftout0), //输出有效数据 38 .shiftout1(shiftout1), //输出有效数据 39 .shiftout2(shiftout2) //输出有效数据 40 ); 41 42 endmodule |
编写完可综合代码之后,查看RTL视图如下:

由RTL视图可以看出,代码综合以后的结果和我们设计的系统框图一致,说明顶层模块级联关系正确,接下来编写测试代码如下:
|
/**************************************************** * Engineer : 梦翼师兄 * QQ : 761664056 * The module function :shift_reg 的仿真测试:*****************************************************/ 00 `timescale 1ns/1ps //时间单位和精度定义 01 02 module shift_reg_tb; 03 //系统输入 04 reg clk; //系统时钟输入 05 reg rst_n;//系统复位 06 //系统输出 07 wire [7:0] shiftout0; //输出有效数据 08 wire [7:0] shiftout1; //输出有效数据 09 wire [7:0] shiftout2; //输出有效数据 10 11 initial begin 12 clk = 1; 13 rst_n = 0; 14 # 200.1 15 rst_n = 1; 16 end 17 18 always # 10 clk = ~clk; //50M的时钟 19 20 shift_reg shift_reg ( 21 .clk(clk), //系统时钟输入 22 .rst_n(rst_n), //系统复位 23 .shiftout0(shiftout0), //输出有效数据 24 .shiftout1(shiftout1), //输出有效数据 25 .shiftout2(shiftout2) //输出有效数据 26 ); 27 28 endmodule |
仿真分析

当shift_en拉高以后,shiftout0,shiftout1,shiftout2,就输出了预想的值,证明我们的设计正确。
