一直想尝试下pxe自动安装centos6和centos7,最近几天做了下实验,虽然实践的过程中碰到许多问题,但收获还是有的,把碰到的问题和收获分享下。
pxe自动安装需要三个服务,分别为dhcp、tftp、nginx,这三个服务我都使用centos6.6安装了。其中nginx也可以使用apache等其它web服务器,也可以使用nfs服务器,由于本人对nginx比较熟悉,就用nginx了。centos6和7的下载地址为:http://archive.kernel.org/centos-vault/。
还是先看效果图,最终使用pxe自动安装cento6和centos7的截图如下:
服务器上的三个服务:

centos6自动安装的截图:


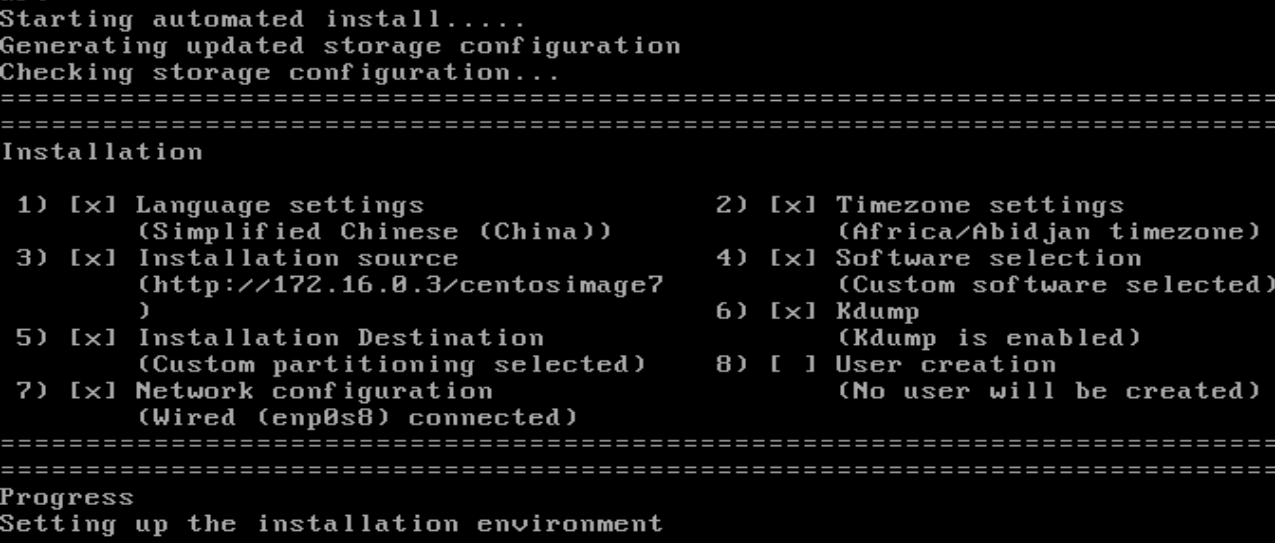
centos7自动安装的截图:

下面说下安装的过程:
1: nginx的安装就不说了,配置贴下,我是root到/var/www/html目录。
location / {
            root   /var/www/html/;
            index  index.html index.htm;
        }
/var/www/html需要放置的kickstart的配置和centos的安装镜像包,如图,后面讲配置的话会有说明:

2: 安装dhcp服务器,直接使用yum install dhcp -y安装即可。dhcp的配置如下,dhcp上有个pxelinux.0需要等安装tftp的时候再说,另外的就是一些dhcp的配置:
ddns-update-style interim;
ignore client-updates;
allow booting;
allow bootp;

class "pxeclients"{
match if substring(option vendor-class-identifier,0,9) = "PXEClient";
filename "pxelinux.0"; //tftp上需要有pxelinux.0的文件
next-server 172.16.0.3;  //这个为提供自动安装服务的ip
}

subnet 172.16.0.0 netmask 255.255.255.0 {  //一个子网
option routers 172.16.0.1;
option subnet-mask 255.255.255.0;
option time-offset -18000;
range dynamic-bootp 172.16.0.10 172.16.0.11; //可分配的ip
default-lease-time 216000;
max-lease-time 432000;
}
3: 安装tftp服务器,tftp服务器由xinetd管理,直接使用yum install tftp-server -y安装即可。安装完后修改/etc/xinetd.d/tftp配置如下:
service tftp
{
        socket_type             = dgram
        protocol                = udp
        wait                    = yes
        user                    = root
        server                  = /usr/sbin/in.tftpd
        server_args             = -s /usr/local/tftp/tftpboot  //tftp的根目录,需要放pxelinux.0等
        disable                 = no     //改为no,则启动xinetd的时候就会启动tftp服务器
        per_source              = 11
        cps                     = 100 2
        flags                   = IPv4
}
接下来得安装yum instll syslinux-tftpboot -y,这个用来引导加载的,pxe自动安装需要用syslinux来引导。安装完后使用:
cp /usr/share/syslinux/pxelinux.0 /usr/share/syslinux/vesamenu.c32 /usr/local/tftp/tftpboot/把pxelinux.0和vesamenu.c32拷贝到tftp的根目录下。dhcp获取到ip地址也会获取到pxelinux.0这个引导的文件名,用它来做引导以做下一步的安装。
4: 使用yum install system-config-kickstart -y安装一下kickstart,kickstart不用开启服务,不知道为什么不需要开启服务,但安装下才能支持kickstart自动安装。到这里服务基本已经安装好了,以下讲下配置,需要配置把这些服务串在一起。
5: pxe的启动配置为:/usr/local/tftp/tftpboot/pxelinux.cfg/default(pxelinux.cfg需要自己创建),这个配置比较简单,最重要的是指明kickstart通过http去获取下来,这边使用到nginx服务器,配置如下:
default vesamenu.c32
prompt 1
timeout 100 //代表10s后启动安装

menu background splash.jpg
menu title Welcome to Install System
label Auto_CentOS
menu label Auto Install CentOS6
kernel centos/vmlinuz
append initrd=centos/initrd.img ks=http://172.16.0.3/ks.cfg #指明ks.cfg去哪里获取

label Auto_CentOS7
menu label Auto Install CentOS7
kernel centos7/vmlinuz
append initrd=centos7/initrd.img inst.ks=http://172.16.0.3/ks7.cfg devfs=nomount inst.repo=http://172.16.0.3/centosimage7/ nomodeset inst.stage2=http://172.16.0.3/centosimage7/
#centos7的自动安装和centos6的安装有点区别,需要inst.ks和inst.repo。

label rescue
menu label Resuce
menu default
kernel centos/vmlinuz
append initrd=centos/initrd.img
为什么要加prompt 1和menu default是为安全,prompt 1会把安装停留在boot,按回车会到另外救援模式,预防别的机器从网络启动把磁盘给格式化了。
还有一个配置需要注意,就是kernel centos/vmliuz这个文件去哪里读取呢?这个就需要把即将要使用的centos6和centos7的镜像mount到/var/www/html下,我这里使用的是最小化的版本,挂载命令如下:
mount -o loop /usr/local/src/CentOS-6.6-x86_64-minimal.iso /var/www/html/centosimage
mount -o loop /usr/local/src/CentOS-7-x86_64-Minimal-1511.iso /var/www/html/centosimage7
挂载后把vmlinuz和initrd.img拷贝到tftp的目录下,命令如下(centos和centos7的目录需要自建):
cp /var/www/html/centosimage/isolinux/vmlinuz /var/www/html/centosimage/isolinux/initrd.img /usr/local/tftp/tftpboot/centos/
cp /var/www/html/centosimage7/isolinux/vmlinuz /var/www/html/centosimage7/isolinux/initrd.img /usr/local/tftp/tftpboot/centos7/
6: kickstart的配置,这个配置也是kickstart自动安装的配置核心了,由于pxe是去读取http://172.16.0.3/ks.cfg和http://172.16.0.3/ks7.cfg,因此这两个文件得在/var/www/html下。
其中/var/www/html/ks.cfg的配置如下,平常手动安装需要设置密码,键盘模式,语言,时区,磁盘分区都在配置中可看到:
firewall --disabled
install
rootpw 123456 #密码这里就简单设置了,一般需要md5后的密码配置在这里。
auth  --useshadow  --passalgo=sha512
url --url http://172.16.0.3/centosimage #这里使用http去获取一些安装包,前面我们已经挂载到/var/www/html下,可直接获取
#graphical
text
firstboot --disable
keyboard us
lang zh_CN
selinux --disabled
logging --level=info
reboot
timezone  Africa/Abidjan
network  --bootproto=dhcp --device=eth0 --onboot=on
bootloader --location=mbr
zerombr
clearpart --all --initlabel #格式化磁盘
part / --asprimary --fstype="ext4" --size=2000 #/分配2G,默认使用M为单位。
part /boot --fstype="ext4" --size=200
part swap --fstype="swap" --size=512
part /data --fstype="ext4" --grow --size=1 #--grow代表剩下的空间全部给/data,这里的--size=1好像没什么用
另外centos7的配置文件也差不多,/var/www/html/ks7.cfg的配置如下:
firewall --disabled
install
rootpw 123456
auth  --useshadow  --passalgo=sha512
#graphical
text
firstboot --disable
keyboard us
lang zh_CN
selinux --disabled
logging --level=debug
zerombr
reboot
timezone  Africa/Abidjan
network  --bootproto=dhcp --device=enp0s8 --onboot=on --noipv6
bootloader --location=mbr
clearpart --all --initlabel
part / --asprimary --fstype="ext4" --size=5000
part /boot --fstype="ext4" --size=200
part swap --fstype="swap" --size=512
part /data --fstype="ext4" --grow --size=1
url --url http://172.16.0.3/centosimage7

%packages
%end #这个得有,不然在安装centos7的时候会被中断。我使用的mini的包,就不用指定,只有base的。
软件安装和配置完就启动服务,启动三个服务的命令如下:
/etc/init.d/dhcpd restart
/etc/init.d/xinetd restart
/usr/local/nginx/sbin/nginx
服务启动完成后,使用virtual box新建个虚拟机,然后添加一个磁盘,使用网络启动即可自动安装。

安装完后使用磁盘启动就可以看到系统了,内存得稍微放大点,不然安装会不成功,1G内存对于cento6和centos7的安装够的。下面讲下实验过程中遇到的问题。
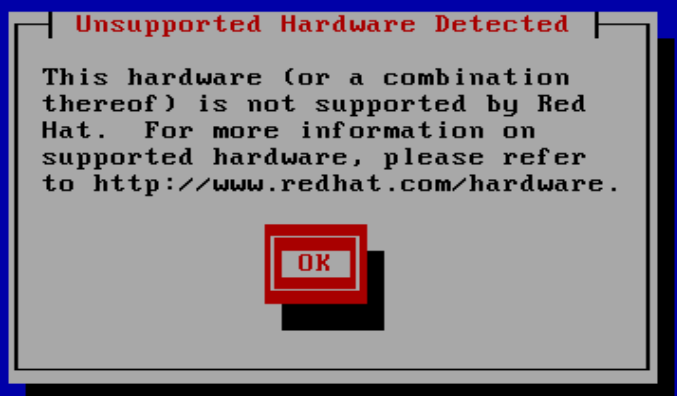
问题1,安装centos6的时候老是提示硬件不支持,要敲个回车才能继续安装。

后来找到原因了,是因为一开始使用的是centos6.3,可能是centos6.3的内核有点老,导致有些硬件不支持,后来换成使用centos6.6的iso就好了。注意:是这两个文件/usr/local/tftp/tftpboot/centos/vmlinuz和/usr/local/tftp/tftpboot/centos/initrd.img,这两个文件一定要用centos6.6里面的。centos6.6里面的vmlinuz和initrd.img也可用来安装centos6.3的,我试过没问题,也就是/var/www/html/centosimage/里面的可以是centos6.3版本的。
问题2,安装centos7的时候报了个磁盘不够用的情况,一开始ks7.cfg根盘的配置是part / --asprimary --fstype="ext4" --size=1000。如图:

报错是比较明显的,由于centos7安装比较大,需要1861M的空间的,一开始我设置的1000M,还一直定位不出问题,改了很多配置,后续才想起根分区设置的1G不够用。
Kickstart自动安装Centos7、Centos6教程地址:https://edu.51cto.com/sd/50426
来源:oschina
链接:https://my.oschina.net/u/1588616/blog/824844