- 目录
- 1.Linux监控平台介绍
- 2.zabbix监控介绍
- 3.安装zabbix
- 4.忘记admin密码如何做
- 5.主动模式和被动模式
- 6.添加主机
- 7.添加自定义模板
- 8.处理图形中的乱码
- 9.自动发现
- 10.添加自定义监控项目
- 11.配置邮件告警
- 12.测试告警
- 扩展
1.Linux监控平台介绍
常见的开源监控软件:
cacti、nagios(不需要mysql的支持)、zabbix(最流行,配置简单)、smokeping(监控网络设备)、open-falcon等等
cacti、smokeping偏向于基础监控,成图非常漂亮(需要mysql的支持);cacti、nagios、zabbix服务端监控中心,需要php环境支持,其中zabbix和cacti都需要mysql作为数据存储,nagios不用存储历史数据,注重服务或者监控项的状态,zabbix会获取服务或者监控项目的数据,会把数据记录到数据库里,从而可以成图
open-falcon为小米公司开发,开源后受到诸多大公司和运维工程师的追捧,适合大企业,滴滴、360、新浪微博、京东等大公司在使用这款监控软件,值得研究。
zabbix支持web界面。
2.zabbix监控介绍
C/S架构,基于C++开发,监控中心支持web界面配置和管理
单server节点可以支持上万台客户端
最新版本3.4,官方文档
5个组件
zabbix-server 监控中心,接收客户端上报信息,负责配置、统计、操作数据
数据存储 存放数据,比如mysql
web界面 也叫web UI,在web界面下操作配置是zabbix简单易用的主要原因
zabbix-proxy 可选组件,它可以代替zabbix-server的功能,减轻server的压力
zabbix-agent 客户端软件,负责采集各个监控服务或项目的数据,并上报
zabbix监控流程图
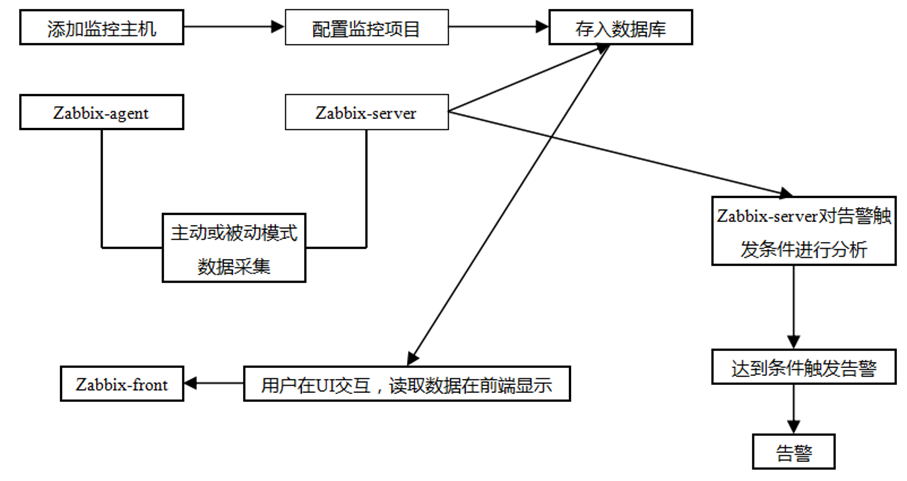
3.安装zabbix
准备两台机器,可以yum安装,但是要安装epel拓展源,但是安装的zabbix版本过低。
在两台机器上下载zabbix安装包,下载地址在官网寻找
[root@localhost src]# wget https://repo.zabbix.com/zabbix/3.2/rhel/7/x86_64/zabbix-release-3.2-1.el7.noarch.rpm
安装zabbix
[root@localhost src]# rpm -ivh zabbix-release-3.2-1.el7.noarch.rpm
警告:zabbix-release-3.2-1.el7.noarch.rpm: 头V4 RSA/SHA512 Signature, 密钥 ID a14fe591: NOKEY
准备中...                          ################################# [100%]
正在升级/安装...
   1:zabbix-release-3.2-1.el7         ################################# [100%]
因为在安装zabbix的时候自动安装了一个zabbix源,所以直接可以安装一些zabbix的一些包。
[root@xiaoqi1 src]# ls /etc/yum.repos.d/zabbix.repo
/etc/yum.repos.d/zabbix.repo
安装一些包;会连带安装httpd和php,只在服务端上安装
[root@localhost src]# yum install -y zabbix-agent zabbix-get zabbix-server-mysql zabbix-web zabbix-web-mysql
编辑服务端上的mysql配置文件,设置默认字符集。如果不设置字符集,当zabbix界面设置为中文时,会显示一些问题。
[mysqld]
character_set_server = utf8
datadir=/data/mysql
socket=/tmp/mysql.sock
创建库
[root@localhost src]# export PATH=$PATH:/usr/local/mysql/bin/
[root@localhost src]# source /etc/profile
[root@localhost src]# mysql -uroot
Welcome to the MySQL monitor.  Commands end with ; or \g.
Your MySQL connection id is 1
Server version: 5.6.36 MySQL Community Server (GPL)

Copyright (c) 2000, 2017, Oracle and/or its affiliates. All rights reserved.

Oracle is a registered trademark of Oracle Corporation and/or its
affiliates. Other names may be trademarks of their respective
owners.

Type 'help;' or '\h' for help. Type '\c' to clear the current input statement.

mysql> create database zabbix character set utf8;
Query OK, 1 row affected (0.00 sec)
创建用户
mysql> grant all on zabbix.* to 'zabbix'@'127.0.0.1' identified by 'xiaoqi-zabbix';
Query OK, 0 rows affected (0.00 sec)
  来源ip
导入原始数据
[root@localhost src]# cd /usr/share/doc/zabbix-server-mysql-3.2.11/
解压文件,并把文件导入zabbix数据库中

[root@localhost zabbix-server-mysql-3.2.11]# gzip -dd create.sql.gz
[root@localhost zabbix-server-mysql-3.2.11]# ls
AUTHORS  ChangeLog  COPYING  create.sql  NEWS  README
[root@localhost zabbix-server-mysql-3.2.11]# mysql -uroot zabbix < create.sql
启动zabbix和httpd,启动前关闭nginx
[root@localhost ~]# systemctl start zabbix-server.service
[root@localhost ~]# ps aux|grep nginx
root       2822  0.0  0.0 112724   972 pts/1    R+   17:30   0:00 grep --color=autonginx
[root@localhost ~]# systemctl start httpd

[root@localhost ~]# systemctl enable httpd
Created symlink from /etc/systemd/system/multi-user.target.wants/httpd.service to /usr/lib/systemd/system/httpd.service.
[root@localhost ~]# systemctl enable zabbix-server.service
Created symlink from /etc/systemd/system/multi-user.target.wants/zabbix-server.service to /usr/lib/systemd/system/zabbix-server.service.
发现没有监听端口,查看日志 /var/log/zabbix/zabbix_server.log ,发现不能连接mysql
修改配置文件
[root@localhost ~]# vim /etc/zabbix/zabbix_server.conf


# DBHost=localhost
DBHost=127.0.0.1            生产环境中可以把mysql放在另外一台机器

在DBUser=zabbix 下增加
DBPassword=xiaoqi-zabbix
重启服务
[root@localhost ~]# systemctl restart zabbix-server.service
[root@localhost ~]# ps aux|grep zabbix
zabbix     2989  2.5  0.4 256308  4132 ?        S    17:39   0:00 /usr/sbin/zabbix_server -c /etc/zabbix/zabbix_server.conf
zabbix     2992  0.0  0.2 256308  2460 ?        S    17:39   0:00 /usr/sbin/zabbix_server: configuration syncer [waiting 60 sec for processes]
.
.
.

监听端口

[root@localhost ~]# !net
netstat -lntp
Active Internet connections (only servers)
Proto Recv-Q Send-Q Local Address           Foreign Address         State       PID/Program name
tcp        0      0 0.0.0.0:22              0.0.0.0:*               LISTEN      813/sshd
tcp        0      0 127.0.0.1:25            0.0.0.0:*               LISTEN      2081/master
tcp        0      0 0.0.0.0:10051           0.0.0.0:*               LISTEN      2989/zabbix_server
tcp6       0      0 :::3306                 :::*                    LISTEN      2674/mysqld
tcp6       0      0 :::80                   :::*                    LISTEN      2829/httpd
tcp6       0      0 :::22                   :::*                    LISTEN      813/sshd
tcp6       0      0 ::1:25                  :::*                    LISTEN      2081/master
tcp6       0      0 :::10051                :::*                    LISTEN
配置web界面
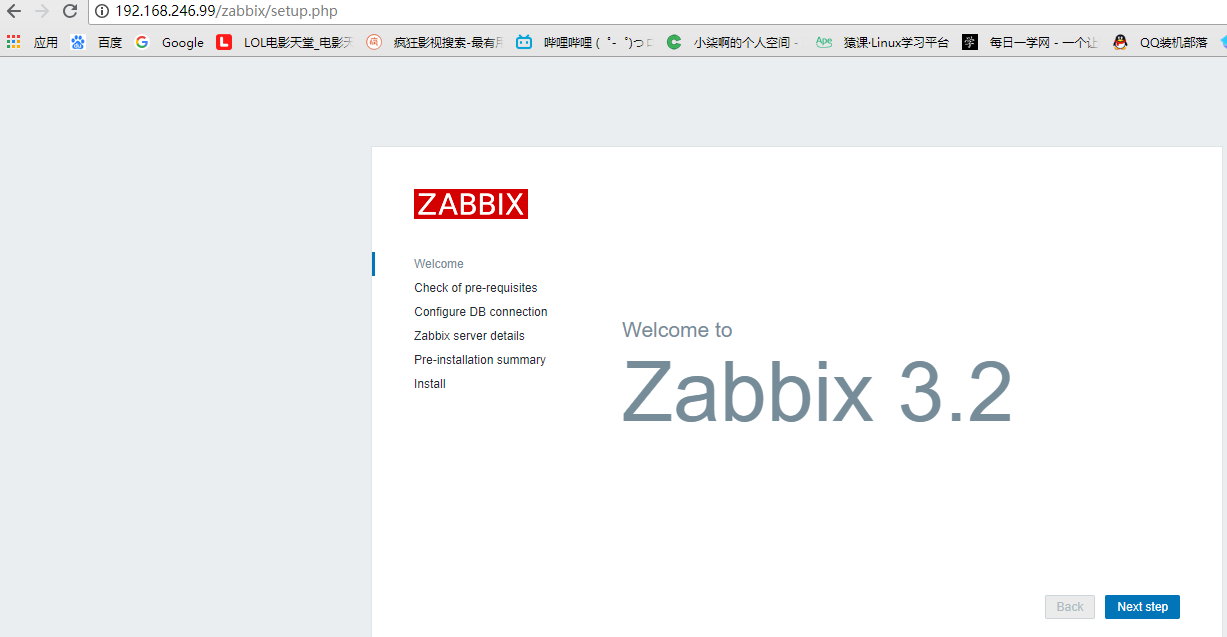

需要设置时区
[root@localhost ~]# vi /etc/php.ini

date.timezone = Asia/Shanghai

重启httpd
[root@localhost ~]# systemctl restart httpd.service
刷新界面
![]()
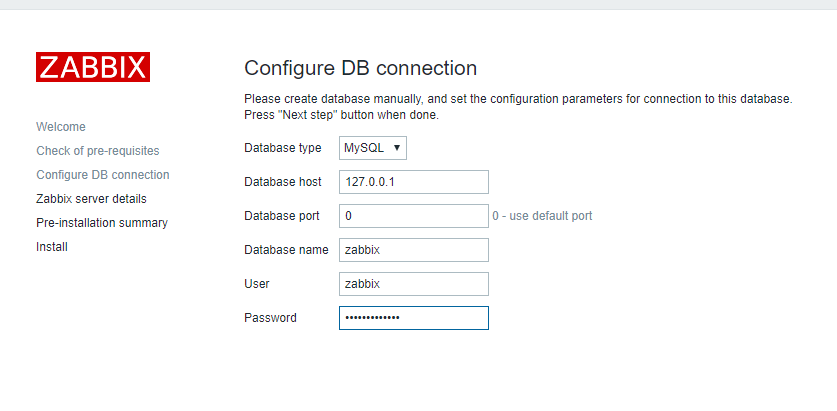 0为默认端口。
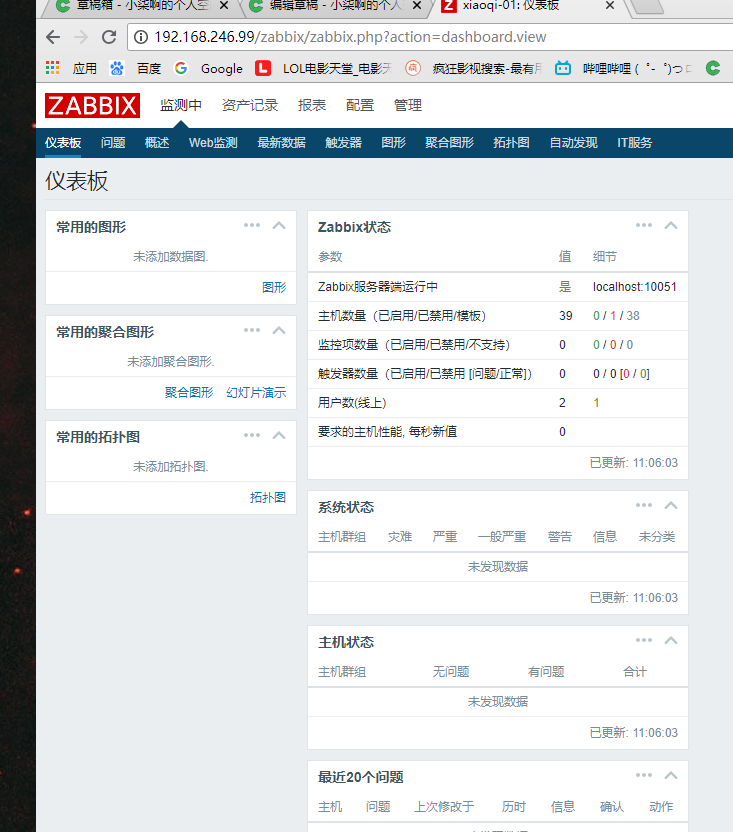
安装成功
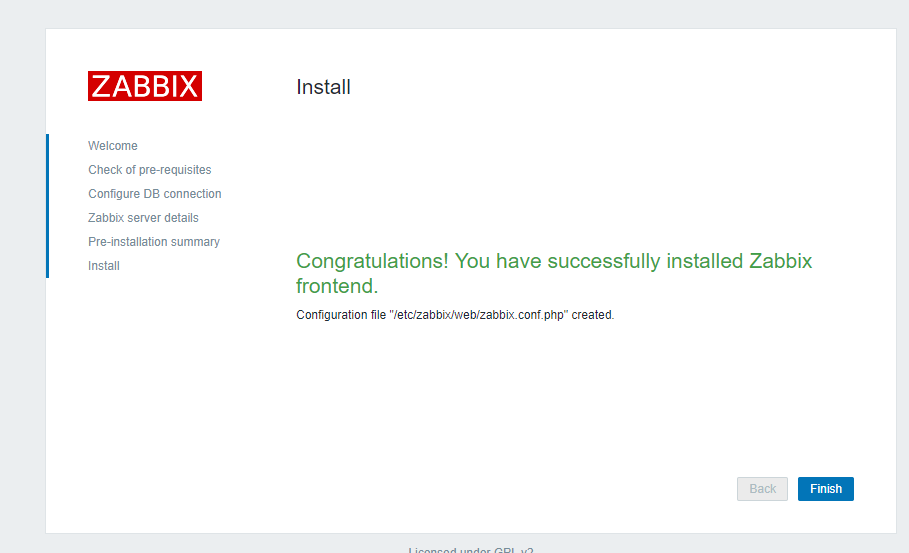
默认管理员账户Admin密码zabbix
修改默认密码;也可以修改语言

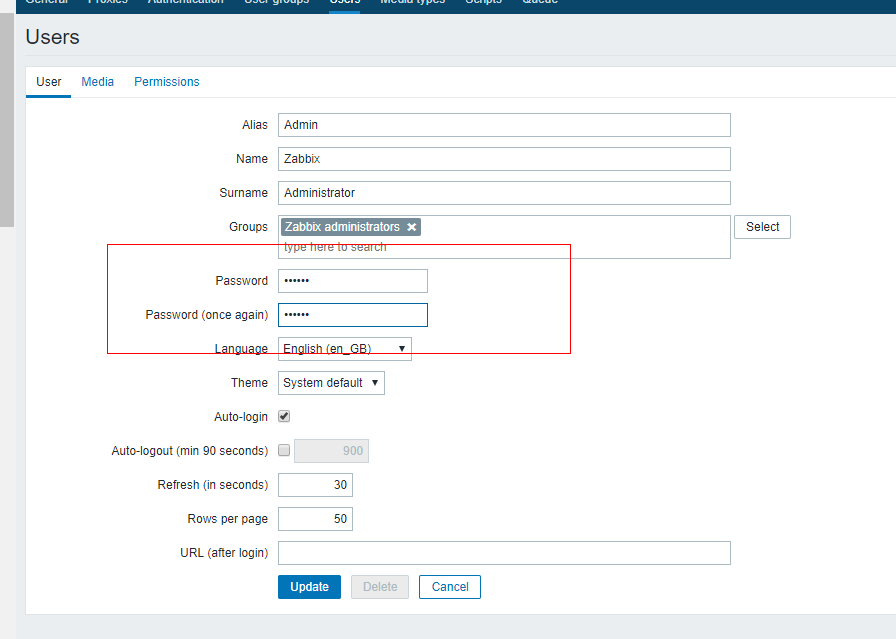
配置完成后的界面
在客户端上也要安装zabbix;只要装 zabbix-agent
[root@xiaoqi1 src]# yum install -y zabbix-agent
修改配置文件
修改server ip
被动模式
Server=192.168.246.99
修改serveractive ip
主动模式
ServerActive=192.168.246.99

Hostname=Klone
启动服务
[root@localhost ~]# systemctl start zabbix-agent.service
[root@localhost ~]# ps aux|grep zabbix
zabbix     2266  0.0  0.1  80644  1272 ?        S    11:24   0:00 /usr/sbin/zabbix_agentd -c /etc/zabbix/zabbix_agentd.conf
zabbix     2267  0.0  0.1  80644  1316 ?        S    11:24   0:00 /usr/sbin/zabbix_agentd: collector [idle 1 sec]
zabbix     2268  0.0  0.1  80644  1832 ?        S    11:24   0:00 /usr/sbin/zabbix_agentd: listener #1 [waiting for connection]
zabbix     2269  0.0  0.1  80644  1832 ?        S    11:24   0:00 /usr/sbin/zabbix_agentd: listener #2 [waiting for connection]
zabbix     2270  0.0  0.1  80644  1832 ?        S    11:24   0:00 /usr/sbin/zabbix_agentd: listener #3 [waiting for connection]
zabbix     2271  0.0  0.2  80772  2220 ?        S    11:24   0:00 /usr/sbin/zabbix_agentd: active checks #1 [idle 1 sec]
root       2273  0.0  0.0 112720   976 pts/0    R+   11:24   0:00 grep --color=auto zabbix
[root@localhost ~]# netstat -lntp
Active Internet connections (only servers)
Proto Recv-Q Send-Q Local Address           Foreign Address         State       PID/Program name
tcp        0      0 0.0.0.0:22              0.0.0.0:*               LISTEN      1502/sshd
tcp        0      0 127.0.0.1:25            0.0.0.0:*               LISTEN      2060/master
tcp        0      0 0.0.0.0:10050           0.0.0.0:*               LISTEN      2266/zabbix_agentd
tcp6       0      0 :::3306                 :::*                    LISTEN      1721/mysqld
tcp6       0      0 :::22                   :::*                    LISTEN      1502/sshd
tcp6       0      0 ::1:25                  :::*                    LISTEN      2060/master
tcp6       0      0 :::10050                :::*                    LISTEN      2266/zabbix_agentd
4.忘记admin密码如何做
进入mysql命令行,选择zabbix库
[root@localhost ~]# mysql -uroot
Welcome to the MySQL monitor.  Commands end with ; or \g.
Your MySQL connection id is 73
Server version: 5.6.36 MySQL Community Server (GPL)

Copyright (c) 2000, 2017, Oracle and/or its affiliates. All rights reserved.

Oracle is a registered trademark of Oracle Corporation and/or its
affiliates. Other names may be trademarks of their respective
owners.

Type 'help;' or '\h' for help. Type '\c' to clear the current input statement.

mysql> use zabbix
Reading table information for completion of table and column names
You can turn off this feature to get a quicker startup with -A

Database changed
mysql>
密码存在user表中
mysql> desc users;
+----------------+---------------------+------+-----+---------+-------+
| Field          | Type                | Null | Key | Default | Extra |
+----------------+---------------------+------+-----+---------+-------+
| userid         | bigint(20) unsigned | NO   | PRI | NULL    |       |
| alias          | varchar(100)        | NO   | UNI |         |       |
| name           | varchar(100)        | NO   |     |         |       |
| surname        | varchar(100)        | NO   |     |         |       |
| passwd         | char(32)            | NO   |     |         |       |
| url            | varchar(255)        | NO   |     |         |       |
| autologin      | int(11)             | NO   |     | 0       |       |
| autologout     | int(11)             | NO   |     | 900     |       |
| lang           | varchar(5)          | NO   |     | en_GB   |       |
| refresh        | int(11)             | NO   |     | 30      |       |
| type           | int(11)             | NO   |     | 1       |       |
| theme          | varchar(128)        | NO   |     | default |       |
| attempt_failed | int(11)             | NO   |     | 0       |       |
| attempt_ip     | varchar(39)         | NO   |     |         |       |
| attempt_clock  | int(11)             | NO   |     | 0       |       |
| rows_per_page  | int(11)             | NO   |     | 50      |       |
+----------------+---------------------+------+-----+---------+-------+
16 rows in set (0.01 sec)
修改密码
mysql> update users set passwd=md5('1234567') where alias='Admin';
Query OK, 1 row affected (0.00 sec)
Rows matched: 1  Changed: 1  Warnings: 0
使用旧密码登录失败,新密码登录后会有错误密码登录提示。

5.主动模式和被动模式
主动或者被动是相对客户端来讲的
被动模式,服务端会主动连接客户端获取监控项目数据,客户端被动地接受连接,并把监控信息传递给服务端。
主动模式,客户端会主动把监控数据汇报给服务端,服务端只负责接收即可。
当客户端数量非常多时,建议使用主动模式,这样可以降低服务端的压力。
服务端有公网ip,客户端只有内网ip,但却能连外网,这种场景适合主动模式
6.添加主机
添加主机群组

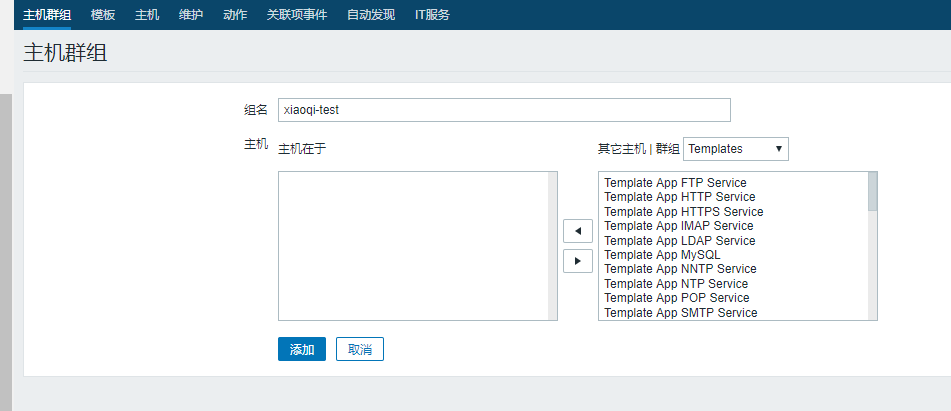
创建主机

配置主机名,所属,ip地址。 主动模式和被动模式在监控项里面定义
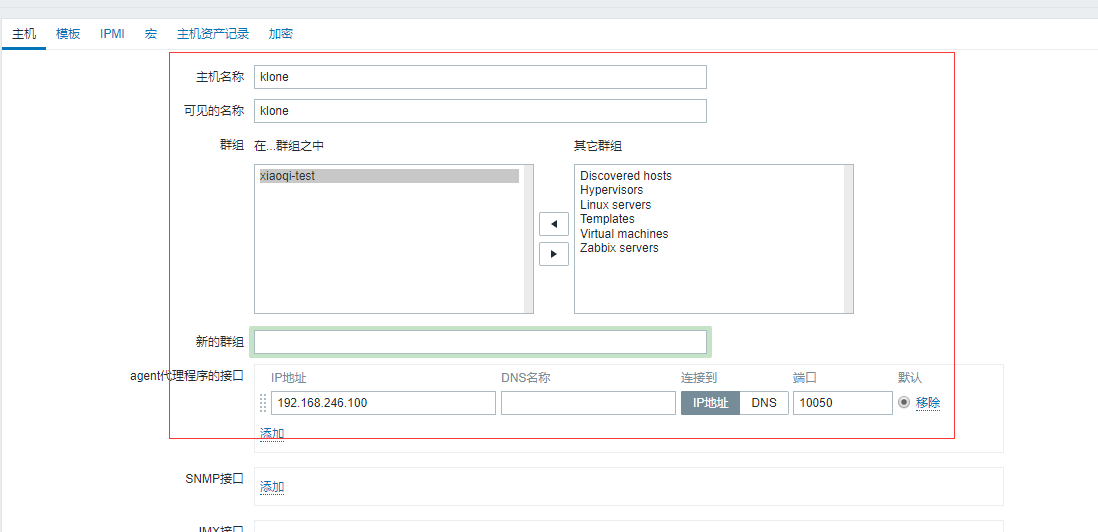

应用集是监控项目的集合,方便管理监控项目;触发器是针对某个项目设置的告警设置;图形是根据历史数据所成的图表;web监测是监测网站是否正常。
7.添加自定义模板
可以自定义一个常用模板,方便给新增主机添加监控项目
创建模板

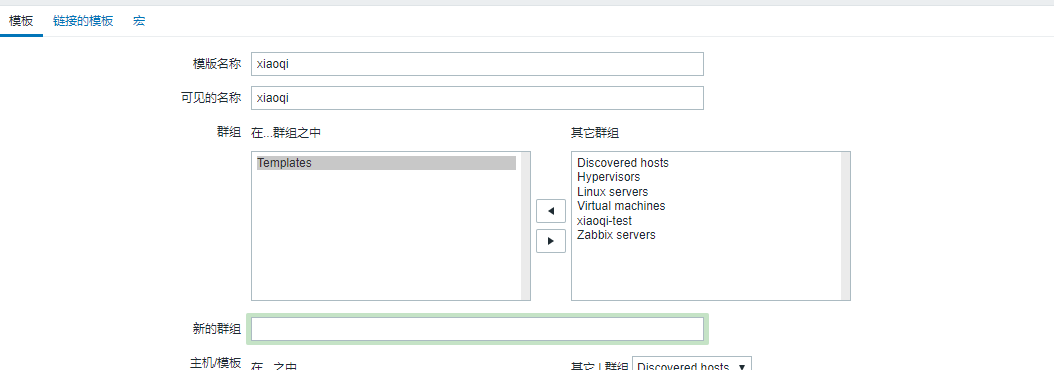
把其他自带模板里面的某些监控项目(比如cpu、内存等)复制到模板里
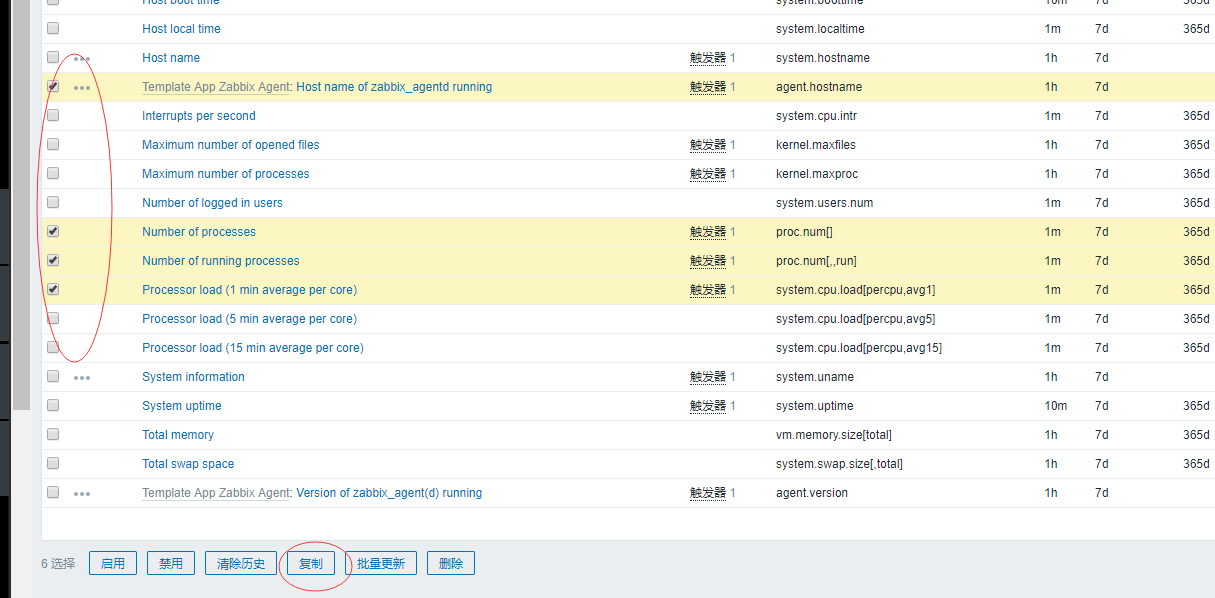


复制成功

定义触发器
添加图形
自动发现,找到Template OS Linux,点击右侧的自动发现,参考Mounted filesystem discovery和Network interface discovery定义规则

没有复制选项可以先导出模板,然后再编辑模板,留下需要的。再导入(工作量很大)
先删除所有的监控项,选择连接的模板
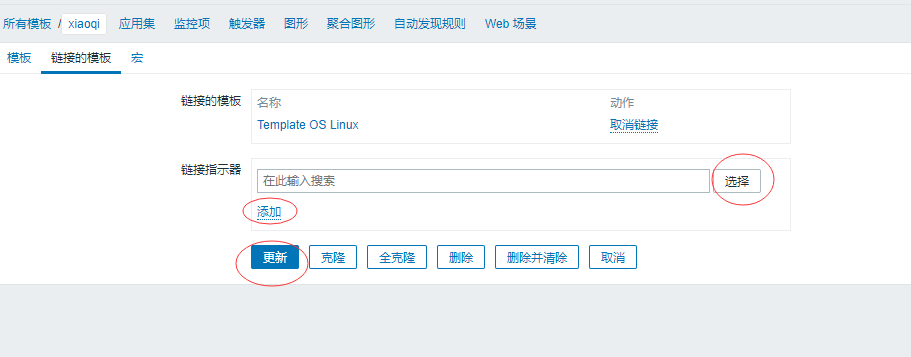

多余的监控项无法删除

取消连接后可以删除多余的监控项,但是取消连接并清理会清空所有了。删除监控项才能删除应用集。

8.处理图形中的乱码
添加模板到主机
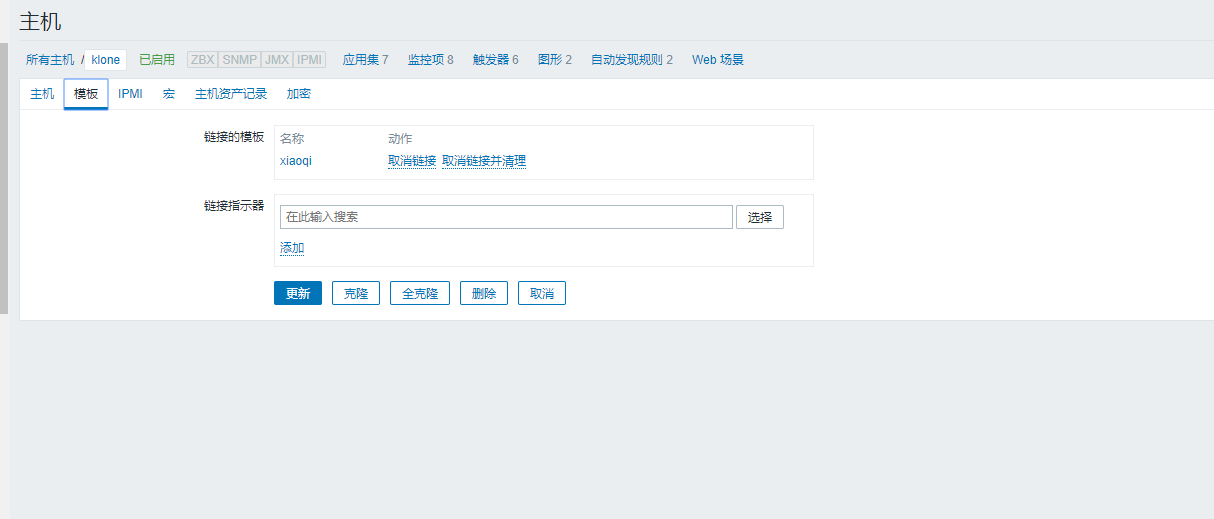

但是预览图形显示乱码;因为没有中文字库。
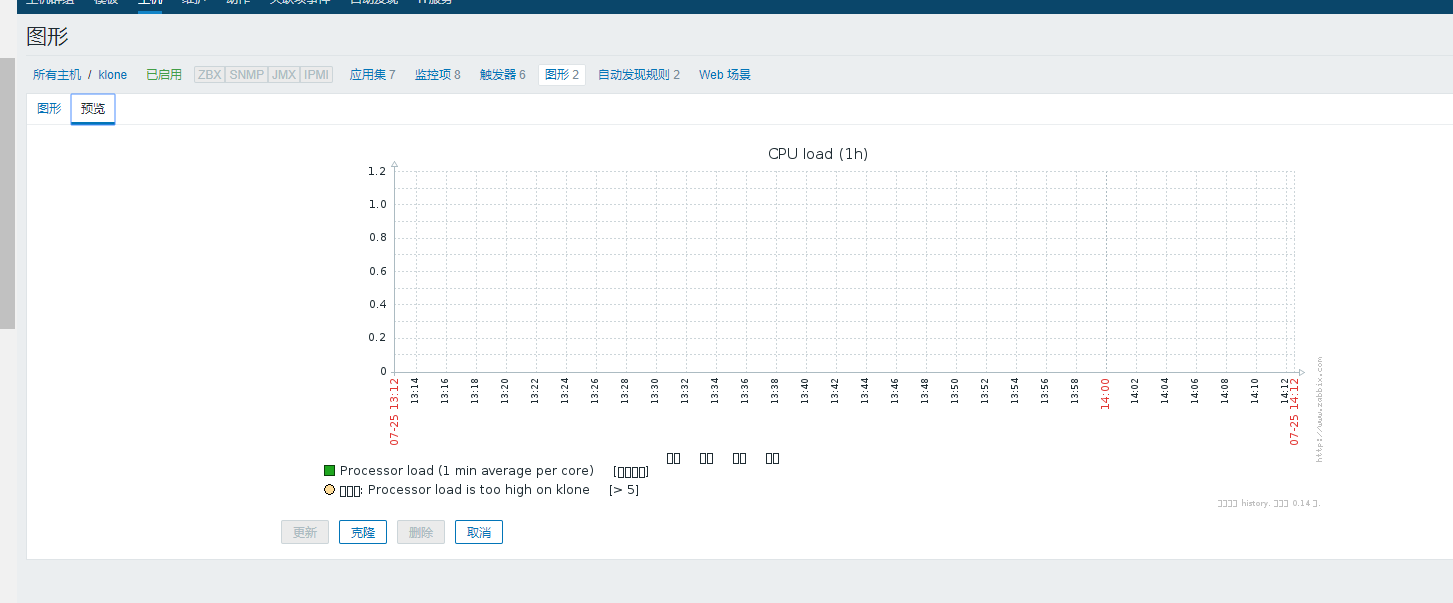
打开服务端的配置文件,查看字体文件所在位置
[root@localhost ~]# vi /usr/share/zabbix/include/defines.inc.php

[1]+  已停止               vi /usr/share/zabbix/include/defines.inc.php
[root@localhost ~]# ll /usr/share/zabbix/fonts/
总用量 0
lrwxrwxrwx 1 root root 33 7月  24 17:11 graphfont.ttf -> /etc/alternatives/zabbix-web-font
寻找windows下的字体文件

用xftp传输文件,移动字体文件到fonts目录下,移除之前的文件并做软连接
[root@localhost ~]# mv /root/STFANGSO.TTF /usr/share/zabbix/fonts/
[root@localhost ~]# cd !$
cd /usr/share/zabbix/fonts/
[root@localhost fonts]# mv graphfont.ttf graphfont.ttf .bak
mv: 目标".bak" 不是目录
[root@localhost fonts]# mv graphfont.ttf graphfont.ttf.bak
[root@localhost fonts]# ls
graphfont.ttf.bak  STFANGSO.TTF
[root@localhost fonts]# ln -s STFANGSO.TTF graphfont.ttf
[root@localhost fonts]# ls -l
总用量 11100
lrwxrwxrwx 1 root root       12 7月  25 15:02 graphfont.ttf -> STFANGSO.TTF
lrwxrwxrwx 1 root root       33 7月  24 17:11 graphfont.ttf.bak -> /etc/alternatives/zabbix-web-font
-rw-r--r-- 1 root root 11362788 7月  25 14:59 STFANGSO.TTF
刷新zabbix图形预览界面
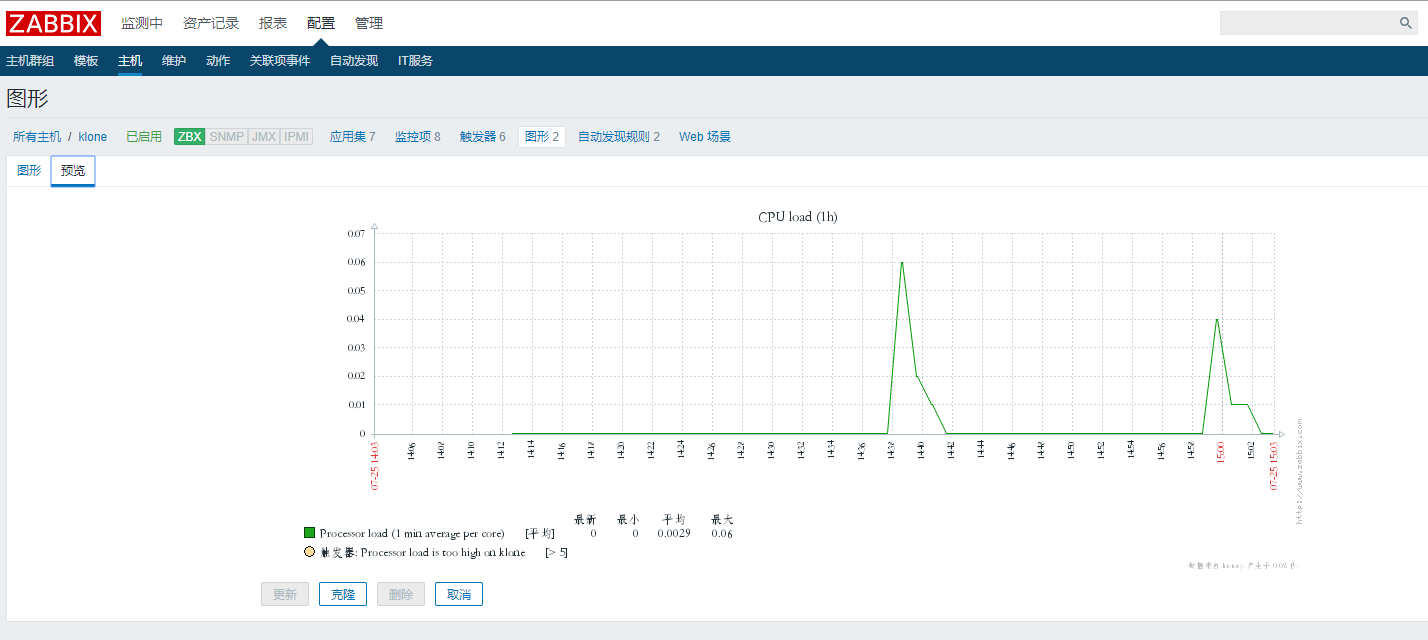
9.自动发现
修改自动发现规则
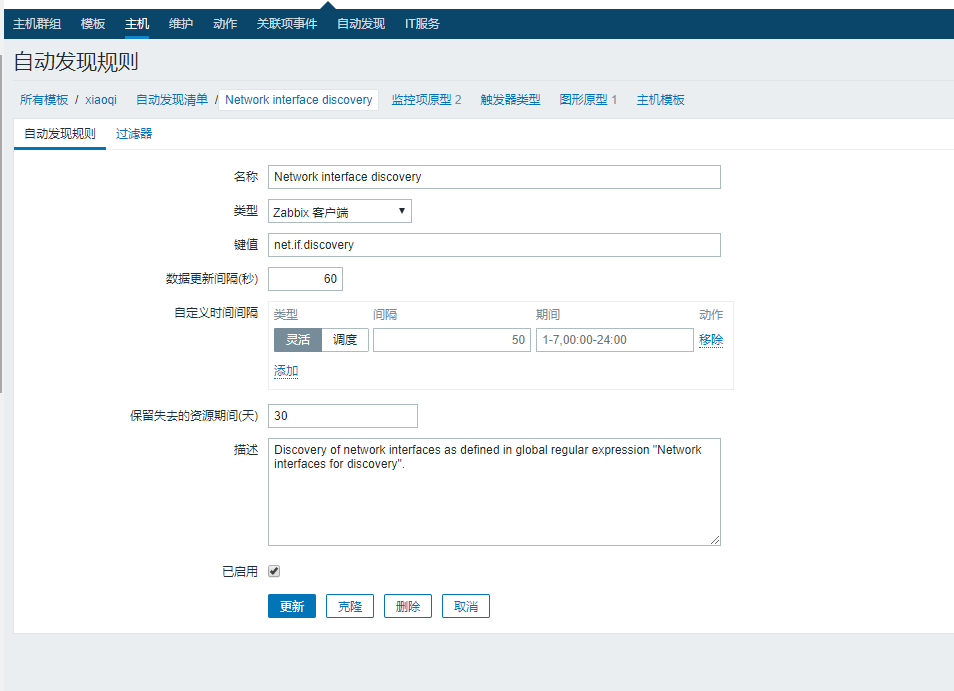
修改后图形增加

查看网卡流量
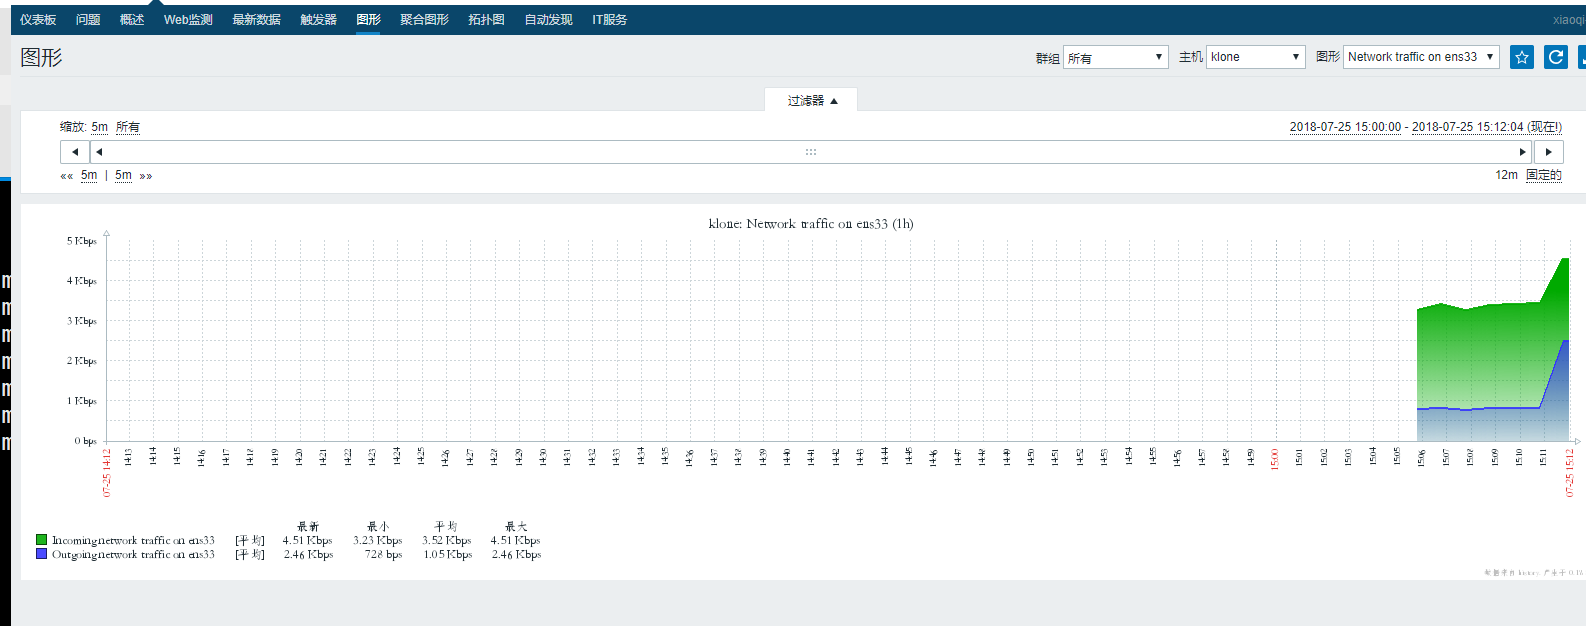
修改图形样式和颜色
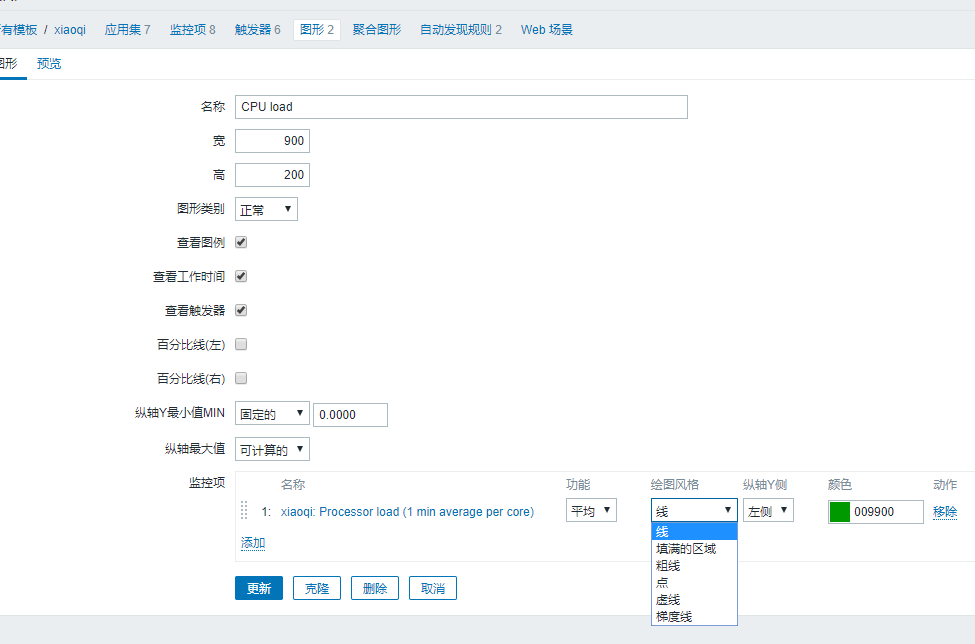
10.添加自定义监控项目
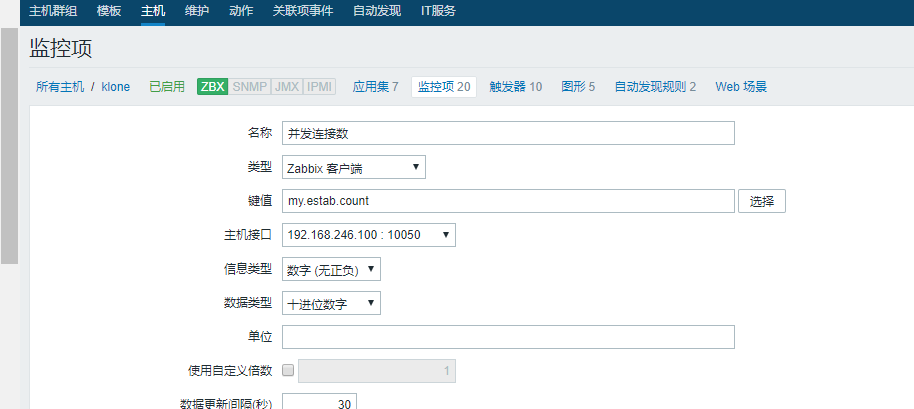
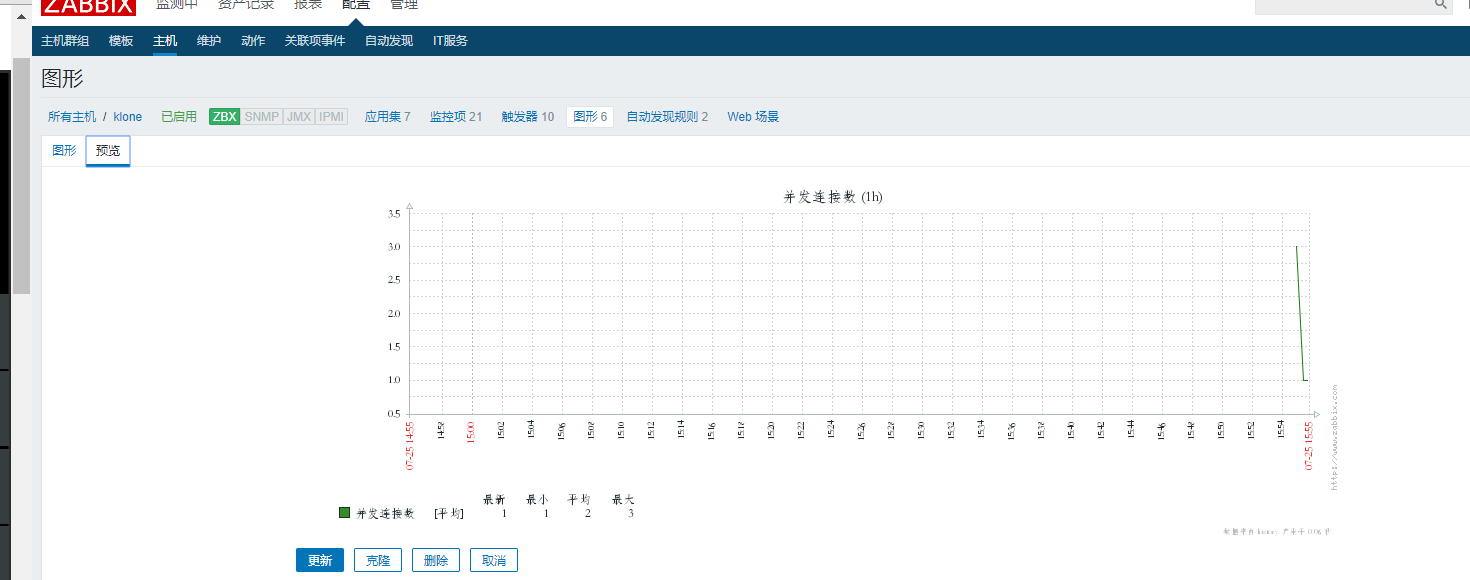
需求:监控某平台的80端口的连接数,并出图。
在zabbix监控中心创建监控项目;针对监控项目以图形展现。
在客户端增加脚本
[root@localhost ~]# vim /usr/local/sbin/estab.sh

#!/bin/bash
##获取80端口并发连接数
netstat -ant |grep ':80 ' |grep -c ESTABLISHED

[root@localhost ~]# chmod 755 !$
chmod 755 /usr/local/sbin/estab.sh
编辑客户端上的配置文件
[root@localhost ~]# vim /etc/zabbix/zabbix_agentd.conf
修改这两项
UnsafeUserParameters=1

UserParameter=my.estab.count[*],/usr/local/sbin/estab.sh

重启服务
[root@localhost ~]# systemctl restart zabbix-agent.service
到服务端验证
[root@localhost fonts]# zabbix_get -s 192.168.246.100 -p 10050 -k 'my.estab.count'
0
在zabbix监控中心(浏览器)配置增加监控项目

键值写my.estab.count
增加图形,选择并发连接数
11.配置邮件告警
使用163或者qq邮箱发告警邮件
设置163邮箱POP3、IMAP、SMTP服务

设置授权码

到监控中心设置邮件告警
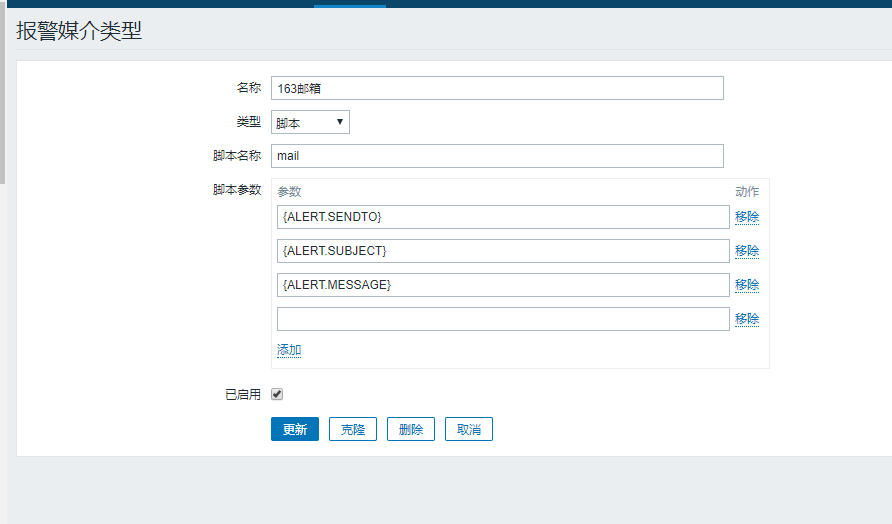
创建报警脚本mail.py
[root@localhost ~]# vim /usr/lib/zabbix/alertscripts/mail.py   配置文件中定义的目录


#!/usr/bin/env python
#-*- coding: UTF-8 -*-
import os,sys
reload(sys)
sys.setdefaultencoding('utf8')
import getopt
import smtplib
from email.MIMEText import MIMEText
from email.MIMEMultipart import MIMEMultipart
from  subprocess import *

def sendqqmail(username,password,mailfrom,mailto,subject,content):
    gserver = 'smtp.qq.com'
    gport = 25

    try:
        msg = MIMEText(unicode(content).encode('utf-8'))
        msg['from'] = mailfrom
        msg['to'] = mailto
        msg['Reply-To'] = mailfrom
        msg['Subject'] = subject

        smtp = smtplib.SMTP(gserver, gport)
        smtp.set_debuglevel(0)
        smtp.ehlo()
        smtp.login(username,password)

        smtp.sendmail(mailfrom, mailto, msg.as_string())
        smtp.close()
    except Exception,err:
        print "Send mail failed. Error: %s" % err


def main():
    to=sys.argv[1]
    subject=sys.argv[2]
    content=sys.argv[3]
##定义QQ邮箱的账号和密码,你需要修改成你自己的账号和密码(请不要把真实的用户名和密码放到网上公开,否则你会死的很惨)
    sendqqmail('1234567@qq.com','aaaaaaaaaa','1234567@qq.com',to,subject,content)

if __name__ == "__main__":
    main()


#####脚本使用说明######
#1. 首先定义好脚本中的邮箱账号和密码
#2. 脚本执行命令为:python mail.py 目标邮箱 "邮件主题" "邮件内容"
测试脚本是否能发送邮件
[root@localhost alertscripts]# python mail.py 13******1@163.com "dasdasdasd" "dasdasdafa"
收到邮件

创建用户,添加告警邮箱

修改用户权限要在用户群组中修改
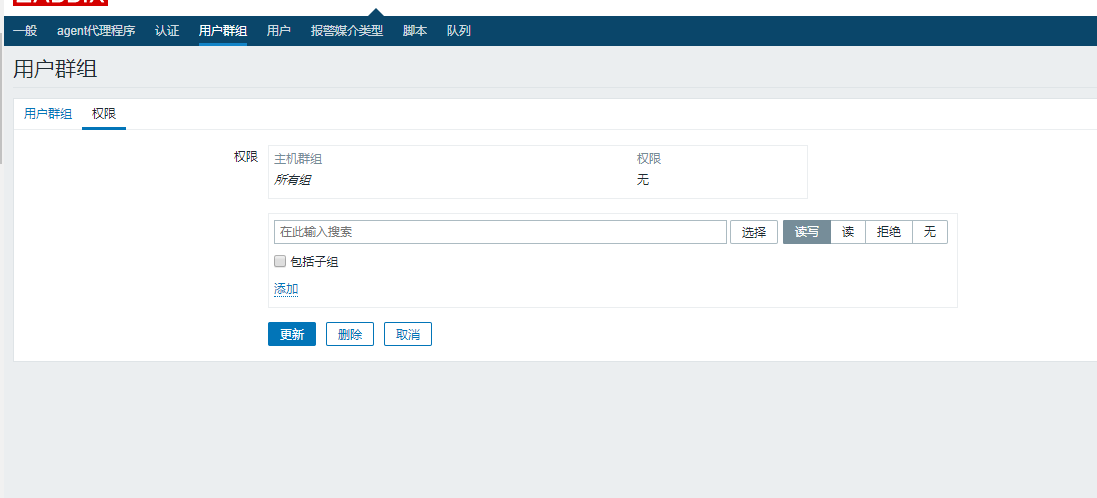

必须设置,否则告警收不到
创建动作
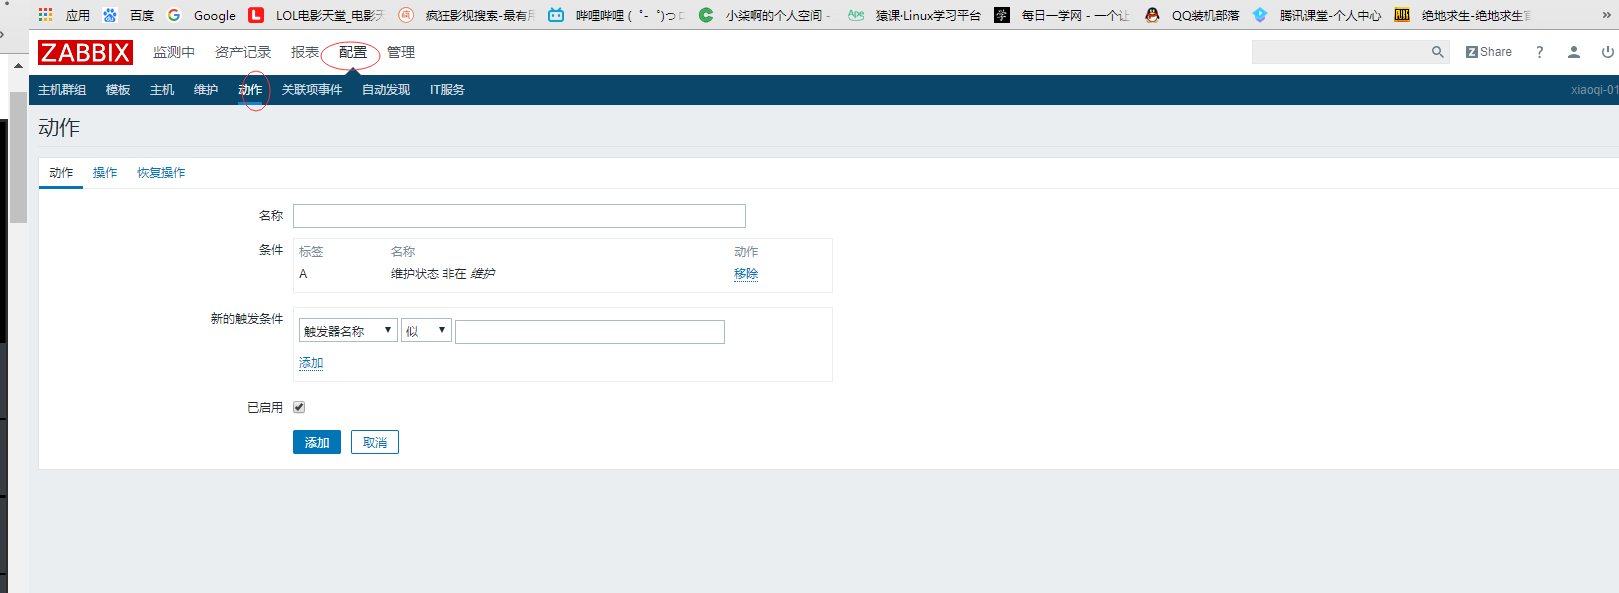
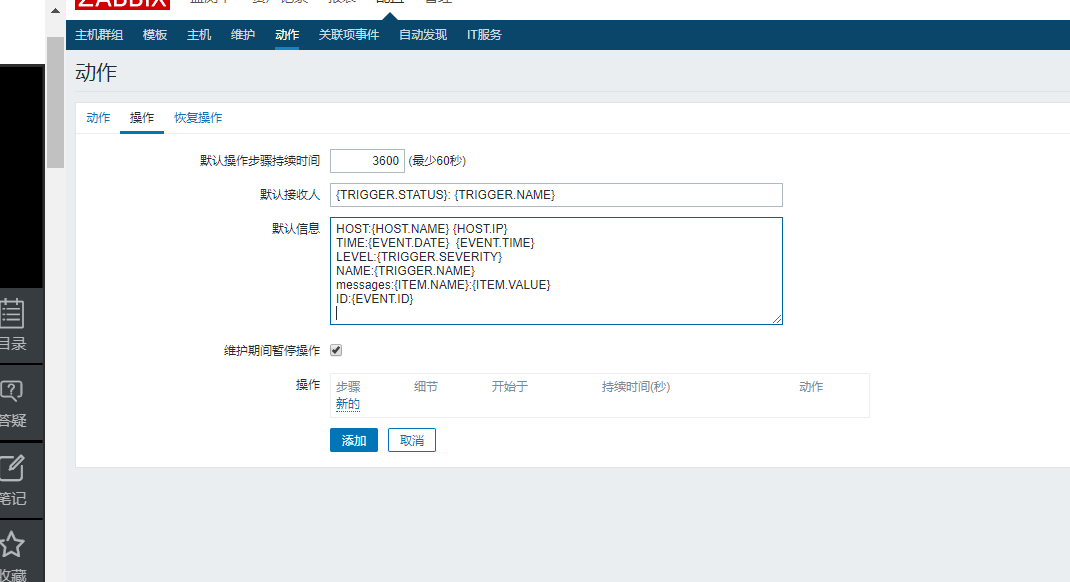
修改操作


配置恢复操作
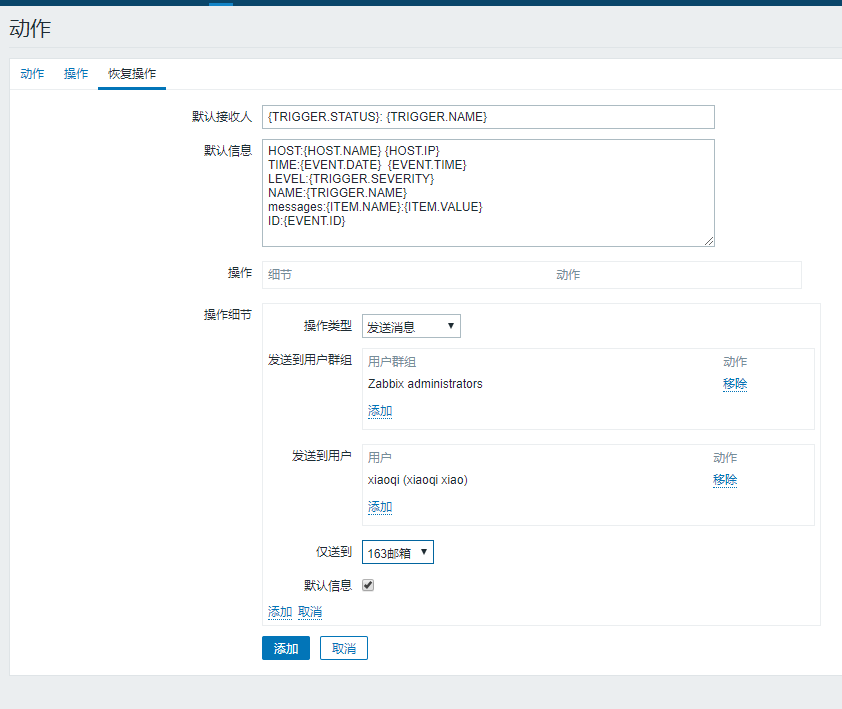
已启用

12.测试告警
修改触发器

失败了

删除发邮件到用户组尝试,失败。显示目录下没有脚本。。
[root@localhost alertscripts]# pwd
/usr/lib/zabbix/alertscripts
[root@localhost alertscripts]# ls
mail.py
[root@localhost alertscripts]# mkdir mail
[root@localhost alertscripts]# cp mail.py mail
显示已送达。。却没有邮件

通过脚本可以发送。

zabbix显示已送达。。但是。。收不到邮件。。。
扩展
zabbix监控交换机(思科) http://tryrus.blog.51cto.com/10914693/1789847
zabbix远程执行命令 http://www.ywnds.com/?p=6610
zabbix分布式部署 http://sfzhang88.blog.51cto.com/4995876/1364399
zabbix监控tomcat(版本有点老,不能照搬) http://www.fblinux.com/?p=616
来源:oschina
链接:https://my.oschina.net/u/3850968/blog/1864077