jenkins结合httprunner配置实现自动化测试
自动化测试思路:
jenkins发布代码到预发布环境 –> 触发自动化测试预发布环境 à 返回测试结:如果测试通过则将代码推送到生产环境目录,测试没有通过则不发布代码到生产环境,同时发送邮件和测试报告
整体步骤:
1.创建一个job :MG.backend.chinasoft.me
使用jenkins配合git和rsync发布代码到预发布环境中,预发布环境和生产环境越接近越好
我们本次发布是使用同一台服务器 nginx 使用不同域名代理不同目录的方式来区分灰度和生产环境
生产环境目录:/data/www/vhosts/chinasoft.me
灰度目录:/data/www/vhosts/chinasoft.me.uat
生产的域名:https://api.chinasoft.me
灰度域名:https://api-uat.chinasoft.me
2.创建另外一个自动化测试的job,该job执行的时机是在 MG.backend.chinasoft.me
执行后触发
jenkins创建灰度发布job

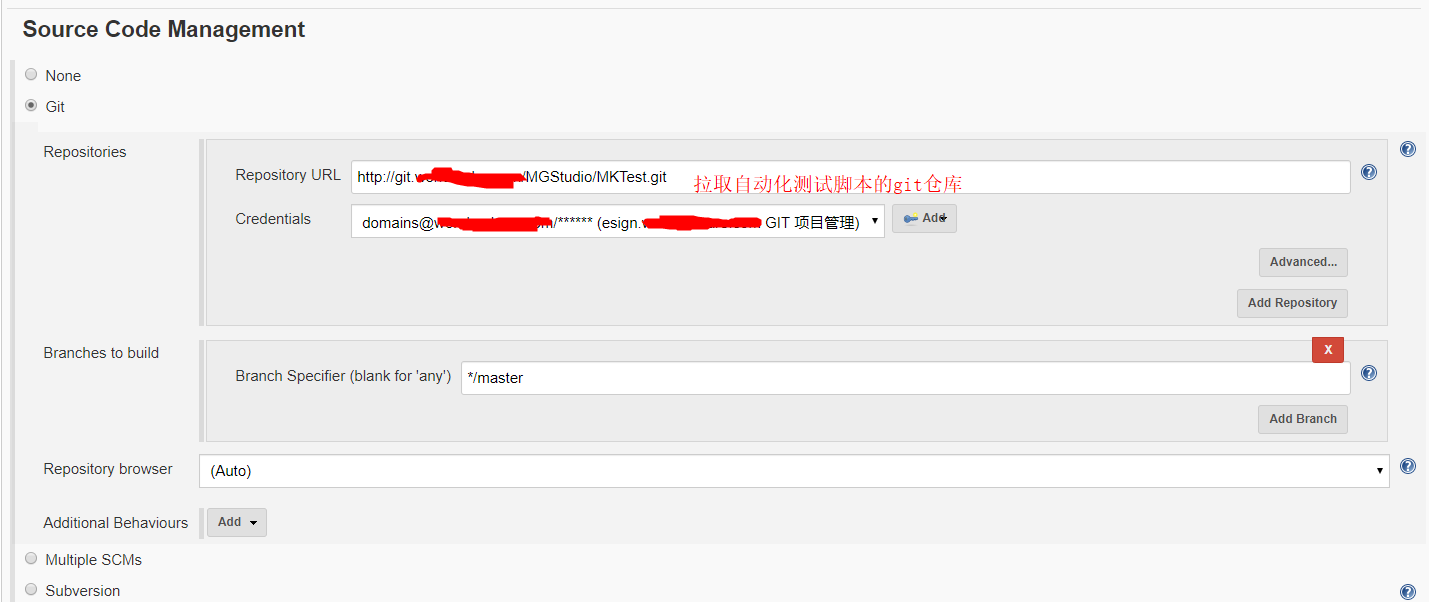
配置git拉取代码

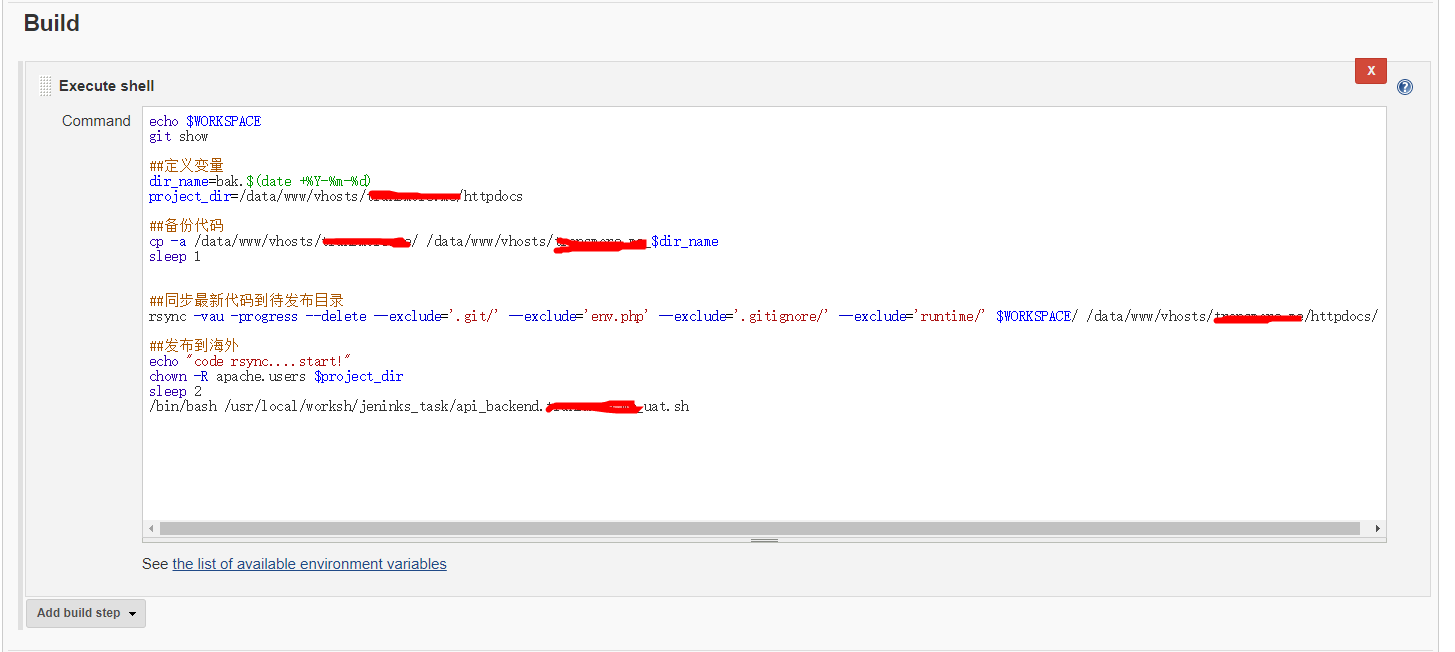
Build执行的脚本

Shell脚本:
echo $WORKSPACE
git show
##定义变量
dir_name=bak.$(date +%Y-%m-%d)
project_dir=/data/www/vhosts/chinasoft.me/httpdocs
##备份代码
cp -a /data/www/vhosts/chinasoft.me/ /data/www/vhosts/chinasoft.me_$dir_name
sleep 1
##同步最新代码到待发布目录
rsync -vau -progress --delete --exclude='.git/' --exclude='env.php' --exclude='.gitignore/' --exclude='runtime/' $WORKSPACE/ /data/www/vhosts/chinasoft.me/httpdocs/
##发布到海外
echo "code rsync....start!"
chown -R apache.users $project_dir
sleep 2
/bin/bash /usr/local/worksh/jeninks_task/api_backend.chinasoft_me_uat.sh
相关的脚本:
[root@jenkins:/usr/local/worksh/jeninks_task]# more api_backend.chinasoft_me_uat.sh
#!/bin/bash
#############################################
# 通过jenkins发布任务 MG.cart.xcloudlab.com 发布 /data/www/vhosts/cart.xcloudlab.com 目录到1.1.1.1 和 1.1.1.2这两台服务器中
# uat和pro获取代码源头都是一个相同目录: /data/www/vhosts/chinasoft.me/httpdocs/
chinasoft_iplist="1.1.1.1"
function chinasoft_eus_rsync()
{
for ip in $chinasoft_iplist
do
echo "-- start pub --- 预发布到外网 ${ip} ----------------------------------------"
/usr/local/bin/rsync -vazP --bwlimit=1000 --exclude='.git/' --exclude='env.php' --exclude='.gitignore/' --exclude='runtime/' --exclude='docs/' --password-file=/data/www/.rsync/rsyncd.pass /data/www/vhosts/chinasoft.me/httpdocs/ apache@$ip::apache/data/www/vhosts/chinasoft.me.uat/httpdocs/
echo -e "-- end pub ${ip} ----------------------------------------------------------\n\n"
done
}
# 执行同步
chinasoft_eus_rsync
[root@jenkins:/usr/local/worksh/jeninks_task]# more api_backend.chinasoft_me_pro.sh
#!/bin/bash
#############################################
# 通过jenkins发布任务 MG.cart.xcloudlab.com 发布 /data/www/vhosts/cart.xcloudlab.com 目录到1.1.1.1和1.1.1.2这两台服务器中
chinasoft_iplist="1.1.1.1"
function chinasoft_eus_rsync()
{
for ip in $chinasoft_iplist
do
echo "-- start pub --- 预发布到外网 ${ip} ----------------------------------------"
/usr/local/bin/rsync -vazP --bwlimit=1000 --exclude='.git/' --exclude='env.php' --exclude='.gitignore/' --exclude='runtime/' --exclude='docs/' --password-file=/data/www/.rsync/rsyncd.pass /data/www/vhosts/chinasoft.me/httpdocs/ apache@$ip::apache/data/www/vhosts/chinasoft.me/httpdocs/
echo -e "-- end pub ${ip} ----------------------------------------------------------\n\n"
done
}
# 执行同步
chinasoft_eus_rsync
触发邮件

至此灰度发布创建完成
创建jenkins的自动化测试关联job
即在上面的灰度发布执行后触发
给个名字

配置拉取自动化测试框架脚本的git

配置触发的时机

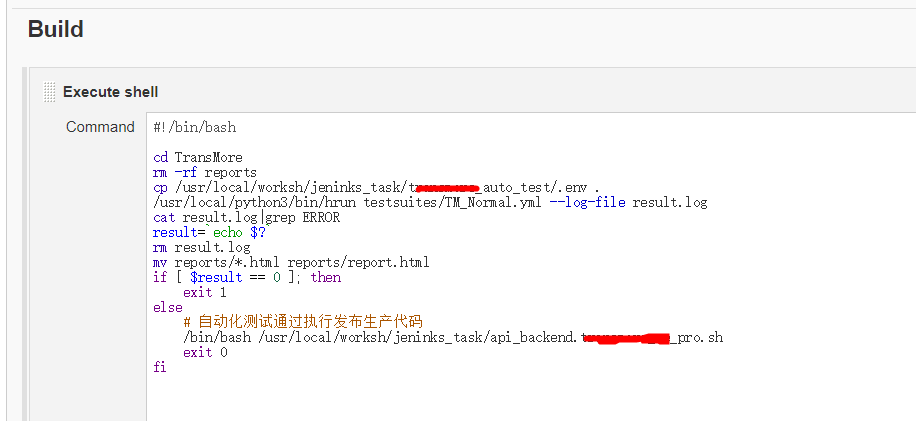
执行自动化测试脚本:

自动化测试脚本代码:
#!/bin/bash
cd Chinasoft
rm -rf reports
cp /usr/local/worksh/jeninks_task/chinasoft_auto_test/.env .
/usr/local/python3/bin/hrun testsuites/TM_Normal.yml --log-file result.log
cat result.log|grep ERROR
result=`echo $?`
rm result.log
mv reports/*.html reports/report.html
if [ $result == 0 ]; then
exit 1
else
# 自动化测试通过执行发布生产代码
/bin/bash /usr/local/worksh/jeninks_task/api_backend.chinasoft_me_pro.sh
exit 0
fi
环境脚本.env内容
[root@jenkins:/usr/local/worksh/jeninks_task]# more chinasoft_auto_test/.env
app_key=G49D94FCV9SE6O64
app_fp=0GOM886LNLT7R5O3JP
Content_Type=application/x-www-form-urlencoded
client_id=FC99DF9D9CFFD8DACE8AC2BA2D7EB5C7
client_from=1
lang=en
user_url=https://user-api.chinasoft.me
transfer_url=https://transfer-api.chinasoft.me
TEST_ENV=PRODUCTION
Username=testonline01@ws.cn
Password=qweasd
vipUsername=dengbz@wondershare.cn
vipPassword=qweasd
当测试完成后发送邮件,并以html的格式附件发送测试报告


邮件发送模板:
本邮件由系统自动发出,请勿回复!<br/>
<h2><font color="#CC0000">构建结果 - ${BUILD_STATUS}</font></h2>
<h4><font color="#0B610B">构建信息</font></h4>
<hr size="2" width="100%" />
<ul>
<li>项目名称:${PROJECT_NAME} - #${BUILD_NUMBER}</li>
<li>触发原因:${CAUSE}</li>
<li>项目 URL:<a href="${PROJECT_URL}">${PROJECT_URL}</a></li>
<li>构建 URL:<a href="${BUILD_URL}">${BUILD_URL}</a></li>
<li>构建日志:<a href="${BUILD_URL}console">${BUILD_URL}console</a></li>
<li>工作目录:<a href="${PROJECT_URL}ws">${PROJECT_URL}ws</a></li>
</ul>
<h4><font color="#0B610B">测试报告</font></h4>
<hr size="2" width="100%" />
<ul>
<li>详细测试报告和构建日志:请看附件</li>
</ul>
测试脚本执行的环境部署(在jenkins服务器中,要求jenkins服务器和目标的灰度环境是连通的):
一、安装python3.6
1. 安装依赖环境
# yum -y install zlib-devel bzip2-devel openssl-devel ncurses-devel sqlite-devel readline-devel tk-devel gdbm-devel db4-devel libpcap-devel xz-devel
2.下载Python3
# wget https://www.python.org/ftp/python/3.6.1/Python-3.6.1.tgz
3.安装python3
创建目录:
# mkdir -p /usr/local/python3
解压下载好的Python-3.x.x.tgz包
# tar -zxvf Python-3.6.1.tgz
4.进入解压后的目录,编译安装。
# cd Python-3.6.1
# ./configure --prefix=/usr/local/python3
# make && make install
5.建立python3的软链
# ln -s /usr/local/python3/bin/python3 /usr/bin/python3
# ln -s /usr/local/python3/bin/pip3 /usr/bin/pip3
6.并将/usr/local/python3/bin加入PATH
vim ~/.bash_profile
# User specific environment and startup programs
PATH=$PATH:$HOME/bin:/usr/local/python3/bin
export PATH
修改完记得执行行下面的命令,让上一步的修改生效:
# source ~/.bash_profile
# 安装自动化测试框架
# pip3 install httprunner
# 看是否安装成功
[root@jenkins:~]# httprunner -V
2.2.4
来源:oschina
链接:https://my.oschina.net/u/4397674/blog/3446118