文章目录
- 在访问网页的主机配置解析文件
/etc/hosts
#内容
ip地址 访问地址
1. Apache的作用(httpd)
Apache HTTP Server(简称Apache)是 Apache 软件基金会的一个开放源码的网页服务器,可以在大多数计算机操作系统中运行,多平台和安全性被广泛使用。
在web被访问时通常使用http://的方式
http://超文本传输协议
- 超文本传输协议提供软件举例
| 软件 | 应用于 |
|---|---|
| Apache | 百度 |
| nginx | 网易、火狐、爱奇艺、360 |
| stgw | 腾讯 |
| jfe | 京东 |
| Tengine | 阿里、新浪、字节跳动 |
curl -I baidu.com:显示网页的头信息
curl -I 163.com
curl -I www qq.com
curl -I www.bytedance.com
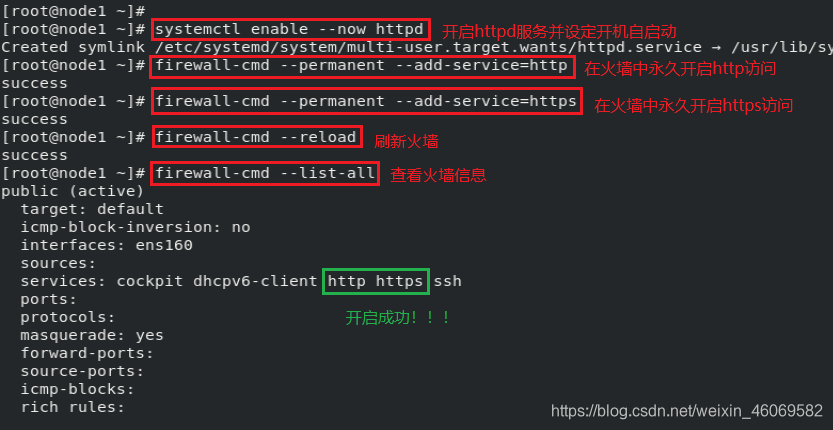
2. Apache安装并开启httpd
dnf install httpd.x86_64 -y:安装Apachesystemctl enable --now httpd:开启httpd服务并设定开机自启动firewall-cmd --permanent --add-service=http:在火墙中永久开启http访问firewall-cmd --permanent --add-service=https:在火墙中永久开启https访问firewall-cmd --reload:刷新火墙使设定生效firewall-cmd --list-all:查看火墙信息

3. Apache基本信息
- 服务名称:httpd
- 配置文件:
- 主配置文件:/etc/httpd/conf/httpd.conf
- 自配置文件:/etc/httpd/conf.d/*.conf
- 默认发布目录:/var/www/html
- 默认发布文件:index.html
- 默认端口:
- 80(http)
- 443(https)
- 用户:apache
- 日志:/etc/httpd/logs
4. Apache基本配置
4.1. 修改Apache端口号
vim /etc/httpd/conf/httpd.conf:修改主配置文件
Listen 80 #默认端口号
firewall-cmd --permanent --add-port=端口号/tcp:添加并永久打开一个端口到区域firewall-cmd --reload:更新火墙规则systemctl restart httpd:重启httpd服务
- 访问 http://192.168.43.101

- 修改端口号为8080,访问 http://192.168.43.101:8080


4.2. 修改默认发布目录
mkdir /westos_web:创建默认发布目录vim /westos_web/index.html:编写程序vim /etc/httpd/conf/httpd.conf:修改主配置文件
DocumentRoot "/westos_web"	#所有Apache文档根目录
<Directory "/westos_web">
        Require all granted
</Directory>
systemctl restart httpd:重启服务
- 修改发布目录,访问 http://192.168.43.101


4.3. 修改默认发布文件
vim /etc/httpd/conf/httpd.conf:修改主配置文件
<IfModule dir_module>
    DirectoryIndex test.html  index.html
    #依次读取,若test.html不存在,就读index.html
</IfModule>
systemctl restart httpd:重启服务
- 示例:创建test.html,并将其设置为默认发布文件,访问 http://192.168.43.101


5. Apache访问控制
-
实验素材:
mkdir -p /var/www/html/westos:创建存放目录vim /var/www/html/westos/index.html:编写程序

5.1. 基于客户端ip的访问控制
vim /etc/httpd/conf/httpd.conf:修改主配置文件
DocumentRoot "/var/www/html"
#DocumentRoot "/westos_web"
<Directory "/var/www/html/westos">
        Order Deny,Allow
        #先读Deny,再读Allow
        Allow from 192.168.43.101	#允许此ip的主机访问
        Deny from all	#禁止所有人访问
</Directory>
systemctl restart httpd:重启服务- 访问http://192.168.43.101/westos
- Order Deny,Allow(最终只有192.168.43.101主机能访问)


- Order Allow,Deny(Deny覆盖了Allow,最终所有主机都不能访问)


5.2. 基于用户认证的访问控制
htpasswd -cm /etc/httpd/.htpasswd admin:生成认证文件htpasswd -m /etc/httpd/.htpasswd lee
c 创建.htpasswd文件
m 加密
#若已经存在.htpasswd文件后创建不用加c
#否则会覆盖已经创建的用户认证
cat /etc/httpd/.htpasswd:查看ls -a /etc/httpd/:列出所有文件vim /etc/httpd/conf/httpd.conf:修改配置文件
DocumentRoot "/var/www/html"
#DocumentRoot "/westos_web"
<Directory "/var/www/html/westos">
    AuthUserFile /etc/httpd/.htpasswd
    AuthName "Please input username and password !!!!"
    AuthType basic
    Require valid-user	#所有用户皆可访问
#   Require user 用户名 #指定用户访问
</Directory>
systemctl restart httpd:重启服务- 访问http://192.168.43.101/westos

- 指定所有用户皆可访问时


- 指定admin用户可以访问,发现admin可以成功访问,lee不能访问


6. Apache的虚拟主机
vim /etc/httpd/conf/httpd.conf:还原文件mkdir -p /var/www/virtual/westos.org/{linux,lee}:创建存放目录vim /var/www/virtual/westos.org/linux/index.html:创建linux.westos.org主页vim /var/www/virtual/westos.org/lee/index.html:创建lee.westos.org主页vim /etc/httpd/conf.d/vhosts.conf:创建并编辑虚拟主机配置文件
<VirtualHost _default_:80>
        DocumentRoot /var/www/html
        Customlog logs/default.log combined
</VirtualHost>
<VirtualHost *:80>
        ServerName linux.westos.org
        DocumentRoot /var/www/virtual/westos.org/linux
        Customlog logs/linux.log combined
</VirtualHost>
<VirtualHost *:80>
        ServerName lee.westos.org
        DocumentRoot /var/www/virtual/westos.org/lee
        Customlog logs/lee.log combined
</VirtualHost>
systemctl restart httpd:重启服务vim /etc/hosts:设定客户端解析(在浏览器所在的主机中添加)
192.168.43.101 www.westos.org linux.westos.org lee.westos.org
- 未设置虚拟主机时,添加解析文件后发现访问界面都是同一个


- 添加Apache虚拟主机后,可访问多个子页面(前提是还原主配置文件设置)


7. Apache的语言支持
7.1. html
默认支持
7.2. php
dnf install php -y:安装phpvim /var/www/html/index.php:创建php程序
<?php
	echo "hello php!";
	echo "<br>";
    echo "hello zy!";
?>
systemctl restart httpd:重启服务


7.3. perl(CGI)
CGI(Common Gateway Interface),通用网关接口,它是一段程序,运行在服务器上如:HTTP服务器,提供同客户端HTML页面的接口。
CGI程序可以是Python脚本,PERL脚本,SHELL脚本,C或者C++程序等。
mkdir /var/www/html/cgi-scripts:创建存放目录vim /var/www/html/cgi-scripts/index.cgi:编写cgi程序
#!/usr/bin/perl
print "Content-type: text/html\n\n";
print `date`;
print "\nzy123";
chmod +x /var/www/html/cgi-scripts/index.cgi:增加可执行权限vim /etc/httpd/conf.d/vhosts.conf:编辑虚拟主机配置文件
<Directory /var/www/html/cgi-scripts>
	Options +ExecCGI
	AddHandler cgi-script .cgi
</Directory>
systemctl restart httpd:重启服务- 访问http://192.168.43.101/cgi-scripts/index.cgi


7.4. python(WSGI)
WSGI:
Web服务器网关接口(Python Web Server Gateway Interface,缩写为WSGI)是为Python语言定义的Web服务器和Web应用程序或框架之间的一种简单而通用的接口。
dnf search wsgi:查找dnf install python3-mod_wsgi.x86_64 -y:安装mkdir /var/www/html/wsgi-scripts:创建存放目录vim /var/www/html/wsgi-scripts/index.wsgi:编写wsgi程序
def application(env, westos):
	westos( '200 ok', [('Content-Type', 'text/html')])
	return [b"hello wsgi! hello zy!"]
python3 /var/www/html/wsgi-scripts/index.wsgi:检测wsgi程序有无错误chmod +x /var/www/html/wsgi-scripts/index.wsgi:增加执行权限vim /etc/httpd/conf.d/vhosts.conf:编辑虚拟主机配置文件
<VirtualHost *:80>
	ServerName wsgi.westos.org
	WSGIScriptAlias / /var/www/html/wsgi-scripts/index.wsgi
</VirtualHost>
vim /etc/hosts:设定客户端解析(在浏览器所在的主机中添加)
172.25.254.127 www.westos.org linux.westos.org lee.westos.org wsgi.westos.org
systemctl restart httpd:重启服务- 访问 wsgi.westos.org


8. Apache的加密访问https
8.1. 安装加密插件
dnf install mod_ssl -y

8.2. 生成证书
- 生成私钥文件
openssl genrsa -out /mnt/www.westos.org.key 2048(不能小于2048)
- 生成证书签名文件
openssl req -new -key /mnt/www.westos.org.key -out /mnt/www.westos.org.csr
Country Name (2 letter code) [XX]:CN#国家
State or Province Name (full name) []:Shannxi#省
Locality Name (eg, city) [Default City]:xi'an #'市
Organization Name (eg, company) [Default Company Ltd]:westos#组织(公司)
Organizational Unit Name (eg, section) []:linux#部门
Common Name (eg, your name or your server's hostname) []:www.wesots.org#主机名
Email Address []:sdsnzy@westos.org#邮箱

A challenge password []:#密码(可不设置,直接回车)
An optional company name []:#公司名(可不设置,直接回车)
- 生成证书
openssl x509 -req -days 365 -in /mnt/www.westos.org.csr -signkey /mnt/www.westos.org.key -out /mnt/www.westos.org.crt
x509 证书格式
-req 请求
-in 加载签证名称


8.3. 编辑ssl.conf配置文件
cp /mnt/www.westos.org.* /etc/httpd/:复制秘钥与证书文件到 /etc/httpd 下vim /etc/httpd/conf.d/ssl.conf:编辑配置文件
#指定证书
SSLCertificateFile /etc/httpd/www.westos.org.crt
#指定秘钥文件
SSLCertificateKeyFile /etc/httpd/www.westos.org.key
systemctl restart httpd:重启服务·firewall-cmd --permanent --add-service=https:在火墙中永久开启https访问firewall-cmd --reload:更新火墙规则


8.4. 修改配置文件
mkdir /var/www/virtual/westos.org/login:创建存放目录vim /var/www/virtual/westos.org/login/index.html:编写程序
hello westos.org/login/index.html
zy!!!
vim /etc/httpd/conf.d/vhosts.conf:编辑虚拟主机配置文件
#jiami login/index.html
<VirtualHost *:443>
	SSLEngine on
	SSLCertificateFile /etc/httpd/www.westos.org.crt
	SSLCertificateKeyFile /etc/httpd/www.westos.org.key
	ServerName login.westos.org
	DocumentRoot /var/www/virtual/westos.org/login
	CustomLog logs/linux.log combined
</VirtualHost>
<VirtualHost *:80>
	ServerName login.westos.org
	RewriteEngine on
	RewriteRule ^(/*)$ https://%{

   HTTP_HOST}$1
</VirtualHost>
#解释
(^(/*)$ #客户地址栏输入的地址
%{

   HTTP_HOST} #客户主机
$1 #RewriteRule后面跟的第一串字符的值)
vim /etc/hosts:添加解析
192.168.43.101 login.westos.org
systemctl restart httpd:重启服务- 访问 login.westos.org ,网址自动变为https://login.westos.org


9. Squid+Apache
squid是一种用来缓存Internet数据的软件。接受来自人们需要下载的目标(object)的请求并适当的处理这些请求。也就是说,如果一个人想下载一web界面,他请求squid为他取得这个页面。squid随之连接到远程服务器并向这个页面发出请求。然后,squid显式地聚集数据到客户端机器,而且同时复制一份。当下一次有人需要同一页面时, squid可以简单的从磁盘中读到它,那样数据会立即传输到客户机上。
- 实验准备:
- 一个可以上网的主机(node1)
- 一个不能上网的主机(node2)
9.1 squid正向代理【代购式】
正向代理:当被缓存的页面被第二次访问的时候,浏览器将直接从本地代理服务器那里获取请求数据而不再向原web站点请求数据。这样就节省了宝贵的网络带宽,而且提高了访问速度。
9.1.1 设定联网主机
dnf install squid -y:安装squidvim /etc/squid/squid.conf:修改squid配置
http_access allow all
cache_dir ufs /var/spool/squid 100 16 256
systemctl restart squid.service:重启squid服务ls /var/spool/squid/firewall-cmd --permanent --add-port=3128/tcp:在火墙中永久添加端口号3128firewall-cmd --reload:更新火墙规则


9.1.2 设定无网主机
- 浏览器属性preferences==>General==>Network Proxy==>Settings==>
选择Manual proxy==>HTTP Proxy:192.168.43.101(下载squid主机的IP)
Port:3128==>勾选Use this proxy server for all protocols==>OK


- 测试node2可以上网

9.2. squid反向代理(加速)【分店式】
反向代理:如果互联网用户请求的页面在代理服务器上有缓冲的话,代理服务器直接将缓冲内容发送给用户。如果没有缓冲则先向WEB服务器发出请求,取回数据,本地缓存后再发给用户。这种方式通过降低了WEB服务器的请求数从而降低了WEB服务器的负载。
- 实验准备(3台主机)
- 一个可以访问到Apache页面的主机(node3:192.168.43.10)
- 一个有squid服务,但没有httpd服务的主机(node1:192.168.43.101)
- 一台需要从node1获取数据的主机(node2)
9.2.1 设定有squid服务,但没有httpd服务的主机
dnf remove httpd -y:删除Apachevim /etc/squid/squid.conf:修改squid配置
 62 http_port 80 vhost vport
 63 cache_peer 192.168.43.10 parent 80 0 proxy-only
#写入一个可以访问到Apache页面的主机IP
systemctl restart squid:重启squid服务


9.2.2 设定需要从node1获取数据的主机
- 还原默认浏览器设置

2. 访问node1主机,最终却是node3主机

来源:oschina
链接:https://my.oschina.net/u/4350184/blog/4757499