1 ActiveMQ消息集群
1.1 集群方式
客户端集群:让多个消费者消费同一个队列
Broker Clusters:多个Broker之间同步消息,实现负载均衡,但是没有高可用
Master Slave:实现高可用,但是没有负载均衡
1.2 客户端集群配置
ActiveMQ失效转移(failover):允许当其中一台消息服务器宕机时,客户端在传输层上重新连接到其它消息服务器,语法为:failover:(uri1,...,uriN)?transportOptions
transportOptions参数说明:
randomize默认为ture,表示在URI列表中使用URI连接时是否采用随机策略
initialReconnectDelay默认为10,单位毫秒,表示第一次重新连接的等待时间
maxReconnectDelay默认为3000,单位毫秒,表示最长重新连接的等待时间
1.3 Broker Cluster集群配置
NetworkConnector(网络连接器):主要用于配置ActiveMQ服务器与服务器之间的网络通讯方式,用于服务器透传消息;分为动态连接器和静态连接器
静态连接器如:
<networkConnectors>
<networkConnector uri="static:(tcp://127.0.0.1:61617,tcp://127.0.0.1:61618)" />
</networkConnectors>
动态连接器如:
<networkConnectors>
<networkConnector uri="multicast://default" />
</networkConnectors>
<transportConnectors>
<transportConnector uri="tcp://localhost:0" discoveryUri="multicast://default" />
</transportConnectors>
2 ActiveMQ消息集群的搭建
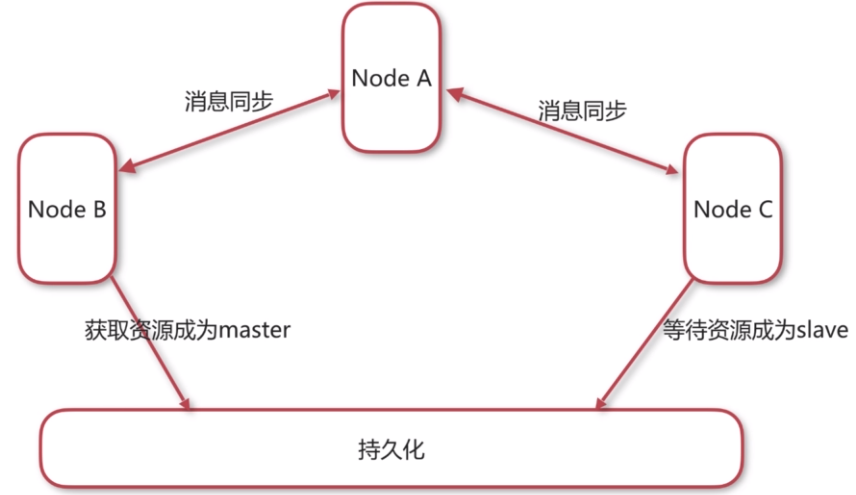
在本地创建一个文件夹,名为activemq,将ActiveMQ的安装包下载到这个文件夹中,我下载的版本是5.14.2,然后将其解压,修改名字为activemq-a,然后再复制两份,分别命名为activemq-b和activemq-c,再次新建一个share文件夹用于消息存储共享文件夹。三台服务器的集群方案如下图所示。NodeA在这里是Broker集群,作为消费者的。因为此时的网络连接是双向连接,如果A节点作为生产者,也是可以被B节点和C节点消费的,但是一旦当A节点上面有消息没有被消费的时候宕机,那么B节点和C节点就不能接收到A节点上面的消息,B节点和C节点作为消费者和生产者都是没有问题的。

2.1 修改activemq-a中的配置
$ cd activemq-a/conf
$ vim activemq.xml
<transportConnectors>
<!-- DOS protection, limit concurrent connections to 1000 and frame size to 100MB -->
<transportConnector name="openwire" uri="tcp://0.0.0.0:61616?maximumConnections=1000&wireFormat.maxFrameSize=104857600"/>
<!--<transportConnector name="amqp" uri="amqp://0.0.0.0:5672?maximumConnections=1000&wireFormat.maxFrameSize=104857600"/>
<transportConnector name="stomp" uri="stomp://0.0.0.0:61613?maximumConnections=1000&wireFormat.maxFrameSize=104857600"/>
<transportConnector name="mqtt" uri="mqtt://0.0.0.0:1883?maximumConnections=1000&wireFormat.maxFrameSize=104857600"/>
<transportConnector name="ws" uri="ws://0.0.0.0:61614?maximumConnections=1000&wireFormat.maxFrameSize=104857600"/>-->
</transportConnectors>
<networkConnectors>
<networkConnector name="local_network" uri="static:(tcp://127.0.0.1:61617,tcp://127.0.0.1:61618)" />
</networkConnectors>
2.2 修改activemq-b中的配置
$ cd activemq-b/conf
$ vim activemq.xml
<persistenceAdapter>
<kahaDB directory="/home/huyj/Downloads/activemq/share"/>
</persistenceAdapter>
...
<transportConnectors>
<!-- DOS protection, limit concurrent connections to 1000 and frame size to 100MB -->
<transportConnector name="openwire" uri="tcp://0.0.0.0:61617?maximumConnections=1000&wireFormat.maxFrameSize=104857600"/>
<!--<transportConnector name="amqp" uri="amqp://0.0.0.0:5672?maximumConnections=1000&wireFormat.maxFrameSize=104857600"/>
<transportConnector name="stomp" uri="stomp://0.0.0.0:61613?maximumConnections=1000&wireFormat.maxFrameSize=104857600"/>
<transportConnector name="mqtt" uri="mqtt://0.0.0.0:1883?maximumConnections=1000&wireFormat.maxFrameSize=104857600"/>
<transportConnector name="ws" uri="ws://0.0.0.0:61614?maximumConnections=1000&wireFormat.maxFrameSize=104857600"/>-->
</transportConnectors>
<networkConnectors>
<networkConnector name="network_a" uri="static:(tcp://127.0.0.1:61616)" />
</networkConnectors>
2.3 修改activemq-c中的配置
$ cd activemq-c/conf
$ vim activemq.xml
<persistenceAdapter>
<kahaDB directory="/home/huyj/Downloads/activemq/share"/>
</persistenceAdapter>
...
<transportConnectors>
<!-- DOS protection, limit concurrent connections to 1000 and frame size to 100MB -->
<transportConnector name="openwire" uri="tcp://0.0.0.0:61618?maximumConnections=1000&wireFormat.maxFrameSize=104857600"/>
<!--<transportConnector name="amqp" uri="amqp://0.0.0.0:5672?maximumConnections=1000&wireFormat.maxFrameSize=104857600"/>
<transportConnector name="stomp" uri="stomp://0.0.0.0:61613?maximumConnections=1000&wireFormat.maxFrameSize=104857600"/>
<transportConnector name="mqtt" uri="mqtt://0.0.0.0:1883?maximumConnections=1000&wireFormat.maxFrameSize=104857600"/>
<transportConnector name="ws" uri="ws://0.0.0.0:61614?maximumConnections=1000&wireFormat.maxFrameSize=104857600"/>-->
</transportConnectors>
<networkConnectors>
<networkConnector name="network_a" uri="static:(tcp://127.0.0.1:61616)" />
</networkConnectors>
最后再修改activemq-a,activemq-b,activemq-c文件中conf下的jetty.xml,端口号分别改为8161,8162,8163
<bean id="jettyPort" class="org.apache.activemq.web.WebConsolePort" init-method="start">
<!-- the default port number for the web console -->
<property name="host" value="0.0.0.0"/>
<property name="port" value="8163"/>
</bean>
2.4 启动集群
在完成以上配置之后,分别进入每个activemq安装包的目录下键入启动命令即可:
# ./bin/activemq start
需要注意的是:在我们通过代码连接集群运行主程序之前,记得一定要开放虚拟机中的61616、61617和61618端口,不然程序会报连接超时错误的。开放端口的命令如下:
# iptables -I INPUT -p tcp --dport 61616 -j ACCEPT
# iptables -I INPUT -p tcp --dport 61617 -j ACCEPT
# iptables -I INPUT -p tcp --dport 61618 -j ACCEPT
来源:oschina
链接:https://my.oschina.net/u/4296616/blog/3599505