App端主要的就是UI的搭建,和数据的请求,然后将服务端的数据以精美的UI展示出来,通过这种方法将信息传递给普通用户。普通用户在App上进行操作,将用户行为和数据上传到服务端。所以当我们刚开始接触Flutter这一跨平台开发的时候首先可以先了解一下我们的Flutter UI的搭建。
为什么要学习Flutter?
Flutter是Google的开源UI框架,Flutter生成的程序可以直接在Google最新的系统 Fuschia上运行, 也可以build成 apk在 android上运行,或是生成 ipa在 iOS运行。
一般传统的跨平台解决方案如RN,Weex等都是将程序员编写的代码自动转换成Native代码,最终渲染工作交还给系统,使用类HTML+JS的UI构建逻辑,但是最终会生成对应的自定义原生控件。 Flutter重写了一套跨平台的UI框架。渲染引擎依靠跨平台的Skia图形库来自己绘制。逻辑处理使用支持AOT的Dart语言,执行效率也比JS高很多。
一. FlutterUI整体架构 跨平台应用的框架,没有使用WebView或者系统平台自带的控件,使用自身的高性能渲染引擎(Skia)自绘,界面开发语言使用dart,底层渲染引擎使用C, C++。
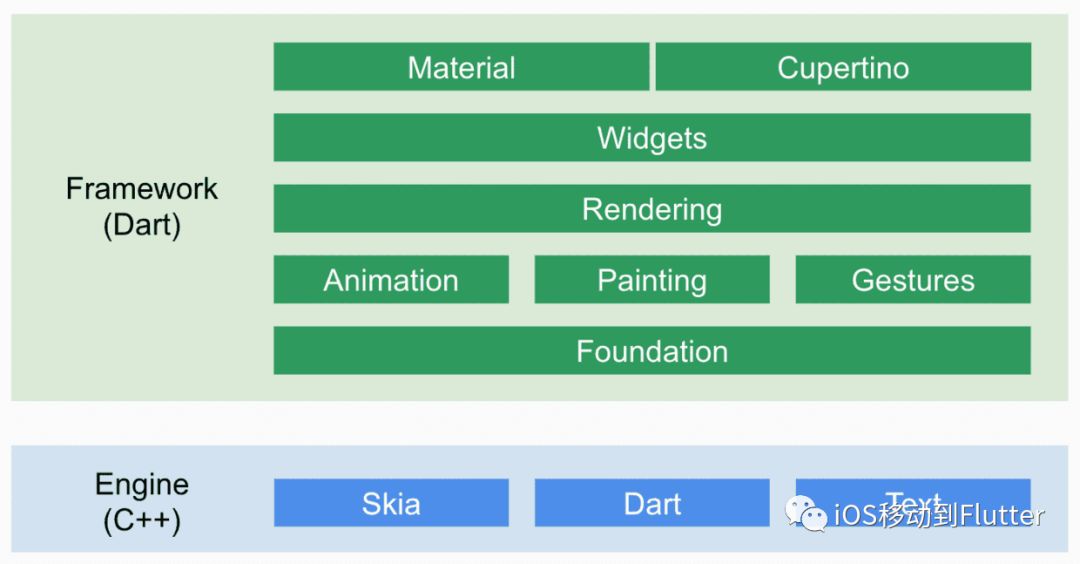

我们可以看到最上层的 Material和 Cupertino组件,这两个什么玩意呢。 其实很简单 Cupertino库比蒂诺是硅谷核心城市之一,也是苹果公司的总部,这就很容易理解了, Cupertino库就是iOS风格的组件。 Material当然就是安卓主流风格的组件了。
从架构图可以看出,这两个组件库都是基于 Widget实现的,可以看出这个 Widget很基础,很重要啊。
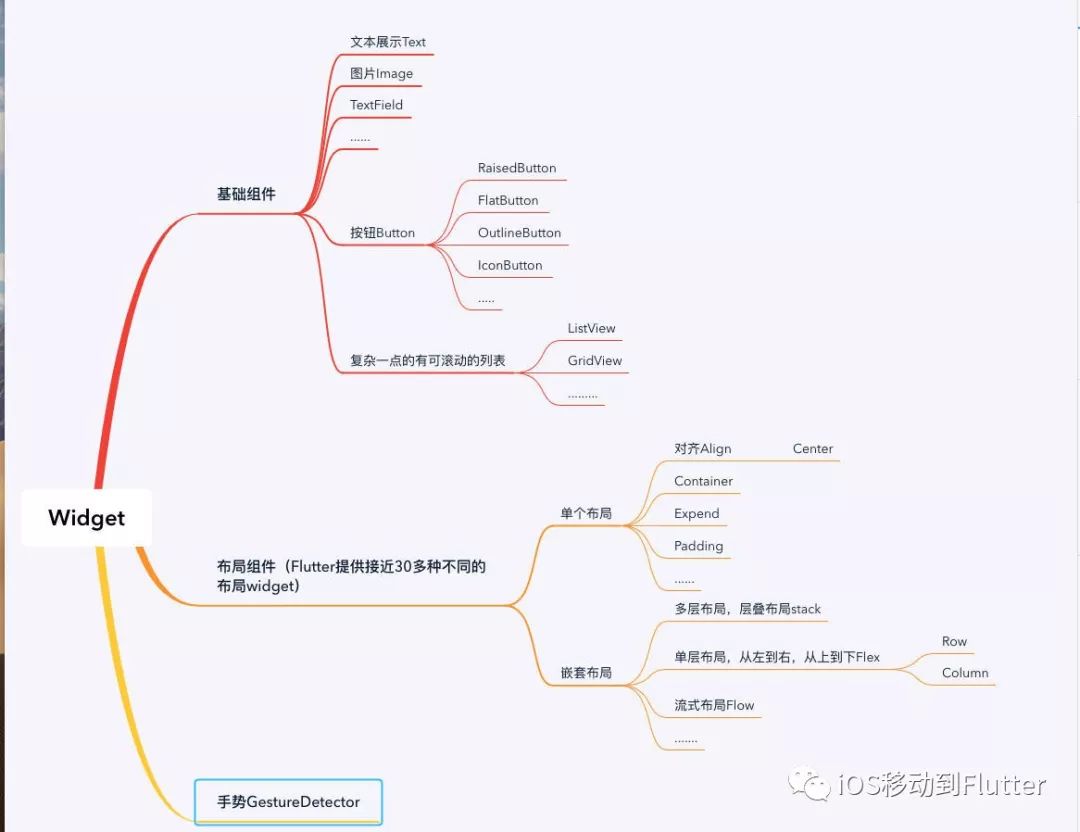
Flutter设计思想是一切皆是Widget,包括UI基础控件,布局方式,手势等都是widget。
当我们新建一个Flutter工程之后,自带的demo示例如下图: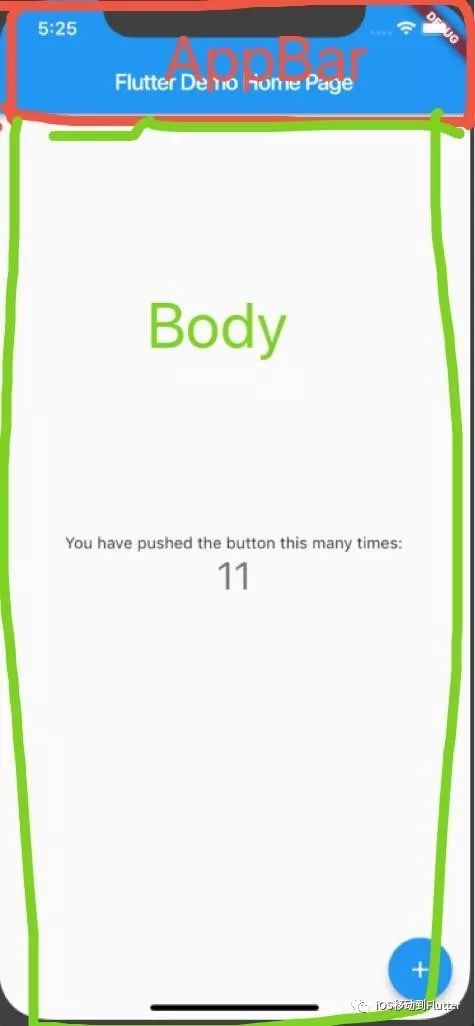
看一下demo代码: MaterialApp包裹 MyHomePage, MyHomePage包裹着 Scaffold, Scaffold包裹着 AppBar和 body也可以增加 bottomNavigationBar等。
MaterialApp继承StatefulWidget,放在Main 入口内函数中,初始化一个Material风格的App,一般配合Scaffold搭建AppUI架构。 Scaffold系统封装好的脚手架,提供了设置顶部导航栏,底部导航栏,侧边栏。 App UI架构搭建完成之后,看一下基本UI组件的使用和组合。
二.下面介绍一下Widget类: abstract class Widget extends DiagnosticableTree{}我们由此可知Widget是一个不能实例化的抽象类。
系统实现的它的两个子类分别为 StatefulWidget和 StatelessWidget。 StatelessWidget是无状态的控件,很简单,创建之后,被它包裹的Widget上边的数据就不在更新了,当然这个也不知绝对的,可以通过其他方法去更新StatelessWidget中Ui,这个以后再说。 StatefulWidget 这个是有状态的,创建StatefulWidget 同时必须创建对应的State类,构建UI就放在了State类里边,并且可以调用 setState(){}函数去从新使用新的状态构建UI。所以在实际开发中,我们要根据具体需求,选择对应的Widget。可以使用StatelessWidget完成的,尽可能的不要用StatefulWidget 。
下面举个例子:

StatelessWidget:比如说在一些静态页面构建时,一旦UI构建之后便不需要再去更改UI,这时候可以使用StatelessWidget,比如一般App的关于我们页面。
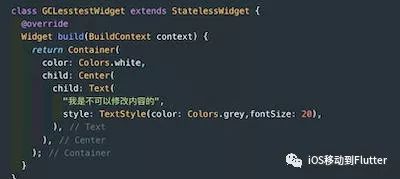
效果如下:
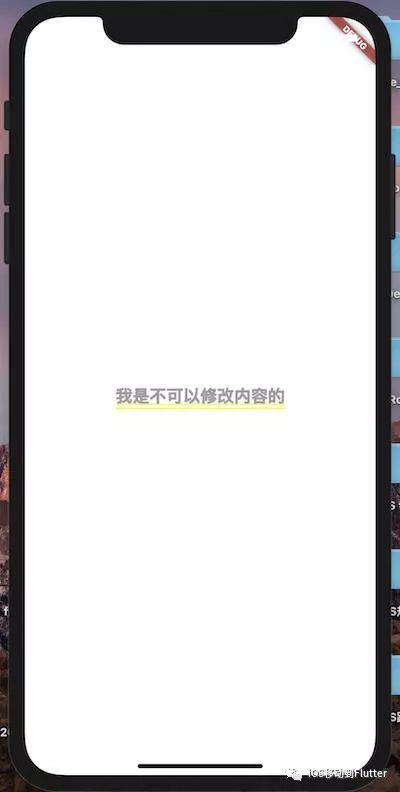
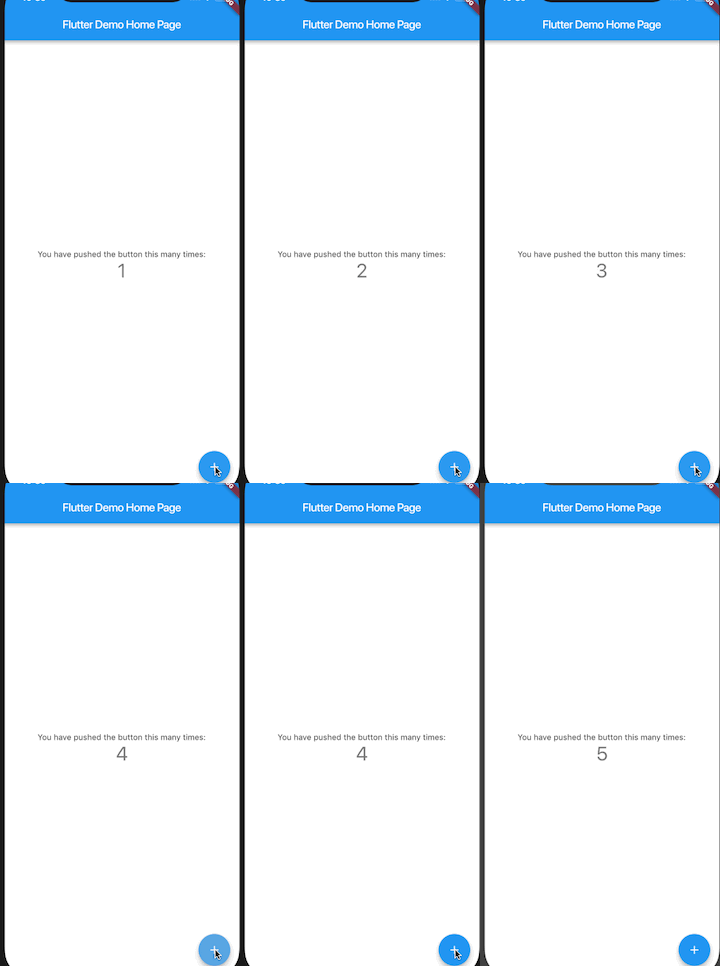
StatefulWidget :我们构建的是动态页面,比如展示的数据是服务器返回来的,或者用户进行交互,需要更新UI斩杀的数据。新建工程自带的demo如下:
void main() => runApp(MyApp());class MyApp extends StatelessWidget {// This widget is the root of your application.Widget build(BuildContext context) {return MaterialApp(title: 'Flutter Demo',theme: ThemeData(// This is the theme of your application.//// Try running your application with "flutter run". You'll see the// application has a blue toolbar. Then, without quitting the app, try// changing the primarySwatch below to Colors.green and then invoke// "hot reload" (press "r" in the console where you ran "flutter run",// or simply save your changes to "hot reload" in a Flutter IDE).// Notice that the counter didn't reset back to zero; the application// is not restarted.primarySwatch: Colors.blue,),home: MyHomePage(title: 'Flutter Demo Home Page'),);}}class MyHomePage extends StatefulWidget {MyHomePage({Key key, this.title}) : super(key: key);// This widget is the home page of your application. It is stateful, meaning// that it has a State object (defined below) that contains fields that affect// how it looks.// This class is the configuration for the state. It holds the values (in this// case the title) provided by the parent (in this case the App widget) and// used by the build method of the State. Fields in a Widget subclass are// always marked "final".final String title;_MyHomePageState createState() => _MyHomePageState();}class _MyHomePageState extends State<MyHomePage> {int _counter = 0;void _incrementCounter() {setState(() {// This call to setState tells the Flutter framework that something has// changed in this State, which causes it to rerun the build method below// so that the display can reflect the updated values. If we changed// _counter without calling setState(), then the build method would not be// called again, and so nothing would appear to happen._counter++;});}Widget build(BuildContext context) {// This method is rerun every time setState is called, for instance as done// by the _incrementCounter method above.//// The Flutter framework has been optimized to make rerunning build methods// fast, so that you can just rebuild anything that needs updating rather// than having to individually change instances of widgets.return Scaffold(appBar: AppBar(// Here we take the value from the MyHomePage object that was created by// the App.build method, and use it to set our appbar title.title: Text(widget.title),),body: Center(// Center is a layout widget. It takes a single child and positions it// in the middle of the parent.child: Column(// Column is also layout widget. It takes a list of children and// arranges them vertically. By default, it sizes itself to fit its// children horizontally, and tries to be as tall as its parent.//// Invoke "debug painting" (press "p" in the console, choose the// "Toggle Debug Paint" action from the Flutter Inspector in Android// Studio, or the "Toggle Debug Paint" command in Visual Studio Code)// to see the wireframe for each widget.//// Column has various properties to control how it sizes itself and// how it positions its children. Here we use mainAxisAlignment to// center the children vertically; the main axis here is the vertical// axis because Columns are vertical (the cross axis would be// horizontal).mainAxisAlignment: MainAxisAlignment.center,children: <Widget>[Text('You have pushed the button this many times:',),Text('$_counter',style: Theme.of(context).textTheme.display1,),],),),floatingActionButton: FloatingActionButton(onPressed: _incrementCounter,tooltip: 'Increment',child: Icon(Icons.add),), // This trailing comma makes auto-formatting nicer for build methods.);}}
效果如下:
三.常用控件的学习
1.Text文本展示类
类似iOS的UILabel控件,系统提供了丰富的配置属性。
-
const Text(this.data, {Key key,this.style,//单独的style类,可以设置字体颜色,字体大小,字重,字间距等强大功能this.strutStyle,this.textAlign,//对齐方式this.textDirection,字体显示方向this.locale,this.softWrap,this.overflow,this.textScaleFactor,this.maxLines,//最大显示行数this.semanticsLabel,}) : assert(data != null),textSpan = null,super(key: key);
当然也同样支持不同样式的复杂文本的显示:
const Text.rich(this.textSpan, {Key key,this.style,this.strutStyle,this.textAlign,this.textDirection,this.locale,this.softWrap,this.overflow,this.textScaleFactor,this.maxLines,this.semanticsLabel,}) : assert(textSpan != null),data = null,super(key: key);
富文本显示可以使用RichText。
2.Image
Image.asset:从asset资源文件获取图片; Image.network:从网络获取图片; Image.file:从本地资源文件回去图片; Image.memory:从内存资源获取图片;
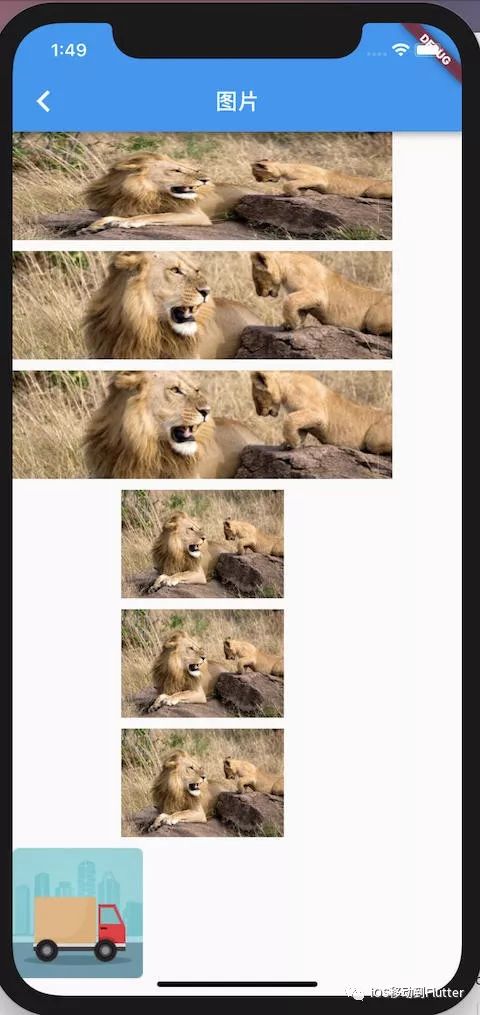
FadeInImage带有一个占位图的Image,比如网络较慢,或者网络图片请求失败的时候,会有一个占位图。 注意Image有一个Fit属性,用于设置图片内容适应方式,类似于iOS ImageView contenMode。
class GCImageTest extends StatefulWidget {_GCImageTestState createState() => _GCImageTestState();}class _GCImageTestState extends State<GCImageTest> {Widget buildImage (url,BoxFit fit){return Container(child: Image.network(url,fit:fit,width: 350,height: 100,),);}Widget build(BuildContext context) {return Column(mainAxisAlignment: MainAxisAlignment.start,crossAxisAlignment: CrossAxisAlignment.start,children: <Widget>[buildImage("https://ss1.bdstatic.com/70cFvXSh_Q1YnxGkpoWK1HF6hhy/it/u=2942065216,1819114681&fm=27&gp=0.jpg", BoxFit.fill),SizedBox(height: 10,),buildImage("https://ss1.bdstatic.com/70cFvXSh_Q1YnxGkpoWK1HF6hhy/it/u=2942065216,1819114681&fm=27&gp=0.jpg", BoxFit.cover),SizedBox(height: 10,),buildImage("https://ss1.bdstatic.com/70cFvXSh_Q1YnxGkpoWK1HF6hhy/it/u=2942065216,1819114681&fm=27&gp=0.jpg", BoxFit.fitWidth),SizedBox(height: 10,),buildImage("https://ss1.bdstatic.com/70cFvXSh_Q1YnxGkpoWK1HF6hhy/it/u=2942065216,1819114681&fm=27&gp=0.jpg", BoxFit.contain),SizedBox(height: 10,),buildImage("https://ss1.bdstatic.com/70cFvXSh_Q1YnxGkpoWK1HF6hhy/it/u=2942065216,1819114681&fm=27&gp=0.jpg", BoxFit.fitHeight),SizedBox(height: 10,),buildImage("https://ss1.bdstatic.com/70cFvXSh_Q1YnxGkpoWK1HF6hhy/it/u=2942065216,1819114681&fm=27&gp=0.jpg", BoxFit.scaleDown),SizedBox(height: 10,),FadeInImage.assetNetwork(image:"",placeholder:"lib/static/express_list_icon@2x.png",)],);}}
3.按钮
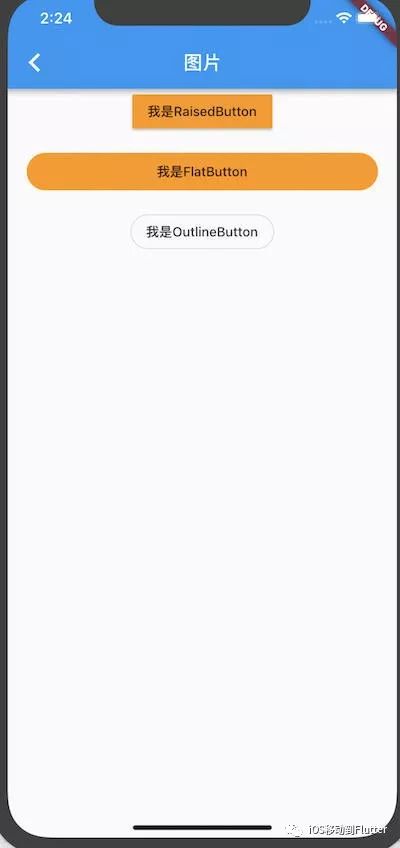
RaisedButton:凸起的按钮,周围有阴影,其实就是Android中的Material Design风格的Button ,继承自MaterialButton。 FlatButton:扁平化的按钮,继承自MaterialButton。 OutlineButton:带边框的按钮,继承自MaterialButton。 IconButton:图标按钮,继承自StatelessWidget。 这些按钮都可以通过设置shape来设置其圆角:
class _GCButtonTestState extends State<GCButtonTest> {@overrideWidget build(BuildContext context) {return Container(width: MediaQuery.of(context).size.width,child: Column(crossAxisAlignment: CrossAxisAlignment.center,mainAxisAlignment: MainAxisAlignment.start,children: <Widget>[RaisedButton(highlightColor: Colors.red,color: Colors.orange,child: Text("我是RaisedButton"),onPressed: () {},),Container(width: MediaQuery.of(context).size.width,height: 80,padding: EdgeInsets.all(20),child: FlatButton(shape: const RoundedRectangleBorder(side: BorderSide.none,borderRadius: BorderRadius.all(Radius.circular(50))),highlightColor: Colors.red,color: Colors.orange,child: Text("我是FlatButton"),onPressed: () {},),),OutlineButton(shape: const RoundedRectangleBorder(side: BorderSide.none,borderRadius: BorderRadius.all(Radius.circular(20))),onPressed: () {},child: Text("我是OutlineButton"),),],),);}}
效果如下:
4.TextField
用户输入控件:
Widget build(BuildContext context) {return KeyboardAvoider(focusPadding:20,autoScroll: true,child: Container(padding: EdgeInsets.only(top: 20),color: Colors.green,width: MediaQuery.of(context).size.width,height:80,child: TextField(decoration: InputDecoration(//设置边框,占位符等border: OutlineInputBorder(borderSide: BorderSide(width: 5,color: Colors.grey,),borderRadius: BorderRadius.all(Radius.circular(20)),),contentPadding: EdgeInsets.all(10),icon: Icon(Icons.text_fields),hintText: "请输入你的用户名"),keyboardType:TextInputType.text,//键盘类型textInputAction: TextInputAction.done, //键盘 return 按钮设置maxLines: 1,autocorrect: true, //是否自动更正autofocus: false, //是否自动对焦obscureText: true, //是否是密码textAlign: TextAlign.center,focusNode: _contentFocusNode,//控制是否为第一响应, _contentFocusNode.unfocus();收起键盘,FocusScope.of(context).requestFocus(_contentFocusNode.unfocus)请求成为第一响应onEditingComplete: () {},controller: controller, //监听输入动作,可以在controller里设置默认值controller.text = "默认值";onSubmitted:(String text){print(text);_contentFocusNode.unfocus();,//提交信息onChanged: (String text){},onTap: (){},//文字输入有变化),),);}}
效果如下图: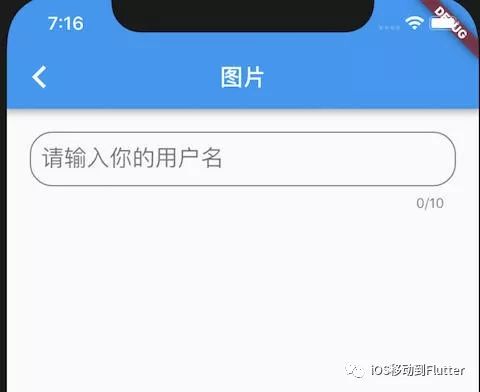
注意的是在实际使用过程中TextField是不允许被键盘遮挡的,当TextField父节点时可滚动视图时,系统会自动上拉,不被键盘遮挡。但是如果TextField父节点不是滚动视图时候,可以使用第三方
KeyboardAvoider进行包裹,这样输入时候也不会被键盘遮盖。controller也必须主动销毁
四常用布局类
1.Flex布局
direction:布局方向可以设置,纵向和横向。 mainAxisAlignment:主轴对齐方向,如果横向布局,那么Y轴是主节点。如果纵向布局那么X轴是主轴。 crossAxisAlignment:副轴对齐方式。 children:顾名思义上边字节点集合。 这一点不理解的话,我举个🌰:
-
class GCFlexRowlayoutTest extends StatelessWidget {@overrideWidget build(BuildContext context) {return Flex(direction: Axis.horizontal,//布局方向mainAxisAlignment: MainAxisAlignment.start,//主轴对齐方向,因为是横向的布局,所以主轴是X方向crossAxisAlignment: CrossAxisAlignment.end,//副轴对齐方式,底部对齐children: <Widget>[Flexible(flex: 1,//设置宽度比例child: Container(height: 100,color: Colors.red,),),Flexible(flex: 2,child: Container(height: 150,color: Colors.grey,),),Flexible(flex: 1,child: Container(height: 50,color: Colors.green,),)],);}}
首先我先注释掉 crossAxisAlignment:效果如下: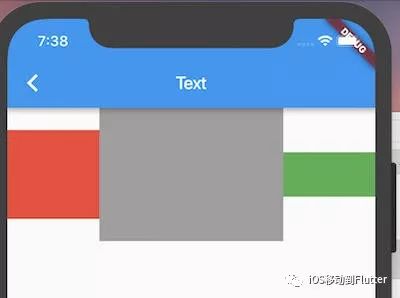
可见副轴(即这里的Y轴),默认对齐方向是居中对齐。 下面我设置: crossAxisAlignment:CrossAxisAlignment.end 效果如下: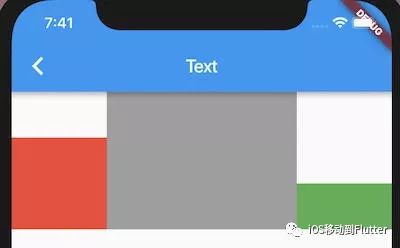
此时设置的为Y轴的end方向对齐。其它对齐方式,可以自行试用一下。
1.0.1Row布局类
行布局类,是Flex的子类,基本功能同Flex,布局方向为横向布局
1.0.2Column布局类
列布局类,是Flex的子类,基本功能同Flex,布局方向为纵向布局
实际开发中,我们都是比较长使用这两者嵌套进行复杂UI 构建
2.Stack层叠布局
如下图效果:

代码实现如下:
Widget build(BuildContext context) {return Center(child: Container(height: 100,width: 100,child: Stack(children: <Widget>[ClipOval(child: Image.asset("lib/static/express_list_icon@2x.png",fit: BoxFit.fill,),),Positioned(left: 25,right: 10,top: 10,child: Text("添加水印"),),Positioned(right: 5,top: 10,child: ClipOval(child: Container(width: 10,height:10,color: Colors.red,),),),],),),);
Stack配合Positioned,FractionalOffset进行定位布局。
Positioned({Key key,this.left,this.top,this.right,this.bottom,this.width,this.height,Widget child,})
本文分享自微信公众号 - iOS移动到Flutter(gh_4bcf84c69cb3)。
如有侵权,请联系 support@oschina.cn 删除。
本文参与“OSC源创计划”,欢迎正在阅读的你也加入,一起分享。
来源:oschina
链接:https://my.oschina.net/u/4244324/blog/4469447
