本章关键点总结 & 说明:
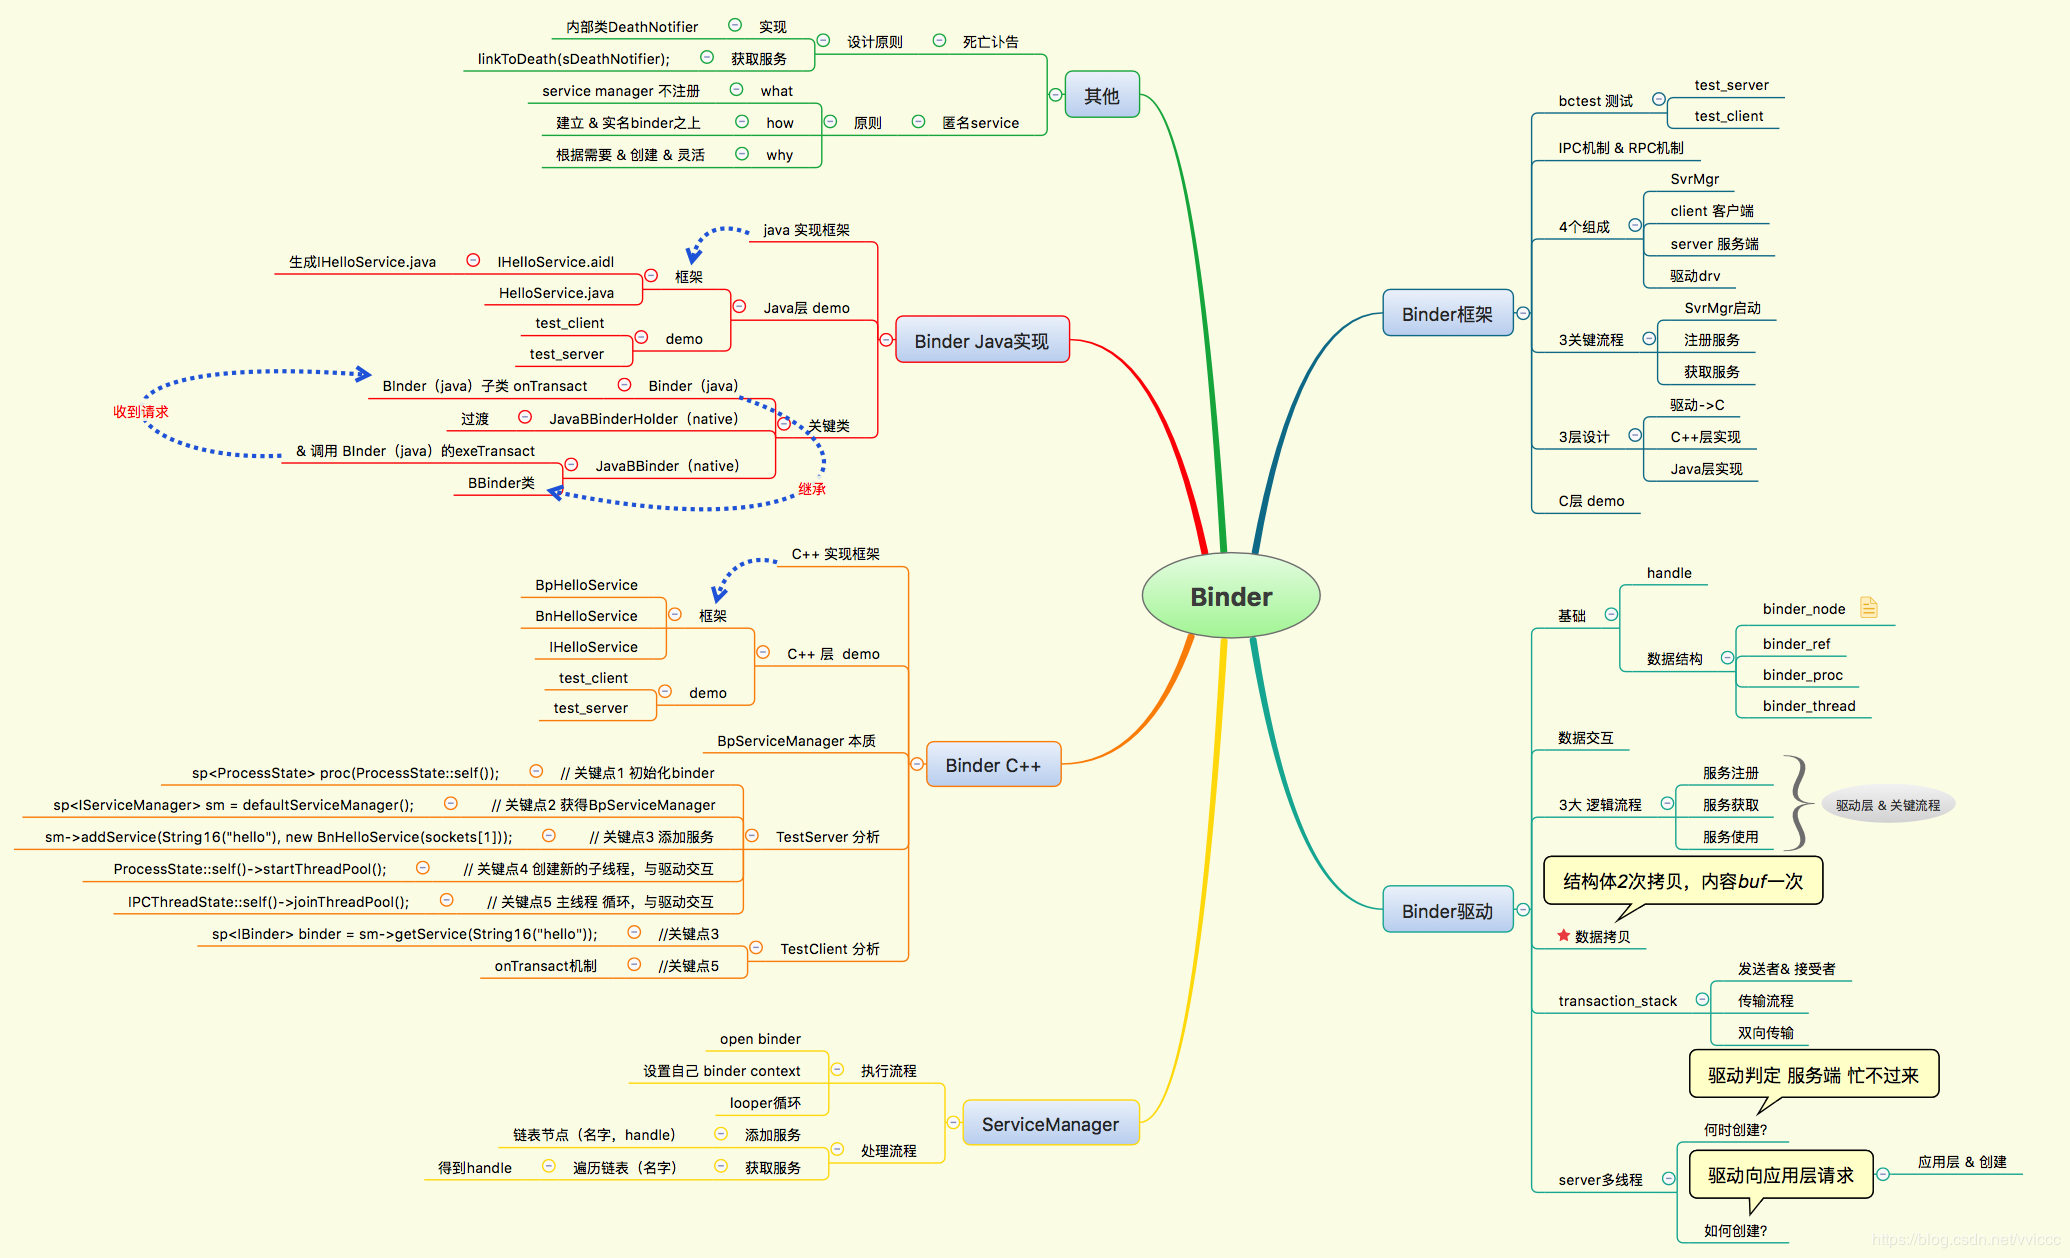
这里关注➕ Binder Java实现部分,主要谈了 java实现框架和demo,最后分析了 关键类 Binder、JavaBBinderHolder、JavaBBinder以及他们之间的关系。
1 binder java层的整体框架
1.1 整体框架图说明
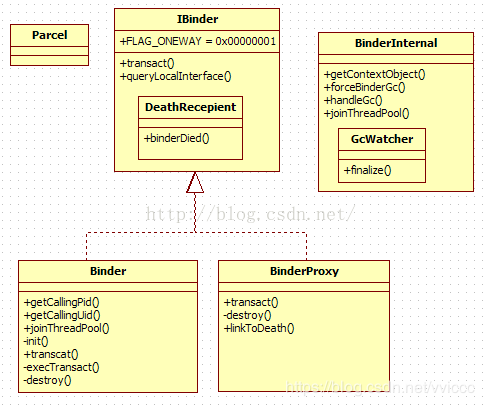
Binder机制在C++层已经有了完整的实现。因此Java层完全不用重复实现,而是通过JNI衔接了C++层以复用其实现。因此java层的架构相对比较简单。如下所示:
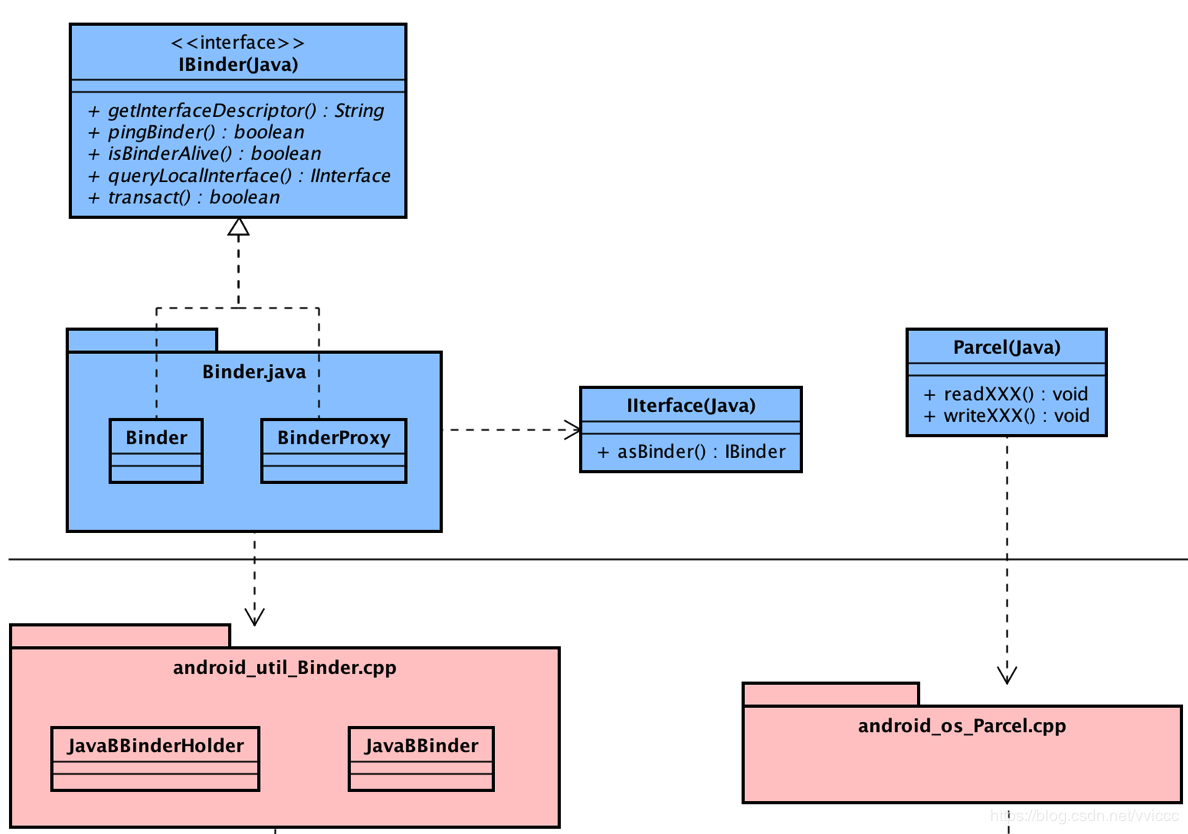
同时这里用另一个图来说明下binder java层、 JNI的衔接以及binder C++层,如下所示:
1.2 binder相关类解读
类 名称 类 说明
IBinder Java层,提供了使用transact方法来调用远程服务的机制,以及DeathRecepient接口
Binder 实现IBinder接口,封装JNI实现,Java层Binder服务基类,BnXXX代表
BinderProxy 实现IBinder接口,封装JNI实现。提供transact方法调用远程服务,BpXXX代表
JavaBBinderHolder 内部存储了JavaBBinder
JavaBBinder 将C++端的onTransact调用传递到Java端
BinderInternal 仅供Binder框架使用的类,内部有一个GcWatcher类,专门用于处理和Binder相关的垃圾回收。
Parcel 承载通信数据,Java层和C++层都有涉及
这里对binder的java层框架又了一个简单了解后,我们接下来看看binder在java层的案例,即如何实现一个java层的binder通信模型。
1.3 Java层Binder架构总结
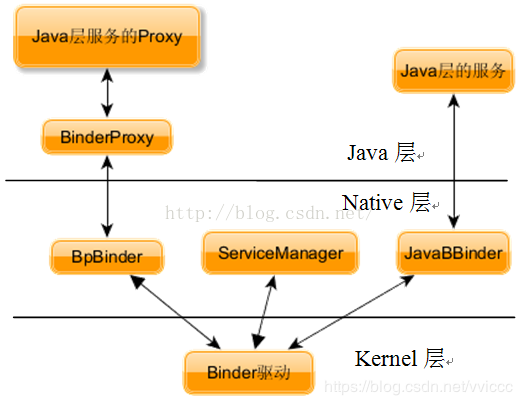
该图给出的是Java层与Native层的关键类BinderProxy 与BpBinder,JavaBBinder之间的关系以及客户端与服务端的关系。
对于代表客户端的BinderProxy来说,Java层的BinderProxy在Native层对应一个BpBinder对象。凡是从Java层发出的请求,首先从Java层的BinderProxy传递到Native层的BpBinder,继而由BpBinder将请求发送到Binder驱动。
对于代表服务端的Service来说,Java层的Binder在Native层有一个JavaBBinder对象。前面介绍过,所有Java层的Binder在Native层都对应为JavaBBinder,而JavaBBinder仅起到中转作用,即把来自客户端的请求从Native层传递到Java层。
1.4 java层 binder FLAG_ONEWAY机制解读
IBinder接口类中定义了一个叫FLAG_ONEWAY的整型,该变量的意义非常重要。
当客户端利用Binder机制发起一个跨进程的函数调用时,调用方(即客户端)一般会阻塞,直到服务端返回结果。
这种方式和普通的函数调用是一样的。但是在调用Binder函数时,在指明了 FLAG_ONEWAY标志后,调用方只要把请求发送到Binder驱动即可返回,而不用等待服务端的结果,这就是一种所谓的非阻塞方式。
在Native 层中,涉及的Binder调用基本都是阻塞的,但是在Java层的framework中,使用FLAG_ONEWAY进行Binder调用的情况非常多, 以后经常会碰到。
使用FLAG_ONEWAY进行函数调用的程序在设计上的特点:对于使用FLAG_ONEWAY的函数来说,客户端仅向服务端发出了请求,但是并不能确定服务端是否处理了该请求。所以,客户端一般会向服务端注册一个回调(同样是跨进程的Binder调用),一旦服务端处理了该请求, 就会调用此回调来通知客户端处理结果。这种回调函数也大多采用FLAG_ONEWAY的方式。
2 binder Java层实现框架案例
2.1 aidl文件与 IHelloService.java
android在java层使用了 一个叫aidl的文件模式,编译后可以直接生成IHelloService.java
/** {@hide} */
interface IHelloService
{
void sayhello();
int sayhello_to(String name);
}
2.2 生成 IHelloService.java
把 IHelloService.aidl,放入 frameworks/base/core/java/android/os,修改 frameworks/base/Android.mk 添加一行
core/java/android/os/IVibratorService.aidl \
+ core/java/android/os/IHelloService.aidl \
执行 $mmm frameworks/base,它会生成:
./out/target/common/obj/JAVA_LIBRARIES/framework_intermediates/src/core/java/android/os/IHelloService.java
打开该文件,如下:
public interface IHelloService extends android.os.IInterface
{
/** Local-side IPC implementation stub class. */
public static abstract class Stub extends android.os.Binder implements IHelloService
{
private static final java.lang.String DESCRIPTOR = "IHelloService";
/** Construct the stub at attach it to the interface. */
public Stub()
{
this.attachInterface(this, DESCRIPTOR);
}
/**
* Cast an IBinder object into an IHelloService interface,
* generating a proxy if needed.
*/
public static IHelloService asInterface(android.os.IBinder obj)
{
if ((obj==null)) {
return null;
}
android.os.IInterface iin = obj.queryLocalInterface(DESCRIPTOR);
if (((iin!=null)&&(iin instanceof IHelloService))) {
return ((IHelloService)iin);
}
return new IHelloService.Stub.Proxy(obj);
}
@Override public android.os.IBinder asBinder()
{
return this;
}
@Override public boolean onTransact(int code, android.os.Parcel data, android.os.Parcel reply, int flags) throws android.os.RemoteException
{
switch (code)
{
case INTERFACE_TRANSACTION:
{
reply.writeString(DESCRIPTOR);
return true;
}
case TRANSACTION_sayhello:
{
data.enforceInterface(DESCRIPTOR);
this.sayhello();
reply.writeNoException();
return true;
}
case TRANSACTION_sayhello_to:
{
data.enforceInterface(DESCRIPTOR);
java.lang.String _arg0;
_arg0 = data.readString();
int _result = this.sayhello_to(_arg0);
reply.writeNoException();
reply.writeInt(_result);
return true;
}
}
return super.onTransact(code, data, reply, flags);
}
private static class Proxy implements IHelloService
{
private android.os.IBinder mRemote;
Proxy(android.os.IBinder remote)
{
mRemote = remote;
}
@Override public android.os.IBinder asBinder()
{
return mRemote;
}
public java.lang.String getInterfaceDescriptor()
{
return DESCRIPTOR;
}
@Override public void sayhello() throws android.os.RemoteException
{
android.os.Parcel _data = android.os.Parcel.obtain();
android.os.Parcel _reply = android.os.Parcel.obtain();
try {
_data.writeInterfaceToken(DESCRIPTOR);
mRemote.transact(Stub.TRANSACTION_sayhello, _data, _reply, 0);
_reply.readException();
}
finally {
_reply.recycle();
_data.recycle();
}
}
@Override public int sayhello_to(java.lang.String name) throws android.os.RemoteException
{
android.os.Parcel _data = android.os.Parcel.obtain();
android.os.Parcel _reply = android.os.Parcel.obtain();
int _result;
try {
_data.writeInterfaceToken(DESCRIPTOR);
_data.writeString(name);
mRemote.transact(Stub.TRANSACTION_sayhello_to, _data, _reply, 0);
_reply.readException();
_result = _reply.readInt();
}
finally {
_reply.recycle();
_data.recycle();
}
return _result;
}
}
static final int TRANSACTION_sayhello = (android.os.IBinder.FIRST_CALL_TRANSACTION + 0);
static final int TRANSACTION_sayhello_to = (android.os.IBinder.FIRST_CALL_TRANSACTION + 1);
}
public void sayhello() throws android.os.RemoteException;
public int sayhello_to(java.lang.String name) throws android.os.RemoteException;
}
这里 直接生成了IHelloService.Stub 和IHelloService.Stub.Proxy,一个相当于C++层的BnXXX(java层不需要在意传输数据的通信架构,即不需要在意服务端的RPC通信框架,仅需要搞定业务层代码sayhello和 syahello_to),一个是客户端的代理BpXXX(这里直接生成,不需要再写代码,非常简单),因此这里只要编写一个HelloService继承IHelloService.Stub即可。
2.3 业务层代码 HelloService
import android.util.Slog;
public class HelloService extends IHelloService.Stub {
private static final String TAG = "HelloService";
private int cnt1 = 0;
private int cnt2 = 0;
public void sayhello() throws android.os.RemoteException {
cnt1++;
Slog.i(TAG, "sayhello : cnt = "+cnt1);
}
public int sayhello_to(java.lang.String name) throws android.os.RemoteException {
cnt2++;
Slog.i(TAG, "sayhello_to "+name+" : cnt = "+cnt2);
return cnt2;
}
}
这里就直接实现了 服务端方法 的处理流程。基于此开始编写测试应用
2.4 TestServer实现
import android.util.Slog;
import android.os.ServiceManager;
public class TestServer {
private static final String TAG = "TestServer";
public static void main(String args[])
{
/* add Service */
Slog.i(TAG, "add hello service");
ServiceManager.addService("hello", new HelloService());
while (true)
{
try {
Thread.sleep(100);
} catch (Exception e){}
}
}
}
2.5 TestClient实现
import android.util.Slog;
import android.os.ServiceManager;
import android.os.IBinder;
/* test_client <hello> [name] */
public class TestClient {
private static final String TAG = "TestClient";
public static void main(String args[])
{
if (args.length == 0)
{
System.out.println("Usage: need parameter: <hello> [name]");
return;
}
if (args[0].equals("hello"))
{
IBinder binder = ServiceManager.getService("hello");//getService
if (binder == null)
{
Slog.i(TAG, "can not get hello service");
return;
}
IHelloService svr = IHelloService.Stub.asInterface(binder);
if (args.length == 1)
{
try {
svr.sayhello();
System.out.println("call sayhello");
Slog.i(TAG, "call sayhello");
} catch (Exception e) {}
}
else
{
try {
int cnt = svr.sayhello_to(args[1]);
System.out.println("call sayhello_to "+args[1]+" : cnt = "+cnt);
Slog.i(TAG, "call sayhello_to "+args[1]+" : cnt = "+cnt);
} catch (Exception e) {
System.out.println("call sayhello_to , err :"+e);
Slog.i(TAG, "call sayhello_to , err : "+e);
}
}
}
}
}
2.6 Android.mk
LOCAL_PATH:= $(call my-dir)
include $(CLEAR_VARS)
LOCAL_SRC_FILES := HelloService.java IHelloService.java TestServer.java
LOCAL_MODULE := TestServer
include $(BUILD_JAVA_LIBRARY)
include $(CLEAR_VARS)
LOCAL_SRC_FILES := HelloService.java IHelloService.java TestClient.java
LOCAL_MODULE := TestClient
include $(BUILD_JAVA_LIBRARY)
2.7 运行测试程序
这里直接生成了两个java端测试程序,但是执行却成了问题,编译结束后,我们要把生成的TestServer.jar 和 TestClient.jar拷贝到机器上,因此这里我么要借助于 app_process,执行步骤如下所示:
$CLASSPATH=/mnt/android_fs/TestServer.jar app_process / TestServer &
$CLASSPATH=/mnt/android_fs/TestClient.jar app_process / TestClient hello
$CLASSPATH=/mnt/android_fs/TestClient.jar app_process / TestClient hello wds
执行步骤仅供参开,了解其中原理才是关键。
3 java层binder 关键类Binder、JavaBBinderHolder和JavaBBinder之间的关系
3.1 从Binder 入手
Java层的 Binder的构造函数,代码如下:
public Binder() {
init();
...
}
Binder构造函数中会调用init方法,如下所示:
private native final void init();
找到native方法的注册,如下所示:
static const JNINativeMethod gBinderMethods[] = {
/* name, signature, funcPtr */
{ "getCallingPid", "()I", (void*)android_os_Binder_getCallingPid },
{ "getCallingUid", "()I", (void*)android_os_Binder_getCallingUid },
{ "clearCallingIdentity", "()J", (void*)android_os_Binder_clearCallingIdentity },
{ "restoreCallingIdentity", "(J)V", (void*)android_os_Binder_restoreCallingIdentity },
{ "setThreadStrictModePolicy", "(I)V", (void*)android_os_Binder_setThreadStrictModePolicy },
{ "getThreadStrictModePolicy", "()I", (void*)android_os_Binder_getThreadStrictModePolicy },
{ "flushPendingCommands", "()V", (void*)android_os_Binder_flushPendingCommands },
{ "init", "()V", (void*)android_os_Binder_init },
{ "destroy", "()V", (void*)android_os_Binder_destroy }
};
init方法对应的native实现函数为android_os_Binder_init ,其实现的代码如下:
static void android_os_Binder_init(JNIEnv* env, jobject obj)
{
JavaBBinderHolder* jbh = new JavaBBinderHolder();//创建一个JavaBBinderHolder对象
if (jbh == NULL) {
jniThrowException(env, "java/lang/OutOfMemoryError", NULL);
return;
}
ALOGV("Java Binder %p: acquiring first ref on holder %p", obj, jbh);
jbh->incStrong((void*)android_os_Binder_init);
//将这个JavaBBinderHolder对象保存到Java Binder对象的mObject成员中
env->SetLongField(obj, gBinderOffsets.mObject, (jlong)jbh);
}
由构造函数的分析可知,Java的Binder对象将和一个Native的JavaBBinderHolder对象相关联。
3.2 JavaBBinderHolder定义如下:
class JavaBBinderHolder : public RefBase
{
public:
sp<JavaBBinder> get(JNIEnv* env, jobject obj)
{
AutoMutex _l(mLock);
sp<JavaBBinder> b = mBinder.promote();//promote,弱引用转强引用
if (b == NULL) {
b = new JavaBBinder(env, obj);//创建一个JavaBBinder,obj实际上是Java层中的Binder对象
mBinder = b;
}
return b;
}
sp<JavaBBinder> getExisting()
{
AutoMutex _l(mLock);
return mBinder.promote();
}
private:
Mutex mLock;
wp<JavaBBinder> mBinder;
};
JavaBBinderHolder仅从RefBase派生,所以它不属于Binder家族。Java层的Binder和Native层的一个与Binder家族无关的对象绑定的原因:JavaBBinderHolder类的get函数中创建了一个JavaBBinder对象,这个对象就是从BBinder派生的。关系如下所示:
class JavaBBinder : public BBinder
通过JavaBBinderHolder的get函数的调用分析3者之间的关系,从下面这句代码开始分析:
//其中,data是Parcel对象,service此时还是ActivityManagerService
data.writeStrongBinder(service);
writeStrongBinder会做一个替换工作,下面是它的native代码实现:
public final void writeStrongBinder(IBinder val) {
nativeWriteStrongBinder(mNativePtr, val);
}
继续分析nativeWriteStrongBinder,代码实现如下:
private static native void nativeWriteStrongBinder(long nativePtr, IBinder val);
找到native方法的注册,如下所示:
static const JNINativeMethod gParcelMethods[] = {
{"nativeDataSize", "(J)I", (void*)android_os_Parcel_dataSize},
...
{"nativeWriteStrongBinder", "(JLandroid/os/IBinder;)V", (void*)android_os_Parcel_writeStrongBinder},
...
}
分析android_os_Parcel_writeStrongBinder的实现,代码如下所示:
static void android_os_Parcel_writeStrongBinder(JNIEnv* env, jclass clazz, jlong nativePtr, jobject object)
{
Parcel* parcel = reinterpret_cast<Parcel*>(nativePtr);//parcel是一个Native的对象
if (parcel != NULL) {
//writeStrongBinder的真正参数是ibinderForJavaObject的返回值
const status_t err = parcel->writeStrongBinder(ibinderForJavaObject(env, object));
if (err != NO_ERROR) {
signalExceptionForError(env, clazz, err);
}
}
}
继续分析ibinderForJavaObject的实现,代码如下所示:
sp<IBinder> ibinderForJavaObject(JNIEnv* env, jobject obj)
{
if (obj == NULL) return NULL;
//逻辑说明:
//如果Java的obj是Binder类,则首先获得JavaBBinderHolder对象,然后调用它的get函数。
//而这个get将返回一个JavaBBinder
if (env->IsInstanceOf(obj, gBinderOffsets.mClass)) {
JavaBBinderHolder* jbh = (JavaBBinderHolder*)env->GetLongField(obj, gBinderOffsets.mObject);
return jbh != NULL ? jbh->get(env, obj) : NULL;
}
//如果obj是BinderProxy类,则返回Native的BpBinder对象
if (env->IsInstanceOf(obj, gBinderProxyOffsets.mClass)) {
return (IBinder*)env->GetLongField(obj, gBinderProxyOffsets.mObject);
}
return NULL;
}
分析后发现:
Java层中所有的Binder对应的都是这个JavaBBinder(不同的Binder对象对应不同的JavaBBinder对象)
下图展示了Java Binder(Java)、JavaBBinderHolder(C++)和JavaBBinder(C++)的关系。如下所示:
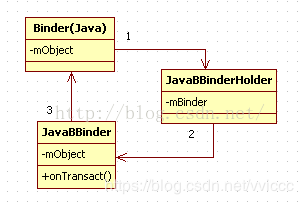
总结如下:
Java层的Binder通过mObject指向一个Native层的JavaBBinderHolder对象。
Native层的JavaBBinderHolder对象通过mBinder成员变量指向一个Native的JavaBBinder对象。
Native的JavaBBinder对象又通过mObject变量指向一个Java层的Binder对象。
3.3 JavaBBinder
Java层的Binder架构中,JavaBBinder却是一个和业务完全无关的对象。它如何实现不同业务呢?
@1 为此开始分析onTransact函数,当收到请求时,JavaBBinder会调用它的这个函数。
class JavaBBinder : public BBinder
{
public:
JavaBBinder(JNIEnv* env, jobject object)
: mVM(jnienv_to_javavm(env)), mObject(env->NewGlobalRef(object))
{...}
...
protected:
virtual ~JavaBBinder(){...}
virtual status_t onTransact(
uint32_t code, const Parcel& data, Parcel* reply, uint32_t flags = 0)
{
JNIEnv* env = javavm_to_jnienv(mVM);
...
IPCThreadState* thread_state = IPCThreadState::self();
const int32_t strict_policy_before = thread_state->getStrictModePolicy();
//调用Java层Binder对象的execTranscat函数
jboolean res = env->CallBooleanMethod(mObject, gBinderOffsets.mExecTransact,
code, reinterpret_cast<jlong>(&data), reinterpret_cast<jlong>(reply), flags);
...
return res != JNI_FALSE ? NO_ERROR : UNKNOWN_TRANSACTION;
}
...
private:
JavaVM* const mVM;
jobject const mObject;
};
本例中mObject就是HelloService,现在调用它的execTransact函数,该函数在Binder(Java类)中实现,代码如下:
private boolean execTransact(int code, long dataObj, long replyObj,
int flags) {
Parcel data = Parcel.obtain(dataObj);
Parcel reply = Parcel.obtain(replyObj);
boolean res;
try {
//调用onTransact函数,派生类可以重新实现这个函数,以完成业务功能
res = onTransact(code, data, reply, flags);
} catch (RemoteException e) {
if ((flags & FLAG_ONEWAY) != 0) {
Log.w(TAG, "Binder call failed.", e);
} else {
reply.setDataPosition(0);
reply.writeException(e);
}
e.printStackTrace(); /// M: ALPS00303655
res = true;
} catch (RuntimeException e) {
if ((flags & FLAG_ONEWAY) != 0) {
Log.w(TAG, "Caught a RuntimeException from the binder stub implementation.", e);
} else {
reply.setDataPosition(0);
reply.writeException(e);
}
e.printStackTrace(); /// M: ALPS00303655
res = true;
} catch (OutOfMemoryError e) {
// Unconditionally log this, since this is generally unrecoverable.
Log.e(TAG, "Caught an OutOfMemoryError from the binder stub implementation.", e);
RuntimeException re = new RuntimeException("Out of memory", e);
re.printStackTrace(); /// M: ALPS00303655
reply.setDataPosition(0);
reply.writeException(re);
res = true;
}
checkParcel(this, code, reply, "Unreasonably large binder reply buffer");
reply.recycle();
data.recycle();
StrictMode.clearGatheredViolations();
return res;
}
这里会调用子类的onTransact函数,IHelloService.stub类实现了onTransact函数,部分代码如下:
@Override public boolean onTransact(int code, android.os.Parcel data, android.os.Parcel reply, int flags) throws android.os.RemoteException
{
switch (code)
{
case INTERFACE_TRANSACTION:
{
reply.writeString(DESCRIPTOR);
return true;
}
case TRANSACTION_sayhello:
{
data.enforceInterface(DESCRIPTOR);
this.sayhello();
reply.writeNoException();
return true;
}
case TRANSACTION_sayhello_to:
{
data.enforceInterface(DESCRIPTOR);
java.lang.String _arg0;
_arg0 = data.readString();
int _result = this.sayhello_to(_arg0);
reply.writeNoException();
reply.writeInt(_result);
return true;
}
}
return super.onTransact(code, data, reply, flags);
}
@2 由此可以看出,JavaBBinder仅是一个传声筒,它本身不实现任何业务函数,其工作是:
收到请求时,只是简单地调用它所绑定的Java层Binder对象的exeTransact。
该Binder对象的exeTransact调用其子类实现的onTransact函数。
子类的onTransact函数将业务又派发给其子类来完成。请读者务必注意其中的多层继承关系。
通过这种方式,来自客户端的请求就能传递到正确的Java Binder对象了。
4 总结
Binder的目的虽简单(即打开binder设备,然后读请求和 写回复),但架构繁琐(编写各种接口类和封装类等)。我们在研究源码时,一定要搞清楚目的。实现只不过是达到该目的的一种手段和方式。脱离目的的实现,缘木求鱼,很容易偏离事物本质。
来源:oschina
链接:https://my.oschina.net/u/920274/blog/4290575