Spring Boot版本v1.5.19.RELEASE
1、增加Jar
<dependency>
			<groupId>com.spring4all</groupId>
			<artifactId>spring-boot-starter-hbase</artifactId>
			<version>1.0.0.RELEASE</version>
		</dependency>
2、创建表
创建命名空间pb
create_namespace 'pb'
在pb命名空间下创建用户表
create 'pb:user', {NAME => 'b', VERSIONS => '3', TTL => '2147483647', 'BLOOMFILTER' => 'ROW'}, {NAME => 'o', VERSIONS => '3', TTL => '2147483647', 'BLOOMFILTER' => 'ROW'}user表下有b和o列族
3、配置参数。
主要是hbase的配置。程序的部署环境和hbase的部署环境是同一台linux服务器。
spring:
  application:
    name: hbaseDemo
  kafka:
    bootstrap-servers: localhost:9092
    consumer:
      group-id: mygroup
    listener:
      concurrency: 4
  data:
    hbase:
      quorum: localhost:2181
      rootDir: hdfs://localhost:9000/hbase
      nodeParent: /hbase
  redis:
    host: 127.0.0.1
    port: 6379

server:
  port: 8080

logging:
  file:hbaseDemo.log
  level: debug
4、实现访问HBase数据库的关键代码
1) 基本信息
用户信息User。包括用户基本信息BaseInfo 和其它信息OtherInfo
@Data
@NoArgsConstructor
@AllArgsConstructor
public class User {

    /** 用户 id */
    private Long id;

    /** 用户基本信息 */
    private BaseInfo baseInfo;

    /** 用户额外信息 */
    private OtherInfo otherInfo;

    @Data
    @NoArgsConstructor
    @AllArgsConstructor
    public static class BaseInfo {

        private String name;
        private Integer age;
        private String sex;
    }

    @Data
    @NoArgsConstructor
    @AllArgsConstructor
    public static class OtherInfo {

        private String phone;
        private String address;
    }
}
用户表结构常量。代表Hbase的表结构,表名为pb:user,列族分别为列族基本信息b和列族其它信息o。
列族基本信息b包括列字段name,列字段age,列字段age
列族其它信息o包括列字段phone和列字段address
public class UserTable {

        /** User HBase 表名 */
        public static final String TABLE_NAME = "pb:user";

        /** 基本信息列族 */
        public static final String FAMILY_B = "b";

        /** 用户名 */
        public static final String NAME = "name";

        /** 用户年龄 */
        public static final String AGE = "age";

        /** 用户性别 */
        public static final String SEX = "sex";

        /** 额外信息列族 */
        public static final String FAMILY_O = "o";

        /** 电话号码 */
        public static final String PHONE = "phone";

        /** 住址 */
        public static final String ADDRESS = "address";
    }
2)Controller层代码
直接调用服务层的创建用户
@ResponseBody
    @PostMapping("/createuser")
    Response createUser(@RequestBody User user) throws Exception {
        return userService.createUser(user);
    }
3)服务层代码
Hbase客户端
/** HBase 客户端 */
    private final HbaseTemplate hbaseTemplate;

    /** redis 客户端 */
    private final StringRedisTemplate redisTemplate;

    @Autowired
    public UserServiceImpl(HbaseTemplate hbaseTemplate, StringRedisTemplate redisTemplate) {
        this.hbaseTemplate = hbaseTemplate;
        this.redisTemplate = redisTemplate;
    }
保存用户信息
@Override
    public Response createUser(User user) throws Exception {

        byte[] FAMILY_B = Constants.UserTable.FAMILY_B.getBytes();
        byte[] NAME = Constants.UserTable.NAME.getBytes();
        byte[] AGE = Constants.UserTable.AGE.getBytes();
        byte[] SEX = Constants.UserTable.SEX.getBytes();

        byte[] FAMILY_O = Constants.UserTable.FAMILY_O.getBytes();
        byte[] PHONE = Constants.UserTable.PHONE.getBytes();
        byte[] ADDRESS = Constants.UserTable.ADDRESS.getBytes();

        //Long curCount = redisTemplate.opsForValue().increment(Constants.USE_COUNT_REDIS_KEY, 1);
        Long userId = genUserId(++curCount);

        List<Mutation> datas = new ArrayList<Mutation>();
        Put put = new Put(Bytes.toBytes(userId));

        put.addColumn(FAMILY_B, NAME, Bytes.toBytes(user.getBaseInfo().getName()));
        put.addColumn(FAMILY_B, AGE, Bytes.toBytes(user.getBaseInfo().getAge()));
        put.addColumn(FAMILY_B, SEX, Bytes.toBytes(user.getBaseInfo().getSex()));

        put.addColumn(FAMILY_O, PHONE, Bytes.toBytes(user.getOtherInfo().getPhone()));
        put.addColumn(FAMILY_O, ADDRESS, Bytes.toBytes(user.getOtherInfo().getAddress()));

        datas.add(put);

        hbaseTemplate.saveOrUpdates(Constants.UserTable.TABLE_NAME, datas);

        user.setId(userId);

        return new Response(user);
    }
4) 使用接口调用
JSON格式
{
        "baseInfo": {
            "name": "nick",
            "age": 100,
            "sex": "m"
        },
        "otherInfo": {
            "phone": "18966668888",
            "address": "shanghai"
        }    }
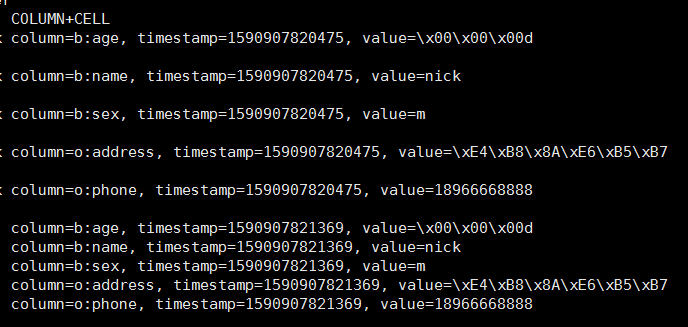
5) 查看HBase 表中创建的用户
scan pb:user

来源:oschina
链接:https://my.oschina.net/u/4309418/blog/4297748