文章目录
由于产品需要, 现在开始为 Auth 模块作技术预研和储备工作. 实际案例已经进行到很后面了…博客缓慢更新中…
先从简单的 Quickstart 开始…本例作为 SpringSecurity 5 的快速入门案例。主要涉及 HttpSecurity 的 csrf,httpBasic,failureHandler 和 successHandler。
关于 SpringSecurity
SpringSecurity 是一个为企业级应用提供认证, 授权以及其他安全特性的框架.
Reference
引入依赖
作为入门案例, 我们只需引入 SpringSecurity, SpringBoot Web 以及 Lombok 即可.
<dependencies>
    <dependency>
        <groupId>org.springframework.boot</groupId>
        <artifactId>spring-boot-starter-web</artifactId>
    </dependency>

    <dependency>
        <groupId>org.springframework.boot</groupId>
        <artifactId>spring-boot-starter-security</artifactId>
    </dependency>

    <dependency>
        <groupId>org.projectlombok</groupId>
        <artifactId>lombok</artifactId>
    </dependency>
</dependencies>
配置 SpringSecurity
编写一个配置 (@Configuration) 类继承 WebSecurityConfigurerAdapter.
这里启用了 httpBasic (用户名和密码会按以:拼接再 Base64 编码放到请求头的 Authorization 中, 是最基础 / 不安全的认证方式) 和 表单登陆并自定义了表单登陆成功和失败的处理类. 最后禁用了 csrf (关于 csrf, 计划有专门的篇幅介绍)
由于是入门案例, 我们先将用户名和密码保存到内存中, 以后会讨论数据库的实现.
@Configuration
public class SecurityConfig extends WebSecurityConfigurerAdapter {

    private CustomAuthenticationFailureHandler customAuthenticationFailureHandler;

    private CustomSimpleUrlAuthenticationSuccessHandler customSimpleUrlAuthenticationSuccessHandler;

    private PasswordEncoder passwordEncoder;

    @Override
    protected void configure(AuthenticationManagerBuilder auth) throws Exception {
        // Java 配置用户名 / 密码
        auth.inMemoryAuthentication()
                .withUser("caplike").roles("ADMIN").password(passwordEncoder.encode("caplike"))
                .and()
                .withUser("tiantian").roles("USER").password(passwordEncoder.encode("tiantian"));
    }

    @Override
    protected void configure(HttpSecurity http) throws Exception {
        // 任何 URL 均由认证过的用户访问
        http.authorizeRequests().anyRequest().authenticated()
                .and().httpBasic()
                .and().formLogin().failureHandler(customAuthenticationFailureHandler).successHandler(customSimpleUrlAuthenticationSuccessHandler)
                // Cross Site Request Forgery: 跨站请求伪造; Reference: https://docs.spring.io/spring-security/site/docs/3.2.0.CI-SNAPSHOT/reference/html/csrf.html
                // Reference: demo-spring-security-csrf
                .and().csrf().disable()
        ;
    }

    @Bean
    PasswordEncoder passwordEncoder() {
        return new BCryptPasswordEncoder();
    }

    // ~Autowired
    // -----------------------------------------------------------------------------------------------------------------

    @Autowired
    public void setPasswordEncoder(PasswordEncoder passwordEncoder) {
        this.passwordEncoder = passwordEncoder;
    }

    @Autowired
    public void setCustomAuthenticationFailureHandler(CustomAuthenticationFailureHandler customAuthenticationFailureHandler) {
        this.customAuthenticationFailureHandler = customAuthenticationFailureHandler;
    }

    @Autowired
    public void setCustomSimpleUrlAuthenticationSuccessHandler(CustomSimpleUrlAuthenticationSuccessHandler customSimpleUrlAuthenticationSuccessHandler) {
        this.customSimpleUrlAuthenticationSuccessHandler = customSimpleUrlAuthenticationSuccessHandler;
    }
}
运行
HttpBasic 方式登陆
打开 Postman, 在 Authorization 选项卡中填入用户名/密码.
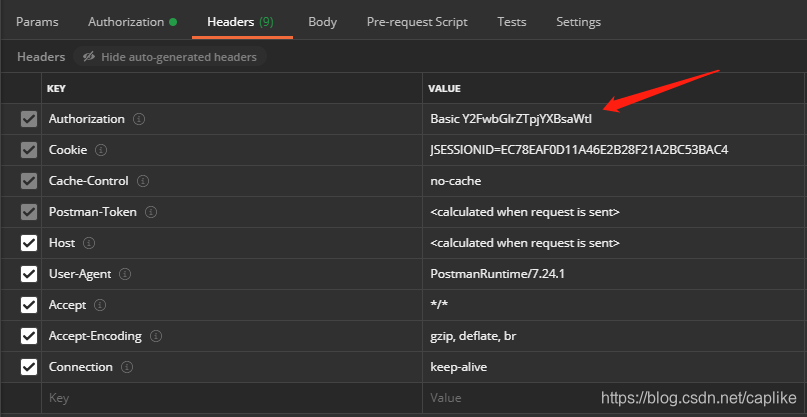
点击 Headers 可以看到 Authorization 所对应的值就是 Basic caplike:caplike
表单登陆
启动项目, 访问 /login 端点, 可以看到如下图所示的登陆界面:
输入用户名/密码 caplike/caplike
自定义的 failureHandler 和 successHandler
在表单登陆中可以自定义登陆成功和失败的 Handler.
failureHandler
@Slf4j
@Component
public class CustomAuthenticationFailureHandler implements AuthenticationFailureHandler {

    @Override
    public void onAuthenticationFailure(HttpServletRequest httpServletRequest, HttpServletResponse httpServletResponse, AuthenticationException e) throws IOException {
        log.debug("::: 认证失败");
        httpServletResponse.setContentType("application/json;charset=utf-8");
        PrintWriter out = httpServletResponse.getWriter();
        out.write("fail");
        out.flush();
    }

}
successHandler
如果配置了 successHandler, 在登陆成功后并不会自动跳转到要访问的端点, 这个时候需要重写 determineTargetUrl 方法, 代码如下:
@Component
public class CustomSimpleUrlAuthenticationSuccessHandler extends SimpleUrlAuthenticationSuccessHandler {

    private final RequestCache requestCache = new HttpSessionRequestCache();

    @Override
    public void onAuthenticationSuccess(HttpServletRequest request, HttpServletResponse response, Authentication authentication) throws IOException, ServletException {
        log.debug("自定义 SuccessHandler :: 登陆成功");
        super.onAuthenticationSuccess(request, response, authentication);
    }

    @Override
    protected String determineTargetUrl(HttpServletRequest request, HttpServletResponse response) {
        log.debug("自定义 SuccessHandler :: 重定向到: {}", requestCache.getRequest(request, response).getRedirectUrl());
        return requestCache.getRequest(request, response).getRedirectUrl();
    }
}
新建一个 Controller 便于模拟跳转到登陆前的端点:
@Slf4j
@RestController
public class HelloController {

    @GetMapping("/hello")
    public String hello() {
        log.debug("authentication: {}", SecurityContextHolder.getContext().getAuthentication());
        return "Hello and congrats, you have successfully accessed inside!";
    }
}
模拟登陆
重启服务, 访问 /hello 端点, 由于没有登陆, 重定向到 /login, 这时输入正确的用户名和密码, 可以看到登陆成功后跳转到了 /hello 端点. 后台日志:
相反, 失败的时候也会调用 failureHandler 的 onAuthenticationFailure 方法.
总结
作为入门案例, 以上就是这篇文章的全部内容.
关于从数据库获取用户信息将在下一篇文章中介绍.
缓慢更新中…
来源:oschina
链接:https://my.oschina.net/u/4404541/blog/4263439