11.AOP日志
10.权限关联与控制
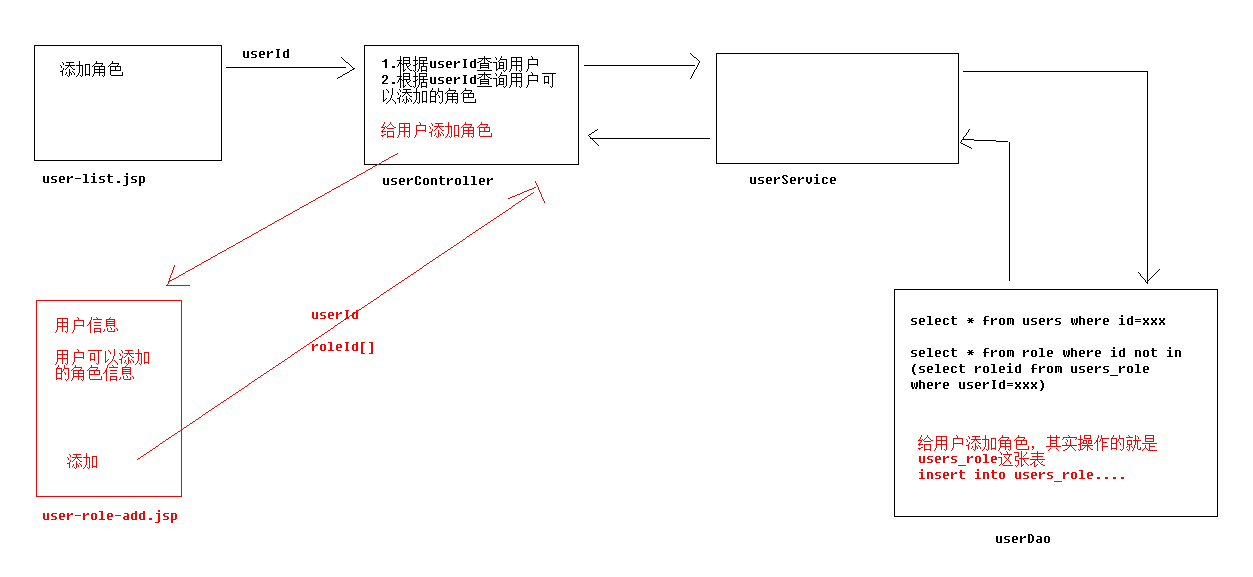
1.用户关联角色操作-流程分析

项目运行的网络环境发生变化后,实际上就是我笔记本电脑 所连接到的路由器发生变更。需要用cmd下的ipconfig命令查看当前主机IP地址,然后去web子模块项目的resources目录下把jdbc.properties配置文件的
jdbc.url=jdbc:oracle:thin:@192.168.0.108:1521:orcl 做修改后重新install一下WEB项目再测试就跑通了。
2.用户关联角色操作
视图层的UsersControler
//查询用户以及可以添加的角色
    @RequestMapping("/findUserByIdAndAllRole.do")
    public ModelAndView findUserByIdAndAllRole(@RequestParam(name = "id") String userId)throws Exception{
        ModelAndView mv = new ModelAndView();
        //1.根据一个用户ID查询结果
        UserInfo userInfo = userService.findById(userId);
        //2.根据用户ID查询可以添加的角色
        List<Role> othersRoles = userService.findOthersRoles(userId);
        mv.addObject("user",userInfo);
        mv.addObject("rolesList",othersRoles);
        mv.setViewName("user-role-add2");
        return mv;
    }
DAO层的 IUserDao
// where not in ()
    @Select("select * from role where id not in (select roleId from users_role where userId = #{userId}) ")
    List<Role> findOthersRoles(String userId);
视图层的UsersControler
//给用户添加选定的角色
    @RequestMapping("/addRoleToUser.do")
    public String addRoleToUser(@RequestParam(name = "userId") String userId,@RequestParam(name = "ids") String[] roleIds ) throws Exception {

        userService.addRoleToUser(userId, roleIds);
        return "redirect:findAll.do";
    }
Service层的接口实现类
//通过ID查询用户详情
    @Override
    public UserInfo findById(String id) throws Exception{

        return userDao.findByUserId(id);
    }
    //通过用户ID查询其他可以添加的角色
    @Override
    public List<Role> findOthersRoles(String userId) throws Exception {

        return userDao.findOthersRoles(userId);

    }

    /**
     * 给用户添加选定角色
     *
     * @param userId
     * @param roleIds
     */
    @Override
    public void addRoleToUser(String userId, String[] roleIds) throws Exception{

        for (String roleId:roleIds
             ) {
            userDao.addRoleToUser(userId,roleId);
        }
        }
DAO层的接口代码
//插入用户的新角色DAO层实现
    //mybatis的@Param注解给接口方法形参指定匹配的#{name}
    @Insert("insert into users_role(userId,roleId) values(#{userId},#{roleId})")
    void addRoleToUser(@Param("userId") String userId, @Param("roleId") String roleId);
DAO层 IRoleDAO
//1.通过roleID查询Role当前已有的权限
    @Select("select * from ROLE where Id = #{roleId}")
    Role findByRoleId(String roleId) throws Exception;

    //1.先根据角色ID查询中间表role_permission中已有的权限ID
    //2.再去取权限表中取已有的权限ID集合的补集
    @Select("select * from PERMISSION where id not in(select permissionId from ROLE_PERMISSION where roleId = #{roleId})")
    List<Permission> findOthersPermissoinByRoleId(String roleId)throws Exception;

    //插入角色Role的新权限DAO层实现
    //mybatis的@Param注解给接口方法形参指定匹配的#{name}
    @Insert("insert into ROLE_PERMISSION (roleId,permissionId) values(#{roleId},#{permissionId})")
    void addPermissionToRole(@Param("roleId") String roleId,@Param("permissionId") String permissionId)throws Exception;
Service层 接口实现类
//1.查询已有的权限根据角色ID
    @Override
    public Role findByRoleId(String roleId) throws Exception {
        return roleDao.findByRoleId(roleId);
    }
    //2.通过角色ID查询其它可以添加的权限
    @Override
    public List<Permission> findOthersPermissoin(String roleId) throws Exception{
        return roleDao.findOthersPermissoinByRoleId(roleId);
    }
    /**
     * 3.给角色添加还没有的权限
     */
    @Override
    public void addPermissionToRole(String roleId, String[] permissionsId) throws Exception {

        for (String permissionId:permissionsId
             ) {
            roleDao.addPermissionToRole(roleId,permissionId);
        }

    }
Controller层
//2.查询角色还没拥有的权限
    @RequestMapping("/findRoleByIdAndAllPermission.do")
    public ModelAndView findUserByIdAndAllRole(@RequestParam(name = "id") String roleId)throws Exception{
        ModelAndView mv = new ModelAndView();
        //1.根据一个roleID查询Role结果
        Role role = roleService.findByRoleId(roleId);
        //2.根据角色ID查询可以添加的权限
        List<Permission> otherPermissions = roleService.findOthersPermissoin(roleId);
        mv.addObject("role",role);
        mv.addObject("permissionList",otherPermissions);
        mv.setViewName("role-permission-add2");
        return mv;
    }

    //3.给角色添加未拥有的权限
    @RequestMapping("/addPermissionToRole.do")
    public String addPermissionToRole(@RequestParam(name = "roleId") String roleId,@RequestParam(name = "ids") String[] permissionsId) throws Exception{
        roleService.addPermissionToRole(roleId,permissionsId);
        return "redirect:findAll.do";
    }
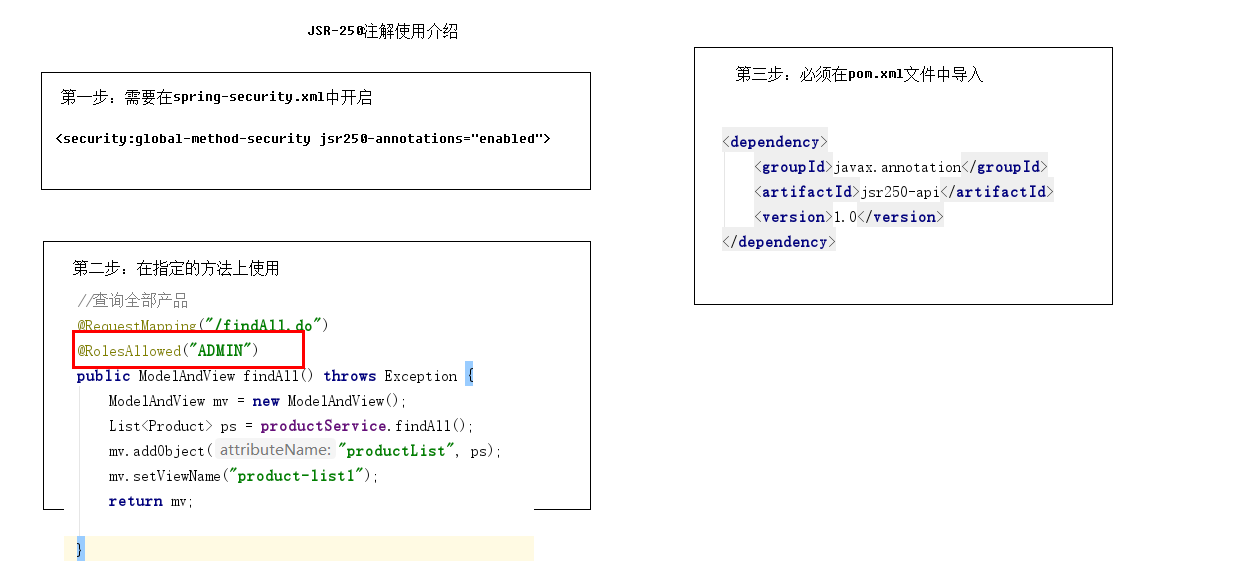
7.方法级别权限控制--JSR250注解的使用

pom.xml导入依赖坐标
<dependency>
            <groupId>javax.annotation</groupId>
            <artifactId>jsr250-api</artifactId>
            <version>1.0</version>
        </dependency>
1、在web项目子模块的 spring-security.xml中添加以下配置信息:
<!-- 开启JSR-250注解支持 -->
    <security:global-method-security jsr250-annotations="enabled"/>
2、在指定的视图层的Controller方法上使用 @RolesAllowed("ADMIN")
//添加产品(后跳转查询产品)
    @RequestMapping("/save.do")
    //添加JSR-250注解权限控制
    @RolesAllowed("ADMIN")
    public String save(Product product)throws Exception{
        productService.save(product);
        return "redirect:findAll.do";
    }
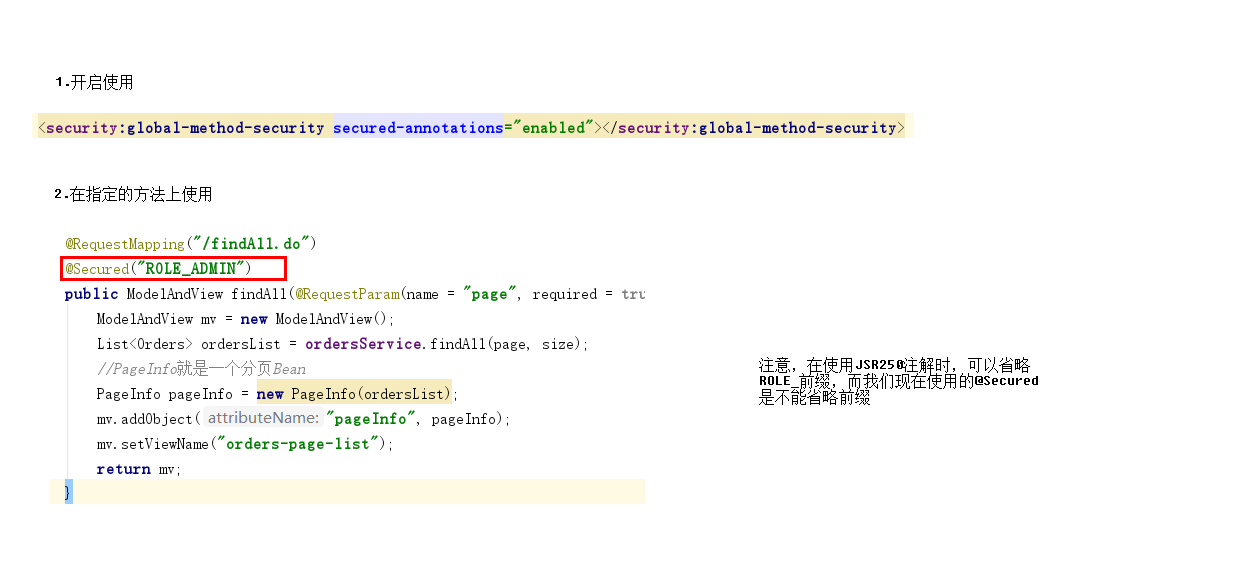
@Secured("ROLE_ADMIN") 注解
1、在spring-security.xml里开启@Secured注解支持
<!--开启Secured注解支持-->
    <securoty:global-method-security secured-annotations="enabled"/>
2、在指定的视图层Controller方法上使用 @Secured("ROLE_ADMIN")

10.页面端权限控制
pom.xml导入依赖坐标
<dependency>
  <groupId>org.springframework.security</groupId>
  <artifactId>spring-security-taglibs</artifactId>
  <version>version</version>
</dependency>
页面导入
<%@taglib uri="http://www.springframework.org/security/tags" prefix="security"%>
6.4.2.常用标签
在jsp中我们可以使用以下三种标签,其中authentication代表的是当前认证对象,可以获取当前认证对象信息,例
如用户名。其它两个标签我们可以用于权限控制
authentication
<security:authentication property="" htmlEscape="" scope="" var=""/> property: 只允许指定Authentication所拥有的属性,可以进行属性的级联获取,如“principle.username”
htmlEscape:表示是否需要将html进行转义。默认为true。
scope:与var属性一起使用,用于指定存放获取的结果的属性名的作用范围,默认为pageContext。Jsp中拥
有的作用范围都进行进行指定
var: 用于指定一个属性名,这样当获取到了authentication的相关信息后会将其以var指定的属性名进行存
放,默认是存放在pageConext中
authorize是用来判断普通权限的,通过判断用户是否具有对应的权限而控制其所包含内容的显示。
<security:authorize access="" method="" url="" var=""></security:authorize> access: 需要使用表达式来判断权限,当表达式的返回结果为true时表示拥有对应的权限
<!-- <bean id="webexpressionHandler" class="org.springframework.security.web.access.expression.DefaultWebSecurityExpressionHandler" />-->
access="hasRole('ADMIN')"
method:method属性是配合url属性一起使用的,表示用户应当具有指定url指定method访问的权限,
method的默认值为GET,可选值为http请求的7种方法
url:url表示如果用户拥有访问指定url的权限即表示可以显示authorize标签包含的内容
var:用于指定将权限鉴定的结果存放在pageContext的哪个属性中
accesscontrollist标签是用于鉴定ACL权限的。其一共定义了三个属性:hasPermission、domainObject和var,
其中前两个是必须指定的
<security:accesscontrollist hasPermission="" domainObject="" var=""></security:accesscontrollist> hasPermission:hasPermission属性用于指定以逗号分隔的权限列表
domainObject:domainObject用于指定对应的域对象
var:var则是用以将鉴定的结果以指定的属性名存入pageContext中,以供同一页面的其它地方使用
====================
end