j360-boot
spring-boot入门工程之j360-boot:(欢迎star、fork)
https://github.com/xuminwlt/j360-boot
spring-boot官方地址
http://projects.spring.io/spring-boot/
【j360-boot】Spring-boot系列
【j360-boot】Spring-boot系列一(可能是最好的quick start)
【j360-boot】Spring-boot系列二(困难模式,比简单复杂那么一点点)
【j360-boot】Spring-boot系列三(崩溃模式,不是你崩就是电脑崩)
【j360-boot】Spring-boot系列四(运维福利,监控和管理生产环境)
【j360-boot】Spring-boot系列五(docker、docker、docker)
案例
Spring Boot和Docker微服务+分布式服务器架构图设计和案例实施
前言
Spring Boot从目前趋势来看已经是Spring的顶级项目,这其中有其存在的必然性,在Spring大行其道的今天,spring就像快要接管了整个javaWeb开发,但是越来越复杂的配置、越来越庞大的集成使得很多人难以招架,于是就像官方的介绍那样,spring-boot来了:
Spring Boot makes it easy to create stand-alone, production-grade Spring based Applications that you
can “just run”. We take an opinionated view of the Spring platform and third-party libraries so you can
get started with minimum fuss. Most Spring Boot applications need very little Spring configuration.
You can use Spring Boot to create Java applications that can be started using java -jar or more
traditional war deployments. We also provide a command line tool that runs “spring scripts”.
Our primary goals are:
• Provide a radically faster and widely accessible getting started experience for all Spring development.
• Be opinionated out of the box, but get out of the way quickly as requirements start to diverge from
the defaults.
• Provide a range of non-functional features that are common to large classes of projects (e.g.
embedded servers, security, metrics, health checks, externalized configuration).
• Absolutely no code generation and no requirement for XML configuration.
Spring boot可以使用多种方法构建,官方对于构建的建议:
强烈建议你选择一个支持依赖管理,能消费发布到Maven中央仓库的artifacts的构建系统。我们推荐你选择Maven或Gradle。
选择其他构建系统来使用Spring Boot也是可能的(比如Ant),但它们不会被很好的支持。
在J360-boot中,使用Maven进行构建,其中会有部分说明使用gradle进行比较,比如使用yml的配置。
Quick Start
在学习spring boot(SB)之前,有着各种各样的疑问,SB到底能改变什么,会对现在的工程结构有多大的提升或者影响,有没有必要将现在的项目迁移到SB,经过一段时间的改造和坚持,我个人认为如果使用Spring作为框架的JavaWeb工程,迁到到SB也是一件必然性的事情,当然其中会有非常多的工作要做,比如Servlet2.5到Servlet3.0的升级牵涉到的内容也足够测试的了。
废话不多说,直接上吧。
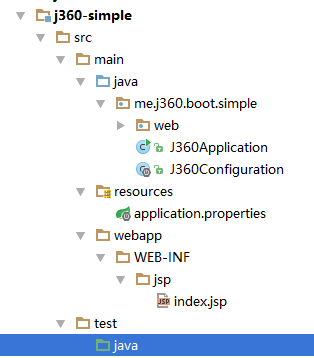
先看看工程结构,和普通maven工程没有太大的区别,可以说几乎没有区别,但是习惯上会有些官方建议的编排:

pom.xml:
<?xml version="1.0" encoding="UTF-8"?>
<project xmlns="http://maven.apache.org/POM/4.0.0"
         xmlns:xsi="http://www.w3.org/2001/XMLSchema-instance"
         xsi:schemaLocation="http://maven.apache.org/POM/4.0.0 http://maven.apache.org/xsd/maven-4.0.0.xsd">

    <groupId>me.j360.boot</groupId>
    <artifactId>j360-simple</artifactId>
    <modelVersion>4.0.0</modelVersion>
    <packaging>jar</packaging>

    <parent>
        <groupId>org.springframework.boot</groupId>
        <artifactId>spring-boot-starter-parent</artifactId>
        <version>1.3.0.BUILD-SNAPSHOT</version>
    </parent>

    <properties>
        <java.version>1.7</java.version>
    </properties>

    <!-- Add typical dependencies for a web application -->
    <dependencies>
        <dependency>
            <groupId>org.springframework.boot</groupId>
            <artifactId>spring-boot-starter-web</artifactId>
        </dependency>

        <dependency>
            <groupId>org.apache.tomcat.embed</groupId>
            <artifactId>tomcat-embed-jasper</artifactId>
            <scope>provided</scope>
        </dependency>
        <dependency>
            <groupId>javax.servlet</groupId>
            <artifactId>jstl</artifactId>
        </dependency>
        <dependency>
            <groupId>org.springframework.boot</groupId>
            <artifactId>spring-boot-starter-test</artifactId>
            <scope>test</scope>
        </dependency>
    </dependencies>
    <!-- Package as an executable jar -->
    <build>
        <plugins>
            <plugin>
                <groupId>org.springframework.boot</groupId>
                <artifactId>spring-boot-maven-plugin</artifactId>
            </plugin>
            <plugin>
                <groupId>org.apache.maven.plugins</groupId>
                <artifactId>maven-surefire-plugin</artifactId>
                <configuration>
                    <useSystemClassLoader>false</useSystemClassLoader>
                </configuration>
            </plugin>
            <plugin>
                <artifactId>maven-war-plugin</artifactId>
                <configuration>
                    <failOnMissingWebXml>false</failOnMissingWebXml>
                </configuration>
            </plugin>
        </plugins>

    </build>
    <!-- Additional lines to be added here... -->
    <!-- (you don't need this if you are using a .RELEASE version) -->
    <repositories>
        <repository>
            <id>spring-snapshots</id>
            <url>http://repo.spring.io/snapshot</url>
            <snapshots><enabled>true</enabled></snapshots>
        </repository>
        <repository>
            <id>spring-milestones</id>
            <url>http://repo.spring.io/milestone</url>
        </repository>
    </repositories>
    <pluginRepositories>
        <pluginRepository>
            <id>spring-snapshots</id>
            <url>http://repo.spring.io/snapshot</url>
        </pluginRepository>
        <pluginRepository>
            <id>spring-milestones</id>
            <url>http://repo.spring.io/milestone</url>
        </pluginRepository>
    </pluginRepositories>
</project>
pom中的几个主要节点都会 部署相关的boot信息,这些信息分别使得使用最少的配置,实现在Spring工程中自动装配相应的配置:
1、parent:继承spring-boot-start-parent可以方便地继承parent中的依赖、build和其他信息
2、dependencies:spring-boot提供了诸多的以start结尾的各种框架的依赖,比如jpa、jms、redis等等
3、build:使用spring-boot提供的插件可以对spring-boot工程进行打包和运行,其中会提供诸多其他特性,比如热加载等等
4、repo:引入官方的依赖包仓库,xcodeghost不约不约啊
在升级版中,打交道最多的将会是第二个依赖包的管理,更好的依赖spring-boot提供的依赖包,将会减少非常多的配置,配置在每个工程里面,特别是随着多场景dev、test、prod切换的时候,配置是一件不得不重视的资源,spring-boot最标准的配置文件是下面的:application.properties
Spring Boot application starters 列出主要的几种官方的依赖
名称 描述
spring-boot-starter 核心Spring Boot starter,包括自动配置支持,日志和YAML
spring-boot-starter-actuator 生产准备的特性,用于帮你监控和管理应用
spring-boot-starter-amqp 对"高级消息队列协议"的支持,通过 spring-rabbit 实现
spring-boot-starter-aop 对面向切面编程的支持,包括 spring-aop 和AspectJ
spring-boot-starter-batch 对Spring Batch的支持,包括HSQLDB数据库
spring-boot-starter-cloudconnectors
对Spring Cloud Connectors的支持,简化在云平台下(例如,Cloud Foundry 和 Heroku)服务的连接
spring-boot-starter-dataelasticsearch对Elasticsearch搜索和分析引擎的支持,包括 spring-data-elasticsearch
spring-boot-starter-datagemfire对GemFire分布式数据存储的支持,包括 spring-data-gemfire
spring-boot-starter-data-jpa 对"Java持久化API"的支持,包括 spring-data-jpa , spring-orm 和Hibernate
spring-boot-starter-datamongodb对MongoDB NOSQL数据库的支持,包括 spring-data-mongodb
spring-boot-starter-data-rest 对通过REST暴露Spring Data仓库的支持,通过 spring-data-rest-webmvc 实现
spring-boot-starter-data-solr 对Apache Solr搜索平台的支持,包括 spring-data-solr
spring-boot-starter-freemarker 对FreeMarker模板引擎的支持
spring-boot-starter-groovytemplates对Groovy模板引擎的支持
spring-boot-starter-hateoas 对基于HATEOAS的RESTful服务的支持,通过 spring-hateoas 实现
spring-boot-starter-hornetq 对"Java消息服务API"的支持,通过HornetQ实现
spring-boot-starter-integration 对普通 spring-integration 模块的支持
spring-boot-starter-jdbc 对JDBC数据库的支持
spring-boot-starter-jersey 对Jersey RESTful Web服务框架的支持
spring-boot-starter-jtaatomikos对JTA分布式事务的支持,通过Atomikos实现
spring-boot-starter-jta-bitronix 对JTA分布式事务的支持,通过Bitronix实现
spring-boot-starter-mail 对 javax.mail 的支持
spring-boot-starter-mobile 对 spring-mobile 的支持
spring-boot-starter-mustache 对Mustache模板引擎的支持
spring-boot-starter-redis 对REDIS键值数据存储的支持,包括 spring-redis
spring-boot-starter-security 对 spring-security 的支持
spring-boot-starter-socialfacebook对 spring-social-facebook 的支持
spring-boot-starter-sociallinkedin对 spring-social-linkedin 的支持
spring-boot-starter-socialtwitter对 spring-social-twitter 的支持
spring-boot-starter-test 对常用测试依赖的支持,包括JUnit, Hamcrest和Mockito,还有 spring-test 模块
spring-boot-starter-thymeleaf 对Thymeleaf模板引擎的支持,包括和Spring的集成
spring-boot-starter-velocity 对Velocity模板引擎的支持
spring-boot-starter-web 对全栈web开发的支持,包括Tomcat和 spring-webmvc
spring-boot-starter-websocket 对WebSocket开发的支持
spring-boot-starter-ws 对Spring Web服务的支持
J360Application.java
package me.j360.boot.simple;

import org.springframework.boot.SpringApplication;
import org.springframework.context.ApplicationContext;

/**
 * Created with springbootweb -> me.j360.springboot.jar.
 * User: min_xu
 * Date: 2015/7/28
 * Time: 15:28
 * 说明:
 */
public class J360Application {
    public static void main(String[] args) {
        SpringApplication.run(J360Configuration.class, args);
    }


}
J360Configuration.java
package me.j360.boot.simple;

import org.springframework.boot.autoconfigure.EnableAutoConfiguration;
import org.springframework.context.annotation.ComponentScan;

/**
 * Created with springbootweb -> me.j360.springboot.jar.
 * User: min_xu
 * Date: 2015/7/28
 * Time: 15:28
 * 说明:
 */
@ComponentScan
@EnableAutoConfiguration
public class J360Configuration {

}
spring boot以default包和定位main方法进行spring boot入口的管理,在pom中使用的project的包名下称之为default包,spring-boot建议一个spring-boot工程使用一个main方法,即spring-boot启动入口,一般放在这个Application类中。
@ComponentScan
@EnableAutoConfiguration
这两个注解几乎是所有spring-boot工程的标配注解(除自己实现外),
@Configuration
更多情况下,需要定义一个配置类,作为默认的配置类,配置类的作用其实就是使用java方式进行配置,而不是xml方式进行的配置,spring-boot的建议其实也是消灭xml配置(不过目前还是可以同时使用xml配置的)。
如果你绝对需要使用基于XML的配置,我们建议你仍旧从一个 @Configuration 类开始。你可以使用附加的 @ImportResource 注解加载XML配置文件。
上述3个注解如果同时使用,可以使用一个注解代替之:
@SpringBootApplication
下面开始配置web的入口,新建一个spring-mvc的类即可:
Index.java
package me.j360.boot.simple.web;

import org.springframework.stereotype.Controller;
import org.springframework.ui.Model;
import org.springframework.web.bind.annotation.RequestMapping;
import org.springframework.web.bind.annotation.ResponseBody;

/**
 * Created with j360-boot -> me.j360.boot.simple.web.
 * User: min_xu
 * Date: 2015/9/23
 * Time: 21:20
 * 说明:
 */

@Controller
public class Index {

    @RequestMapping("/hello")
    @ResponseBody
    String hello(Model model) {
        return "hello";
    }

    @RequestMapping("/index")
    String index(Model model) {
        return "index";
    }
}
application.properties
spring.mvc.view.prefix: /WEB-INF/jsp/
spring.mvc.view.suffix: .jsp
测试
执行spring-boot:run(也可以直接在IDE中执行Application.java main方法)
输入localhost:8080/index
看到下面可爱的spring的字眼的时候,说明环境搭建没有问题了,在启动过程中出现的log,可以很好地了解到spring boot运行的顺序和过程,如果定义log的等级,会有更加详细的过程,建议初学者设置,如何设置log等级,见系列二
http://my.oschina.net/smartsales/blog/510412

将应用打包成jar并使用一个内嵌HTTP服务器的一个最大好处是,你可以像其他方式那样运行你的应用程序。调试SpringBoot应用也很简单;你不需要任何特殊IDE或扩展。
打包成jar的形式,目前为止有个最大的好处是可以和docker进行完美的配合,一个java -jar 即可运行docker中的spring-boot工程,实现容器的快速部署使用。
使用jar运行
如果使用Spring Boot Maven或Gradle插件创建一个可执行jar,你可以使用 java -jar 运行你的应用。例如:
$ java -jar target/myproject-0.0.1-SNAPSHOT.jar
运行一个打包的程序并开启远程调试支持是可能的,这允许你将调试器附加到打包的应用程序上:
$ java -Xdebug -Xrunjdwp:server=y,transport=dt_socket,address=8000,suspend=n \
-jar target/myproject-0.0.1-SNAPSHOT.jar
Maven运行
Spring Boot Maven插件包含一个 run 目标,它可以用来快速编译和运行应用程序。应用程序以一种暴露的方式运行,由于即
时"热"加载,你可以编辑资源。
$ mvn spring-boot:run
你可能想使用有用的操作系统环境变量:
$ export MAVEN_OPTS=-Xmx1024m -XX:MaxPermSize=128M -Djava.security.egd=file:/dev/./urandom
("egd"设置是通过为Tomcat提供一个更快的会话keys熵源来加速Tomcat的。)
war格式
j360-simplewar
只需要将pom.xml的package改成war即可
<groupId>me.j360.boot</groupId>
<artifactId>j360-simplewar</artifactId>
<modelVersion>4.0.0</modelVersion>
<packaging>war</packaging>
为了构建一个即是可执行的,又能部署到一个外部容器的war文件,你需要标记内嵌容器依赖为"provided",例如:
<?xml version="1.0" encoding="UTF-8"?>
<project xmlns="http://maven.apache.org/POM/4.0.0" xmlns:xsi="http://www.w3.org/2001/XMLSchema-instance"
xsi:schemaLocation="http://maven.apache.org/POM/4.0.0 http://maven.apache.org/xsd/maven-4.0.0.xsd">
<!-- ... -->
<packaging>war</packaging>
<!-- ... -->
<dependencies>
<dependency>
<groupId>org.springframework.boot</groupId>
<artifactId>spring-boot-starter-web</artifactId>
</dependency>
<dependency>
<groupId>org.springframework.boot</groupId>
<artifactId>spring-boot-starter-tomcat</artifactId>
<scope>provided</scope>
</dependency>
<!-- ... -->
</dependencies>
</project>来源:oschina
链接:https://my.oschina.net/u/1026123/blog/510411