说在前面:
最近有个MVVM模式非常火热, 相信它的出现是为了模块化iOS开发, 其实在我看来,它始终还是MVC模式, 只是一个变种罢了 .(当然有人用到了响应式编程的思路颠覆了常规 , 但我们今天把讨论点集中于代码的设计模式) .
与其专注于说明 MVVM 的来历,不如让我们看一个典型的 iOS 是如何构建的,并从那里了解MVVM:

Typical Model-View-Controller setup
我们看到的是一个典型的 MVC设置。Model呈现数据,View呈现用户界面,而 View Controller调节它两者之间的交互。
稍微考虑一下,虽然View 和 View Controller是技术上不同的组件,但它们几乎总是手牵手在一起,成对的。你什么时候看到一个 View能够与不同 View Controller配对?或者反过来?所以,为什么不正规化它们的连接呢?

Intermediate
这更准确地描述了你可能已经编写的 MVC代码。但它并没有做太多事情来解决iOS应用中日益增长的重量级视图控制器。在典型的 MVC 应用里,许多逻辑被放在View Controller里。它们中的一些确实属于View Controller,但更多的是所谓的“用于显示的逻辑”,以 MVVM 属术语来说——就是那些从Model转换数据为 View可以呈现的东西的事情,例如将一个NSDate 转换为一个格式化过的 NSString。
我们的图解里缺少某些东西。某些使我们可以放置所有表示逻辑的东西。我们打算将其称为“View Model”——它位于 View/Controller与 Model之间:

Model-View-ViewModel
看起好多了!这个图解准确地描述了什么是 MVVM:一个 MVC 的增强版,我们正式连接了视图和控制器,并将表示逻辑从 Controller 移出放到一个新的对象里,即 View Model。MVVM 听起来很复杂,但它本质上就是一个精心优化的 MVC架构,而 MVC你早已熟悉。
好了, 引言说完了, 这是一个铺垫 .
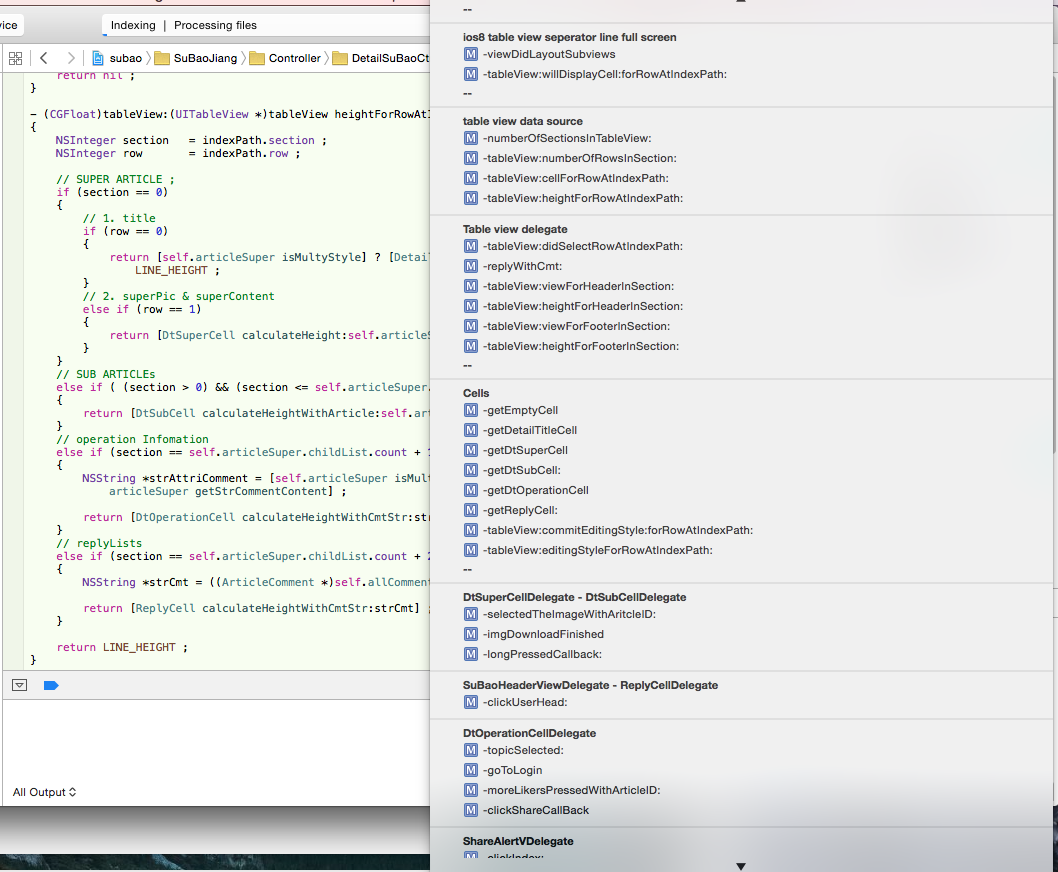
如果你认为下图右边的方法全部放在ViewController里便于日后维护和扩展的话 . 你大可固执己见然后点击浏览器右上角的"×" ...

屏幕快照 2015-12-14 下午3.58.00.png
当然, 关于瘦身ViewController有很多方面 . 然而今天我们讲讲从Controller中分离TableView的表示逻辑 . 为什么引言MVVM设计模式, 也是阐述这个主要思想是相通的 . 就是把"逻辑部分"尽量移到Model层, 你可以认为它是一个中间层 , 所谓"逻辑部分"可以是各种delegate,网络请求,缓存,数据库,coredata等等等等 , 而controller正是用来组织串联他们 .使得整个程序走通 .
正文
我们很容易想到把 UITableViewDataSource和UITableViewDelegate 的代码提取出来放到一个单独的类.
但我发现还是有东西可以抽象出来 .
例如cell的生成, cell行高, 点击等等 .这里我还用了block的形式使得函数能够回调 . 如果你对block还不太了解先看这里 .
此外, 如果你也重度使用.xib生成Cell, 那和我封装的类会非常契合 .
记住我默认习惯用.xib前的文件名来定义cell的Identifier. 如果你想把它用于实战, 记得在xib设置cell的Identifier不要设错.
处理类XTTableDataDelegate的.h
#import #import typedef void    (^TableViewCellConfigureBlock)(NSIndexPath *indexPath, id item, XTRootCustomCell *cell) ;
typedef CGFloat (^CellHeightBlock)(NSIndexPath *indexPath, id item) ;
typedef void    (^DidSelectCellBlock)(NSIndexPath *indexPath, id item) ;

@interface XTTableDataDelegate : NSObject //1
- (id)initWithItems:(NSArray *)anItems
     cellIdentifier:(NSString *)aCellIdentifier
 configureCellBlock:(TableViewCellConfigureBlock)aConfigureCellBlock
    cellHeightBlock:(CellHeightBlock)aHeightBlock
     didSelectBlock:(DidSelectCellBlock)didselectBlock ;
//2
- (void)handleTableViewDatasourceAndDelegate:(UITableView *)table ;
//3
- (id)itemAtIndexPath:(NSIndexPath *)indexPath ;

@end
注释: //1. 初始化方法: 传数据源, cellIdentifier, 三个block分别对应配置, 行高, 点击 .
//2. 将UITableViewDataSource和UITableViewDelegate设于XTTableDataDelegate
//3. 默认indexPath.row对应每个dataSource .相应返回item
此外, 为了更彻底, 有必要抽象出"根Cell" .但这样不利于扩展cell . 为了避开model和view的耦合. 所以使用category来做类的扩展 .
#import @interface UITableViewCell (Extension)

+ (void)registerTable:(UITableView *)table
        nibIdentifier:(NSString *)identifier ;

- (void)configure:(UITableViewCell *)cell
        customObj:(id)obj
        indexPath:(NSIndexPath *)indexPath ;

+ (CGFloat)getCellHeightWithCustomObj:(id)obj
                            indexPath:(NSIndexPath *)indexPath ;

@end故UITableViewCell+Extension, 通过类的扩展来实现新Cell .
注释: //1 .不解释.
//2. 根据数据源配置并绘制cell 子类务必重写该方法
//3. 根据数据源计算cell的高度 子类可重写该方法, 若不写为默认值44.0
#pragma mark - Public
+ (void)registerTable:(UITableView *)table
        nibIdentifier:(NSString *)identifier
{
    [table registerNib:[self nibWithIdentifier:identifier] forCellReuseIdentifier:identifier] ;
}

#pragma mark --
#pragma mark - Rewrite these func in SubClass !
- (void)configure:(UITableViewCell *)cell
        customObj:(id)obj
        indexPath:(NSIndexPath *)indexPath
{
    // Rewrite this func in SubClass !

}

+ (CGFloat)getCellHeightWithCustomObj:(id)obj
                            indexPath:(NSIndexPath *)indexPath
{
    // Rewrite this func in SubClass if necessary
    if (!obj) {
        return 0.0f ; // if obj is null .
    }
    return 44.0f ; // default cell height
}
那么新cell类的实现如下: 实现两个新方法
- (void)configure:(UITableViewCell *)cell
        customObj:(id)obj
        indexPath:(NSIndexPath *)indexPath
{
    MyObj *myObj = (MyObj *)obj ;
    MyCell *mycell = (MyCell *)cell ;
    mycell.lbTitle.text = myObj.name ;
    mycell.lbHeight.text = [NSString stringWithFormat:@"my Height is : %@", @(myObj.height)] ;
    cell.backgroundColor = indexPath.row % 2 ? [UIColor greenColor] : [UIColor brownColor] ;
}

+ (CGFloat)getCellHeightWithCustomObj:(id)obj
                            indexPath:(NSIndexPath *)indexPath
{
    return ((MyObj *)obj).height ;
}
看下结果, 瘦身后的controller干净的不像实力派, 只剩下了这一个方法 .呵呵呵呵 .
- (void)setupTableView
{
    self.table.separatorStyle = 0 ;

    TableViewCellConfigureBlock configureCell = ^(NSIndexPath *indexPath, MyObj *obj, XTRootCustomCell *cell) {
        [cell configure:cell customObj:obj indexPath:indexPath] ;
    } ;

    CellHeightBlock heightBlock = ^CGFloat(NSIndexPath *indexPath, id item) {
        return [MyCell getCellHeightWithCustomObj:item indexPath:indexPath] ;
    } ;

    DidSelectCellBlock selectedBlock = ^(NSIndexPath *indexPath, id item) {
        NSLog(@"click row : %@",@(indexPath.row)) ;
    } ;

    self.tableHander = [[XTTableDataDelegate alloc] initWithItems:self.list
                                                   cellIdentifier:MyCellIdentifier
                                               configureCellBlock:configureCell
                                                  cellHeightBlock:heightBlock
                                                   didSelectBlock:selectedBlock] ;

    [self.tableHander handleTableViewDatasourceAndDelegate:self.table] ;
}诸多.m文件太过于冗长,我就不贴到博客了, 博客主要是讲思路, 思路是王道 .
当然如果你想深入理解, 可以看源代码, 我传到了github, 点我下载 , 喜欢的话去那加个??, 对开源者是莫大的鼓励 .
任何疑问或建议, 欢迎, 我会看你们的留言 .
来源:oschina
链接:https://my.oschina.net/u/2363065/blog/596467