1、下载包:从Ueditor的官网下载1.4.3.3jsp版本的Ueditor编辑器,官网地址为:
http://ueditor.baidu.com/website/
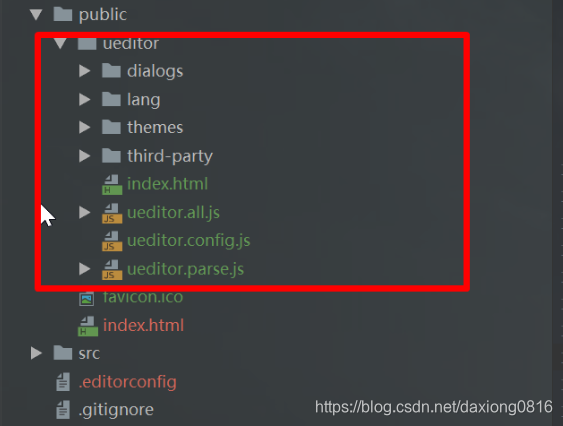
2、下载好之后,将Jsp版本解压,解压后文件夹改名为ueditor,将文件夹中的jsp单独剪切到一边,之后将整个ueditor文件夹拷贝到Vue的public或者static目录下,项目结构如下:

3、修改 ueditor.config.js ,如下

4、在前面的工作中,我们找到jsp文件夹中的这个jar包ueditor-1.1.2,将其解压,反编译成java文件,复制到 后台工程中。
注意jsp文件夹中有个config.json文件,这是Ueditor上传功能所需的配置文件,找到将之复制到资源目录中。


5、原来Ueditor是通过访问controller.jsp文件来初始化配置文件以及进行上传操作的,我们现在将之用代码进行替换。下面看一下上传图片功能的源码:
package com.plat.controller;

import com.baidu.ueditor.ActionEnter;
import com.platform.oss.OSSFactory;
import org.json.JSONObject;
import org.slf4j.Logger;
import org.slf4j.LoggerFactory;
import org.springframework.web.bind.annotation.RequestMapping;
import org.springframework.web.bind.annotation.RestController;
import org.springframework.web.multipart.MultipartFile;

import javax.servlet.http.HttpServletRequest;
import javax.servlet.http.HttpServletResponse;
import java.io.IOException;
import java.io.PrintWriter;
import java.util.HashMap;
import java.util.Map;
import java.util.UUID;


@RestController
@RequestMapping("/ueditor")
public class UeditorController {

    private static final Logger logger = LoggerFactory.getLogger(UeditorController.class);

    @RequestMapping("/ueditorConfig")
    public void ueditorConfig(HttpServletRequest request, HttpServletResponse response, MultipartFile upfile) {

        response.setContentType("application/json");
        String rootPath = request.getSession().getServletContext().getRealPath("/");
        try {
            String exec = "";
            String actionType = request.getParameter("action");
            if("uploadimage".equals(actionType) && !upfile.isEmpty()){
                // 做图片上传操作
                exec = uploadImage(upfile,request);

            }else{
                request.setCharacterEncoding( "utf-8" );
                exec = new ActionEnter(request, rootPath).exec();
            }
            PrintWriter writer = response.getWriter();
            writer.write(exec);
            writer.flush();
            writer.close();
        } catch (IOException e) {
            logger.error("UeditorController#ueditorConfig exception:",e);
        }
    }

    private String uploadImage(MultipartFile file, HttpServletRequest request) {
        JSONObject jsonResult = null;
        try {
            String fileName = file.getOriginalFilename();
            String extraName = fileName.substring(fileName.lastIndexOf("."));
            // 这里就是上传图片的具体逻辑了,原本是通过fastdfs来上传图片的,这里就简单生成个字符串假装上传成功了吧
//            String url = FastdfsUtil.upload(file.getBytes(), file.getOriginalFilename());

            //上传文件
            String url = OSSFactory.build().upload(file,request);//上传图片的方法
            jsonResult = new JSONObject(resultMap("SUCCESS",url,file.getSize(),fileName,fileName,extraName));

        } catch (Exception e) {
            logger.warn("UeditorController#uploadImage exception:",e);
            jsonResult = new JSONObject(resultMap("文件上传失败","",0,"","",""));
        }
        return jsonResult.toString();
    }

    //{"state": "SUCCESS","original": "111.jpg","size": "124147","title": "1535961757878095151.jpg","type": ".jpg","url": "/1535961757878095151.jpg"}

    private Map<String,Object> resultMap(String state, String url, long size, String title, String original, String type){
        Map<String ,Object> result = new HashMap<>();
        result.put("state",state);
        result.put("original",original);
        result.put("size",size);
        result.put("title",title);
        result.put("type",type);
        result.put("url", url);
        return result;
    }

}
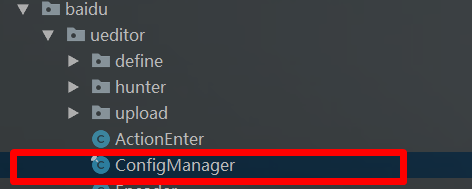
6、找到ConfigManager文件:

找到:String configContent = this.readFile( this.getConfigPath() );
将之替换为:
String configJsonPath = null;
try {
    configJsonPath = this.getClass().getClassLoader().getResource("config.json").toURI().getPath();
} catch (URISyntaxException e) {
    e.printStackTrace();
}
String configContent = this.readFile( configJsonPath );
7、在 vue 里
var vm = new Vue({

    data: {
         editor: null,//百度编辑器
    },
在相应的 methods: 方法里
// 实例化editor编辑器
vm.editor = UE.getEditor('goodsDesc');
vm.editor.getContent() //获取编辑器内容
vm.editor.destroy(); //销毁编辑器
//编辑器添加内容
vm.editor.ready(function() {
    vm.editor.setContent("11111");
});
来源:CSDN
作者:daxiong0816
链接:https://blog.csdn.net/daxiong0816/article/details/104202057